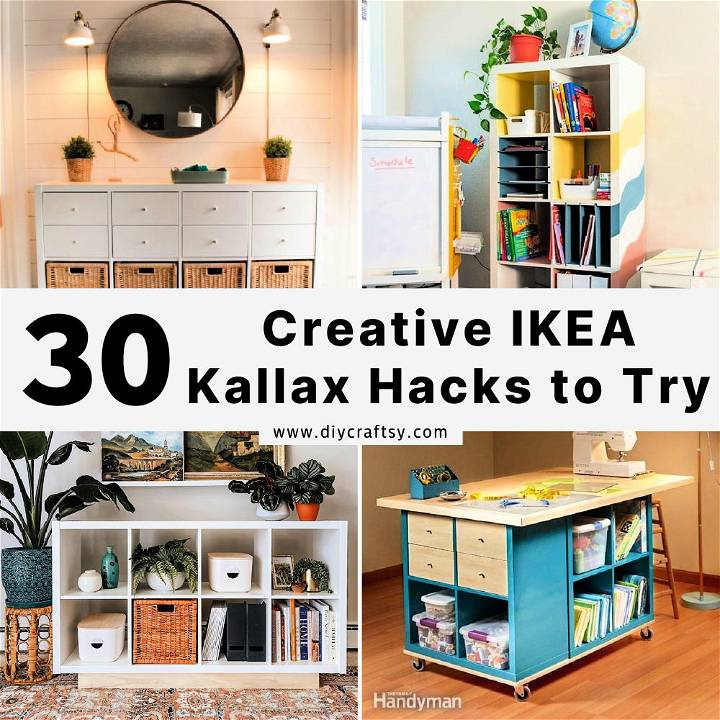
Unlock the potential of your living space with 30 creative IKEA kallax hacks and DIY ideas. This guide offers unique ways to transform the classic IKEA Kallax shelf into something more personalized and functional. Tailored for individuals keen on adding a personal touch to their homes, our tips range from simple modifications to more involved DIY projects. Not only will these ideas enhance the aesthetics of your space, but they'll also improve its organization and utility.
Embarking on a DIY journey with IKEA Kallax hacks can seem daunting at first, but with our clear and straightforward advice, success is within reach. We cover everything from understanding your needs and space, finding inspiration and planning your project, to the actual execution with helpful tips for success. By the end of this guide, you'll feel empowered to tackle your own projects, transforming everyday furniture into pieces that speak volumes about your style. Let's get creative and make your space work for you in ways you've never imagined.
Why Opt for IKEA Kallax Hacks?
Choosing to embark on an IKEA Kallax hack project is not just about saving money, it's about injecting personality and style into your living space. Here's why these hacks are worth considering:
- Personalization: IKEA's Kallax series is known for its simplicity and versatility. By customizing these pieces, you can make something that perfectly fits your space and style. Whether it's adding a unique color, changing the hardware, or transforming its use, the end result is uniquely yours.
- Cost-Effective: Buying bespoke furniture can be expensive. IKEA Kallax hacks offer a budget-friendly alternative. With a little creativity and some DIY effort, you can achieve a high-end look without the high-end price tag.
- Eco-Friendly: Upcycling or repurposing furniture is good for the environment. Instead of buying new, you're giving a second life to something that already exists. This reduces waste and the demand for new resources.
- Functionality: Many of these hacks not only improve the appearance of the furniture but also enhance its functionality. Adding wheels, for example, can turn a stationary shelf into a mobile cart. This adaptability means you get exactly what you need from your furniture.
- Satisfaction: The sense of accomplishment you feel when you complete a DIY project is unparalleled. You've not only maked something useful but also honed your crafting skills in the process.
IKEA Kallax hacks are a practical, economical, and satisfying way to make custom furniture that meets your needs and reflects your personal style.
Certainly! Here’s the revised section without hyperlinks:
Material Lists and Alternatives
When embarking on an IKEA Kallax hack or DIY project, having a clear and comprehensive material list is crucial. This not only helps in planning and budgeting but also ensures that you have everything needed at hand before starting.
Materials Needed:
- IKEA Kallax shelving unit
- Wood or MDF panels for customization
- Paint or wood stain
- Sandpaper (various grits)
- Wood glue
- Screws and fasteners
- Tools (saw, drill, screwdriver, etc.)
Alternatives:
- Instead of wood panels, consider using fabric or wallpaper for a unique look.
- If paint is not preferred, adhesive vinyl can be a quick and easy alternative to change the color and style.
- For a more sustainable approach, look for recycled or second-hand materials that can be repurposed.
Skill Level Indicators
To ensure that everyone can enjoy the process of customizing their Kallax unit, we categorize each project by skill level:
- Beginner: These projects require basic tools and involve simple modifications like painting or adding new knobs.
- Intermediate: Here, you might need to use more advanced tools like a saw or drill and undertake tasks such as cutting wood or installing hinges.
- Advanced: These projects are for those who are comfortable with power tools and complex constructions, possibly involving carpentry skills.
Estimated Time and Cost
Understanding the time and financial commitment required for a project is essential. On average, a simple Kallax hack might take a weekend to complete and cost around $50-$100. More complex projects could span several weekends and cost upwards of $200, depending on the materials and tools required.
Remember, these are just estimates. The actual time and cost can vary based on your choice of materials, the complexity of the project, and your level of experience. Always plan for a buffer in both time and budget to accommodate any unexpected challenges.
How to Get Started with IKEA Kallax Hacks
Transforming your IKEA Kallax into a unique piece that perfectly fits your space and style can seem like a daunting task. But with a bit of creativity and some DIY effort, it's an achievable and rewarding project. Here's how to get started on your IKEA Kallax hack journey, making the process enjoyable and straightforward.
Understanding Your Needs and Space
First, assess what you need from your IKEA Kallax. Is it more storage, a specific function like a desk or bar cart, or purely an aesthetic upgrade? Understanding your requirements will guide your project's direction.
- Evaluate the space: Measure the area where your Kallax will go. Consider how it interacts with other items in the room.
- Functionality: Determine what the primary use of the Kallax will be. This will influence the type of hack you might consider, such as adding doors for hidden storage or wheels for mobility.
Inspiration and Planning
Before diving into the project, gather inspiration. Websites like Pinterest, DIY blogs, and even Instagram offer a wealth of creative ideas.
- Make a vision board: Collect images that inspire you, noting what you like about each.
- Plan your budget: Decide how much you're willing to spend. This will affect the materials and tools you can use.
- List materials and tools needed: Based on your chosen hack, list everything you'll need. Common materials include paint, adhesive, and hardware. Common tools might be a drill, saw, or screwdriver.
Execution: Step by Step
Now that you have a plan, it's time to start the transformation. Even if you're new to DIY, breaking down the process into manageable steps makes it less intimidating.
- Preparation: Clear a workspace and gather your materials and tools. If you're painting or staining, make sure the area is well-ventilated.
- Measure and cut: If your hack involves cutting wood or other materials, double-check your measurements before cutting. Remember the old adage, "Measure twice, cut once."
- Assembly: Follow your plan to start putting your hack together. This might involve assembling the Kallax as per IKEA's instructions before adding your customizations.
- Customize: This is where the magic happens. Paint, add hardware, apply adhesive paper, or whatever your hack entails. Take your time and enjoy the process.
- Final touches: Once your main work is done, add any finishing touches. This might include additional decorations, organizing baskets, or simply styling your newly hacked Kallax.
Tips for Success
- Be patient: Some steps may require waiting, like paint drying. Don't rush the process.
- Safety first: Always use tools according to their instructions and wear protective gear as needed.
- It's okay to make mistakes: Part of DIY is learning. If something doesn't go as planned, see if there's a way to fix it or embrace the imperfection.
Enjoy Your Creation
After finishing your IKEA Kallax hack, admire your craft. You've created a custom piece, improved your DIY skills, and added a personal touch to your space.
Sustainability Tips for IKEA Kallax Hacks
Creating a sustainable home is not just about reducing energy consumption; it’s also about making eco-friendly choices in our furniture and decor. When hacking your IKEA Kallax, consider the following tips to minimize environmental impact:
- Choose Sustainable Materials: Opt for recycled, reclaimed, or sustainably sourced materials for your DIY projects. For example, use recycled wood or bamboo instead of new timber.
- Repurpose and Upcycle: Before buying new, see if you can repurpose materials you already have. An old bookshelf or cabinet could provide wood or hardware for your Kallax hack.
- Non-Toxic Finishes: Select paints, stains, and adhesives that are low in volatile organic compounds (VOCs) to maintain indoor air quality.
- Energy-Efficient Tools: Use hand tools or electric tools with energy-saving features to reduce your carbon footprint while working on your project.
- Donate Unused Items: If you have leftover materials, consider donating them to local schools, community centers, or online marketplaces.
By following these tips, you can create a beautiful, functional piece that aligns with your values and contributes to a healthier planet.
Maintenance and Care for Your IKEA Kallax
Proper maintenance and care can extend the life of your IKEA Kallax and keep it looking great for years to come. Here’s how to keep your Kallax in top condition:
- Regular Cleaning: Dust your Kallax regularly with a soft, dry cloth. For tougher stains, use a damp cloth with a mild cleaner, but avoid harsh chemicals.
- Protect Surfaces: Use coasters, placemats, and felt pads to protect the surfaces from scratches and spills.
- Avoid Direct Sunlight: Prolonged exposure to direct sunlight can fade the colors. Position your Kallax away from windows or use curtains to minimize sun damage.
- Handle with Care: When moving your Kallax, lift it rather than dragging it to prevent damage to the unit and your floors.
- Check Hardware: Periodically tighten screws and fasteners to ensure stability and prevent wobbling.
With these simple steps, your Kallax will continue to be a stylish and practical addition to your home. Remember, taking care of your furniture is not just about aesthetics; it’s also about making sustainable choices for the long term.
Troubleshooting Common Issues
When working on IKEA Kallax hacks, you might encounter a few hiccups along the way. Here’s a guide to help you troubleshoot common issues and ensure your DIY project is a success.
Problem: Pieces Don’t Fit Together Properly
- Solution: Double-check the assembly instructions to ensure all pieces are oriented correctly. If dowels or screws seem misaligned, it may be necessary to disassemble and reassemble the affected sections, paying close attention to the correct order and orientation of parts.
Problem: Wobbly or Unstable Unit
- Solution: Ensure that all connections are tight and secure. If the unit still wobbles, check if the floor is even; you may need to adjust the feet or add shims under the unit for stability.
Problem: Drawers or Doors Don’t Slide Smoothly
- Solution: Check for any obstructions and verify that the drawer rails or door hinges are installed correctly. Lubricating the rails with a silicone-based product can also improve movement.
Problem: Surface Damage During Assembly
- Solution: If the surface gets scratched or dented, you can use a furniture marker or crayon that matches the color of your Kallax to fill in and camouflage the damage.
Problem: Missing or Damaged Parts
- Solution: IKEA provides replacement parts for their products. Contact customer service or visit your local IKEA store to obtain the necessary components.
Patience is crucial for DIY tasks. Slow down, follow the instructions, and seek help if you're stuck. This way, you'll successfully build a stylish, useful Kallax.
FAQS on IKEA Kallax Hacks and DIY Ideas
When it comes to revamping your living space, IKEA Kallax hacks are a go-to for many DIY enthusiasts. Here's a handy FAQ section to guide you through common queries related to these creative projects.
What is an IKEA Kallax hack?
An IKEA Kallax hack involves modifying or adding to the IKEA Kallax shelf unit to make a piece of furniture that meets specific needs or design preferences. It's a way to personalize and enhance the functionality or aesthetic of the standard Kallax unit.
How do I start my IKEA Kallax hack project?
- Identify the purpose of your hack (e.g., storage, decor).
- Measure your space to ensure the hacked piece will fit.
- Gather inspiration from blogs, Pinterest, or Instagram.
- Plan your budget and list the materials and tools needed.
- Follow a step-by-step guide to complete your project.
Can I transform my Kallax unit into a bench or desk?
Yes, you can transform a Kallax unit into a bench or desk by adding a sturdy top and, for a bench, some comfortable cushions. For a desk, consider reinforcing the structure to support the weight of items typically found on a desk.
Is it possible to add doors or drawers to a Kallax shelf?
Absolutely! Adding doors, drawers, or inserts is a common hack to increase the functionality of a Kallax shelf. You can purchase IKE Kallax inserts or use custom pieces to achieve the look and function you desire.
What are some simple hacks for beginners?
For beginners, simple hacks might include:
- Adding adhesive vinyl or contact paper for a fresh look.
- Swapping out knobs or handles on inserts or doors.
- Placing the unit on its side and adding a cushion to make a bench.
- Painting the unit for a color change.
How do I ensure my hacked Kallax unit is safe to use?
- Always follow IKEA's assembly instructions carefully.
- Use appropriate fixings if you're attaching the unit to a wall.
- If adding heavy items or altering the structure significantly, ensure it is balanced and securely supported.
- For tall or stacked units, securing them to the wall is recommended to prevent tipping.
Can I make my Kallax hack eco-friendly?
Yes, making your hack eco-friendly can involve:
- Using non-toxic paints and adhesives.
- Upcycling or reusing materials.
- Choosing sustainable add-ons like bamboo or reclaimed wood.
- If you no longer need your Kallax, consider donating it instead of disposing of it.
What should I do if my hack doesn't go as planned?
Don't worry if your project doesn't go exactly as planned. DIY is often about learning and adapting. Consider:
- Seeing if there's a simple fix or adjustment that can be made.
- Embracing the imperfections as part of the character of your piece.
- Starting over with a different approach if necessary. Remember, each attempt is a learning opportunity.
By addressing these questions, you're well on your way to completing your IKEA Kallax hack project successfully. Remember, the key to a successful hack is creativity, planning, and a bit of DIY spirit. Happy hacking!
30 Creative IKEA Kallax Hacks and DIY Ideas
Discover 30 creative IKEA Kallax hacks and DIY ideas to transform your space. Get inspired with innovative storage solutions and stylish decor projects.
1. IKEA Kallax Shelf Glow Up Hack
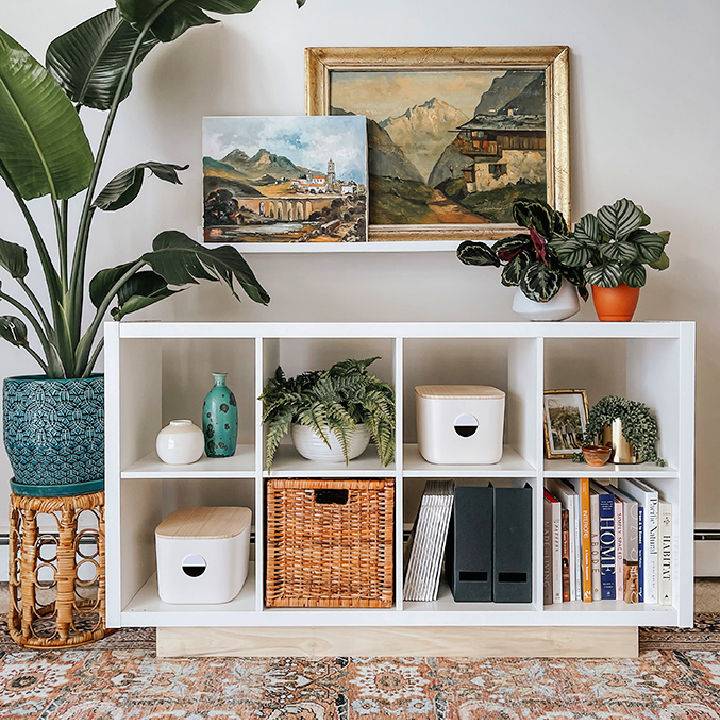
Elevate your interior with a unique twist on the IKEA Kallax shelf, meticulously detailed by Dream Green DIY. This innovative guide walks you through transforming the versatile Kallax shelf into a chic console.
By adding a custom wooden base and adorning it with stylish peel-and-stick terrazzo wallpaper, the piece gets a glamorous makeover. Ideal for DIY enthusiasts seeking to personalize their space without the need for heavy machinery or advanced skills. With endless possibilities for customization, make this project your next creative adventure.
2. How to Make a Rustic Cube Shelves
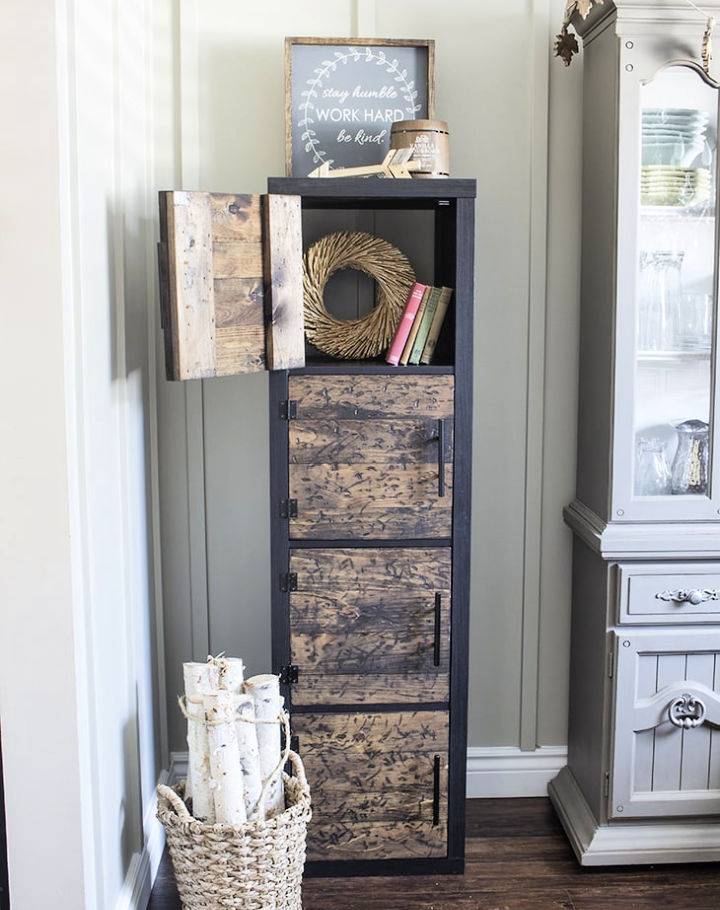
Elevate your storage solutions with this DIY Rustic Cube Shelves tutorial. Perfect for adding character to any room, this guide brings out the craftsman in you, transforming the Ikea Kallax shelves into a bespoke piece. Ideal for beginners, this project introduces you to basic woodworking techniques—from assembling and cutting to distressing and staining. Follow these clear, step-by-step instructions to repurpose your shelving unit into a rustic masterpiece. Your creativity is the only limit!
3. IKEA Kallax Toy Storage
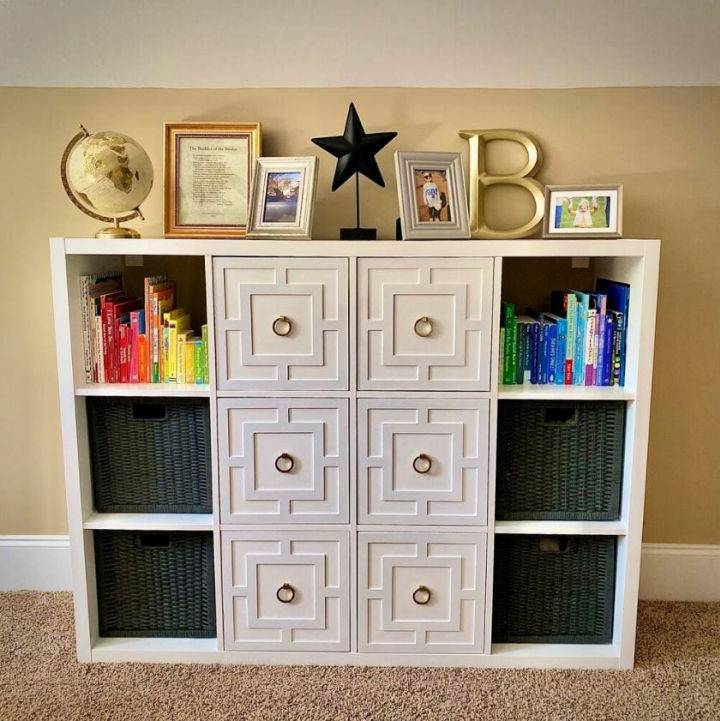
Transform your playroom chaos into organized bliss with an ingenious IKEA KALLAX storage hack. Perfect for categorizing a multitude of toys, this versatile solution adapts to your evolving needs. Not limited to just new purchases, repurpose existing bins for a smart, budget-friendly approach. Embrace the journey of organization - an ever-changing, yet rewarding endeavor as your child's interests grow. Safety tip: Always anchor furniture to prevent accidents.
4. IKEA Kallax Waterbed Frame
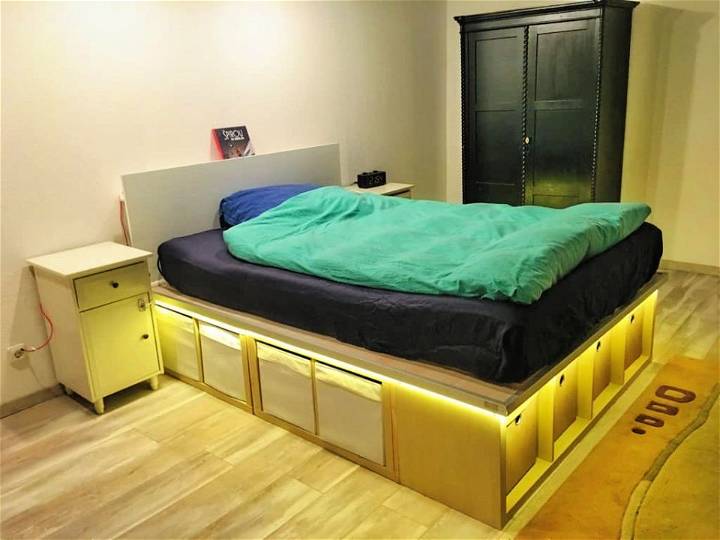
Elevate your bedroom with an ingenious DIY waterbed frame crafted from IKEA KALLAX shelves, presented by IKEA Hackers. Christoph Bock demonstrates how combining IKEA KALLAX units and additional materials can make a sturdy and stylish waterbed frame.
This unique makeover not only supports a full-sized waterbed but also incorporates practical features like a custom headboard, LED lighting for ambiance, and sound insulation. Dive into the detailed guide for a step-by-step tutorial on constructing your own waterbed frame, enhancing both function and style in your sleeping space.
5. Window Seat From Kallax Shelves
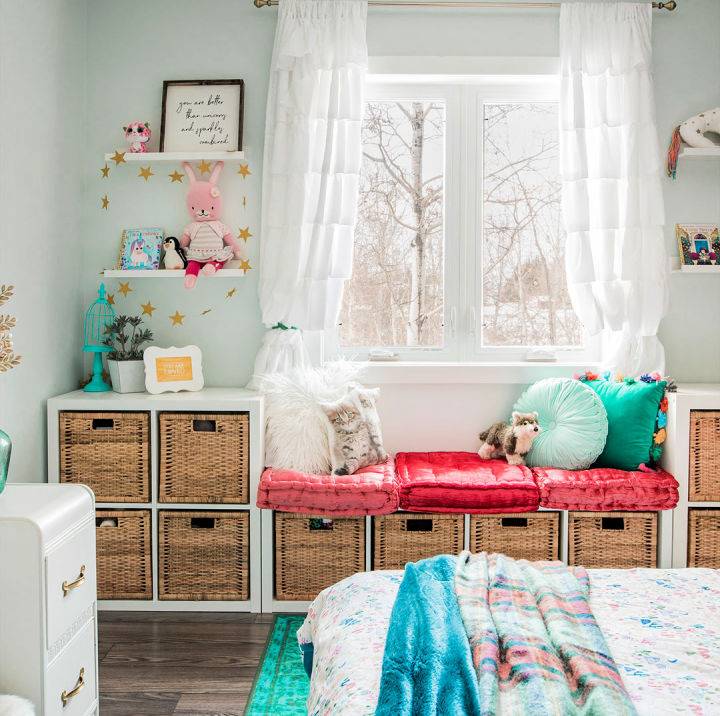
Transform your space with this brilliant IKEA hack! Discover how to fashion a cozy and practical window seat using IKEA KALLAX shelves. Perfect for added storage and building a cherished reading nook, this DIY project combines style, function, and affordability.
With step-by-step instructions, this guide makes it easy to assemble a beautiful window seat that enhances any room—be it a bedroom, dining area, or mudroom. For a full tutorial on crafting this versatile piece, visit The DIY Mommy. Happy building and enjoy your new, personalized nook!
6. IKEA Kallax Overlays Hack
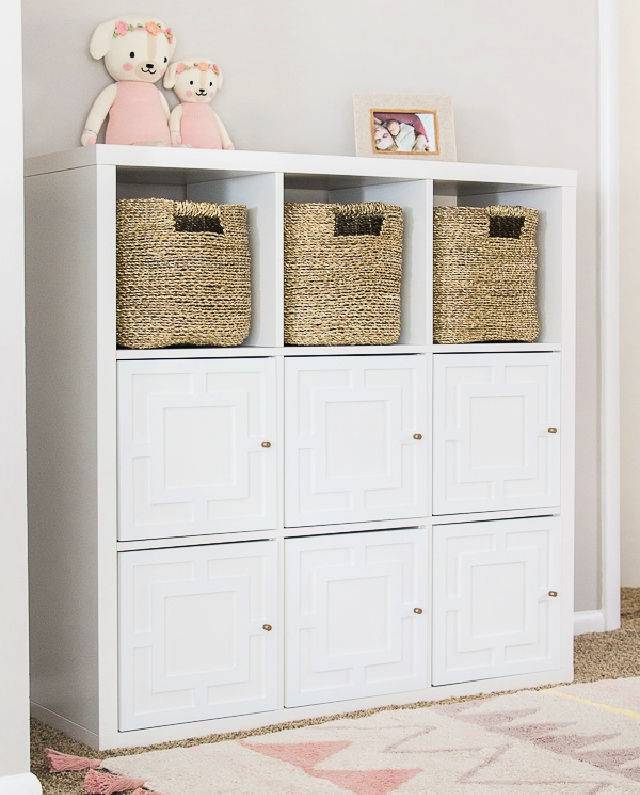
Transform your IKEA Kallax into a stunning piece with this DIY IKEA Kallax Overlays Hack! Perfect for hiding toys stylishly, this tutorial guides you through building a chic, high-end look on a budget. In five easy steps, paint and attach decorative overlays to Kallax door inserts. This project elevates your space and keeps it organized, ideal for anyone aiming to merge functionality with elegance. Ready your materials and follow along to achieve this exquisite storage solution.
7. Make Your Own Library on Wheels
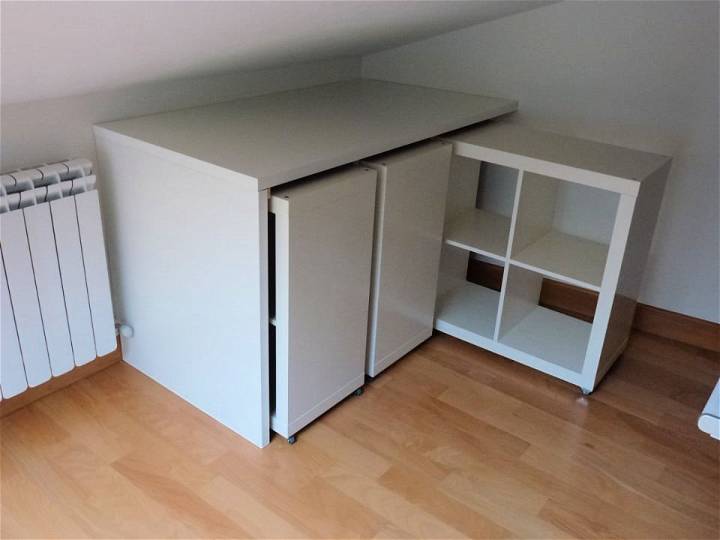
Transform your living space with an inventive and functional library on wheels, perfect for rooms with challenging layouts or limited space. This creative DIY project involves combining IKEA's popular Expedit shelves and Linnmon table tops, along with a few additional materials from a local DIY store, to make a mobile library that maximizes space efficiency and adds a unique touch to your home.
Whether it's adapting to inclined ceilings or making use of tight corners, this solution is not only practical but also customizable to fit your specific needs. Learn how to bring this clever idea to life by visiting IKEA Hackers.
8. IKEA Kallax Shelf Hack
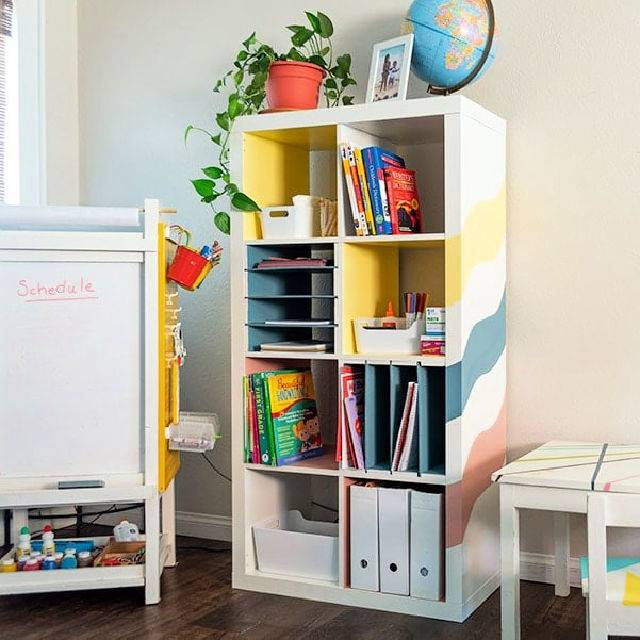
Transform your space with a clever and colorful Ikea Kallax Shelf hack, ideal for organizing your home office or homeschooling supplies. Anika's DIY Life guides you through a simple yet impactful DIY project. With some plywood, paint, and a few tools, turn your Kallax shelf into a vibrant and organized space.
This project not only rejuvenates the oldest piece of furniture in your home but also brightens up your learning or working area. Dive into this easy-to-follow tutorial and give your Ikea shelf a new lease on life while keeping your space tidy and cheerful.
9. IKEA Kallax Expedit Sideboard
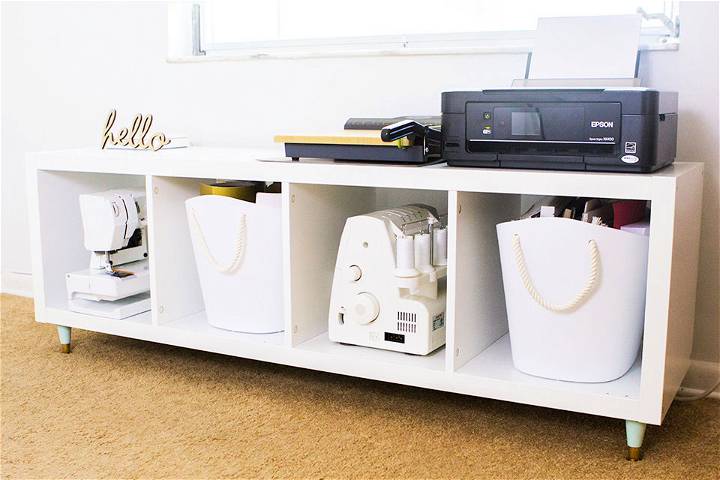
Discover a seamless way to enhance your home storage and style with the IKEA Kallax Expedit Sideboard Hack by Sarah Hearts. Learn to transform an IKEA Kallax or Expedit bookcase into a chic sideboard table. Perfect for under-the-window spaces, this project involves adding tapered table legs for a mid-century modern touch. Ideal for storing sewing machines, supplies, and more. Simple yet impactful, elevate your home studio or any room with this creative hack.
10. Modern Library Card Catalog Using Kallax Shelves
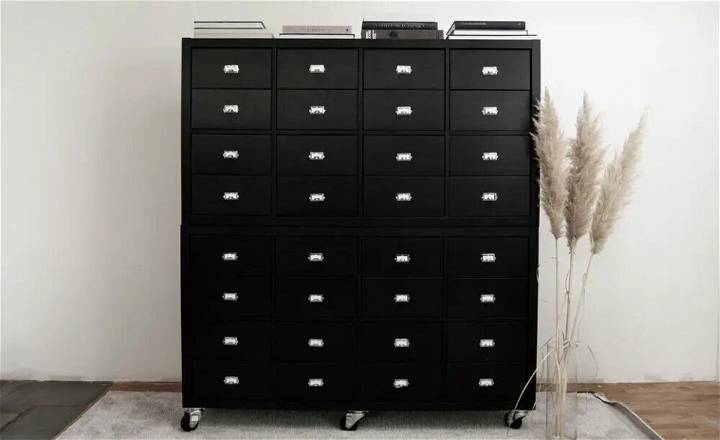
Transform your space with this ingenious IKEA hack! Make a stylish, modern library card catalog from Kallax shelves to organize and elevate your home. This DIY is simple yet impactful, perfect for any room needing organized charm. You'll need basic tools, Kallax shelves, drawer inserts, and chic file pulls.
Follow easy steps to assemble, customize, and fill your new piece. Ideal for offices, kids' rooms, or craft areas. Get the full guide and inspiration at The Savvy Heart. Dive into this project and see how function meets elegance in a few simple steps!
11. How to Make Your Own Sliding Doors
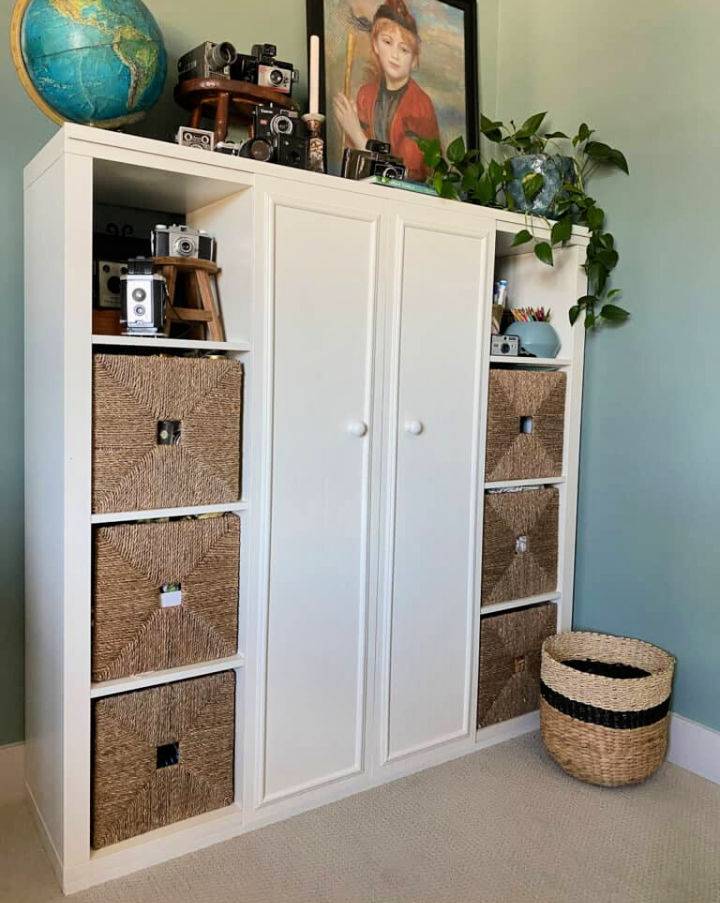
Transform your bookshelf or IKEA Kallax into a stylish and functional storage solution with sliding doors, following this easy and engaging guide from Deeply Southern Home. Perfect for hiding away unsightly items or craft supplies, this DIY project adds both charm and practicality to any room, optimizing space without the need for daily access.
From the selection of materials like plywood and aluminum angle bars to the finishing touches of paint and knobs, each step is thoroughly explained, making it achievable for anyone with a zest for DIY endeavors. Elevate your home's organization and style today!
12. Homemade IKEA Kallax Cubby
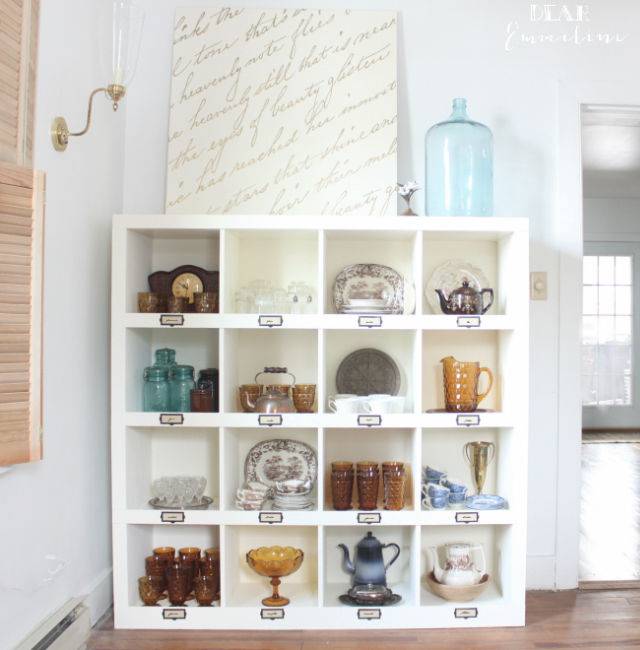
Transform your Ikea cubbies with this straightforward hack, turning them from ordinary to extraordinary storage solutions! Discover how easy it is to add a polished look to your Ikea Kallax (formerly Expedit) units, inspired by the chic Pottery Barn Mitchell Cubby Storage style.
This DIY project not only enhances the aesthetics but also fortifies the structure, making it ideal for any room. For a detailed guide on building this stylish and functional piece, visit Petal and Ply. Perfect for those looking to elevate their home decor with practical and affordable handmade pieces!
13. IKEA Kallax Entryway Storage
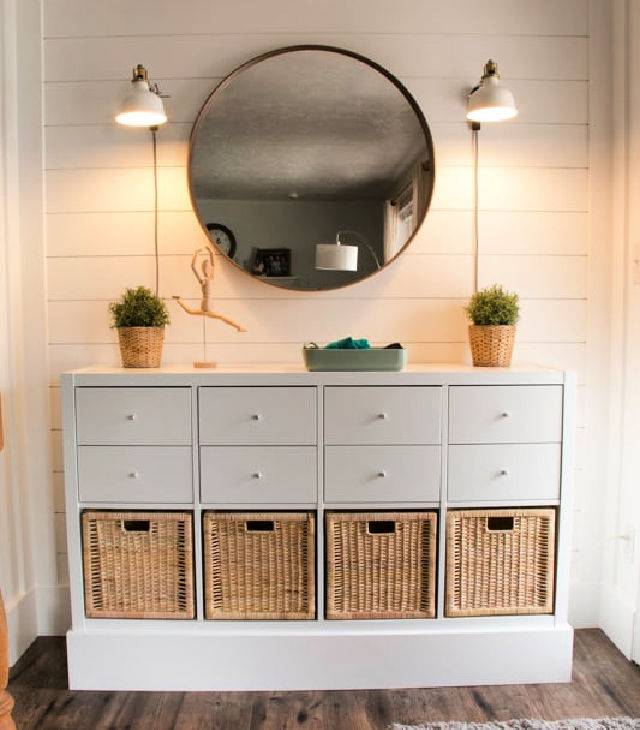
Transform your entryway on a budget with smart and stylish storage solutions from Remodelaholic. Discover how an IKEA hack can elevate your space, offering practical ways to organize essentials while adding a touch of decor. From the versatile KALLAX shelf to maximizing hidden storage with drawer units and adding natural textures with rattan baskets, your entryway can be both functional and inviting. Plus, with creative decor ideas like mirrors and LED spotlights, you'll enjoy a well-lit, welcoming area. Dive into easy, budget-friendly tips to rejuvenate your entryway.
14. IKEA Kallax With Doors and Overlays
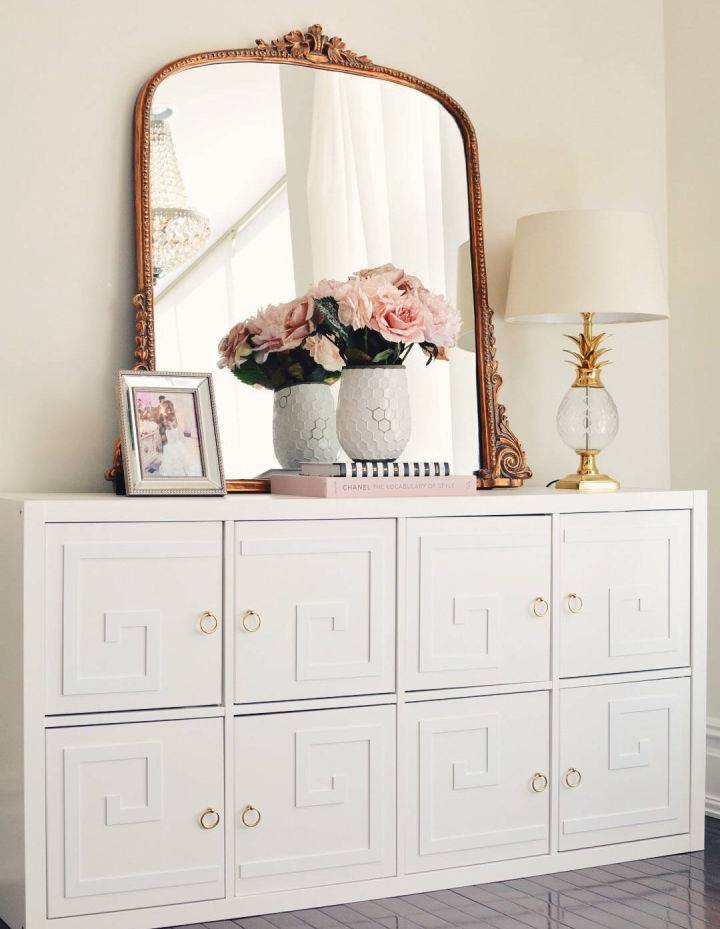
Transform your Ikea Kallax unit into a stylish storage solution with our simple hack. Perfect for hiding toys in the living room or organizing clutter, this DIY project is both budget-friendly and chic. Learn how to add doors and decorative overlays to your Kallax shelf for a customized look that fits your space perfectly. For a step-by-step guide and more inspiring Ikea hacks, visit The Pink Dream. Elevate your home decor without breaking the bank today!
15. Mid Century Modern IKEA Kallax
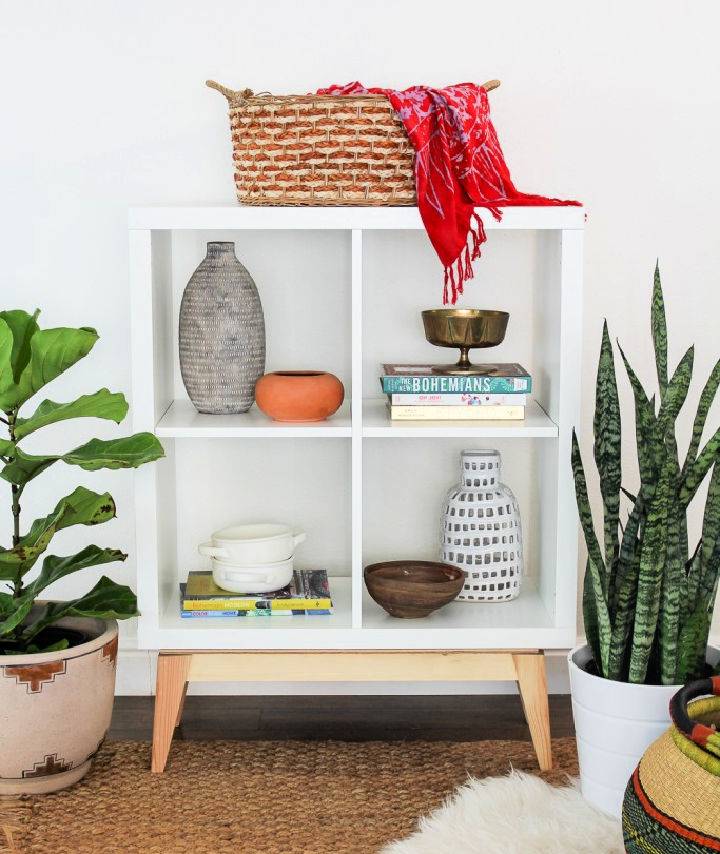
Transform your plain IKEA KALAX into a stunning mid-century modern masterpiece with ease. Learn the steps to make stylish, angled legs and a sleek frame at Hawthorne and Main. Safety and precision are key; follow the guide to cut and assemble without a hitch. Don't let little hiccups derail you – a bit of flexibility and ingenuity can lead to beautiful results. Dive into this DIY project and elevate your home decor with a personalized touch.
16. IKEA Expedit Bookcase With Wood
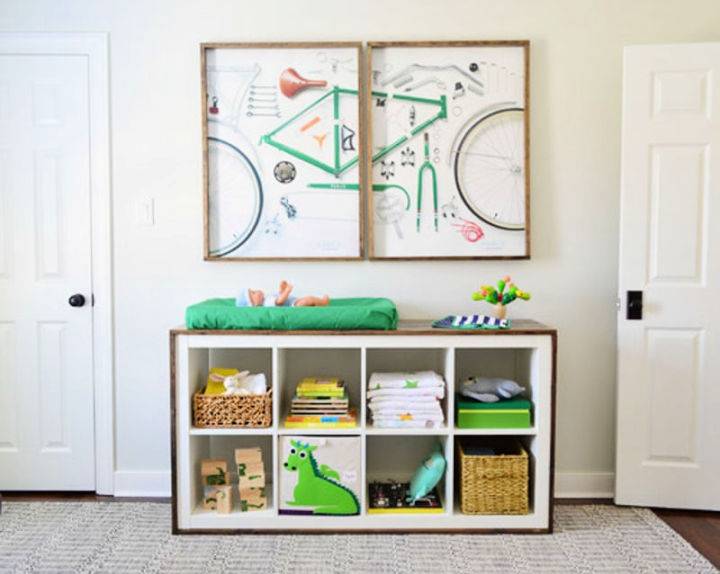
Transform your Ikea Expedit bookcase into an elegant, multifunctional piece with a simple wood-wrapping technique. Discover the steps and visual inspiration to elevate your nursery or any room in your home with a personal touch. Gain practical, open storage space without sacrificing style, perfect for accommodating a changing pad, toys, or diapering essentials. For a detailed guide on this creative project, visit Young House Love. Elevate your furniture in a few easy steps for a beautifully functional space.
17. IKEA Kallax Bathroom Vanity
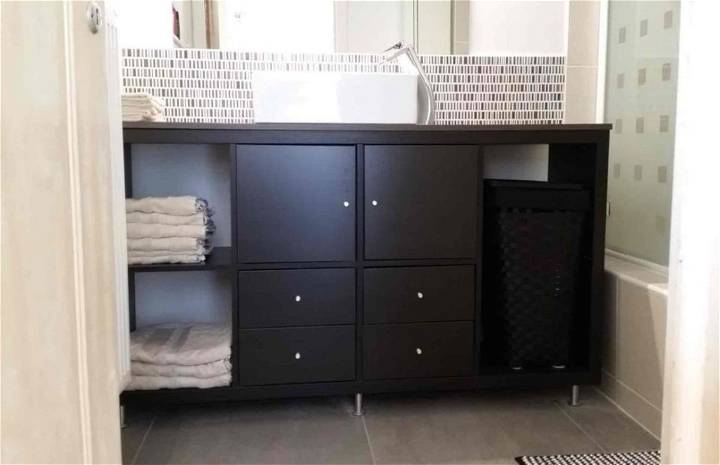
Transform your cramped bathroom into a stylish and practical space with an ingenious IKEA hack! Stefanie shares a brilliant transformation using the KALLAX unit to craft a chic bathroom vanity. Perfect for small bathrooms, the design incorporates clever storage solutions and keeps essential plumbing hidden. Capita legs add a sleek touch, ensuring easy cleaning underneath. Follow Stefanie's step-by-step guide to making the most out of limited space without sacrificing style. Explore more on IKEA Hackers for a vanity that's truly better than imagined.
18. IKEA Kallax Desk Hack
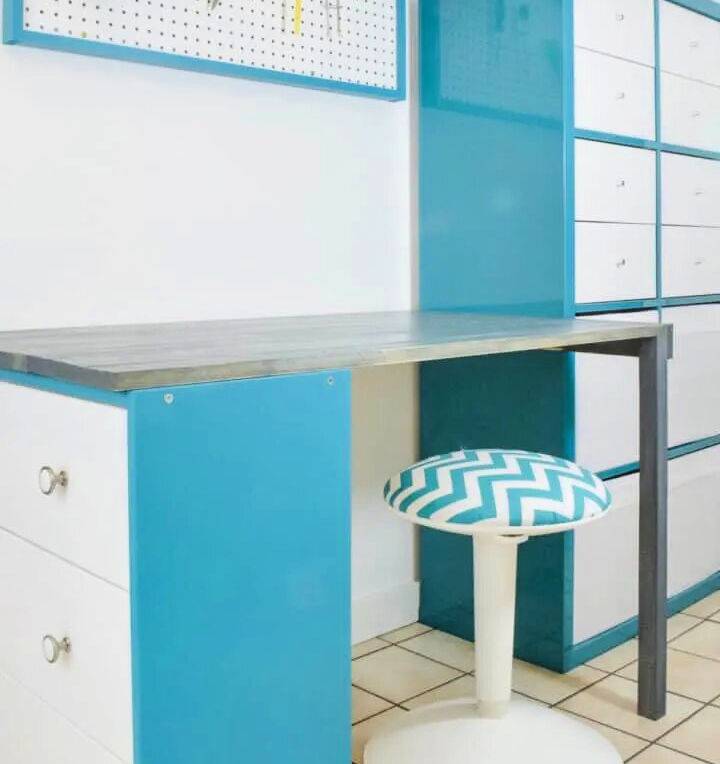
Transform your workspace with this ingenious IKEA Kallax desk hack. Harness the organizational power of IKEA's Kallax (or Expedit) and the Rast dresser, combined with a few boards, to craft a desk that's not only functional but also offers ample storage.
Ideal for creative endeavors outside your workshop, this project maximizes space while keeping essentials dust-free. Follow this easy guide to make a workspace that perfectly blends style and practicality, complete with a customized desk area that's excellent for drafting plans or jotting down to-do lists.
19. IKEA Shelves Craft Room Storage
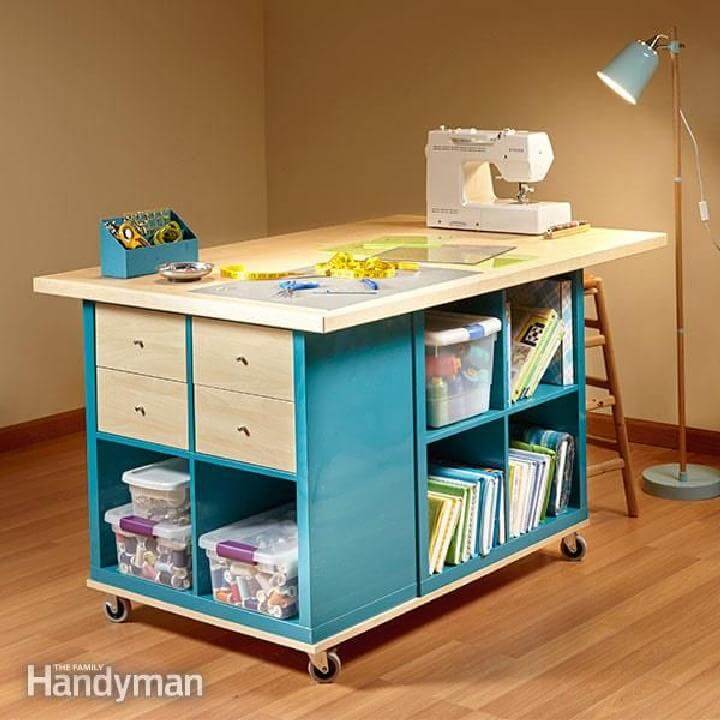
Transform your craft room with an imaginative Ikea Kallax Hack! By utilizing the Ikea Kallax shelf, you can make a spacious worktable that not only offers an ample surface but also integrates craft storage and mobility.
This inventive project involves sandwiching three small storage units between a sturdy base equipped with casters and a plywood top, enhanced with hardwood edging. Ideal for those with an intermediate skill level, this hack requires a few days to complete and costs between $101–250. For a detailed guide on making this craft storage dream a reality, visit Family Handyman.
20. IKEA Kallax Command Center With Storage and Chalkboard
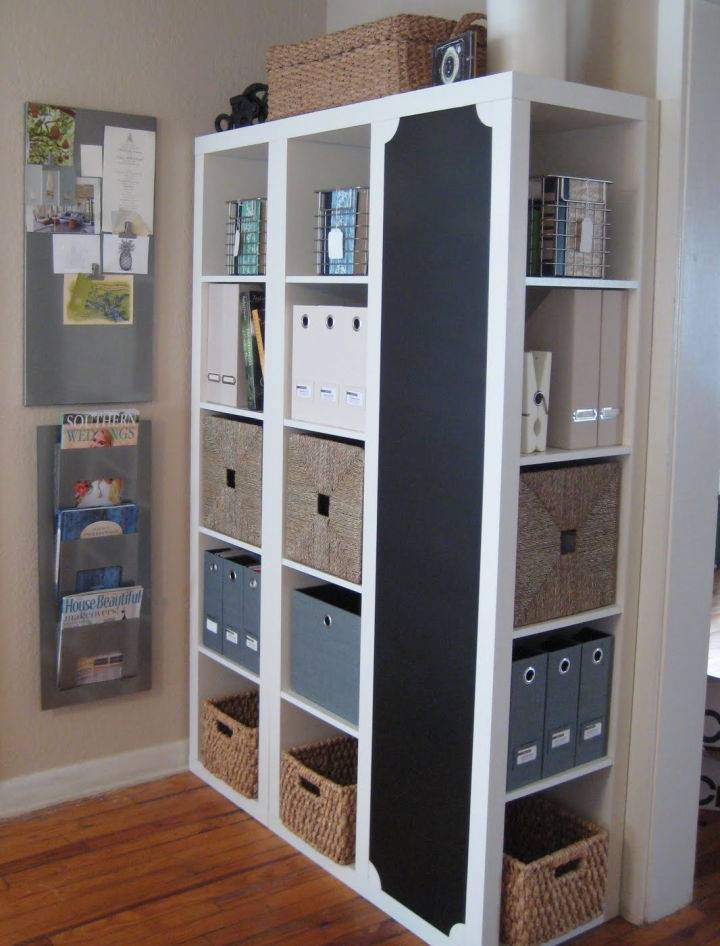
Discover the magic of transforming a simple Ikea Expedit into a center of organization and creativity in your home! From a misunderstood measurement to a beautifully adapted solution, learn how a trio of shelving units and a touch of DIY ingenuity with a chalkboard can revolutionize your space. Perfect for keys, mail, and crafts, this command center has stood the test of time in functionality and style. For a step-by-step guide on building your own, visit Iron & Twine.
21. Fabric Lined IKEA Kallax Bookshelf
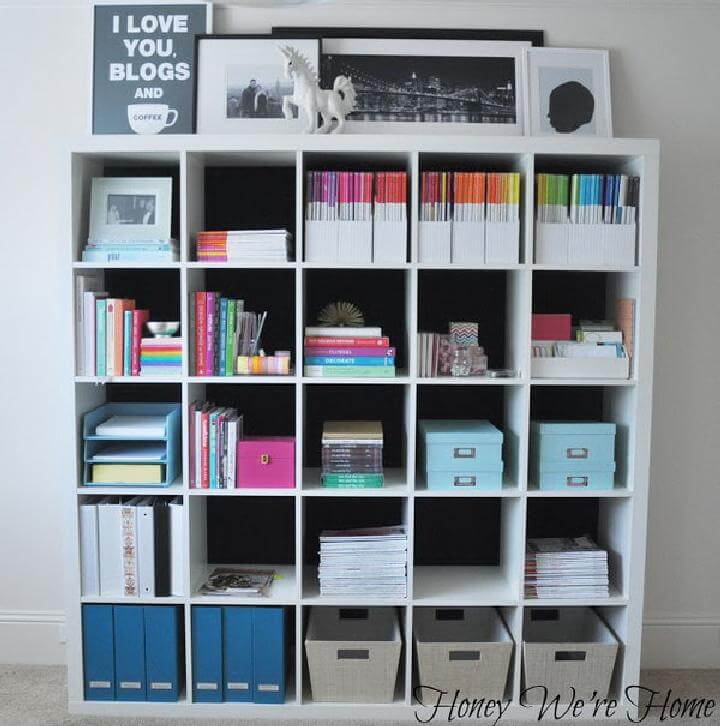
Transform your Expedit bookshelf into a striking piece with a simple fabric lining trick! Learn how on Honey We're Home. This guide shows you an easy, cost-effective way to personalize your bookshelf, boosting its appeal and blending it perfectly with your decor. Ideal for those seeking a fresh look without major changes. Elevate your space today!
22. IKEA Shelving Unit Into TV Stand
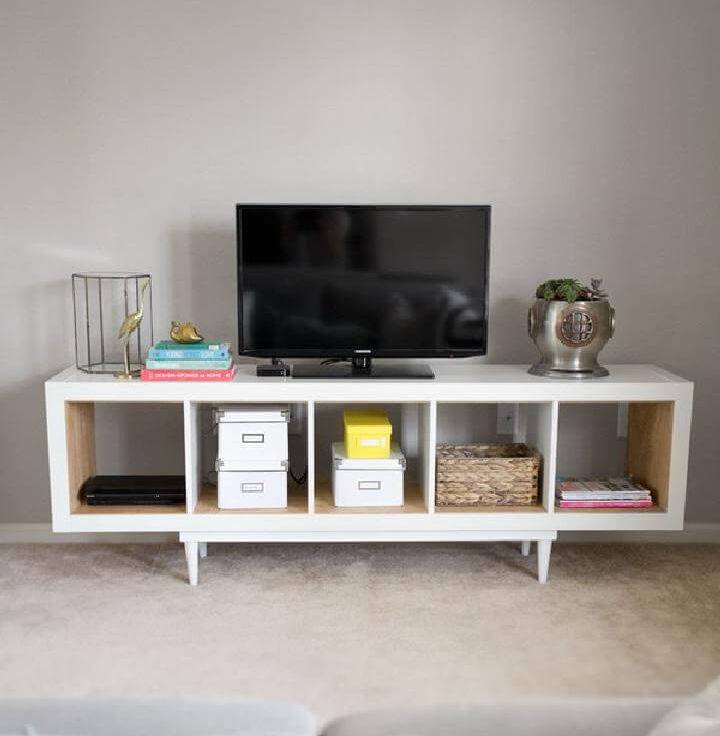
Transform your living space with a sleek and modern TV stand by repurposing an IKEA shelving unit. Sarah from Sarah M. Dorsey Designs brings you a simple yet transformative project, guiding you every step of the way.
From selecting the right materials to attaching stylish legs, she covers all you need for a weekend DIY project. Ideal for adding a personalized touch to your home, this handy guide ensures a functional and fashionable addition to your room. For a complete walkthrough, visit Infarrantly Creative and get started on elevating your entertainment area today!
23. IKEA Kallax Bar Cart Hack
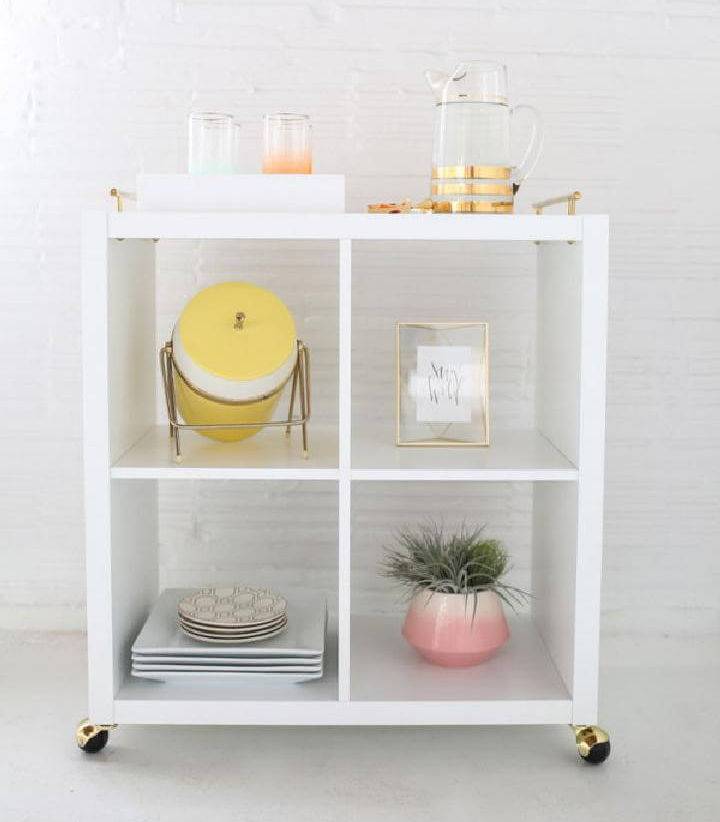
Transform your space with a chic and budget-friendly DIY Ikea Bar Cart. This Sugar & Cloth guide showcases how to elevate Ikea's staple bookshelf into a stylish bar cart. With just a few materials like brass pulls and casters, you can make a functional and fabulous piece perfect for entertaining or adding a mid-century twist to your decor. Ideal for those who love modern design with a touch of color, this DIY project proves sophistication doesn't have to break the bank. Ready to assemble? Follow these easy steps and make your own bar cart for less than $70.
24. IKEA Cubbies Into Rustic Storage Apothecary
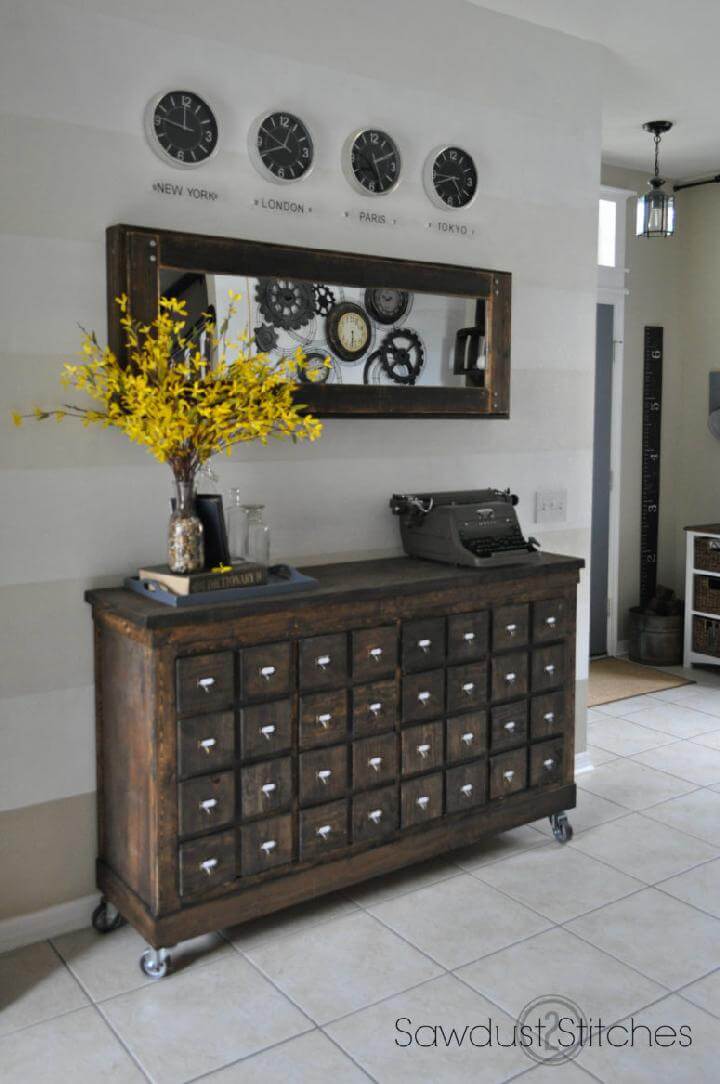
Transform your standard Ikea cubbies into a charming rustic apothecary with ease and creativity. This project breathes new life into simple furniture, blending practical storage with vintage charm. Follow step-by-step instructions to construct a sturdy base, trim and detail for character, and add a personalized stain finish.
Ideal for DIY enthusiasts seeking to infuse a sense of old-world apothecary into their home. For a detailed guide, including material and tool recommendations, visit Sawdust 2 Stitches. This project not only enhances your space but also showcases the versatility and potential for transformation in everyday furniture.
25. IKEA Expedit Long Storage Unit
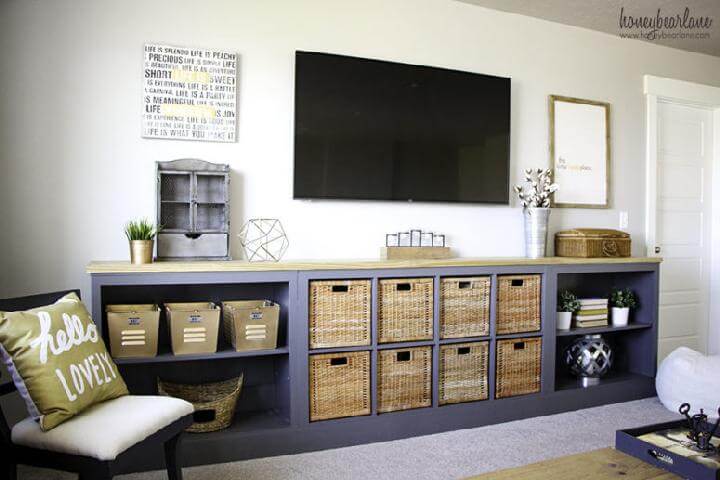
Transform your living space with an innovative IKEA hack by converting an Expedit into a chic, long storage unit. This DIY project is perfect for enhancing your home's storage solution while adding a touch of style. Ideal for those loving a personalized touch, the process involves a bit of sawing, painting, and assembling—leading to a polished and built-in look. For a detailed guide, material list, and step-by-step instructions, visit Honeybear Lane. Dive into this project and give your space both functionality and a fresh aesthetic.
26. IKEA Kallax Vinyl Record Shelf
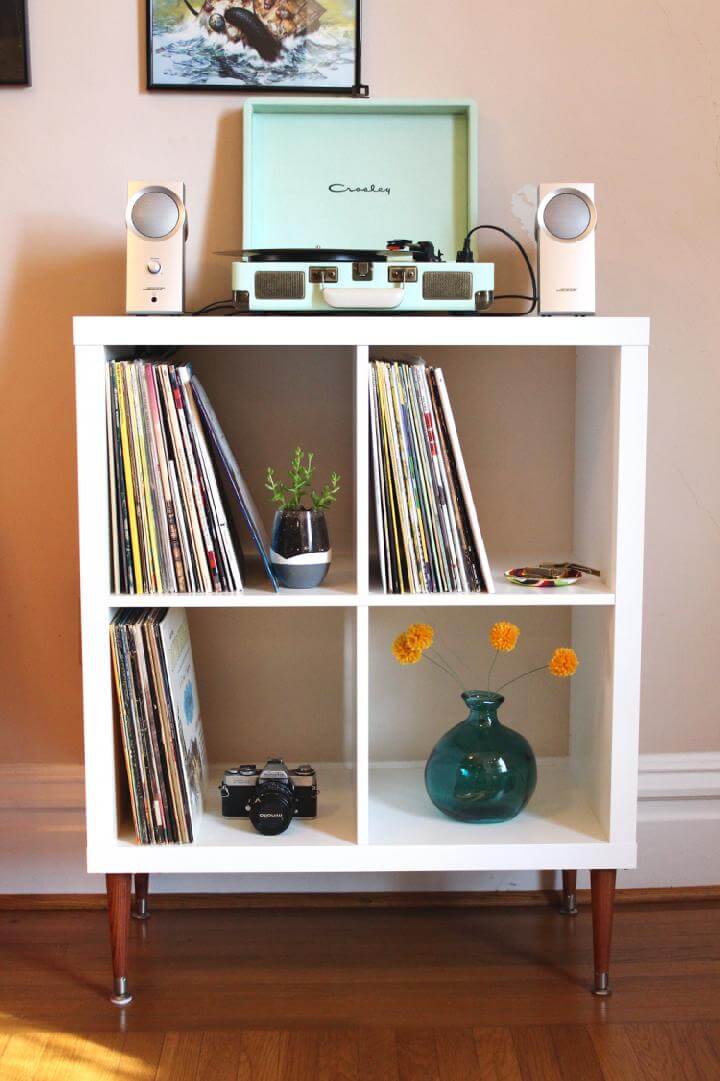
Discover a game-changer for music enthusiasts looking to elevate their space with a stylish DIY vinyl record shelf. In a heartfelt transformation journey, Sarah and Nick share how they revamped their outdated vinyl storage into a chic, Scandinavian-inspired piece using a simple IKEA Kallax shelving unit and adding a retro flair with mid-century modern legs. Their step-by-step guide on SarahNick.com makes this DIY project accessible, ensuring your beloved vinyl collection gets the showcase it deserves.
27. IKEA Kallax Shelving Hack
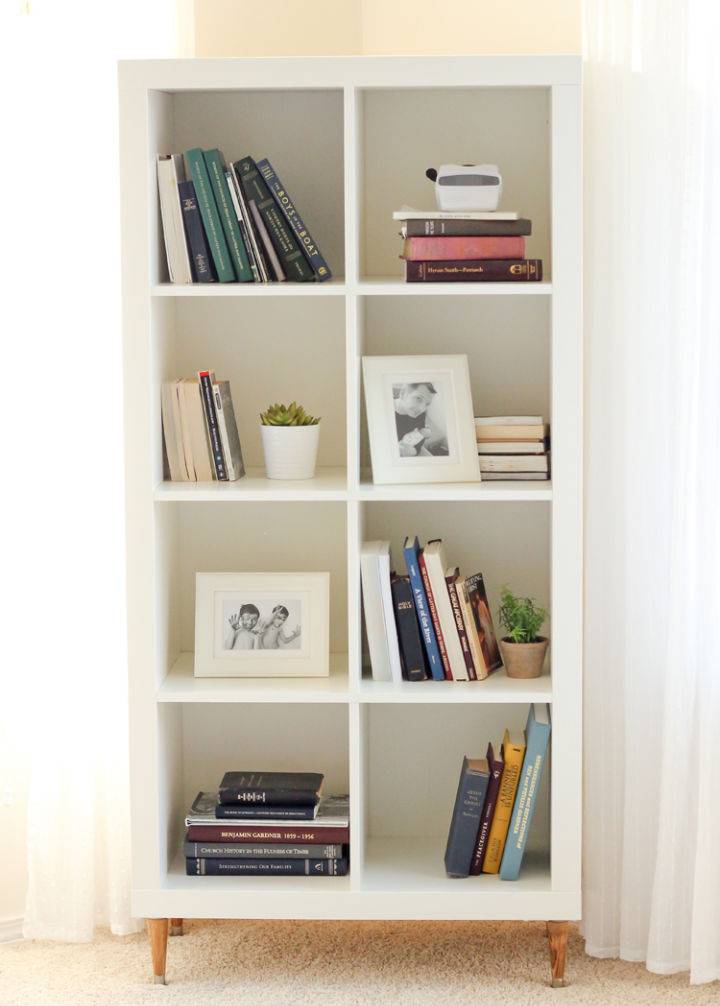
Elevate your IKEA Kallax or Expedit shelf into a stylish, mid-century modern piece with this simple DIY hack. By adding wooden legs and a painted plywood backing, you can transform your standard shelf unit into a chic piece of furniture. This guide, courtesy of Deliamakes, provides a step-by-step tutorial. Learn how to measure, cut, paint, and assemble your new upgrade. Perfect for those ready to give their shelf a creative and functional makeover.
28. IKEA Kallax and Plywood Nightstand
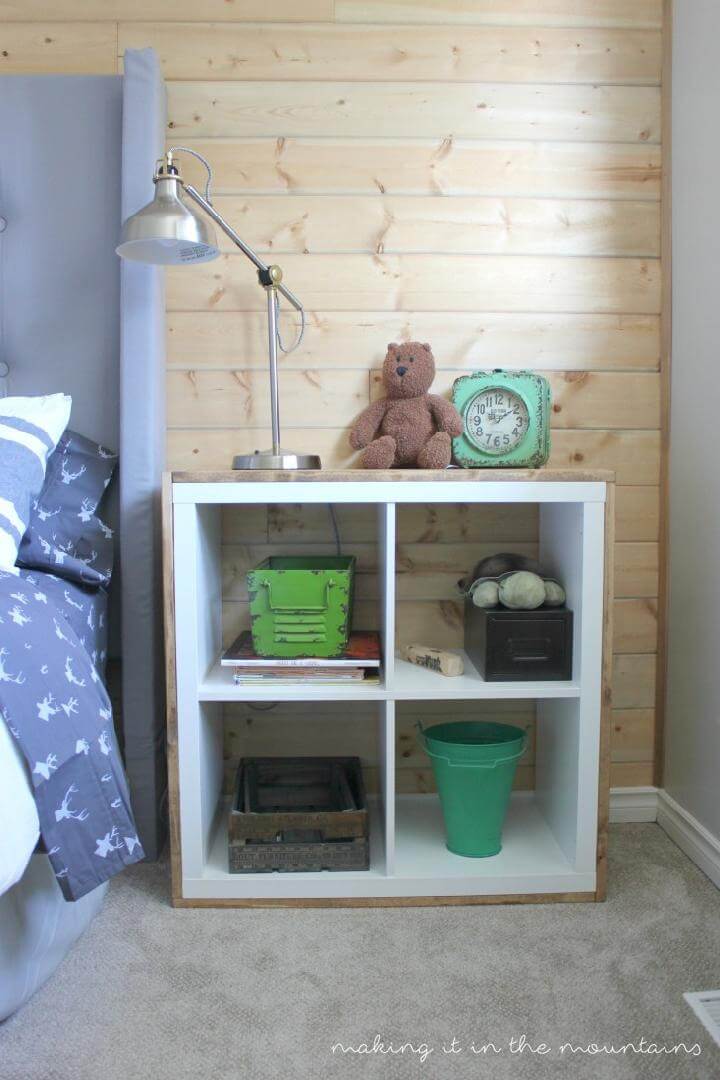
Transform your plain IKEA shelf into a centerpiece with a rustic twist! With a few simple steps, adding wood to an IKEA Kallax shelf brings a touch of warmth and character to any room. We found pine wood to be a perfect fit, giving the shelf a charming, countryside feel. For a full guide on this easy yet transformative DIY, visit Making it in the Mountains. Elevate the look of your space with this unique customization!
29. Wood Wrapped Kallax Cube Shelf
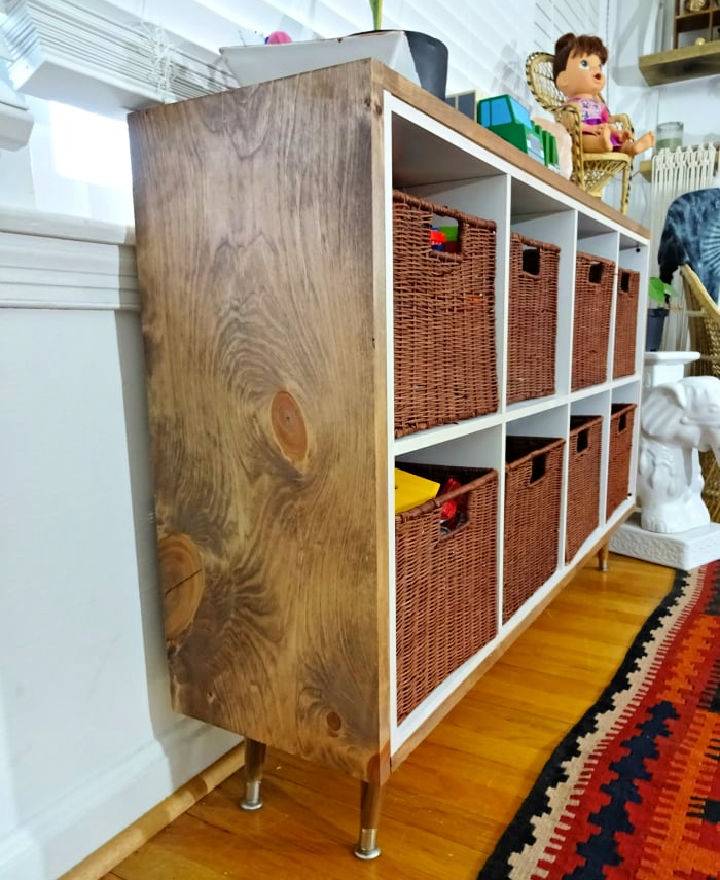
Transform your space with an Easy IKEA Hack: a wood-wrapped Kallax cube shelf! Dive into a simple DIY project that elevates the humble cube organizer into a stylish, retro-inspired storage solution. Perfect for rooms needing extra storage without sacrificing style. With basic tools, some wood, and a dash of creativity, you'll breathe new life into an ordinary organizer. Ideal for keeping toys tidy or enhancing any room's decor. Get all the details and step-by-step instructions for this practical yet chic upcycle.
30. IKEA Kallax Kitchen Island
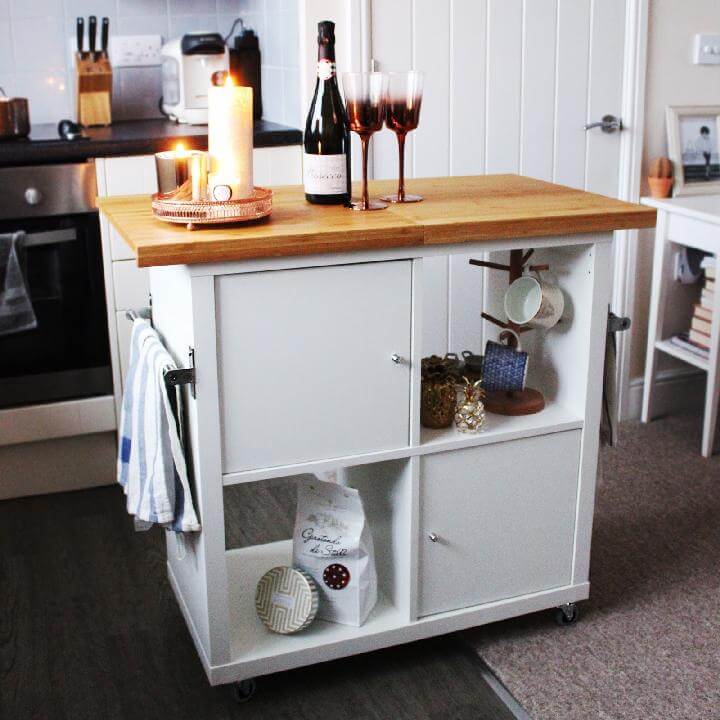
Discover a brilliant way to transform your kitchen with the Ikea Kallax kitchen island hack. This ingenious project repurposes the simple Kallax shelving unit into a highly functional and movable kitchen island, answering the need for additional storage and counter space in small kitchens.
Costing just over £80, this DIY endeavor includes easy-to-follow steps like assembling the Kallax unit, adding castors for mobility, and customizing with inserts and chopping boards for storage and food preparation surfaces. For a detailed guide on building this affordable, stylish, and practical kitchen island, visit Jen Lou Meredith's blog. This project is perfect for DIY enthusiasts looking to enhance their kitchen's functionality without breaking the bank.
Conclusion:
Unlock the potential of your living space with 30 creative IKEA kallax hacks and DIY ideas. This guide offers unique ways to transform the classic IKEA kallax shelf into something more personalized and functional. Tailored for individuals keen on adding a personal touch to their homes, our tips range from simple modifications to more involved DIY projects. Not only will these ideas enhance the aesthetics of your space, but they'll also improve its organization and utility.
Embarking on a DIY journey with IKEA Kallax hacks can seem daunting at first, but with our clear and straightforward advice, success is within reach. We cover everything from understanding your needs and space, finding inspiration and planning your project, to the actual execution with helpful tips for success. By the end of this guide, you'll feel empowered to tackle your own projects, transforming everyday furniture into pieces that speak volumes about your style. Let's get creative and make your space work for you in ways you've never imagined.


