Sewing a baby onesie at home is a practical project, especially for new parents or those looking to give a handmade gift. Sewing a onesie from scratch might seem daunting at first, especially if you're new to sewing, it's an enjoyable process that anyone can accomplish. I’m here to guide you through each step of making a DIY baby onesie, sharing tips, tricks, and lessons I’ve learned along the way. Let's dive in!
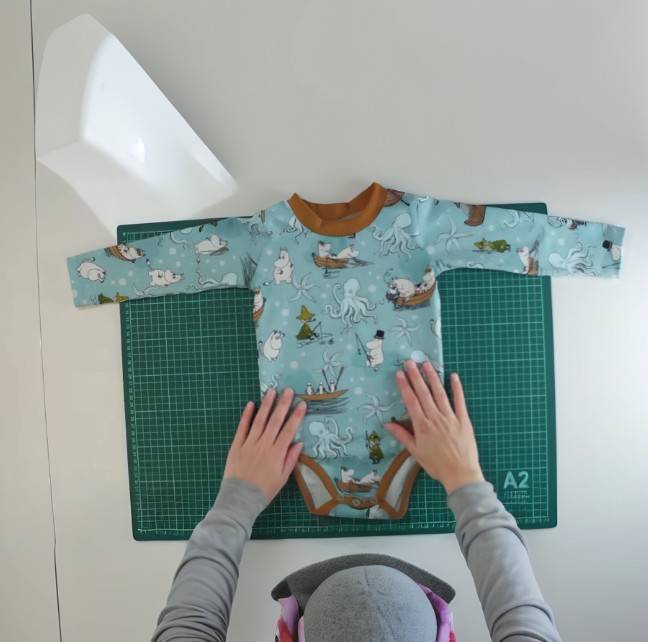
Materials You'll Need
Before starting, it's crucial to gather all the necessary materials. Having everything ready will make the sewing process smoother and more enjoyable. Here’s what you’ll need:
- Fabric: Cotton jersey is the best fabric for baby onesies as it’s soft, stretchy, and comfortable for the baby’s sensitive skin. A blend of 95% cotton and 5% Lycra works well.
- Rib Fabric: For the neckline, sleeve edges, and leg openings, rib fabric (often called "stretch cotton ribbon") provides the elasticity needed for a snug fit.
- Sewing Machine: A regular sewing machine is fine for this project, but an overlocker (serger) and a coverstitch machine can give more professional-looking results.
- Scissors and Rotary Cutter: Essential for cutting fabric accurately.
- Glue Pen: Useful for stabilizing fabric before sewing.
- Pins or Clips: To hold fabric pieces together while sewing.
- Pattern: A printed onesie pattern (available online or in sewing books) to guide your cuts.
- Prime Burial Pliers or Snap Fasteners: For attaching buttons or snaps to the crotch area.
Choosing the Right Size
When sewing a baby onesie, selecting the correct size is crucial to ensure comfort and fit. Babies grow rapidly, and their measurements can change significantly over a short period. Therefore, it's essential to take fresh measurements before starting your sewing project. Up-to-date measurements will ensure the onesie fits perfectly and can be worn for as long as possible before the baby outgrows it.
Here's a quick guide on choosing the right size for a baby onesie based on waist, hips, and height measurements. Both standard (inches) and metric (centimeters) systems are provided to help you pick the right size:
| Size | Waist (inches) | Hips (inches) | Height (inches) | Waist (cm) | Hips (cm) | Height (cm) |
|---|---|---|---|---|---|---|
| Preemie | 15 | 20 | 18 | 38 | 50.8 | 50 |
| Newborn | 15.75 | 20.5 | 22 | 40 | 52 | 56 |
| 0-3 Months | 17 | 20.75 | 24.25 | 43 | 52.7 | 62 |
| 3-6 Months | 18.5 | 21.25 | 26.75 | 47 | 54 | 68 |
| 6-9 Months | 18.75 | 21.5 | 29.25 | 47.5 | 54.6 | 74 |
| 9-12 Months | 19 | 21.75 | 31.5 | 48 | 55.2 | 80 |
| 12-18 Months | 19.25 | 22 | 33.75 | 49 | 55.8 | 86 |
| 18-24 Months | 19.5 | 22.5 | 35 | 49.5 | 57 | 90 |
| 2 Years | 20 | 22.75 | 36.25 | 51 | 57.7 | 92 |
How to Measure
- Waist: Measure around the natural waistline, which is the narrowest part of the torso.
- Hips: Measure around the fullest part of the baby's hips.
- Height: Measure from the top of the head to the bottom of the feet while the baby is lying down.
By using these measurements, you can select the most appropriate size for the baby onesie pattern. Remember that every baby is unique, and it's always better to choose a slightly larger size if you're unsure. This way, the baby can grow into the onesie, ensuring longer use.
Now that we have everything we need, let's get into the sewing process step by step.
Step 1: Preparing the Fabric and Pattern
The first step is to prepare your fabric. Choose a soft, stretchy fabric like cotton jersey and ensure it’s washed and dried beforehand to avoid any shrinkage after sewing. Lay your fabric out on a flat surface, making sure it is smooth and wrinkle-free.
When cutting out the pattern pieces, make sure to add a seam allowance if it's not already included in the pattern. Most patterns will have a seam allowance included, but always check the instructions. If you're unsure, you can add about 1/4 inch around the pattern for safety. Fold the fabric so you can cut out two pieces at once for symmetry, especially for the sleeves.
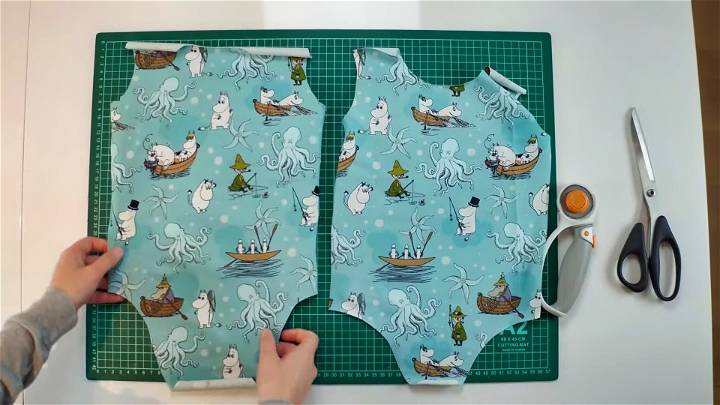
Step 2: Cutting the Onesie Pieces
Next, lay your pattern on the fabric. The basic pieces you'll need to cut are:
- Front Piece
- Back Piece
- Two Sleeves
- Neck Ribbing
- Leg Opening Ribbing
Ensure that the pattern pieces are aligned with the fabric grain (usually marked by a vertical thread line). This alignment is crucial for maintaining the stretch and durability of the fabric. Cut out the pieces carefully using scissors or a rotary cutter. If you're a beginner, the rotary cutter provides a cleaner edge and can make cutting curves much easier.
Step 3: Assembling the Shoulders and Sleeves
With your pieces cut out, it’s time to start sewing. Begin by laying the front and back pieces of the onesie on top of each other with the right sides facing each other. Use clips or pins to hold them together at the shoulder seams. A glue pen can help stabilize the fabric here, making it easier to sew.
Sew both shoulder seams using a straight stitch or a serger if you have one. After securing the shoulders, it’s time to attach the sleeves. Fold each sleeve piece to find the center point and cut a small notch. Align this notch with the shoulder seam and pin or clip the sleeves in place. Sew them on carefully, making sure the fabric is not stretched too much, which could lead to puckering.
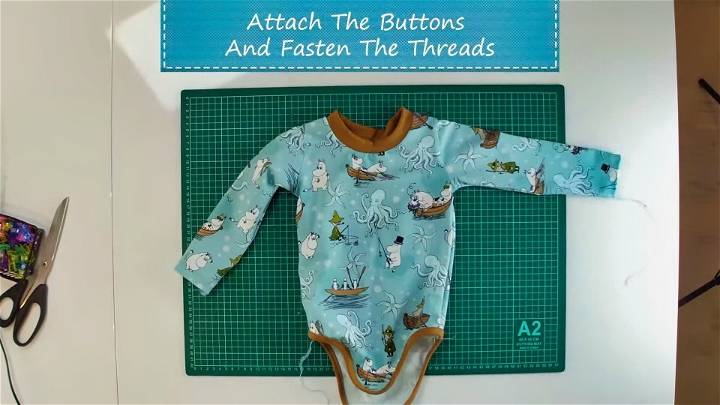
Step 4: Sewing the Neckline and Sleeve Edges
For the neckline, you’ll need to prepare the ribbing. Fold the ribbing fabric in half lengthwise, and sew along the edge to create a continuous loop. Pin or clip this ribbing around the neck opening, aligning it so the seam falls inconspicuously along the back. Stretch the ribbing gently as you sew to fit it to the neckline, but avoid stretching the main fabric to prevent waves.
Repeat the same process for the sleeve edges. Fold the ribbing fabric, sew the edges together to form a loop, and attach it to the sleeve openings using a similar technique. This step gives a clean, professional finish and ensures the sleeves sit snugly on the baby’s arms.
Step 5: Sewing the Side Seams and Bottom Ribbing
With the sleeves attached, the next step is to sew the side seams. Fold the onesie so that the front and back pieces are aligned and the sleeve edges are touching. Sew from the edge of the sleeve all the way down to the bottom of the onesie on both sides.
After that, it’s time to attach the bottom ribbing around the leg openings. If you don’t have a binding folder (a handy tool that helps sew on binding more evenly), use a twin needle or zigzag stitch to achieve a similar effect. Attach the ribbing around the leg holes just as you did for the neckline and sleeves.
Step 6: Attaching Snaps or Buttons
The final step in completing your baby onesie is attaching snaps or buttons along the crotch area for easy diaper changes. Using pliers or a snap-fastening tool, carefully attach the snaps to the bottom edges of the onesie. This part can be a bit tricky, so take your time to ensure they are aligned and secure.
Video Tutorial
For a step-by-step video tutorial on sewing a baby onesie, check out this helpful YouTube video.
This video complements the written guide, offering a clear visual of the techniques, making it perfect for visual learners. With both resources, you'll soon sew a beautiful DIY baby onesie that will be treasured.
Tips and Troubleshooting
Sewing a onesie can be a bit challenging, especially if you’re new to sewing. Here are some additional tips and answers to common questions that might help you along the way:
- Seam Allowance: If you’re unsure whether your pattern includes seam allowances, it's safer to add about 1/4 inch all around. This will ensure your onesie doesn’t turn out too small.
- Choosing the Right Machine: While a serger and coverstitch machine can give a professional finish, a regular sewing machine works perfectly fine. Use a zigzag or overlock stitch for stretchy fabrics.
- Binding Tips: If you’re struggling with attaching the ribbing or binding, using a binding folder can be incredibly helpful. These tools make it easier to sew even edges and are compatible with many sewing machines.
- Handling Fabric Layers: When sewing through multiple layers, such as at the side seams, go slowly and carefully to prevent the fabric from bunching or shifting.
- Stretching the Fabric: Stretch the ribbing slightly while attaching it, but avoid stretching the main fabric. This technique prevents waves and ensures a snug fit around the neckline and leg openings.
FAQ: Sewing a Baby Onesie
Learn how to sew a baby onesie with our step-by-step FAQ guide. Perfect for beginners and baby shower gifts!
What sewing machine should I use?
A regular sewing machine works well, but for professional results, consider an overlocker (e.g., Brother 4234D) and a coverstitch machine (e.g., Baby Lock Coverstitch). Both help in handling stretchy fabrics.
Do I need a binding folder?
A binding folder helps sew neat ribbing edges, especially for beginners. If unavailable, use a zigzag or twin needle stitch on a regular machine.
Is the seam allowance included in the pattern?
Yes, most patterns include a seam allowance. However, always double-check the pattern details to be certain.
Can I use a regular sewing machine for the entire project?
Yes, you can use a regular sewing machine. Opt for a zigzag or three-point zigzag stitch to handle the stretch in the fabric effectively.
What is the best fabric for a baby onesie?
Cotton jersey (95% cotton, 5% Lycra) is ideal due to its softness, stretch, and comfort, perfect for a baby's sensitive skin.
How do I sew ribbing without stretching the main fabric?
While sewing ribbing, stretch the ribbing slightly but avoid pulling the main fabric. This prevents waves and keeps the fabric flat.
What if I don’t have snaps for the crotch area?
You can use buttons or Velcro as alternatives. Ensure they are securely attached and safe for a baby to avoid choking hazards.
How do I cut both sleeves evenly?
Fold the fabric and cut both sleeves simultaneously. This ensures they are symmetrical and match perfectly when sewing.
What size should I choose for my onesie?
Use the baby's current measurements and refer to the provided size chart. Always opt for a slightly larger size if unsure, allowing room for growth.
Can I make a sleeveless onesie?
Yes, omit the sleeve attachment step. Finish the armholes with ribbing or a rolled hem for a clean, polished look.
5 Easy DIY Baby Onesie Ideas
Sewing a baby onesie is a wonderful way to make custom, adorable outfits for the little ones in your life. Here are five easy DIY baby onesie ideas based on different techniques and styles, gathered from various sewing tutorials:
1. Simple Organic Cotton Onesie
Make a soft, breathable onesie using organic cotton fabric. This idea involves a free downloadable pattern that’s easy to follow. Use an overlock stitch or zigzag stitch to attach the neck and leg bands, ensuring comfort and flexibility. Add snaps for easy diaper changes. This is a great project for beginners who want to make a natural, safe outfit for babies.
2. Panda Fabric Onesie with Homemade Binding
For a unique and personalized look, try sewing a onesie with fun printed fabric, like a panda design. Make your own binding by cutting strips of matching or contrasting fabric. This project requires careful attention to pattern placement and the use of stay stitching to maintain the shape. It's ideal for those who want to experiment with homemade bindings and distinctive fabrics.
3. Preemie-Sized Onesie for Newborns
If you’re looking for a special gift for a newborn or a preemie, this tiny onesie is perfect. Made using a stretchy knit fabric and a zigzag stitch, this pattern focuses on a snug yet comfortable fit. It’s particularly easy to put on, with an envelope neckline that slips over the head without the need for snaps or buttons. A thoughtful project for anyone expecting a new addition to the family.
4. Free Pattern Onesie with Sew-On Snaps
This idea uses a free pattern that allows for customization with either sew-on or snap pliers. The pattern includes options for short or long sleeves, making it versatile for any season. This project is perfect for those who want a quick and simple sewing project that does not require advanced sewing skills or expensive tools.
5. Professional-Looking Onesie with Coverstitch and Overlocker
For those aiming for a more professional finish, using an overlocker and a coverstitch machine can provide a polished look. This technique allows for clean edges and a snug fit, especially around the neck and leg bands. Choose a durable fabric like cotton jersey and add embellishments such as appliqué or embroidery for a unique touch. This project is ideal for intermediate sewists looking to enhance their skills.
These five ideas cater to various skill levels and styles, for everyone interested in sewing adorable, custom baby onesies.
Conclusion
Sewing a baby onesie from scratch is a fulfilling project that allows you to create something special and custom for a little one. By following these steps, you can make a beautiful, comfortable onesie that is both practical and stylish. Remember, the key to sewing is practice and patience. Don’t be afraid to make mistakes—they’re part of the learning process. Happy sewing!
Feel free to share your finished projects or ask any further questions. There’s always room to learn and grow in the sewing community. Good luck with your onesie sewing adventure!


