Starting a new project can be exciting. I remember when I decided to build my own DIY RC car. The first step was selecting the type of car and gathering all the necessary parts. It seemed a bit overwhelming, but I soon realized that it was manageable by breaking down the tasks. I researched and made a list, which included the body, motor, wheels, and remote control system.
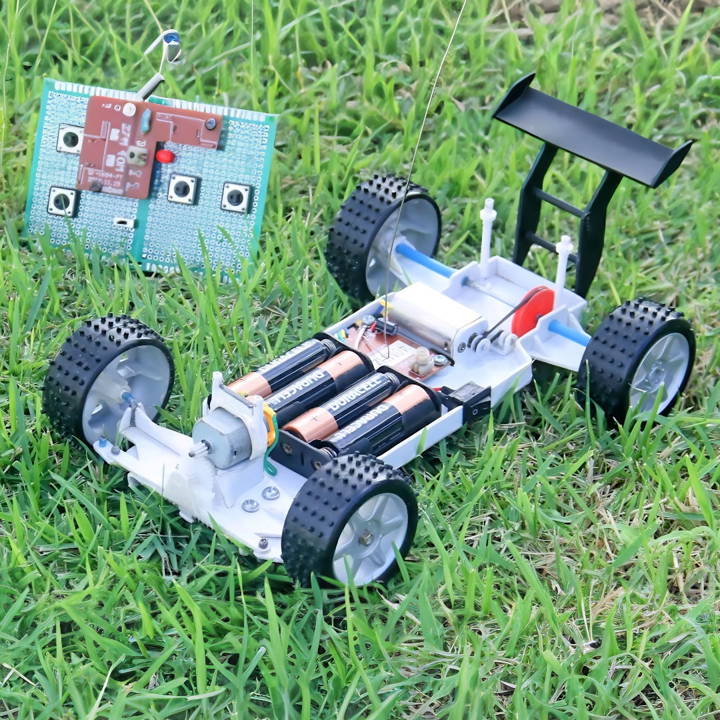
Assembling my DIY RC car was surprisingly fun. Following a step-by-step guide made it easier to put together. I took it slow, double-checking each connection to ensure everything fit perfectly. Upon finishing, seeing my car come to life was immensely satisfying. I couldn't wait to see it zoom around, knowing that each piece had been carefully placed by my hands.
I hope this experience inspires you to start your own DIY RC car project. These tips will certainly help you get started and enjoy the process as much as I did.
Understanding the Basics
When you're starting out with DIY RC (Radio-Controlled) cars, it's essential to grasp the fundamentals. This will help you build a solid foundation for building a vehicle that's not only fun to drive but also reflects your personal touch.
What is an RC Car?
An RC car is a miniature model vehicle that can be controlled remotely using a transmitter. These cars come in various types and sizes, each designed for different terrains and racing styles.
Types of RC Cars:
- On-road cars are sleek and fast, perfect for smooth surfaces.
- Off-road cars are rugged and can handle rough terrain.
- Drift cars are designed to slide around corners in style.
- Racing cars are built for speed and competition.
Scale Matters:
The scale of an RC car refers to its size relative to a full-size vehicle. Common scales include:
- 1/10 scale – Great for beginners and the most popular size.
- 1/12 scale – Smaller and typically used for indoor racing.
- 1/18 scale – Ideal for those with limited space.
Key Components:
- Chassis: The car's frame, which holds everything together.
- Motor: The heart of the car, providing the power to move.
- Electronic Speed Controller (ESC): This regulates the motor's speed and direction.
- Battery: The source of power for electric RC cars.
- Radio System: Consists of a transmitter you hold and a receiver in the car.
Building Your First RC Car:
- Choose a simple kit that matches your interest in either on-road or off-road driving.
- Follow the instructions carefully, and don't rush the process.
- If you're unsure about a step, seek advice from RC car forums or local hobby shops.
Learning by Doing:
The best way to understand RC cars is by building and experimenting with them. Each car you build will teach you more about how it works and how to improve it.
Building and customizing DIY RC cars is enjoyable. Take your time, enjoy it, and soon you'll have an RC car that showcases your passion and skills.
Materials You Need and Why
Before diving into the construction, let's talk about the materials you'll need. The beauty of this project lies in its simplicity and affordability. Here's a breakdown:
- 2 Inch PVC Drain Pipe: This will serve as the main body of our car. PVC is durable, lightweight, and easy to work with.
- Blueprint of Car Parts: Essential for cutting out the parts accurately. A blueprint ensures all components fit together perfectly.
- Utility or Craft Knife & Scissors: For cutting out the PVC parts according to the blueprint.
- Drill or Screwdriver: To make holes in the PVC for mounting the parts.
- Glue Stick & Super Glue: For affixing the blueprint to the sheet and assembling the car parts.
- Sandpaper: To smooth out the edges for better adhesion.
- Motor, Wheels, and Axles: The heart of our RC car, providing mobility.
- 40MHz 4-Channel RC Transmitter & Receiver Pair: This affordable electronics set will give us control over the car.
- Batteries: To power both the car and the transmitter.
Step-By-Step Instructions
Follow our DIY RC car guide to easily build your own remote-controlled car and enjoy a fun, hands-on project with step-by-step instructions.
Preparing the PVC Chassis
- Flatten the PVC Pipe: Heat the PVC pipe on a stove, cut it open, and then flatten it. This will be our working sheet.
- Apply the Blueprint: Glue the blueprint onto the flattened PVC, ensuring it sticks well.
- Cutting and Hole-Making: With a utility knife, score the outlines of the parts before cutting them out with scissors. Drill or poke holes where indicated on the blueprint.
Assembling the Car
- Bending Parts: Some parts require bending to form structures like the motor mount and axle supports. Heat the PVC slightly and bend as needed.
- Assembly: Begin gluing the parts together according to the blueprint. This includes the chassis, walls, and motor mount.
- Installing the Wheels and Axles: Attach the wheels to the axles. Make sure the rear wheels are tightly secured as they will propel the car.
Electronics and Steering Mechanism
- Setting Up the Motor and Pulleys: Secure the motor to its mount and install the drive belt (a simple rubber band works well).
- Installing the Electronics: Mount the RC receiver inside the chassis. Connect the motor and batteries to the receiver, following the wiring diagram provided in your guide.
- Making the Steering: Follow the dedicated guide to craft a self-centering steering mechanism. This adds realism and control to your RC car, elevating the driving experience.
Finishing Touches
- Body Shell: Use a shell from an old toy car or build one from leftover PVC. This is where you can get creative and customize the look of your car.
- Testing and Tuning: Insert the batteries, turn on the car, and pair it with the transmitter. Test the car's range and steering, adjusting the frequency tuning coils on both the car and transmitter if necessary.
Tips for Success
- Precision is Key: Take your time cutting and assembling the PVC parts. Precise cuts make assembly easier and improve the final look and functionality of the car.
- Customization: Feel free to modify the design, especially the body shell, to suit your tastes. Personal touches will make your RC car truly one of a kind.
- Patience with Electronics: Wiring can be tricky. Triple-check connections before powering on to avoid shorts or damage.
Customization Tips
Customizing your DIY RC car is where your creativity truly shines. It's your chance to make your vehicle stand out and perform better. Here are some tips to help you personalize your RC car:
Express Yourself with Paint
- Choose a color scheme that reflects your style. Bright colors make your car more visible during races.
- Use masking tape to build patterns or designs on the car's body before painting.
- Apply multiple thin coats of paint rather than one thick coat for a professional finish.
Decals and Details
- Add decals for a realistic look. These can be logos, numbers, or graphics.
- Consider adding small details like side mirrors, spoilers, or even a driver figure for a more authentic appearance.
Performance Upgrades
- Upgrade the tires to suit the terrain you'll be driving on. Slick tires for on-road and knobby tires for off-road.
- Install a more powerful motor or battery for increased speed and longer run times.
- Adjust the suspension settings to improve handling. Softer springs for rough surfaces and stiffer ones for smooth tracks.
Lighting It Up
- Install LED lights for driving in low-light conditions. This not only looks cool but also helps you keep track of your car.
- You can add lights to the front, rear, and even under the body for a unique effect.
Make It Unique
- Personalize your remote control with stickers or a custom paint job.
- Modify the body of the car by cutting or adding parts to change its shape.
Safety First
- Ensure all modifications do not compromise the car's safety or stability.
- Check that all parts are securely attached to avoid accidents during operation.
Follow these tips to build an RC car that's fun to drive and showcases your personality. Balance style and performance for great customization.
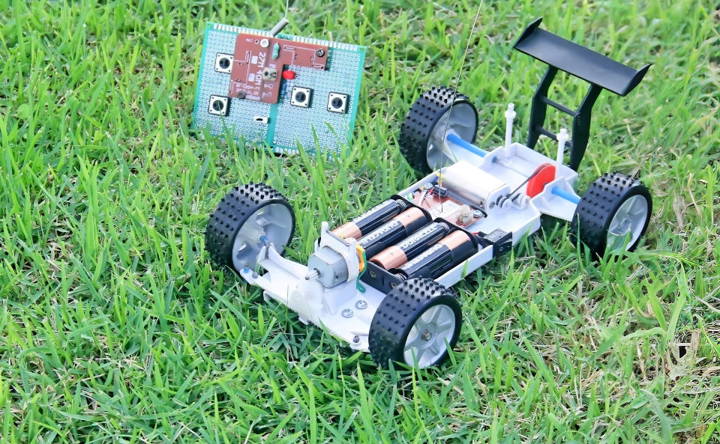
Troubleshooting Common Issues
Building and running a DIY RC car can be a smooth ride, but sometimes you might hit a bump. Here's a guide to troubleshooting some common issues you may encounter, ensuring your RC car gets back on track quickly and safely.
Car Won't Start
- Check the Battery: Ensure it's properly charged and connected.
- Inspect the Wiring: Look for loose connections or damaged wires.
- Motor Issues: If the motor doesn't respond, it might need cleaning or replacing.
Loss of Control
- Radio Interference: Make sure there are no signal interferences nearby.
- Transmitter Batteries: Weak batteries can cause loss of control. Replace if necessary.
- Receiver Connection: Verify that the receiver is securely connected to the components.
Car Flips Over Easily
- Weight Distribution: Adjust the weight balance by shifting the battery or adding counterweights.
- Suspension Setup: Tweak the suspension settings for better stability.
- Tire Pressure: Ensure the tires are evenly inflated according to the terrain.
Reduced Speed or Power
- Gearing: Check if the gears are properly aligned and lubricated.
- ESC Settings: Review the Electronic Speed Controller settings for any limitations set.
- Drive Train: Inspect the drive train for blockages or wear and tear.
Unusual Noises
- Grinding Sound: This could indicate a gear issue. Inspect and replace worn gears.
- Squeaking: Often caused by lack of lubrication. Apply appropriate lubricants to moving parts.
- Rattling: Loose parts can rattle. Tighten screws and secure all components.
Poor Handling
- Alignment: Ensure the wheels are properly aligned.
- Shock Absorbers: Check if the shock absorbers are functioning correctly.
- Differential: The differential may need adjustment for smoother turns.
Frequent Battery Drain
- Driving Habits: Aggressive driving can drain the battery faster. Practice efficient driving techniques.
- Battery Health: Older batteries may not hold a charge as well. Consider replacing them.
- Motor Efficiency: A dirty or damaged motor can consume more power. Clean or replace if needed.
Addressing these issues systematically will fix your RC car and deepen your understanding. Patience and observation are essential. Keep this guide handy for any problems.
Safety Considerations
When engaging in the exciting world of DIY RC cars, it's crucial to prioritize safety for yourself, others, and your environment. Here are some key safety considerations to keep in mind:
Personal Safety
- Wear protective gear such as gloves and goggles when assembling or repairing your RC car.
- Be cautious with tools and sharp objects to prevent injuries.
- Keep small parts away from young children and pets to avoid choking hazards.
Operational Safety
- Test your RC car in a safe, open area where there are no people or traffic.
- Maintain a safe distance from the car while it's in motion to avoid being hit.
- Be aware of your surroundings and stop the car immediately if someone enters the area.
Battery Handling
- Use the correct charger for your batteries to prevent overheating and potential fires.
- Never leave charging batteries unattended and always charge them in a fireproof container or area.
- Inspect batteries for damage before use. Swollen or leaking batteries should be disposed of properly.
Legal Compliance
- Know the local laws regarding the use of RC cars in public spaces. Some areas may have restrictions or require permits.
- Respect property rights and do not operate your RC car on private property without permission.
Environmental Considerations
- Avoid sensitive areas such as wildlife habitats or protected ecosystems.
- Clean up after yourself and ensure no parts or batteries are left behind in nature.
Emergency Preparedness
- Have a first aid kit handy in case of minor accidents.
- Know how to disconnect the power quickly to your RC car in case of an emergency.
Follow these safety tips to enjoy DIY RC cars responsibly. Prioritize safety to prevent accidents and ensure a great experience for all.
FAQs About DIY RC Car
Explore our faqs about DIY rc car to get answers on building, troubleshooting, and enhancing your remote control vehicle projects.
A DIY RC car typically consists of a chassis, motors, a drivetrain, a steering mechanism, batteries, and a remote control system. You may also include a lighting system and, of course, the wheels. Each part plays a specific role in the car’s operation, and understanding these basics is crucial for building and maintaining your RC car.
The motor is the heart of your RC car, and its choice will affect the vehicle’s speed and power. Brushed motors are more common and budget-friendly, while brushless motors offer higher efficiency and performance. Consider your needs: if you want speed, go for a brushless motor. For general use, a brushed motor might suffice.
Absolutely! Customizing the body of your RC car is one of the most enjoyable aspects of the DIY process. You can use materials like plastic, fiberglass, or even 3D-printed parts to design a body that reflects your style. Just make sure it’s lightweight and aerodynamic to enhance your car’s performance.
To ensure good performance, focus on fine-tuning your car’s suspension, gear ratios, and weight distribution. Test and adjust the steering and electronic speed controller (ESC) settings. Regular testing and refinement will help balance speed, stability, and control, leading to a well-performing RC car.
Regular maintenance is key to keeping your DIY RC car in top condition. Here are some tips:
Check and replace worn parts: Inspect your car for any signs of wear and replace the parts as necessary to prevent further damage.
Clean after each use: Dirt and debris can accumulate and affect performance, so clean your car after each run.
Proper lubrication: Use the right lubricants for gears and moving parts to reduce friction and wear.
Tighten loose parts: Regularly check for and tighten any loose screws or components to avoid loss or damage.
Protect electronics: Keep the electronic components clean and dry; use a moisture-resistant spray if necessary.
Battery care: Monitor the battery's health and charge it properly to ensure longevity and consistent power supply.
Adjust gear mesh: Make sure the gear mesh is not too tight or too loose for smooth operation.
Balance wheels and tires: Balanced wheels will improve handling and reduce strain on the motor.
Conclusion
In conclusion, building your own DIY RC car can be a fun and rewarding experience. It allows you to learn how to build a radio-controlled car from scratch, giving you a deeper understanding of how these machines work. Whether it's a passion project or a way to bond with your kids, this activity brings a lot of joy and learning opportunities. Plus, it is a great way to spend your leisure time productively.


