Ceiling cracks are a common issue in many homes, and they can be concerning for homeowners who notice them for the first time. Whether it’s a minor cosmetic blemish or a sign of a more serious structural problem, understanding the causes and potential solutions for ceiling cracks is crucial. I'll walk you through what you need to know about ceiling cracks, what could be causing them, and the best ways to address them to ensure the safety and integrity of your home.
Understanding Ceiling Cracks: What Causes Them?
Ceiling cracks can result from a variety of factors, ranging from natural settling to more severe structural issues. Here are some of the most common causes:
1. Settling of the House
One of the most common causes of ceiling cracks is the natural settling of a house over time. This is especially prevalent in older homes or homes built on expansive soil types like clay, which is common in regions like Texas. As the house settles, minor shifts in the foundation can cause the walls and ceilings to develop small cracks. This type of cracking is usually not a major concern unless the cracks continue to widen or appear suddenly.
2. Temperature and Humidity Changes
Significant temperature changes and humidity fluctuations can cause materials like wood and drywall to expand and contract. This expansion and contraction can lead to small cracks, especially in homes located in areas with extreme weather conditions. For instance, in hot climates like Texas, the heat can cause materials to dry out and contract, contributing to cracking over time.
3. Poor Quality Construction or Flipped Homes
If your home was recently renovated or "flipped," the quality of the workmanship could play a role in the appearance of ceiling cracks. Quick renovations sometimes lead to less attention to detail and poor structural adjustments, which can result in cracks appearing sooner than expected.
4. Structural Stress Points
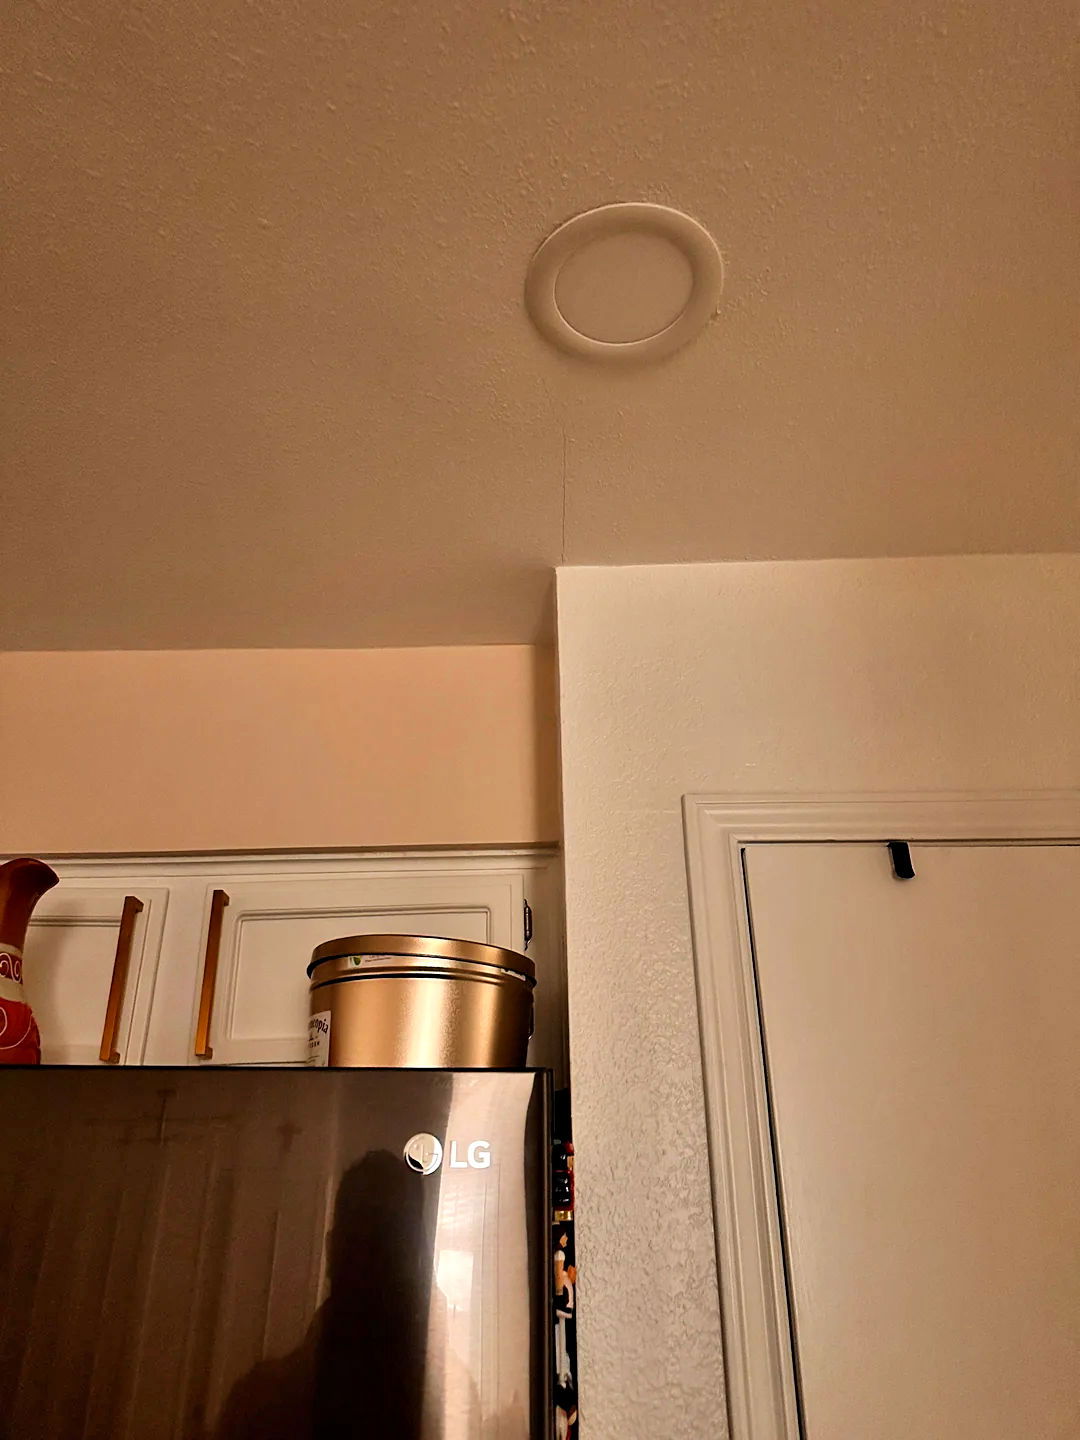
Ceiling cracks that appear at the junctions of walls, doorways, or windows are often due to stress points where different materials meet or where there is a change in structural dynamics. These types of cracks are typical and generally not a significant concern unless they rapidly increase in size.
5. Water Damage or Moisture Issues
Water damage from leaks, whether from a roof, plumbing, or condensation buildup, can lead to cracks in the ceiling. Water-soaked drywall or plaster becomes weak and can crack or even crumble. If you suspect water damage is causing your ceiling cracks, it's crucial to address the moisture issue promptly to prevent further damage.
6. Foundation Problems
In some cases, ceiling cracks can indicate more serious problems with the foundation of your home. Uneven foundation settling or foundation movement due to soil erosion, poor drainage, or significant weather events can cause cracks that extend from the ceiling down to the walls.
When Should You Worry About Ceiling Cracks?
While many ceiling cracks are harmless, certain signs can indicate a more serious issue. Here’s how to distinguish between minor and more concerning cracks:
1. Size and Location of the Crack
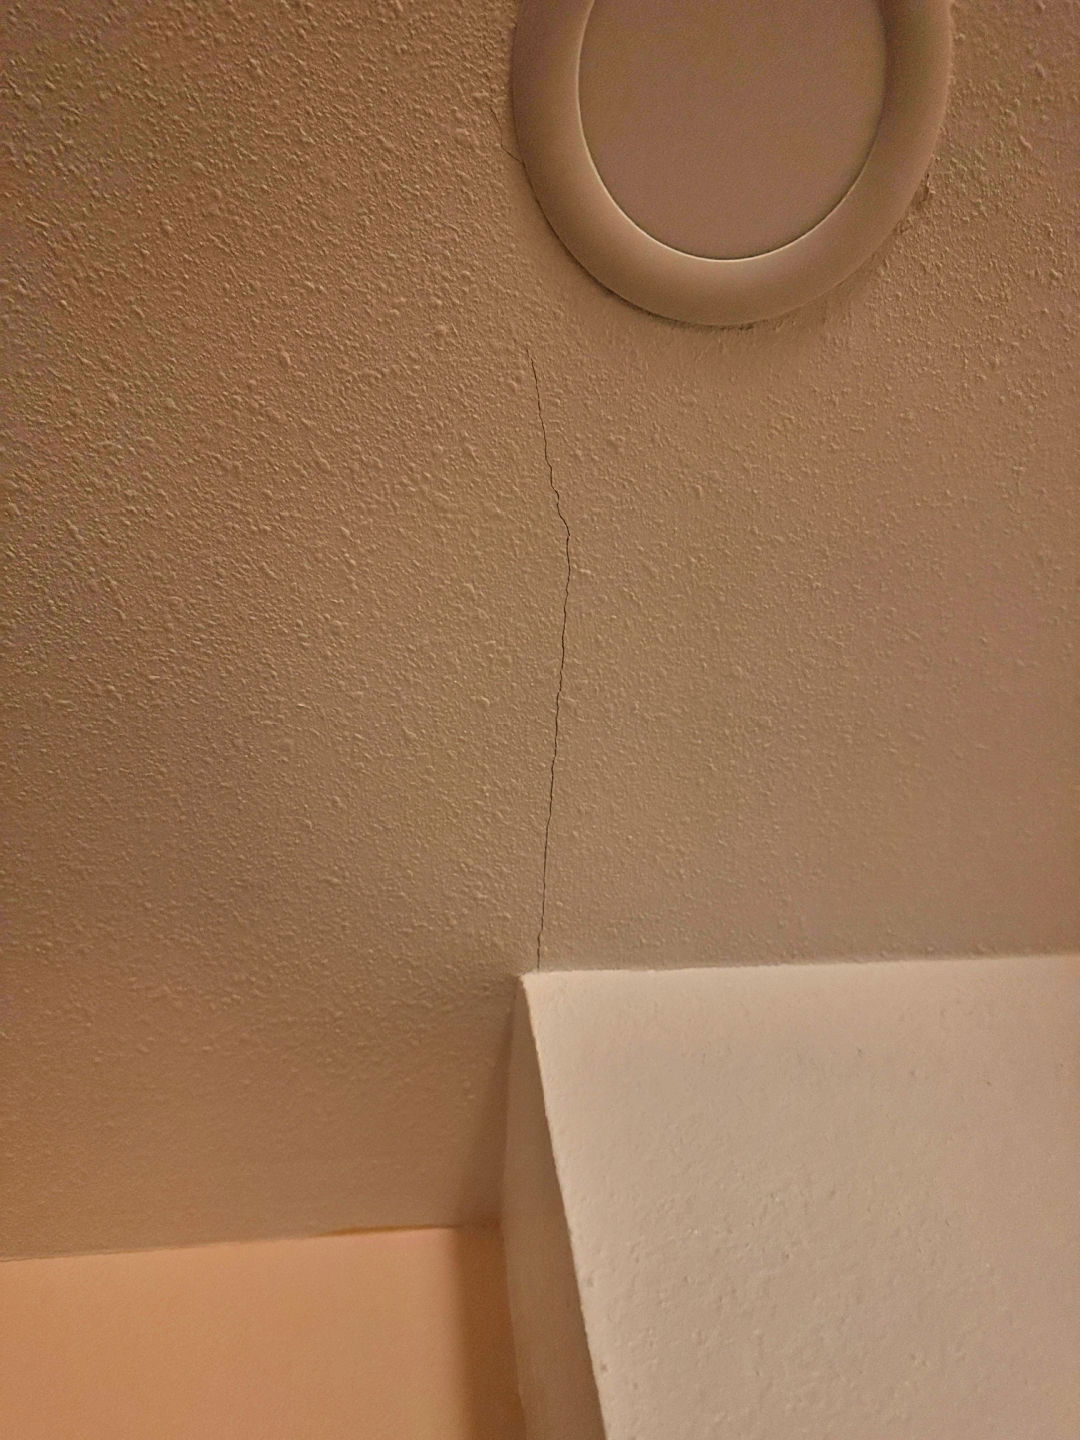
- Small, Hairline Cracks: Often due to settling or temperature changes, these are generally not a cause for concern.
- Wide Cracks (More Than 1/8 Inch Wide): Larger cracks, especially those more than 1/8 inch wide, may indicate a structural issue.
- Cracks at Corners or Along Stress Points: These are common in areas where different materials meet and are typically less concerning unless they continue to grow.
- Cracks in the Middle of Ceilings: Cracks away from corners and near the middle of a ceiling could suggest structural movement or roof issues.
2. Pattern and Shape
- Straight Cracks: Often related to drywall seams and usually less severe.
- Spiderweb or Network Cracks: These could suggest a more serious underlying issue such as a significant shift in the foundation or a water leak.
- Sagging or Bowing Cracks: If a ceiling crack is accompanied by sagging or bowing, this is a major red flag that should be addressed immediately.
3. Progression of Cracks
Cracks that are static and don’t change over time are typically not a serious concern. However, if you notice a crack growing or new cracks appearing, it may be time to consult a professional.
4. Signs of Water Damage
Staining, discoloration, or soft, spongy texture around the crack is a clear indication of water damage. In such cases, addressing the leak source should be the priority.
Solutions for Repairing Ceiling Cracks
Depending on the cause and severity of the crack, the solutions can range from simple DIY fixes to needing professional repair. Here are some common approaches:
1. Caulking Minor Settling Cracks
For small cracks caused by natural settling, caulking can be an effective solution. Here's how you can do it:
- Step 1: Clean the crack with a damp cloth to remove any dust.
- Step 2: Fill the crack with a flexible acrylic latex caulk, pressing it in with your finger.
- Step 3: Wipe away excess caulk with a damp cloth and allow it to dry.
- Step 4: Touch up with matching paint if necessary.
This method works well for minor cracks, and as mentioned in the DIY discussion, if the crack reappears, it could be an indication that more extensive repairs might be needed【4†source】.
2. Using Drywall Tape and Compound
For more significant or recurring cracks, especially those along seams or stress points, using drywall tape and compound can provide a more durable repair.
- Step 1: Widen the crack slightly with a utility knife or spatula to ensure the compound adheres properly.
- Step 2: Apply a layer of joint compound and press in a strip of drywall tape.
- Step 3: Cover the tape with another layer of compound and smooth it out.
- Step 4: Sand the area smooth once dry and apply paint to match the ceiling.
3. Addressing Water Damage Cracks
If water damage is suspected, it’s critical to find and repair the source of the leak before fixing the crack. Once the leak is resolved, the following steps can help repair the ceiling:
- Step 1: Cut out the damaged area of drywall.
- Step 2: Replace with new drywall and secure it with screws.
- Step 3: Tape and apply joint compound over the seams.
- Step 4: Sand smooth and repaint.
4. Foundation Repair for Structural Cracks
If the ceiling cracks are accompanied by other signs of foundation problems (such as cracks in walls or uneven floors), it’s crucial to consult a structural engineer or foundation specialist. Foundation repairs can range from installing piers to stabilize the foundation to more extensive work, depending on the severity of the issue.
5. Professional Assessment and Repair
If you're unsure about the severity of a crack or if DIY solutions don't seem to be working, it's always best to consult with a professional. A qualified contractor or structural engineer can assess the crack and recommend the appropriate action.
Preventing Ceiling Cracks: Maintenance Tips
While some ceiling cracks are inevitable, there are steps you can take to minimize their occurrence:
1. Monitor and Control Humidity Levels
Using dehumidifiers in humid climates or during rainy seasons can help reduce the risk of cracks caused by expansion and contraction of materials.
2. Regular Home Inspections
Routine inspections can help catch small issues before they become larger problems. Check for signs of water leaks, foundation movement, or other potential causes of structural stress.
3. Ensure Proper Drainage Around the Home
Good drainage is crucial to prevent water from accumulating around the foundation, which can lead to soil expansion and contraction, causing structural movement.
4. Address Foundation Issues Promptly
If there are any signs of foundation problems, addressing them early can help prevent more extensive damage, including ceiling cracks.
Conclusion
Ceiling cracks can be a source of worry for homeowners, but understanding the causes and knowing how to address them can help alleviate those concerns. While many cracks are minor and easily fixed, some may indicate more serious issues that require professional intervention. By keeping an eye on the condition of your ceilings and knowing when to take action, you can ensure the safety and longevity of your home.
FAQ on Ceiling Cracks: Additional Insights and Troubleshooting Tips
Discover expert tips for troubleshooting ceiling cracks. Learn insights on causes and effective solutions to repair and prevent them.
What should I do if a ceiling crack keeps reappearing after repairs?
If a crack reappears in the same spot after you've repaired it, it could be a sign that the underlying issue hasn't been resolved. Here are a few steps to take:
- Widen the Crack Slightly: Use a utility knife to widen the crack before applying a new repair. This ensures better adhesion of the repair materials.
- Use Drywall Tape and Compound: Apply drywall tape over the crack after the initial layer of joint compound. This method helps reinforce the area and prevents the crack from returning.
- Monitor for Further Movement: If the crack continues to reappear or grows wider, it may indicate a structural issue. At this point, consider consulting a structural engineer for a more in-depth assessment.
Are ceiling cracks in textured ceilings more challenging to repair?
Yes, repairing cracks in textured ceilings can be more challenging because the repair work needs to match the existing texture to be visually seamless. Here’s what you can do:
- Apply a Drywall Mesh Tape: First, reinforce the crack with mesh drywall tape to prevent it from reopening.
- Use a Textured Spray or Stipple Brush: After applying joint compound, use a stipple brush or a spray texture that matches your ceiling. This helps blend the repair with the existing ceiling texture.
- Practice on a Test Surface: If you’re unfamiliar with texturing techniques, practice on a piece of cardboard or scrap drywall before working on your ceiling to avoid mismatched textures.
When should I consider replacing part of the ceiling instead of patching cracks?
Consider replacing a portion of the ceiling rather than patching if:
- The Crack is Large or Widening Quickly: Large cracks, especially those that keep expanding, might indicate a structural problem that simple patching won’t resolve.
- There is Evidence of Water Damage: If the crack is associated with water stains, sagging, or soft spots, the ceiling material could be compromised. In this case, it's safer to remove the damaged section and replace it.
- The Ceiling Material is Old and Brittle: In older homes, plaster or drywall may have aged to the point of being too brittle to hold a patch effectively. Replacing the affected area can provide a more secure and long-lasting solution.
What are some signs that ceiling cracks might indicate a more serious structural issue?
While many ceiling cracks are harmless, certain signs suggest they could be indicative of a more serious problem:
- Cracks Accompanied by Sagging or Bowing: This is a strong indicator of a possible structural issue, such as a weakened ceiling joist or truss.
- Horizontal or Stair-Step Cracks: These types of cracks, especially if they continue down the wall from the ceiling, can suggest foundation movement or settling that needs professional attention.
- Multiple Cracks Appearing Suddenly: If you notice several new cracks forming within a short time, this could be a sign of shifting or settling that requires a thorough inspection.
How can I minimize the chances of ceiling cracks developing in the future?
Preventing ceiling cracks involves addressing potential causes before they lead to damage:
- Control Humidity and Temperature: Use dehumidifiers or air conditioning to maintain stable humidity levels, especially in regions with extreme weather conditions.
- Ensure Proper Insulation: Proper attic and wall insulation can prevent extreme temperature fluctuations that cause materials to expand and contract, leading to cracks.
- Monitor Structural Changes: If you’re planning any renovations or additions, make sure they’re done by qualified professionals who understand how changes can affect the overall structure of your home.
What are some quick DIY tips for minor ceiling cracks?
For small, non-structural cracks, a quick DIY approach can often be effective:
- Clean the Crack Area: Use a damp cloth to remove dust and debris from the crack.
- Fill with Flexible Caulk or Spackle: Apply a thin bead of flexible acrylic caulk or spackle, then smooth it out with your finger or a putty knife.
- Repaint as Needed: Once the filler is dry, touch up the area with matching ceiling paint for a seamless finish.
Is there a point when I should call a professional for ceiling crack repairs?
Yes, certain situations warrant professional inspection and repair:
- Cracks Larger Than 1/4 Inch: These may suggest a more significant issue that requires a structural evaluation.
- Cracks with Accompanying Structural Symptoms: Such as sticking doors, uneven floors, or cracked walls. These signs can point to foundation problems or significant structural shifts.
- Persistent Water Damage: If a crack is due to a leak, it’s essential to fix the underlying issue. Persistent moisture problems could lead to mold growth, which is a serious health hazard.
How can you identify the type of ceiling crack you have?
Ceiling cracks can vary significantly, and identifying the type can help determine if it's a cosmetic issue or a sign of something more serious:
- Hairline Cracks: These are thin cracks, usually less than 1/16 inch wide. They are often caused by minor settling or fluctuations in humidity and are typically not a structural concern.
- Straight Cracks in Drywall: These "cracks" are often due to the drywall tape pulling away when not enough drywall mud was used during installation. These are generally harmless but can be repaired for cosmetic purposes.
- Discolored Cracks: If a crack is discolored, this suggests moisture or water damage. It’s crucial to locate and repair the leak before addressing the crack itself.
- Large Cracks in the Center of the Ceiling: These cracks, especially when accompanied by sagging, are a clear sign of structural damage and could be due to heavy objects on the floor above, water damage, or foundation settlement.
- Cracks That Extend Down a Wall: If a ceiling crack continues down a wall, it usually indicates a structural issue, often related to foundation settlement.
What specific signs should prompt immediate concern regarding ceiling cracks?
If you observe any of the following signs, it's advisable to contact a foundation professional:
- Cracks Wider than 1/8 Inch: These are usually more than just cosmetic and could indicate structural issues.
- Multiple Small Cracks: Even if small, a large number of cracks could point to a bigger problem.
- Cracks Accompanied by Sagging or Separation Between the Ceiling and Walls: These signs are almost always indicative of serious structural issues like foundation movement.
- A Crack that Continues Across the Ceiling and Down a Wall: This type of crack is often associated with significant structural problems.
What additional precautions should homeowners take when ceiling cracks are noticed?
- Monitor for Changes: Regularly check the size and shape of the cracks. If they grow or change, it might indicate ongoing structural movement or another issue that needs attention.
- Look for Other Signs of Foundation Trouble: Uneven floors, sticking doors and windows, stair-step cracks in brickwork, or water in the basement are signs that there could be broader foundation problems affecting your ceiling.
- Consider Recent Environmental Changes: Earthquakes, heavy rains, or other natural events can impact a home's foundation, potentially leading to ceiling cracks.
When is professional intervention necessary?
A professional inspection is necessary if:
- You notice any signs of significant structural damage.
- Cracks are recurring after repairs.
- There is visible sagging in the ceiling.
- You observe related problems such as wall rotation, uneven floors, or separation between the wall and ceiling.
Are there specific repair methods for different types of ceiling cracks?
- Minor Cosmetic Cracks: Can often be addressed with simple spackling or caulk, followed by repainting. This is suitable for small hairline cracks or straight cracks caused by drywall tape separation.
- Structural Cracks: May require more extensive solutions like drywall replacement, use of mesh tape, or even underpinning if the foundation is involved. Underpinning involves extending the foundation depth to more stable soil to prevent further settlement.


