If you've ever looked at an unused or broken pool in your backyard and thought, "What else could this space become?" you're not alone. Recently, I decided to take on the challenge of transforming a dug-in pool on my deck into a cozy fire pit surrounded by new decking. This DIY Fire Pit project was more than just filling in a hole; it became a creative journey that involved carpentry, geometry, and a bit of problem-solving. Here's how I turned an 11-sided pool space into a unique fire pit and conversation area, step-by-step.
Why Convert a Pool to a Fire Pit?
Pools can be wonderful in the summer, but they also require maintenance, cleaning, and are often underutilized if you live in a colder climate. In my case, the pool was over 30 years old and no longer functional. Instead of letting this space go to waste or dealing with the costly repair or removal of the entire structure, I saw an opportunity to create a cozy fire pit area. This new setup would allow for year-round use, provide a great gathering spot for friends and family, and add a rustic, yet modern charm to my backyard.
Step 1: Removing the Old Pool
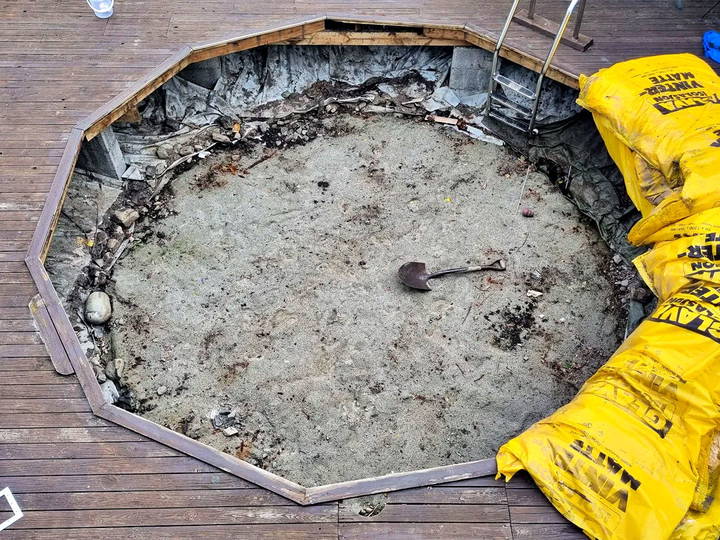
The first step was to remove the existing pool structure, which was dug into the ground and built into the deck. Once the pool was drained and removed, I was left with a space that was about 1 meter deep. One common concern is drainage, especially when dealing with an open pit in an outdoor environment. Fortunately, the drainage in this spot was already decent, and I noticed no water accumulation during rain. For those considering a similar project, it's vital to ensure proper drainage to prevent water from pooling under your new decking or fire pit area.
Step 2: Planning the New Layout
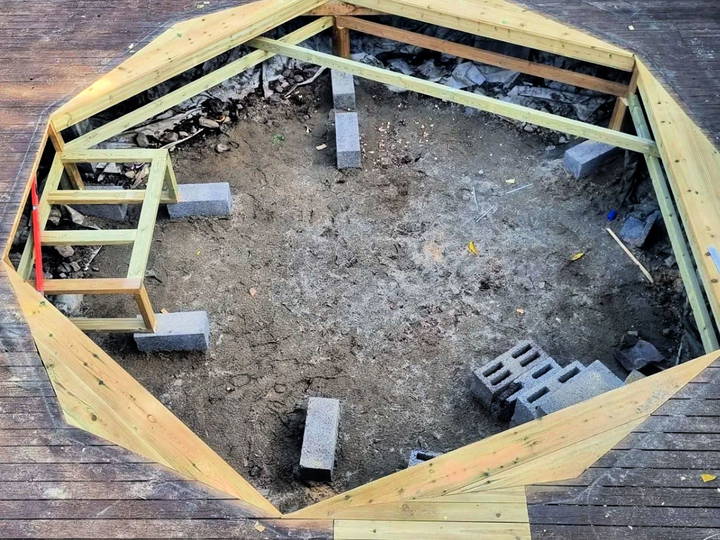
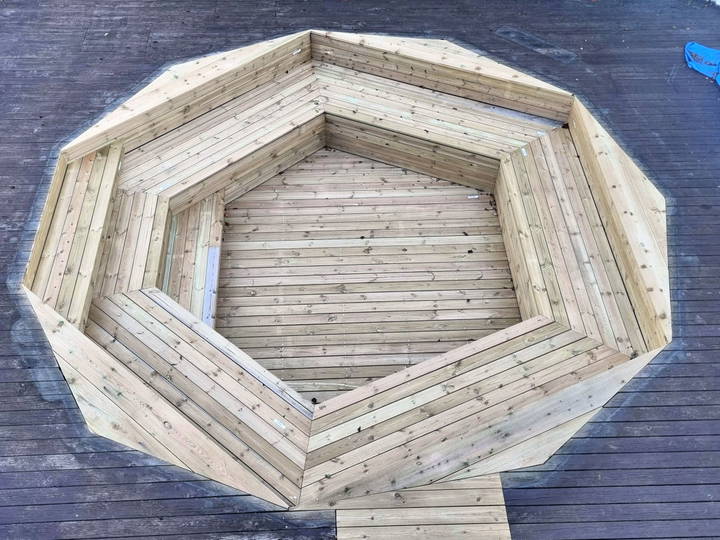
The original pool area was an 11-sided polygon, which presented a unique challenge. Rather than trying to fill in the space to make it a simple square or circle, I embraced the unusual shape. I decided to simplify the design into a "5+1" shape by using wide boards to cover the remaining sides, creating a more manageable and aesthetically pleasing layout. This approach saved me time and effort compared to attempting to construct a perfectly round or square space. For anyone attempting a similar project, remember: sometimes it's better to work with what you have than to force a new shape.
Step 3: Building the Frame and Adding Support
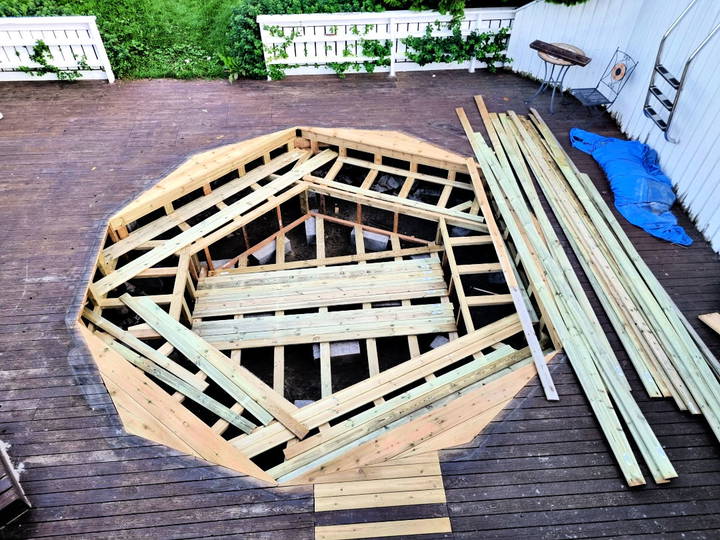
Once I had the design figured out, it was time to build the frame for the new deck area. I used lightweight expanded clay aggregate (LECA) blocks to raise the flooring by about 25 cm, which would provide a sturdy base for the new decking boards. These blocks were carefully leveled to ensure an even surface for the frame. Building the frame took careful measurement and alignment, especially since the shape was not a standard polygon. I constructed the frame piece by piece, making sure everything was secure and level.
Step 4: Installing the Decking Boards
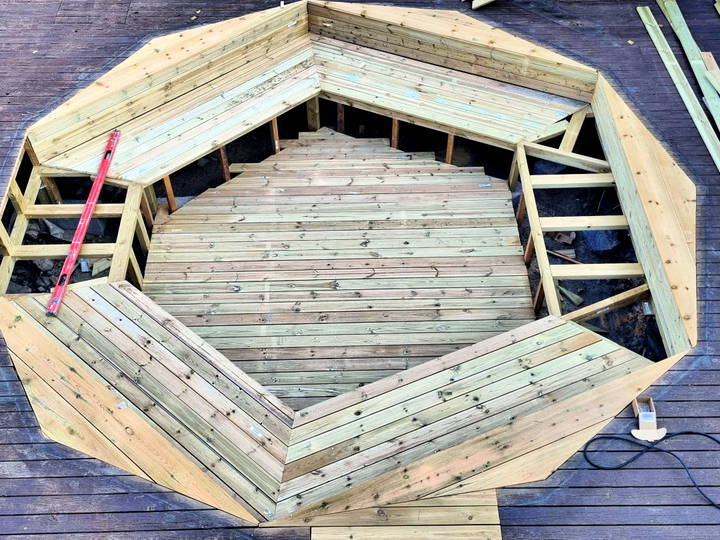
With the frame in place, it was time to lay down the decking boards. This process was probably the most labor-intensive part of the project. I started by laying down two sides of boards and then cutting them to fit using a circular saw. The remaining boards were cut and mitered to fit perfectly, a task that required precision and patience. Getting the angles just right was a challenge, especially given the unique shape of the space. I know that over time, the boards may shrink or expand depending on the weather, but that's part of working with natural materials like wood.
Step 5: Building the Stairs and Final Touches
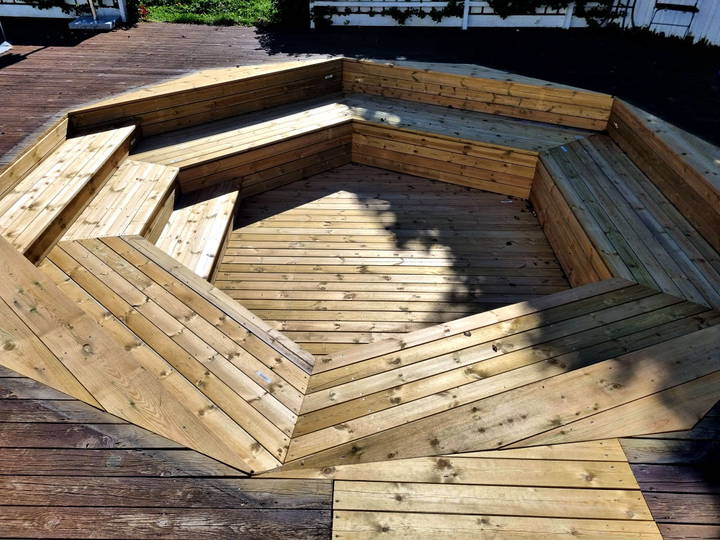
After the decking was in place, I built a set of stairs to provide easy access to the new fire pit area. One unique aspect of the stairs was the decision to make the lowest step removable. This allows me to easily sweep the floor and maintain cleanliness in the pit area. The steps weren't perfectly even—two of the lowest steps ended up being about an inch higher than the others. This was a deliberate choice to accommodate 40 cm high benches while still keeping the top step at a comfortable height.
Step 6: Adding the Fire Pit

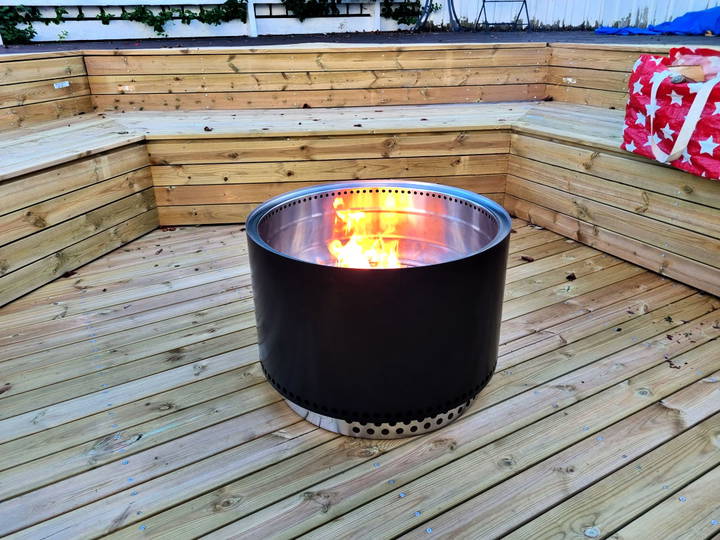
Finally, I added a Solo Stove fire pit to the center of the new space. These fire pits are designed to be safe on wooden decks, provided they are used with the appropriate stand, which keeps the base of the fire pit cool and prevents heat transfer to the wood. However, I still plan to add a layer of fire-resistant material, like pavers or fire bricks, under the stove for extra safety. It's always better to be safe than sorry, especially when dealing with fire on a wooden structure.
Addressing Safety Concerns
A significant topic of discussion around this project was safety. Several people raised valid concerns about the potential fire hazard of having a fire pit on a wooden deck. The key to mitigating these risks involves a few important precautions:
- Use a Fire Pit Stand: Make sure to use a stand or base that provides insulation between the fire pit and the deck. This prevents heat from directly contacting the wood.
- Add a Fire-Resistant Layer: Consider placing a layer of bricks, pavers, or fire-resistant mats under the fire pit. This not only adds another layer of protection but also keeps embers from damaging the wood.
- Keep a Fire Extinguisher Nearby: Always have a fire extinguisher readily accessible in case of emergencies.
- Monitor the Fire: Never leave the fire pit unattended, and ensure the fire is fully extinguished before leaving the area.
Conclusion: A Unique Backyard Transformation
Transforming an old, unused pool space into a functional and inviting fire pit area has been a rewarding project. Not only does it breathe new life into a previously underused part of the deck, but it also creates a cozy and unique gathering spot that can be enjoyed year-round. For anyone looking to tackle a similar project, the key takeaways are to plan carefully, embrace the unique aspects of your space, and always prioritize safety. With some creativity, effort, and attention to detail, you can turn even the quirkiest of spaces into a beautiful and functional part of your home.
Frequently Asked Questions (FAQ) About Converting a Pool to a Fire Pit with Deck
This FAQ section addresses common questions and concerns about converting an old pool space into a fire pit with decking.
What should I consider for drainage when converting a pool into a fire pit?
When converting a pool into a fire pit, ensuring proper drainage is crucial. In this project, the area where the pool was removed had good drainage, with no water accumulating during heavy rain. If you're dealing with a similar project, it's important to check the soil and ensure there's no pool liner left underneath that could trap water. Consider adding a layer of gravel or sand beneath the decking to improve drainage and prevent water from pooling around the fire pit area, especially in regions with heavy rainfall or snowmelt.
Why was an 11-sided polygon used, and how was it converted into a 5+1 shape?
The original pool space was an 11-sided polygon, which was created to fit a round pool more easily than cutting a perfect circle. After removing the pool, the decision was made to convert this irregular shape into a more manageable "5+1" layout using wide boards. This approach allowed for a simpler, more symmetrical design without the need for complex geometry. If you're working with a similarly unconventional shape, don't be afraid to simplify it into a more workable form by adding or removing sides as needed.
Is it safe to have a fire pit on a wooden deck?
Safety is a primary concern when placing a fire pit on a wooden deck. For this project, a Solo Stove was chosen because it is designed to be safe on wooden surfaces when used with its stand, which insulates the deck from heat. However, it's still recommended to add a layer of fire-resistant material, such as pavers, fire bricks, or lava rock, under the fire pit for extra protection. Always have a fire extinguisher nearby, and never leave the fire unattended. While many people safely use fire pits on decks worldwide, it's essential to follow all safety guidelines to prevent accidents.
How can I prevent the deck from sinking or shifting over time?
If the deck is built on blocks rather than permanent footings, there is a risk of sinking or shifting over time, especially in areas with loose or sandy soil. To mitigate this, ensure the ground is well-compacted and consider adding a base layer of gravel or sand to help distribute weight and improve stability. Alternatively, installing proper footings, such as push piers down to bedrock, can provide a more stable foundation. For those using blocks, it's advisable to regularly check for any signs of movement or instability and address them promptly.
What materials should I use to line the floor and walls of the fire pit area?
While wood was used for this project, it might not be the best choice for lining the floor and walls of a fire pit area due to its flammability. Consider using non-flammable materials like concrete, stone, or fire bricks to line the area. This will reduce the risk of fire and increase the longevity of the structure. Adding a layer of sand or gravel can also help with drainage and prevent moisture from collecting under the decking.
How do I handle the unevenness of steps or decking?
Uneven steps can be a concern for safety and comfort. In this project, the lowest step was made removable to facilitate cleaning, and there was a height discrepancy between steps to accommodate bench seating. If you encounter similar issues, consider adjusting the step heights to ensure they are as even as possible or adding visual cues, like reflective strips, to indicate step edges. This can help prevent accidents, especially at night or in low-light conditions.
Are there any local building codes or regulations to consider?
Yes, it is essential to check local building codes and regulations before starting a project like this. In some areas, there are strict rules about the distance required between a fire pit and any structure, such as fences or houses. Additionally, some regions may have rules against placing fire pits directly on wooden decks due to fire hazards. Always consult with local authorities or a professional to ensure your project complies with all safety and building regulations.
How can I enhance the comfort of a fire pit area on a wooden deck?
Wooden seating around a fire pit can be uncomfortable for long periods due to the lack of back support and cushioning. To enhance comfort, consider adding outdoor cushions or seat pillows. You can also design benches with built-in storage for these cushions. Including floor lighting or reflective strips can improve visibility around the fire pit area, making it safer and more inviting, especially at night.
What are the benefits of using a Solo Stove or similar fire pit in this setup?
Solo Stoves are a popular choice for wooden decks because they are engineered to be low-heat on the bottom and produce minimal smoke. They also come with a stand that insulates the deck from heat. For additional safety, you can use a fire shield top and cover, which helps contain embers and sparks. However, it's important to note that even with these features, using additional layers of protection like fire bricks or a fire-resistant mat is always a good practice.
How can I maintain the deck and fire pit area to ensure it lasts?
Regular maintenance is key to extending the life of your deck and fire pit area. This includes periodically cleaning the deck, especially the areas around the fire pit, to remove any debris or leaves that could catch fire. Treat the wood with weatherproof sealants to protect it from the elements. Also, check for any signs of wear or damage, such as cracks in the wood or shifting of the foundation blocks, and address them promptly to avoid larger issues down the line.


