Starting with curiosity, I wanted to make a DIY 3D scanner. The idea of scanning objects at home sounded exciting and accessible. I gathered simple materials like a camera, a turntable, and some software. It was fascinating knowing that I could make a high-tech gadget with everyday items. The best part was seeing it come together piece by piece.
With some patience, I followed a step-by-step guide. Connecting the camera to my computer was easy, and the software made it simple to capture and stitch images. Before I knew it, I had successfully scanned my first object. Achieving this milestone showed me that anyone can do it. I'm sharing this because I believe this guide will help you make one, too.
Introduction to 3D Scanning Technology
3D scanning is a transformative process that turns physical objects into precise digital models. This technology captures the shape and size of any object, building a digital blueprint that can be used for a variety of applications. Here's a simple breakdown of what 3D scanning is and how it works:
What is 3D Scanning?
At its core, 3D scanning is about capturing the physical world around us in a format we can manipulate and analyze digitally. It involves using devices called 3D scanners, which measure the distance and surface details of an object to make a digital copy, known as a 3D model.
How Does it Work?
3D scanners use different technologies, such as lasers or structured light, to bounce off the surface of an object. These reflections are then captured and used to calculate the object's dimensions. The data collected forms a point cloud, which is a collection of data points in space that represent the surface of the object.
Why is it Important?
3D scanning has revolutionized industries by providing a way to quickly and accurately capture the dimensions of complex shapes. This is crucial for tasks like quality control, reverse engineering, and digital archiving. It allows for precise measurements that would be difficult or impossible to obtain manually.
Accessibility and Evolution
The technology has evolved to become more user-friendly and accessible. Today, there are portable 3D scanners that can be used by anyone, from professionals to hobbyists. The market for 3D scanning is growing, with portable scanners leading the way due to their convenience and flexibility.
Applications of 3D Scanning
The applications are vast and varied. From building custom-fit prosthetics in medicine to preserving historical artifacts in digital form, 3D scanning serves many purposes. It's also used in entertainment to make special effects and in engineering to design parts that fit perfectly.
3D scanning is a strong tool that digitizes the physical world, impacting various fields by capturing detailed measurements. For engineers or DIY enthusiasts, it opens new innovation and creativity possibilities.
Materials You Will Need and Why
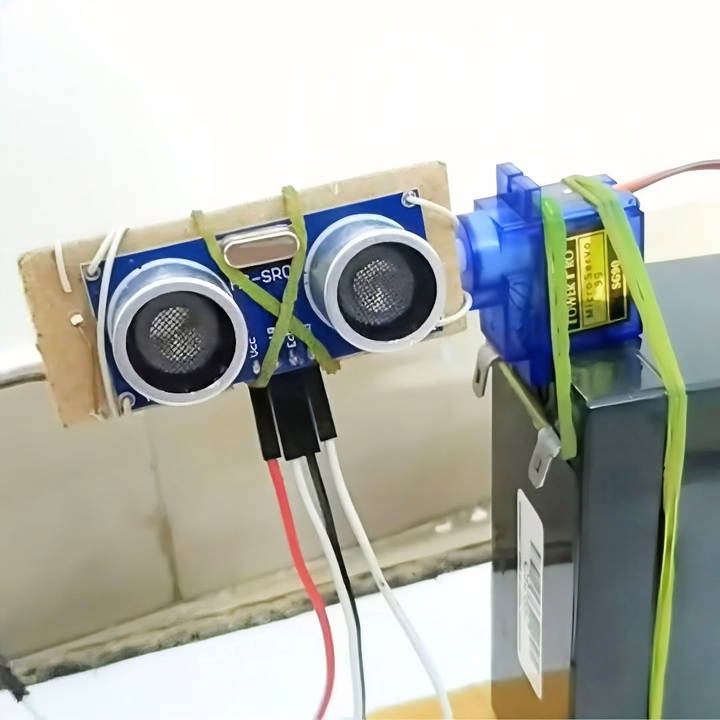
- HC-SR04 Ultrasonic Sensor: Essential for measuring distances by emitting ultrasonic waves.
- Servo Motor: Allows precise control over the orientation of the ultrasonic sensor.
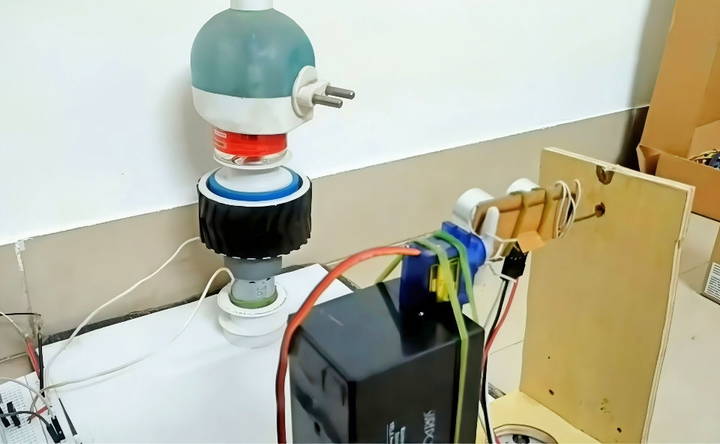
- DC Motor with a Gear and Worm Mechanism: This setup rotates the object gently, ensuring precision in scanning.
- Arduino: Acts as the brain of the operation, controlling the motors and reading sensor inputs.
- Python with Matplotlib: For processing the data collected and plotting it in 3D.
- Breadboard and Jumper Wires: For easy prototyping without soldering.
Each component is crucial for assembling a scanner that's both accurate and reliable.
Step by Step Instructions
Learn how to make a DIY 3d scanner with our step-by-step instructions on setting up the hardware, programming with arduino and python, and calibration.
Setting Up the Hardware
- Mount the HC-SR04 on the Servo Motor: This allows the sensor to scan from top to bottom or in any required orientation.
- Attach Your Object to the Gear: Powered by the DC motor, this gear will rotate the object.
- Connect Everything to the Arduino: Follow a basic circuit diagram to wire the motors and the sensor to your Arduino board.
Programming with Arduino and Python
Coding is where the magic happens. You'll need to upload a sketch to your Arduino to control the motors and read from the sensor. The servo rotates the sensor, taking measurements at several angles, while the DC motor gently rotates the object for a comprehensive scan.
In Python, use Matplotlib to process these readings and make a 3D plot. This involves translating cylindrical coordinates (collected from the scans) into Cartesian coordinates for visualization.
Calibration and Testing
Calibration is crucial:
- Ensure the ultrasonic sensor is accurately reading distances.
- Adjust the motor steps if the rotation is off.
- Test scanning simple objects first to simplify troubleshooting.
Overcoming Challenges
Tackle mechanical issues, ensure data accuracy, and optimize with software tweaks for seamless operations and efficiency.
Mechanical Issues
The initial setup had a significant flaw: the gear and worm mechanism was unreliable. Replacing the gear system with a more precise motor improved accuracy dramatically.
Data Accuracy
Initially, the 3D plots were far from perfect, with distorted lines and inaccurate shapes. This issue was mostly due to the imprecise rotation and inconsistent distance measurements. Refining the code for motor control and implementing more sophisticated data processing in Python helped improve the results.
Software Tweaks
The real breakthrough came with adjusting the Python script for data conversion. Recognizing the limits of cylindrical to Cartesian conversion clarified the need for precise angular measurements and consistent scanning intervals.
Software Options for DIY 3D Scanning
Choosing the right software for DIY 3D scanning is key. It converts raw data into 3D models. Here are some user-friendly options for all skill levels.
Skanect: A Budget-Friendly Choice
For those starting out or working within a tight budget, Skanect is a solid choice. It's compatible with both Windows and Mac and is known for its ease of use. While it may not boast the highest resolution, it's a great entry point for hobbyists, especially since it's free for non-commercial use. If you decide to go professional, the licensing cost is quite reasonable.
Meshroom: Open-Source and Powerful
Meshroom is a free, open-source option that runs on Windows and Linux. It's a step up from Skanect in terms of power and features, offering advanced editing and reconstruction capabilities. Although it has a steeper learning curve, once you get the hang of it, Meshroom can be a very precise tool for your projects.
ReconstructMe and Skanect: Open-Source Alternatives
Other open-source alternatives like ReconstructMe offer a range of features and are compatible with various hardware setups. These options are great for those who like to tinker and have the patience to delve into more technical aspects of 3D scanning.
3DF Zephyr and Autodesk ReCap: For the Pros
If you're looking for something more advanced, 3DF Zephyr and Autodesk ReCap are paid software that offer powerful tools for professional-grade work. They come with a higher price tag but provide the precision and features needed for complex projects.
Choosing the Right Software
Selecting the right software depends on your needs:
- If you're a beginner, start with something straightforward like Skanect.
- If you're comfortable with technology and want more control, consider Mushroom or ReconstructMe.
- For professional use, invest in software like 3DF Zephyr or Autodesk ReCap.
Find software that fits your project and tech comfort. The right choice can lead to impressive DIY 3D scanning results and creative possibilities.
Future of DIY 3D Scanning
The future of DIY 3D scanning looks bright and promising, with advancements making this technology more accessible and versatile than ever before. Here's what we can anticipate in the world of DIY 3D scanning:
- Increased Accuracy and Resolution As technology progresses, DIY 3D scanners are expected to achieve higher levels of accuracy and resolution. This means even hobbyists can produce scans that are close to professional quality, making DIY scanning a viable option for more precise applications.
- Affordability and Availability The cost of components required for DIY 3D scanning is dropping, making it more affordable for enthusiasts to build their own scanners. This trend is likely to continue, making 3D scanning technology available to a wider audience.
- Ease of Use With improvements in software and user interfaces, DIY 3D scanning will become even more user-friendly. Expect to see more intuitive software that simplifies the scanning process, making it easier for people without a technical background to make high-quality 3D models.
- Integration with Other Technologies DIY 3D scanners will increasingly integrate with other technologies such as virtual reality (VR) and augmented reality (AR), expanding their use cases. For instance, scanned objects could be directly imported into VR environments for immersive experiences.
- Community-Driven Innovation The DIY community plays a significant role in the evolution of 3D scanning. As more people share their designs and improvements, we'll see a surge in innovative solutions and customizations that cater to specific needs and challenges.
- Sustainability There's a growing focus on sustainability, and DIY 3D scanning aligns with this trend. By enabling the reuse and repurposing of existing objects through accurate scanning and printing, DIY 3D scanning supports eco-friendly practices.
The future of DIY 3D scanning is becoming more precise, affordable, and easy to use. Hobbyists and professionals are excited as DIY 3D scanning advances. The collaboration will push this technology forward, leading to innovative uses.
Troubleshooting
When diving into DIY 3D scanning, you might encounter some hiccups along the way. Don't worry; most issues have simple fixes. Here's a guide to help you troubleshoot common problems so you can get back to scanning in no time.
Inaccurate Scans
Sometimes, your 3D scans might not look quite right. This could be due to poor lighting or the object's reflective surfaces. To fix this, scan in a well-lit area and use a matte spray on shiny objects to reduce glare.
Missing Data
If parts of your object are missing from the scan, it might be because the scanner didn't capture all angles. Make sure to rotate the object or the scanner to cover all sides. For larger objects, take multiple scans and merge them.
Scanner Not Recognizing the Object
This can happen with objects that are too small or too large. Check your scanner's specifications for its optimal scanning size range. For small objects, consider using a macro lens, and for large objects, step back to capture the entire object.
Software Crashes or Freezes
Software issues can be frustrating. Ensure your computer meets the software's system requirements. Keep your software up to date, and if crashes persist, try reinstalling the software or seeking help from the community forums.
Distorted Geometry
Distortion can occur if the object moves during scanning. Secure the object in place, and if you're using a handheld scanner, try to keep your hand steady or use a tripod for stability.
Long Processing Times
3D scanning can be resource-intensive. If processing takes too long, try closing other programs to free up memory or consider upgrading your computer's hardware for better performance.
Difficulty with Complex Geometries
Complex shapes can be challenging. Use scanning spray for transparent or dark surfaces, and break down the scan into smaller sections to ensure all details are captured.
Keep these tips in mind to tackle DIY 3D scanning issues. Patience and practice are key. Each challenge boosts your experience and confidence.
FAQs About DIY 3D Scanner
Discover essential FAQs about DIY 3d scanners. Learn everything from components to step-by-step guides for your DIY 3d scanning projects.
A DIY 3D scanner is a device that you can build at home to make digital 3D models of physical objects. It works by using sensors, cameras, or lasers to capture the shape and appearance of an object from multiple angles, which is then processed by software to make a 3D representation.
Yes, you can! There are many resources and kits available that guide you through the process step-by-step. Some scanners are designed to be simple and use common household items, while others might require 3D printed parts and basic programming with components like Arduino.
While DIY 3D scanners can be quite accurate, they generally do not match the precision of high-end professional scanners. However, for many hobbyists and small projects, the accuracy of a DIY scanner is sufficient.
There are numerous online platforms like Instructables, where enthusiasts share their build guides and tips. Additionally, there are communities and forums dedicated to 3D scanning technology where you can seek advice and share your progress.
To ensure the best results from your DIY 3D scanner, follow these tips:
Calibrate your scanner carefully to ensure accuracy. This may involve adjusting the camera focus, laser alignment, and turntable speed.
Use consistent lighting to avoid shadows and reflections that can distort the scan.
Scan in a stable environment where vibrations and movements are minimal, as these can affect the scan quality.
For complex objects, consider using multiple scans from different angles and combine them for a complete 3D model.
After scanning, use software to clean up and refine the model. This might include smoothing surfaces, filling gaps, and correcting errors.
Final Thoughts
If I can make a DIY 3D scanner, you can too. Give it a try! This guide makes it easy and fun.


