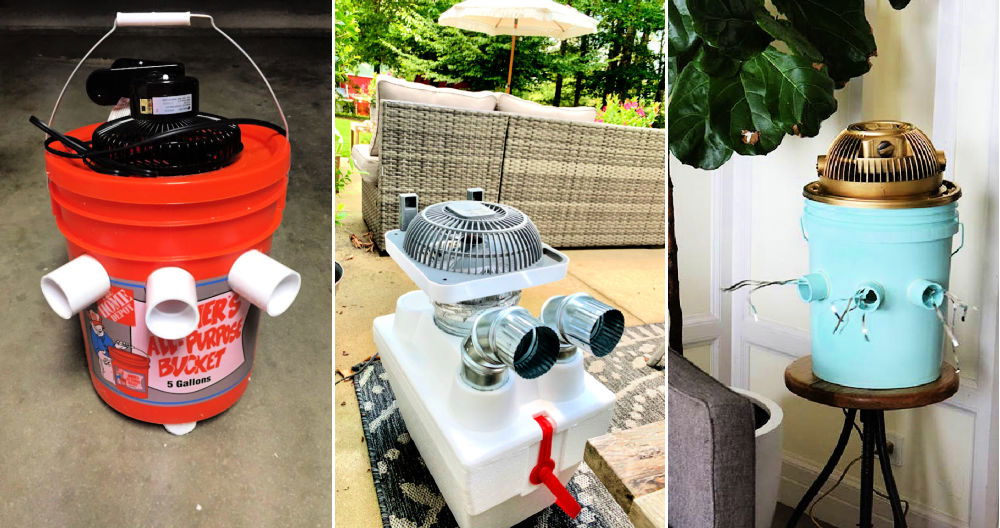
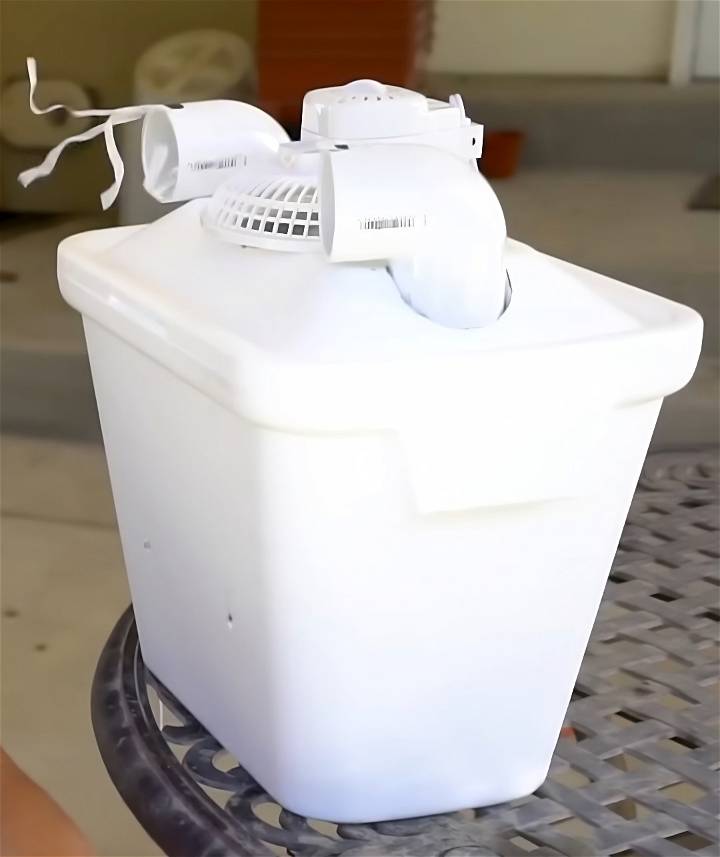
Living in a place where summer feels like being wrapped in a warm, wet blanket, air conditioning isn't a luxury; it's survival. But when my ancient air conditioner wheezed its last breath, the reality of buying a new one hit hard. That's when I came across a video by TKOR, showing a DIY air conditioner made from recycled styrofoam. Inspired, I decided to give it a shot.
Gathering Materials
The Essentials
- Styrofoam cooler: Easy to find and often lying unused in the garage.
- Fan: I had an old desk fan that hadn't seen much use.
- Two 2-inch PVC elbows: Instead of dryer vents, these were cheaper and readily available at the local hardware store.
Why Each Material Matters:
The styrofoam cooler acts as an insulated box, keeping the inside cold. The fan pushes warm air into the cooler, where it gets chilled by ice before being directed out by the PVC elbows. Simple, yet effective.
Step by Step Instructions
Make a simple DIY air conditioner with step-by-step instructions. Learn how to gather materials, prepare the fan, craft the cooler, and optimize performance.
Step 1: Preparing the Fan
First, I removed the fan's front grill and base, leaving only the essential parts. This modification allowed me to place the fan closer to the cooler, ensuring that no air escaped sideways.
Step 2: Crafting the Cooler
Cutting a hole in the cooler's lid just big enough for the fan took some patience. Ensuring the fan blades didn't scrape the sides was crucial. I then cut additional holes for the PVC elbows, ensuring they would direct the chilled air exactly where I needed.
Step 3: Ice, Ice, Baby
Following TKOR's guidance, I initially filled the cooler with frozen water bottles. This choice was practical—water bottles are reusable and don't make a watery mess as they thaw.
Testing the Setup
With bated breath, I switched on the fan. The device hummed to life, pushing air through the cooler and out the PVC elbows. It was working! The air felt noticeably cooler, a triumph affirmed by the drop in temperature on my thermometer.
Optimizing Performance
Satisfied but not yet content, I pondered how to enhance the design. I replaced the water bottles with ice cubes, increasing the surface area for heat exchange. The results were immediate; the air output was colder.
Further Tweaks for Efficiency
- ABS Tubing: I added lengths of ABS tubing to extend the PVC elbows to the cooler's base, forcing air to pass through more ice before exiting.
- Sink Mat Modification: A dollar store sink mat, trimmed to fit inside the cooler, held ice cubes above and below it, making a zig-zag pathway for the air and further cooling it before it left the cooler.
Energy Efficiency Tips for Your DIY Air Conditioner
Discover top tips for maximizing energy efficiency with your DIY air conditioner. From insulation to maintenance, optimize your system for optimal cooling.
1. Insulation Matters
- Insulate your DIY air conditioner to prevent cool air from escaping and warm air from entering. Use materials like foam board insulation or weatherstripping.
- Seal gaps around windows, doors, and any openings where air might leak. Even small gaps can significantly impact energy efficiency.
2. Optimal Placement
- Position your DIY air conditioner near a window or door. This allows it to expel hot air outside more effectively.
- Avoid placing it in direct sunlight or near heat sources (e.g., lamps, appliances) to prevent unnecessary strain on the cooling system.
3. Use Energy-Efficient Materials
- When building your air conditioner, choose materials that enhance energy efficiency:
- Reflective surfaces: Use reflective materials for the outer casing to bounce sunlight away.
- Low-emissivity (Low-E) film: Apply this film to the window side of your air conditioner to reduce heat transfer.
- High-efficiency fans: Opt for fans that move air efficiently without consuming excessive power.
4. Regular Maintenance
- Clean filters: Dirty filters reduce airflow and make the system work harder. Clean or replace filters regularly.
- Check for leaks: Inspect hoses, connections, and joints for leaks. Fix any issues promptly.
- Dust and debris: Keep the air intake and exhaust areas free from dust and debris. A clogged system is less efficient.
5. Temperature Settings
- Set your DIY air conditioner to a comfortable temperature. Lowering it excessively won't cool the room faster; it'll only strain the system.
- Consider using a smart thermostat to regulate temperature and save energy.
6. Nighttime Cooling
- Take advantage of cooler nighttime temperatures. Run your air conditioner during the night and turn it off during the day.
- Use a timer to automate this process.
7. Shade the Unit
- If possible, place your DIY air conditioner in a shaded area. Direct sunlight increases the workload.
- Consider using a temporary shade (e.g., an umbrella) during peak sunlight hours.
8. Size Matters
- Ensure your DIY air conditioner is appropriately sized for the room. An oversized unit wastes energy, while an undersized one struggles to cool effectively.
- Calculate the cooling capacity based on the room's square footage.
9. Avoid Overcooling Unoccupied Spaces
- Turn off the air conditioner when you're not in the room. There's no need to cool an empty space.
- Use zoning if possible—cool only the areas where people are present.
10. Long-Term Considerations
- If you plan to use your DIY air conditioner frequently, invest in a more efficient design or explore other cooling options.
- Regularly assess its performance and make adjustments as needed.
Remember, energy efficiency not only saves money but also benefits the environment. By following these tips, your DIY air conditioner will keep you cool without breaking the bank!
Optimal Temperature Settings for Your DIY Air Conditioner
Discover the best temperature settings for your DIY air conditioner. Learn how to optimize efficiency and save on energy costs with smart thermostats and zoning strategies.
1. Finding the Sweet Spot
- Comfort and Efficiency: Striking the right balance between comfort and energy efficiency is crucial. Set your DIY air conditioner to a temperature that keeps you comfortable without wasting energy.
- Recommended Range: Aim for a temperature range of 24°C to 26°C (75°F to 79°F) during the summer months. This range provides a pleasant indoor environment without overburdening your cooling system.
2. Avoid Extreme Settings
- Avoid Extreme Cold: Lowering the thermostat excessively won't cool your room faster. It only makes the air conditioner work harder and consumes more energy.
- Energy Savings: For every degree you raise the thermostat, you can save up to 3% on cooling costs. Consider this when adjusting the temperature.
3. Smart Thermostats
- Invest in a Smart Thermostat: If possible, upgrade to a smart thermostat. These devices allow you to program temperature settings based on your daily routine.
- Programmable Schedules: Set different temperatures for daytime, nighttime, and when you're away. For example:
- Daytime: Keep it cooler when you're active.
- Nighttime: Raise the temperature slightly during sleep hours.
- Away: Set a higher temperature when you're not at home.
4. Nighttime Cooling Strategies
- Nighttime Advantage: Nights are naturally cooler. Take advantage of this by running your air conditioner during the night and turning it off during the day.
- Timer Function: Use a timer to automate this process. Set it to turn off shortly after sunrise and back on before sunset.
5. Zoning Considerations
- Cool Only Where Needed: If your home has multiple rooms, consider zoning. Cool only the areas where people are present.
- Close Doors: Keep doors closed to prevent cool air from escaping into unoccupied rooms.
6. Long-Term Efficiency
- Regular Assessment: Periodically assess your DIY air conditioner's performance. Is it maintaining the desired comfort level? Adjust as needed.
- Maintenance: Regularly clean filters, check for leaks, and ensure proper airflow. A well-maintained system operates more efficiently.
Remember, finding the right temperature setting not only keeps you comfortable but also contributes to energy savings and a greener environment.

FAQs About DIY Air Conditioners
Get answers to all your questions about DIY air conditioners. Learn how to install, maintain, and troubleshoot your own unit at home.
1. What Is a DIY Air Conditioner?
- A DIY air conditioner is a homemade cooling device that you can build using simple materials. It's an affordable alternative to traditional air conditioning units. Let's dive into the details:
2. How Does a DIY Air Conditioner Work?
- A DIY air conditioner operates on the principle of evaporative cooling. Here's how it works:
- Evaporation: Water evaporates, absorbing heat from the surrounding air.
- Cooling Effect: As the water evaporates, it cools down the air passing through the system.
- Fan Circulation: A fan blows this cooled air into your living space.
3. What Materials Do I Need for a DIY Air Conditioner?
- To build a basic DIY air conditioner, gather the following materials:
- Styrofoam cooler or box: Acts as the housing for your system.
- Fan: To circulate air.
- Ice or frozen water bottles: Provides the cooling effect.
- PVC pipe or flexible tubing: Channels air from the fan to the ice.
- Power source: Battery-operated or plugged into an outlet.
4. Can I Use a DIY Air Conditioner in Any Room?
- Yes, you can use it in most rooms, but keep in mind:
- Room Size: DIY air conditioners work best in small to medium-sized rooms.
- Ventilation: Ensure proper ventilation to expel hot air generated during the cooling process.
5. How Do I Optimize Energy Efficiency?
- Follow these tips:
- Insulate: Seal gaps and insulate your DIY air conditioner to prevent air leaks.
- Optimal Placement: Position it near a window or door for efficient heat exchange.
- Energy-Efficient Materials: Use reflective surfaces and low-emissivity film.
- Regular Maintenance: Clean filters, check for leaks, and keep the system dust-free.
6. What Temperature Should I Set for Energy Savings?
- Aim for a temperature range of 24°C to 26°C (75°F to 79°F) during hot weather.
- Avoid extreme cold settings, as they strain the system and increase energy consumption.
7. Can I Use Smart Thermostats with a DIY Air Conditioner?
- Absolutely! Smart thermostats allow you to program temperature schedules. Set different temperatures for daytime, nighttime, and when you're away.
Remember, your DIY air conditioner provides relief during scorching days, and these FAQs will guide you in making an effective and efficient cooling solution!
Final Thoughts
For only $20 and a few hours of work, I now have an eco-friendly air conditioner made with creativity and necessity.
It won't replace a big air conditioner, but it is great for personal use. Also, it is a fun project promoting recycling and creativity.
So, if you're feeling the heat and looking for a project, why not try building your own recycled styrofoam air conditioner? It's a cool way to beat the heat, both literally and figuratively.


