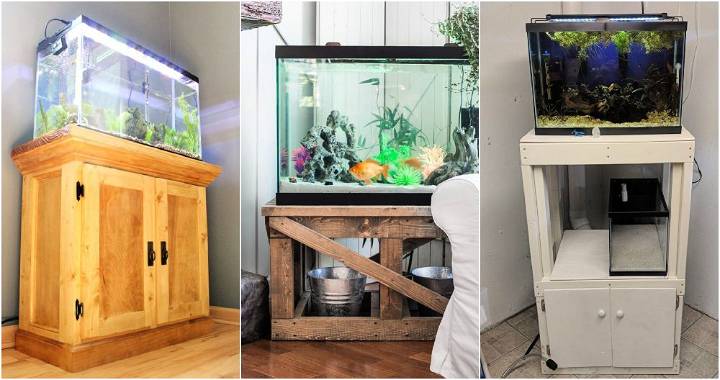
Making a DIY aquarium stand for your fish tank can be a rewarding project that enhances the beauty of your home. Building your own DIY fish tank stand gives you the freedom to design something that fits perfectly with your interior decor while also providing sturdy support for your aquarium. With the right materials and a simple plan, you can create a custom stand that not only looks great but also ensures your fish tank is safe and secure.
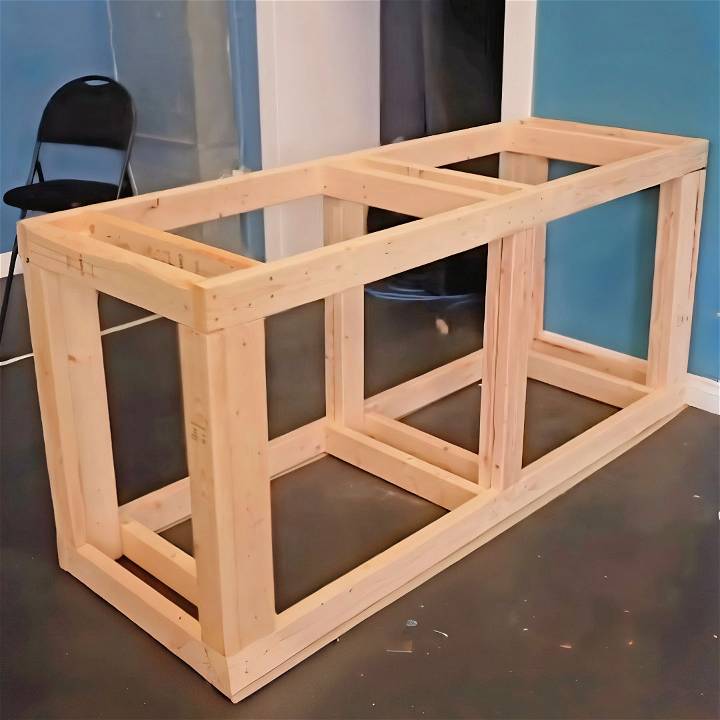
This guide is designed to help you through each step of constructing a DIY aquarium stand, from choosing the correct wood to assembling the pieces. You'll get helpful tips on how to measure your tank, select the right screws, and stain or paint your finished stand. By the end, you’ll have a strong, attractive base for your aquarium that you built yourself.
Introduction to Aquarium Stand Design Principles
When setting up a home for your aquatic friends, the stand you choose is just as important as the tank itself. A good stand is the foundation that supports your aquarium, ensuring it’s both safe and stylish. Let’s dive into the basics of aquarium stand design principles.
- Stability is Key: First and foremost, your stand must be stable. An unstable stand can lead to a disastrous spill, harming both your fish and your floors. Ensure the stand is level and can handle the weight of a full tank, which can be surprisingly heavy.
- Weight Matters: Speaking of weight, it’s crucial to understand how much your aquarium will weigh when filled with water, gravel, decorations, and, of course, your fish. A gallon of water weighs about 8.34 pounds, so even a small 10-gallon tank can weigh over 100 pounds when full. Your stand must be able to support this weight consistently over time.
- Material Choices: The materials you choose for your stand can affect both its look and longevity. Wood is a popular choice for its natural beauty and strength, but it must be treated to resist water damage. Metal stands, like those made from aluminum or stainless steel, offer durability and a modern look but can be more expensive.
- Aesthetic Appeal: Your stand should complement your home’s decor. Whether you prefer a sleek, modern design or a rustic wooden piece, the stand should enhance the beauty of your aquarium, not detract from it.
- Customization: Finally, consider a stand that can be customized to fit your space and needs. Adjustable shelves or removable panels can make maintenance easier and allow you to store all your aquarium supplies neatly.
Remembering these principles, your stand will safely hold your aquarium and enhance your home's charm.
Choosing the Right Materials
The choice of materials is crucial for the durability and functionality of your stand. Here's what you'll need and why:
- 2x4 Lumber: The backbone of your stand. I chose this for its strength and affordability. A 2x4 piece can support a significant amount of weight when positioned correctly, making it ideal for the frame of the aquarium stand.
- Screws: Specifically, #8, 2.5-inch wood screws. These are sturdy enough to hold the pieces together securely without being too long to poke through the other side.
- Plywood: For the top panel where the tank sits. Plywood is strong and provides a flat, stable surface for the aquarium.
- Styrofoam Padding: This is to be placed between the plywood and the tank. This helps distribute the weight evenly and prevent stress points that could crack the glass.
Step by Step Instructions
Build your own aquarium stand with our step-by-step instructions. Learn measuring, cutting, assembly, and finishing touches for a perfect DIY project.
Measuring and Cutting
- Determine the Stand Height: Consider how you'll be viewing your aquarium. Will you be standing or sitting most often? Where in your house will it go? The average height for stands is between 28-36 inches, but I opted for 32 inches for a comfortable viewing level.
- Calculate Wood Length: To minimize waste, calculate how many pieces you can get from each length of lumber. Remember, a 2x4 is actually 1.5x3.5 inches due to the way lumber is milled.
- Make Your Cuts: You need four main pieces for each stand - the length, width, uprights, and supports. Designating a specific measurement for each piece simplifies the process. For my project, the majority of waste was merely an inch offcut from each piece of lumber, optimizing my resources.
Assembly
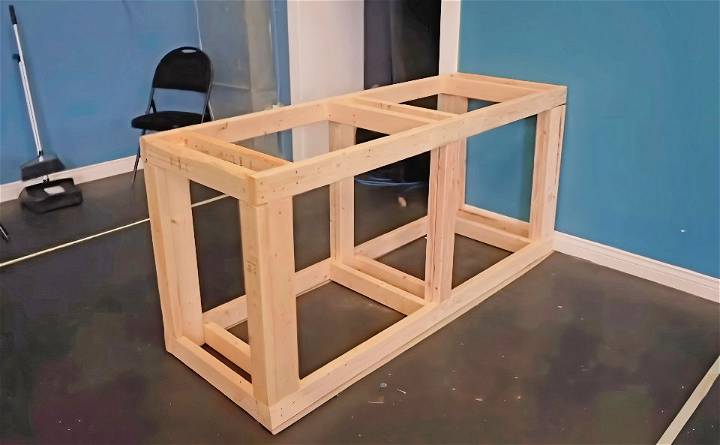
- Frame Construction: Begin by constructing the frame. Align your cut pieces according to the length and width of your aquarium stand. Use the screws to join these pieces, creating a rectangular frame.
- Adding Supports: Upright supports are vital. They dictate the stand's height and overall strength. Place them at the corners and, depending on the length of your stand, consider adding a middle support for extra stability.
- Cross Bracing: For additional sturdiness, add cross bracing between the uprights. This distributes the weight more evenly and adds rigidity to the structure.
- Top Panel: Attach the plywood top with screws, ensuring it's perfectly flush with the frame. This is where your aquarium will sit, so ensure it's secure and level.
- Styrofoam Padding: Finally, add the padding between the plywood and the bottom of the tank. This small step can prevent disaster by removing any minor imperfections in the wood that could crack the tank.
Finishing Touches
- Sanding: Smooth out any rough edges with sandpaper. Not only does this make the stand more visually appealing, but it also prevents splinters.
- Staining or Painting: Depending on your home decor, you might want to stain or paint your stand. This not only enhances its appearance but can also protect the wood.
- Waterproofing: Consider adding a waterproof sealant, especially around the top where water spills are likely. This can extend the life of your stand significantly.
The Importance of Safety
Throughout this process, always prioritize safety. Wear eye protection when cutting wood and ensure your workspace is well-ventilated, especially during staining or painting.
Troubleshooting Common Issues
Building a DIY aquarium stand can be a rewarding project, but sometimes, you might run into a few snags along the way. Here’s a straightforward guide to solving some common issues you may encounter.
- Wobbling Woes: If your stand wobbles, first check to make sure the floor is level. Use a carpenter’s level and adjust the feet of the stand if possible. If the stand itself is uneven, you may need to add shims under the legs until it’s stable.
- Weight Distribution Worries: Uneven weight distribution can stress the stand and the aquarium. Make sure the tank is centered on the stand and that the stand’s surface is flat. Reinforce any areas that seem to sag or bow under the tank’s weight.
- Moisture Matters: Water damage can weaken your stand over time. If you notice any moisture, dry it immediately. Consider applying a waterproof sealant to the stand’s surface and edges to prevent future issues.
- Material Mix-ups: Chose the wrong materials? If the wood is warping or the metal is corroding, it might be time to switch to more durable materials like treated lumber or stainless steel.
- Assembly Anxieties: If the stand doesn’t seem sturdy after assembly, double-check all connections. Tighten any loose screws and ensure that all joints are properly glued or welded.
- Door Dilemmas: Having trouble with doors or panels? Ensure hinges are properly aligned and lubricated. If they stick or won’t close, adjust the placement or consider replacing them with a better quality product.
By addressing these common issues, you’ll ensure your aquarium stand is both safe and functional. Taking the time to troubleshoot now can save you from bigger problems in the future.
Maintenance and Upkeep
Keeping your DIY aquarium stand in top condition is crucial for the safety of your aquatic setup. Regular maintenance not only extends the life of your stand but also ensures the well-being of your fish. Here’s how to keep your stand looking great and functioning perfectly.
- Regular Inspections: Every few months, give your stand a thorough check. Look for signs of wear and tear, such as cracks, warping, or loose screws. Tighten any loose parts and repair minor damages promptly.
- Keep It Dry: Water is the enemy of most standard materials. Wipe up spills immediately, and consider using a water-resistant mat under the aquarium to catch any drips.
- Avoid Overloading: Don’t treat the stand as a storage shelf for heavy items. Keep it clutter-free to ensure it’s not bearing more weight than it’s designed to handle.
- Easy Cleaning: Dust and clean your stand regularly. Use gentle cleaners that won’t damage the finish or material of the stand.
- Protect from Sunlight: If your stand is made of wood, prolonged exposure to sunlight can fade the color. Position it away from direct sunlight or use curtains to minimize exposure.
- Mind the Humidity: High humidity can affect the stand’s materials, especially wood. Maintain a stable environment with moderate humidity to prevent swelling or shrinking of the stand.
- Refresh the Finish: If the stand starts to look dull, consider refinishing it. A fresh coat of paint or sealant can do wonders for its appearance and protection.
By following these simple maintenance steps, you’ll ensure your DIY aquarium stand remains a sturdy and attractive base for your underwater world for years to come.
Safety Considerations
When crafting a DIY aquarium stand, safety is paramount. Not only for the well-being of your fish but also for everyone around the aquarium. Here’s a guide to ensure your stand is as safe as it is sturdy.
- Sturdy Construction: Start with a solid design that can bear the weight of a fully loaded tank. Use quality materials and secure joints to prevent any chance of collapse.
- Water Resistance: Since spills are inevitable, choose materials that are water-resistant or treat them to repel water. This will help prevent rot or rust.
- Child and Pet Proofing: If you have little ones or pets, design your stand with their safety in mind. Avoid sharp edges and use locks or safety straps to secure the tank.
- Electrical Safety: Keep all electrical cords from heaters, filters, and lights organized and away from water. Use drip loops and cover outlets with child-proof plugs.
- Proper Ventilation: Make sure your stand allows for adequate airflow to prevent moisture buildup, which could damage the stand or electrical components.
- Emergency Plan: Have a plan in case of leaks or spills. Keep towels and a siphon handy, and know how to quickly and safely drain your tank if needed.
Following these safety tips ensures a secure environment for your fish and peace of mind for you. Safety first for happy fish and a happy home.
FAQs About DIY Aquarium Stand
Explore faqs about DIY aquarium stand - find answers, tips, and advice for building and maintaining your own aquarium stand at home.
The size of your aquarium stand should be based on the dimensions of your tank. Ensure the stand is at least as long and wide as the tank’s base. For larger tanks, like a 55-gallon, you may need to reinforce the stand with additional supports to ensure stability.
Yes, many DIY plans include options for adding storage beneath the stand. This can be a great place to keep fish food, cleaning supplies, and other aquarium accessories. You can add doors to conceal the area, which can be both functional and aesthetically pleasing.
When building an aquarium stand, it’s crucial to ensure that it’s perfectly level to prevent stress on the aquarium glass. Additionally, the stand must be capable of supporting the full weight of the aquarium, which includes the weight of the water, substrate, decorations, and the tank itself. Always double-check the strength of your stand before placing the aquarium on it.
To protect your stand from water damage, you can seal the wood with a water-resistant finish like polyurethane or marine varnish. Make sure to apply the finish evenly and allow it to dry completely before placing your aquarium on the stand. It’s also a good idea to use materials that are less prone to water damage, such as pressure-treated wood or marine plywood.
The best way to level an aquarium stand is to use a spirit level during construction to ensure all parts are even. After the stand is built, place it in its final location and use adjustable feet or shims under the legs to make fine adjustments. This will ensure that the weight of the water is evenly distributed and reduce the risk of stress on the aquarium glass.
Conclusion
Wrapping up, building a DIY aquarium stand is a fantastic way to customize and perfect your fish tank base. With the right materials and some dedication, this project can be both rewarding and enjoyable. A DIY fish tank stand ensures your aquarium has a sturdy and stylish foundation tailored to your personal taste. Get started on your DIY aquarium stand today and enjoy the satisfaction of building something truly unique.


