The day I decided to build a DIY full-size arcade cabinet was one filled with excitement and a bit of trepidation. My love for arcade games and a desire to undertake a project that combined my passion for gaming with my budding woodworking skills led me to this moment. My goal was straightforward – to make an arcade cabinet that not only played like a dream but also looked the part, all while using the most basic tools available to me. Here's how I embarked on this challenging yet rewarding journey.
Why I Started This Project
The idea struck me when I stumbled upon an online video showcasing a DIY arcade cabinet. The notion of having my very own arcade machine, customized to my preferences and filled with all my favorite games, was too tantalizing to resist. Armed with enthusiasm but minimal experience in woodworking, I embarked on this project with three tools, a circular saw, a jigsaw, and a drill - affirming the belief that one doesn't need an extensive toolkit to bring their dream project to life.
Gathering Materials and Tools
The first step was to gather all necessary materials. I opted for three-quarter-inch MDF (Medium-Density Fibreboard) for its durability and ease of cutting. My shopping list included two and a half sheets of MDF, hardware like t-nuts, bolts, washers, and lock nuts, among other things. On the tool front, I challenged myself to utilize only the basics. Although a table saw or a band saw might have made the job easier, I was determined to prove that one could undertake and complete such a project with just handheld tools.
Design and Planning: Sketches to Templates
Transform sketches into templates with our design and planning guide for DIY arcade cabinets.
Translating Ideas into Sketches
With a clear vision in mind, I translated my ideas into sketches. The design phase was crucial. Beyond aesthetics, I had to ensure the cabinet would be functional and durable. Considering the dimensions, my primary constraint was that it needed to fit through a doorway – a practical detail that often gets overlooked until it's too late.
Building a Template
Deciding to build a full-size template was a turning point. Utilizing leftover half-inch MDF, I carefully cut out what would serve as the stencil for my arcade cabinet. This not only made the cutting process more accurate but also allowed me to visualize the cabinet's size and shape in real space, ensuring that my measurements were not just good on paper but feasible in reality.
Cutting and Assembling: Bringing the Cabinet to Life
Learn how to bring your DIY arcade cabinet to life by mastering the art of cutting and assembling MDF with accurate measurements.
Cutting the MDF
Using a circular saw guided by a straight edge, I began cutting the MDF according to my template. The jigsaw came in handy for the more intricate cuts, proving that with patience, one could achieve straight, clean cuts without the need for more sophisticated tools.
The Importance of Accurate Measurement and Assembly
Assembly required precision. Each section was measured and remeasured before being cut and attached. The use of blocking for support and the strategic placement of each component was planned meticulously. This was not just about building a structure but ensuring its stability and durability for years to come.
Finishing Touches: Customization and Personalization
Transform your DIY arcade cabinet into a one-of-a-kind masterpiece with our customization and personalization services.
Painting and Artwork
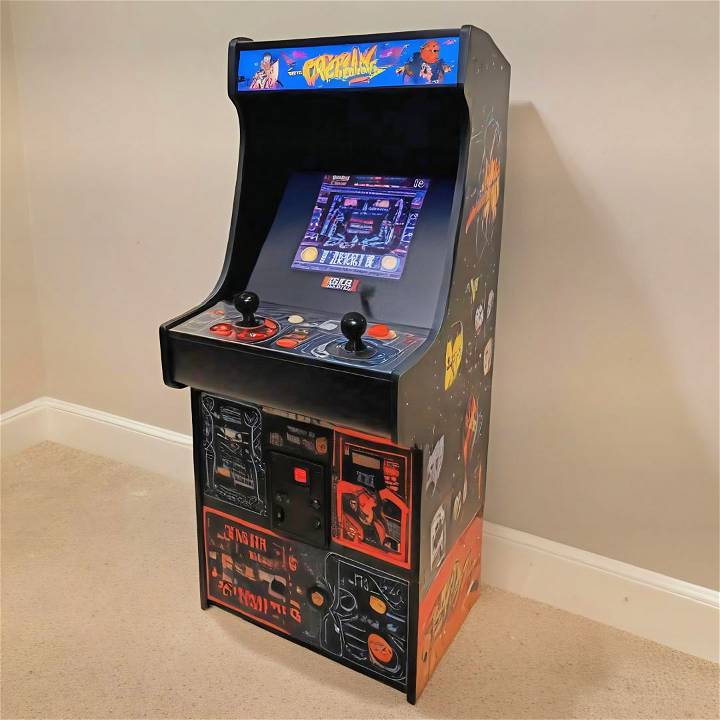
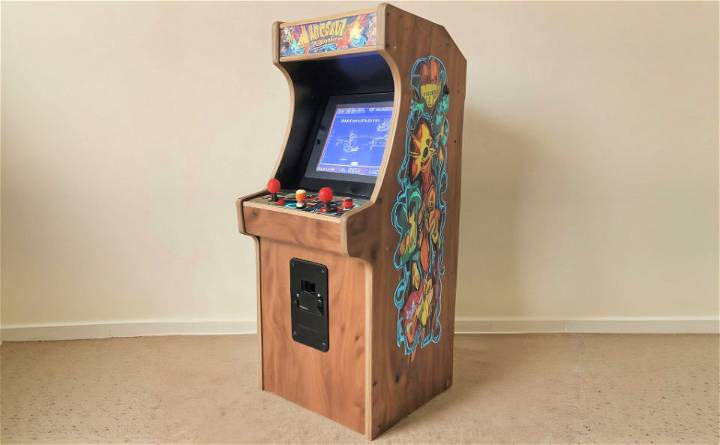
Painting was more than just an afterthought; it was an opportunity to give the cabinet character. Choosing a classic black and red theme, I applied several coats to achieve a professional finish. Adding custom vinyl stickers gave the cabinet a personal touch, reflecting my personal style and paying homage to the arcade machines of my youth.
The Final Assembly
The final assembly saw the installation of the electronic components, from the monitor to the sound system and the LED lights. Each addition brought the cabinet closer to its final form. The wiring required attention to detail, ensuring not just functionality but also safety.
Reflections: Challenges, Triumphs, and Lessons Learned for DIY Arcade Cabinet
Discover how to overcome challenges, celebrate triumphs, and learn valuable lessons in building your own DIY arcade cabinet.
Challenges Overcame
One of the biggest challenges was working with a limited set of tools. It taught me the value of ingenuity and patience. Additionally, the design phase presented its own set of challenges, from ensuring the cabinet's stability to incorporating all the features I desired within the constraints I had set for myself.
Triumphs
Completing the project was an immense triumph. What started as a sketch and a collection of materials had transformed into a fully functional arcade cabinet. Through this journey, I learned not only about woodworking and electronics but also about perseverance and the satisfaction of bringing a vision to life.
Lessons Learned
This project underscored the importance of thorough planning and preparation. However, it also taught me that flexibility and creativity are equally important. Challenges will arise, but with determination and a willingness to adapt, one can overcome them and achieve something truly rewarding.
Advice for Aspiring Builders
To anyone looking to embark on a similar project, my advice is simple:
- Plan thoroughly but be prepared to adapt.
- Don't be deterred by a lack of tools or experience.
- Enjoy the process. The challenges are part of the journey and make the completion all the more satisfying.
Building this arcade cabinet involved discovery, creativity, and success. It showcases what one can achieve with basic tools, a vision, and dedication.
Customization Ideas for Your Arcade Cabinet
Making a DIY arcade cabinet is not just about building a box to play games; it's about expressing your personality and reliving cherished memories. Customization is key to making your arcade cabinet uniquely yours. Here are some ideas to inspire your project:
- Design Your Marquee: The marquee is the light-up sign at the top of an arcade cabinet. Designing your own marquee can be a fun way to showcase the name of your arcade or your favorite game. Use bright colors and bold fonts to catch the eye.
- Choose Your Artwork: The side panels of your cabinet are a canvas for creativity. You can paint them, use decals, or even commission custom artwork. Classic arcade games often featured vibrant, action-packed illustrations, so feel free to be bold!
- Selecting Buttons and Joysticks: The controls are the heart of the gaming experience. You can find buttons and joysticks in various colors and styles. Some prefer the classic feel of concave buttons, while others might opt for LED-lit ones for a modern touch.
- Light It Up: LED strips can add a cool factor to your cabinet. Consider placing them under the control panel or around the marquee for a backlit effect. You can even program them to change colors or sync with the game's audio.
- Sound System: Good audio can make a big difference. Invest in quality speakers and consider where to place them for the best sound. Some builders even add a headphone jack for private gaming sessions.
- Screen Choices: The monitor is where the action happens. You can go for a modern LCD for its crisp image or an old-school CRT for authenticity. Make sure it's the right size for your cabinet and consider adding a protective plexiglass cover.
- Software Customization: The software interface, or ‘front end', is what you'll navigate to choose games. There are many options available that can be customized with themes, music, and preview videos.
- Comfort Matters: If you're going to spend hours playing, comfort is essential. Add a padded bar stool or an anti-fatigue mat to stand on. Ensure the controls are at a comfortable height and angle.
By customizing your arcade cabinet, you can make it a reflection of your style and a tribute to gaming's golden age. Just remember to have fun and build something you're proud of. Game on!
Troubleshooting Common Issues
When building a DIY arcade cabinet, you might run into a few snags along the way. Here's a helpful guide to troubleshoot some common issues you may encounter:
The Monitor Won't Display Anything
- Solution: Check all connections to ensure they're secure. If you're using a computer or Raspberry Pi, make sure it's powered on and the monitor is set to the correct input. If the problem persists, try using a different monitor to determine if the issue is with the display or the computer.
Buttons or Joysticks Aren't Responding
- Solution: First, check the wiring. Loose or incorrect connections are often the culprit. If the wiring is fine, test each button or joystick individually to identify if one is faulty.
The Sound Is Distorted or Nonexistent
- Solution: Verify that the audio cables are properly connected and the volume is turned up. If using a computer, check the sound settings to ensure the correct output device is selected. For persistent issues, try using external speakers to rule out internal speaker failure.
The Cabinet Is Unstable
- Solution: Stability issues usually stem from uneven legs or an uneven floor. Adjust the legs or add shims to level out the cabinet. If the entire structure wobbles, double-check that all screws and joints are tight.
The Arcade Cabinet Overheats
- Solution: Good ventilation is crucial. Make sure there's enough airflow around the electronic components. If necessary, install additional fans or vents to help dissipate heat.
Games Are Lagging or Crashing
- Solution: This can be due to insufficient hardware specs or software issues. Make sure your computer or Raspberry Pi meets the requirements for the games you're running. Update the software and drivers to the latest versions for optimal performance.
By being prepared to tackle these common problems, you'll ensure your arcade cabinet project is a success. Remember, patience and a methodical approach will help you overcome any challenge.
FAQs About DIY Arcade Cabinets
Discover all you need to know about DIY arcade cabinets in this comprehensive FAQ guide. Learn how to build your own and customize your gaming experience.
How can I design my arcade cabinet to fit my space?
Start by sketching out your design on paper. Consider the dimensions based on your available space and the size of the screen you plan to use. Plan the placement of the control panel, screen, and speakers. Make sure to leave enough room for comfortable play and movement around the cabinet.
Can I customize my arcade cabinet?
Absolutely! Customization is one of the joys of building your own arcade cabinet. You can choose your own artwork for the side panels, design a unique marquee, select different styles of buttons and joysticks, and even add LED lighting for a personalized touch.
How do I wire the controls for my arcade cabinet?
Carefully follow the instructions provided with your arcade kit to connect the buttons and joysticks to the encoder board. Then, connect the encoder board to your chosen game system or computer. Ensure all connections are secure and test them before finalizing the setup.
What should I do if I encounter problems with my arcade cabinet?
If you run into issues, start by checking all connections and ensuring that each component is properly installed. For specific problems like a non-responsive monitor or controls, troubleshoot by testing with alternative parts when possible. If the problem persists, seek advice from online forums or communities where experienced builders can offer guidance.
Conclusion:
In conclusion, building your own DIY arcade cabinet can be a fun and rewarding project for any gaming enthusiast. With the right tools and materials, you can build a custom gaming experience right in your own home. Happy gaming!


