Building a durable DIY archery target can be a rewarding project. I remember the first time I decided to make one in my backyard. It started with gathering materials like cardboard, old clothes, and a wooden frame. Making a homemade archery target allowed me to recycle and save money. With each step, my excitement grew, knowing it would soon be ready for use.
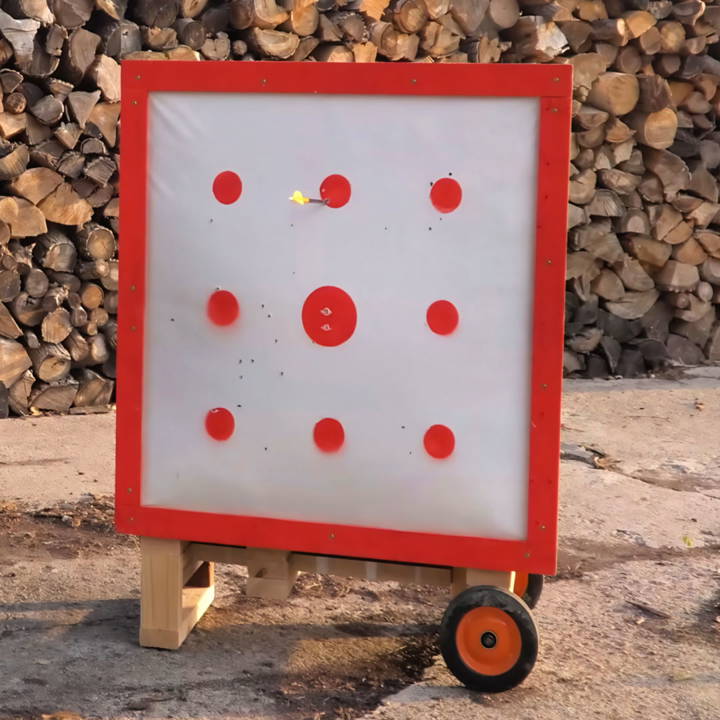
When it was finally done, I felt proud to see it stand firmly against my first shot. The satisfaction of hitting the target was immense. Making a DIY archery target not only gave me confidence in my skills but also provided a great way to practice regularly. This experience taught me that sometimes, a little effort and creativity could lead to impressive results. Now,
I'm helping with this: DIY archery target plans will guide and inspire you to start your own project.
Materials Needed and Why
- Four 2x4s: These form the frame of the target. They're sturdy and inexpensive, costing about $3.50 each.
- One 4x8 sheet of OSB or plywood: Used to wrap around the frame, making the body of the target. A sheet costs between $16 and $18.
- Screws: To assemble the frame and attach the sheeting. Self-tapping screws are easier to work with since they don't require pre-drilling.
- Vinyl Banner or Grain Sack: I used an old vinyl event banner for the target face. Materials with a weave pattern are ideal because they part around the arrow and seal back when pulled out.
All these materials combined cost around $35, which is quite affordable compared with the prices of larger archery targets in the market.
Tools Required
- Circular Saw: This is used to cut the 2x4s and the sheet material to size.
- Impact Driver: To drive the screws in and assemble the target.
Step by Step Instructions
Learn how to make a DIY archery target with our step-by-step guide. Perfect for archery enthusiasts looking for a budget-friendly solution.
Step 1: Cutting the Materials
Using the circular saw, I cut the 2x4s into lengths to make a 36-inch square frame. This included four pieces at 36 inches and four pieces at 33 inches (to account for the thickness of the 2x4s). Then, I cut the sheet material into panels to wrap around this frame – two at 36 inches and two at 37 inches.
Step 2: Assembling the Frame
Starting with the 2x4s, I attached the shorter pieces to the ends of the longer ones using the impact driver and screws. It didn't matter that the 2x4s were a bit warped; the sheeting pulled everything square enough. I repeated the assembly for the second frame.
Step 3: Attaching the Target Faces
The old vinyl banner was stretched and stapled to the frame. While I used a staple gun for convenience, screws could serve the same purpose. The key was to stretch the banner as tight as possible for durability.
Step 4: Wrapping the Frame with Sheeting
After attaching the target faces, I proceeded to wrap the sheet material around the frame, securing it with screws. This process involved a bit of wrestling due to the warps in the 2x4s, but it was manageable with some effort.
Step 5: Applying Protective Paint
I applied a thick layer of deck paint to the exterior surfaces of the OSB sheeting to enhance its durability. While OSB isn't known for its water resistance, painting helps it withstand elements better, prolonging the target's life.
Step 6: Filling the Target
I filled the target with pallet wrap and packed it tightly. This material is advantageous because it's lightweight, doesn't hold moisture, and stops arrows effectively. It's a superior option compared to heavier materials like wool or fabrics, which can retain water and potentially cause mold issues.
Final Touches
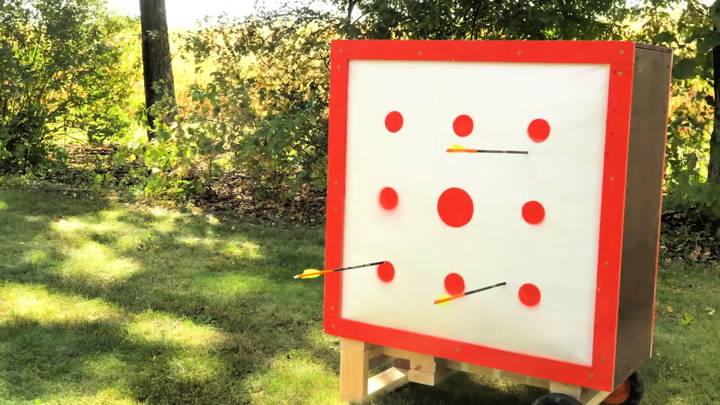
After stuffing, I sealed the target with the top sheet and added florescent orange painted strips around the edges as a "no shoot zone" indicator. This not only marked the areas to avoid shooting but also gave the target a professional look.
Customization Ideas for Your DIY Archery Target
Making a DIY archery target is not just about functionality; it's also an opportunity to add a personal touch. Here are some customization ideas to make your target unique and suited to your needs:
For Beginners:
- Color Coding: Paint the target in bright, contrasting colors to help with visibility and aim.
- Larger Bullseye: Make the center bullseye larger to provide a confidence boost for new archers.
For Intermediate Archers:
- Varying Circles: Add circles of different sizes to practice precision.
- Score Zones: Designate score zones with numbers to simulate a competitive environment.
For Advanced Archers:
- Smaller Targets: Incorporate smaller targets around the main bullseye to challenge accuracy.
- Moving Parts: Attach parts that can swing or move to mimic real-life hunting scenarios.
For Fun:
- Themed Designs: Paint targets to resemble animals or favorite characters for a fun twist.
- Light It Up: Add LED lights around the target for night-time practice sessions.
For Training:
- Distance Markers: Place markers at different distances to practice long-range shots.
- Wind Flags: Set up flags to gauge wind direction and speed, which affect arrow flight.
For the Environmentally Conscious:
- Recycled Materials: Use recycled foam or old clothes for the target stuffing.
- Biodegradable Paints: Choose biodegradable paints to decorate the target.
For Tech Enthusiasts:
- Electronic Scoring: Install sensors for automatic scoring.
- Camera Setup: Set up a camera to record and analyze shooting techniques.
The goal is to make a target that not only helps you improve your archery skills but also brings joy and satisfaction to the crafting process.
Advanced Techniques for Enhancing Your DIY Archery Target
When you've mastered the basics of archery and target-making, you might be looking for ways to challenge yourself further. Here are some advanced techniques to upgrade your DIY archery target:
Adjustable Tension System:
- Build a system that allows you to adjust the tension of the target face. This can simulate different types of games and improve your arrow-stopping power.
Variable Weather Conditions:
- Introduce elements that can mimic weather conditions, like a sprinkler for rain or a fan for wind, to practice in more challenging scenarios.
Rotating Target Faces:
- Install a rotating mechanism to change target faces quickly. This helps in practicing various shot placements without moving from your spot.
Elevation Changes:
- Build a platform with adjustable height to practice shooting at different angles and elevations, mimicking shooting from a tree stand or hill.
Sound Dampening:
- Use materials that reduce noise when the arrow hits, such as rubber layers, to practice stealth shooting.
Realistic Target Silhouettes:
- Cut out targets in the shape of game animals with vital organ markings to practice for hunting.
Integrated Scoring Technology:
- Incorporate a digital scoring system that can track where your arrows hit and provide instant feedback on your performance.
Reactive Targets:
- Design targets that move or react when hit, such as dropping down or releasing another target, to simulate live game reactions.
Using advanced techniques in your DIY archery target will enhance your skills and make practice more enjoyable. Always prioritize safety and ensure modifications don't compromise target integrity or user safety.
Safety Tips and Best Practices
When engaging in archery, whether as a sport or a hobby, safety is paramount. Here are some essential safety tips and best practices to ensure a secure environment for everyone involved:
Before You Start:
- Inspect Equipment: Always check your bow and arrows for any damage before use.
- Wear Protective Gear: Use arm guards and finger tabs to protect yourself from string snaps and arrow fletching.
Setting Up Your Target:
- Secure Location: Place your target in an area free from obstructions with a safe, ample backstop to catch any stray arrows.
- Stable Base: Ensure the target is stable and won't tip over or move upon arrow impact.
While Shooting:
- Clear Range: Make sure the area around and behind the target is clear before shooting.
- Follow Range Commands: If at a range, always follow the established start and stop shooting commands.
Arrow Handling:
- Carry with Care: When carrying arrows, hold them by the quiver or point them down to avoid injury.
- Retrieve Safely: Never run to retrieve arrows and ensure others have finished shooting before you do so.
General Conduct:
- Respectful Behavior: Treat fellow archers with respect and courtesy at all times.
- No Horseplay: Avoid any form of horseplay or rough behavior around the shooting area.
Teaching Beginners:
- Supervise Closely: Always supervise new archers closely until they demonstrate a clear understanding of safety procedures.
- Start with Basics: Begin with fundamental safety rules and proper handling before moving on to shooting.
Emergency Preparedness:
- First Aid Kit: Keep a first aid kit nearby in case of accidents.
- Know Emergency Procedures: Be aware of the procedures for handling emergencies, including how to contact medical personnel.
Follow these safety tips to ensure a safe and enjoyable archery experience, preventing accidents and injuries. Remember, safety is a shared responsibility.
FAQs About DIY Archery Target
Discover essential faqs about DIY archery target, including materials, construction tips, and safety guidelines. Perfect for archery enthusiasts.
The size of your target should be based on the distance you’ll be shooting from and the type of bow you’re using. A larger target is recommended for beginners or for longer distances, while a smaller target is suitable for experienced archers or short-range practice.
Yes, you can make a versatile target by using weather-resistant materials like marine-grade plywood for the frame and UV-resistant fabric for the cover. Ensure the stuffing material is also suitable for outdoor conditions.
Safety is paramount. Make sure your target is stable and won’t tip over. The materials should be dense enough to stop arrows without allowing them to pass through. Always place the target against a safe backdrop to catch any missed shots.
To maintain your DIY archery target, regularly check for wear and tear and replace materials as needed. If you're using foam or clothes, fluff them up to maintain density. For outdoor targets, cover them to protect from weather damage.
To increase the challenge, add smaller aiming points or vary the distances from which you shoot. You can also make 3D targets by shaping the foam or other materials into animal shapes or other figures to simulate hunting scenarios.
Conclusion
I encourage you to dive into this creative endeavor. Making a durable DIY archery target is simpler than you think and extremely rewarding. Plus, it offers a fantastic way to continually enhance your archery skills.


