Starting a DIY awning project can be exciting and rewarding. One summer, I decided to build my own awning for my backyard. I wanted a space where I could relax and enjoy without worrying about the sun. I read up on some basic instructions, gathered my materials, and got to work. The process was straightforward, and I loved seeing the progress as I went along.
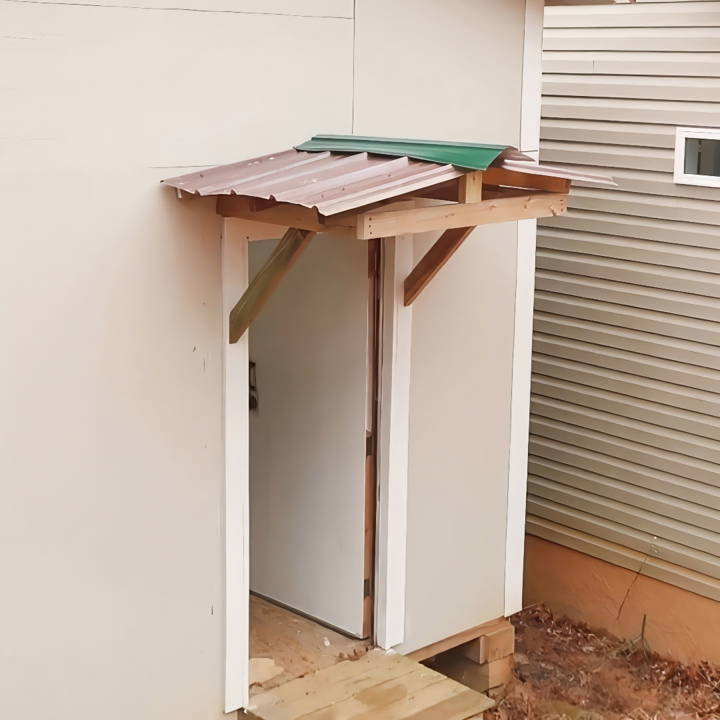
Building an awning gave me a sense of accomplishment. I chose sturdy wood for the frame and a durable fabric for the cover. Each step, from measuring the space to assembling the materials, was a learning experience. Now, whenever I sit under my awning, I feel proud that I built it myself. I'm sharing this to help and inspire you to start your own project.
Why an Awning?
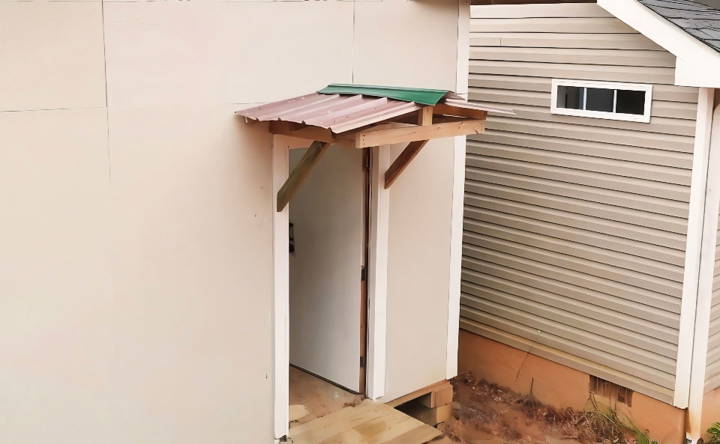
My workshop's backdoor was constantly under siege from rain, sometimes accompanied by a slight wind, making the interior susceptible to water damage. An awning seemed like the most straightforward solution to protect the door and, by extension, the interior of my workshop.
Materials Needed and Their Purpose
- Wood Boards: Used for the frame of the awning. The dimensions will vary based on your specific project needs. In my case, I used two 44-inch boards for the horizontal parts and three 32.5-inch boards for the vertical supports.
- Lag Screws: For securely attaching the frame to the wall. Their length and thickness ensure the frame holds up against weather conditions.
- Metal Roofing: This serves as the actual cover of the awning, providing the necessary protection from rain and snow.
- Basic Tools: Drill, saw, angle grinder for cutting metal roofing, and a level. Each tool has its unique role from cutting the wood and metal to ensuring the structure is evenly balanced.
Step by Step Instructions
Learn the step-by-step instructions for a DIY door awning, from planning and measurements to installing the metal roofing and final adjustments.
1. Planning and Measurements
Every project starts with a solid plan. I measured the door and the space above it to decide on the dimensions of the awning. Sketching a rough outline helped visualize the final structure.
2. Cutting and Assembling the Frame
I cut the wood according to the measurements - two boards at 44 inches and three at 32.5 inches. Assembling the frame was straightforward. I started by making a rectangular frame that would serve as the base of the awning, then added additional supports where necessary.
3. Attaching the Frame to the Wall
Using lag screws, I secured the frame to the wall above the backdoor. I cannot stress the importance of pre-drilling enough, as it significantly reduces the risk of splitting the wood. Positioning and leveling took a bit of patience, especially doing it solo, but it was crucial for the overall stability of the awning.
4. Adding Support Beams
To ensure the awning could support the weight of snow or heavy rain, I added diagonal support beams. These beams also added to the aesthetic, giving it a more finished look.
5. Installing the Metal Roofing
Cutting the metal roofing required an angle grinder. Remember, safety gear is non-negotiable here. I measured and cut the metal, then secured it to the top of the frame, confirming it was properly sloped for water runoff.
6. Final Adjustments and Additions
After installing the roofing, I examined the structure for any gaps where water might seep through and added extra seals where necessary. A slight adjustment to ensure the awning was perfectly level made a huge difference in its appearance and function.
Design Customization
When it comes to making a DIY door awning, one of the most exciting aspects is the ability to tailor the design to your personal taste and the architectural style of your home. Here's how you can approach the customization of your door awning design:
Choose a Style That Complements Your Home
- Traditional homes often pair well with classic awning styles featuring stripes or solid colors.
- Modern homes may suit sleek, minimalist awnings with sharp angles and neutral colors.
- Cottage-style homes can be enhanced with awnings that have soft curves and bright, welcoming colors.
Select Materials That Reflect Your Aesthetic
- Wooden awnings provide a natural, rustic look and can be painted or stained to match your home.
- Metal awnings, like those made from aluminum or copper, offer a durable and contemporary appearance.
- Fabric awnings allow for a wide range of colors and patterns, giving you the flexibility to change the look seasonally.
Incorporate Decorative Elements
- Add decorative brackets or scrollwork to wooden or metal awnings for an extra touch of elegance.
- Consider using contrasting trim on fabric awnings to outline the shape and add visual interest.
Ensure Functionality Meets Design
- Make sure the awning size provides adequate coverage for your doorway, without overwhelming the entrance.
- If your area receives heavy snow or rain, design the awning with a steep enough slope to prevent accumulation.
Think About Lighting
- Integrate LED strip lights underneath the awning for a warm, inviting glow in the evening.
- Solar-powered lights can be an eco-friendly option, adding both functionality and ambiance.
Designing a practical and stylish door awning enhances curb appeal and offers shelter, welcoming you and your guests for years.
Troubleshooting Common Issues
When embarking on a DIY door awning project, you might encounter a few hiccups along the way. Here's a guide to help you troubleshoot some common issues:
Sagging Awning
- Cause: Inadequate tension or weak support structure.
- Fix: Tighten any loose fittings and ensure the frame is robust enough to support the awning material.
Damaged Fabric
- Cause: Wear and tear, weather damage, or accidental punctures.
- Fix: Patch small tears with repair tape or replace the fabric if the damage is extensive.
Mechanical Problems
- Cause: Faulty retractable mechanisms or jammed parts.
- Fix: Lubricate moving parts and check for obstructions. If the mechanism is broken, consult the manufacturer's guide or seek professional help.
Environmental Damage
- Cause: Harsh weather conditions like strong winds or heavy snowfall.
- Fix: Install awning guards and remove any accumulated debris or snow to prevent structural damage.
Aging Material
- Cause: Long-term exposure to the elements.
- Fix: Regular maintenance and timely replacement of materials can extend the life of your awning.
Incorrect Installation
- Cause: Not following installation instructions or improper measurements.
- Fix: Double-check the manufacturer's guidelines and ensure all measurements are precise before cutting or assembling.
Water Pooling
- Cause: Insufficient slope or poor drainage design.
- Fix: Adjust the slope to allow water runoff and consider adding grommets for better drainage.
Prepare for common problems to keep your DIY door awning functional and beautiful long-term. Regular inspections and maintenance prevent most issues.
Legal and Safety Guidelines
When you decide to add a DIY door awning to your home, it's not just about picking the right materials or following the building instructions. It's also crucial to ensure that you're in line with local laws and safety standards. Here's what you need to know:
Check Local Building Codes
- Before you start, check with your local building authority. Some areas require permits for construction, even for something as simple as an awning.
- There may be specific rules about the size, placement, or materials you can use, so it's best to find out before you begin.
Understand the Safety Requirements
- Safety is paramount. Make sure you're using the right tools and equipment, and always wear protective gear like gloves and safety glasses.
- If you're not experienced with power tools or construction, consider getting help from someone who is.
Consider the Weather
- Your awning should be built to withstand local weather conditions. In areas with heavy snow, for example, the awning must be strong enough to support the weight.
- Think about wind, too. Securely fasten your awning so it won't become a hazard in strong gusts.
Respect Your Neighbors
- Make sure your awning doesn't encroach on your neighbor's property or block their view. It's not just polite; it's often a legal requirement.
Plan for Accessibility
- Your awning shouldn't make it difficult for people to access your home. Keep pathways clear and consider the needs of all visitors, including those with disabilities.
Follow these guidelines to ensure your DIY door awning is safe, legal, and community-respectful. When in doubt, ask local authorities or a professional for guidance.
FAQs About DIY Door Awning
Discover answers to common questions about DIY door awning projects, including installation tips, material choices, and maintenance advice.
Measure the width of your door and decide how much coverage you want. The awning should extend at least a few inches beyond each side of the door frame for effective protection and aesthetics. The projection (how far it extends outward) should be sufficient to shield the doorway from rain and sun, typically around 30-40 inches.
Yes, you can! There are many simple designs available that require minimal tools and skills. For example, a simple porch awning can be made using pallet wood for the frame and a piece of scrap material for the roof. There are also step-by-step guides available that can walk you through the process.
For robust weather protection, consider using materials like corrugated metal or thick, waterproof fabric. These materials are durable and provide excellent resistance to rain, snow, and sun. A corrugated metal awning is a great choice for its longevity and ease of construction.
Maintenance depends on the materials used. For fabric awnings, regular cleaning and reproofing with a waterproofing agent are recommended. Metal and PVC awnings should be checked periodically for rust or damage and cleaned with mild soap and water. Ensure all connections and mounts are secure and tighten any loose hardware.
To ensure your DIY door awning is securely attached:
Identify the type of wall: Different materials require different fasteners. For brick, use masonry anchors; for wood, use screws that penetrate into studs.
Use appropriate fasteners: Select anchors or screws that are suitable for the weight of your awning and the wall material.
Follow a pattern: Space your fasteners evenly to distribute the load and prevent sagging or pulling away from the wall.
Check for stability: After installation, gently test the awning for any movement. If it shifts, reinforce the attachments where needed.
Conclusion
I'm helping with this guide to ensure you can confidently build a DIY awning. With the steps and tips provided, you'll find it straightforward. Take the first step and enjoy making a personalized space in your home.


