Making things for my baby brings me joy. One day, I decided to make a homemade baby mobile. It seemed like a special way to decorate the nursery. I gathered some felt, string, and an embroidery hoop. It took a few hours, but I loved every minute. The mobile was colorful and cheerful, perfect for my little one's room.
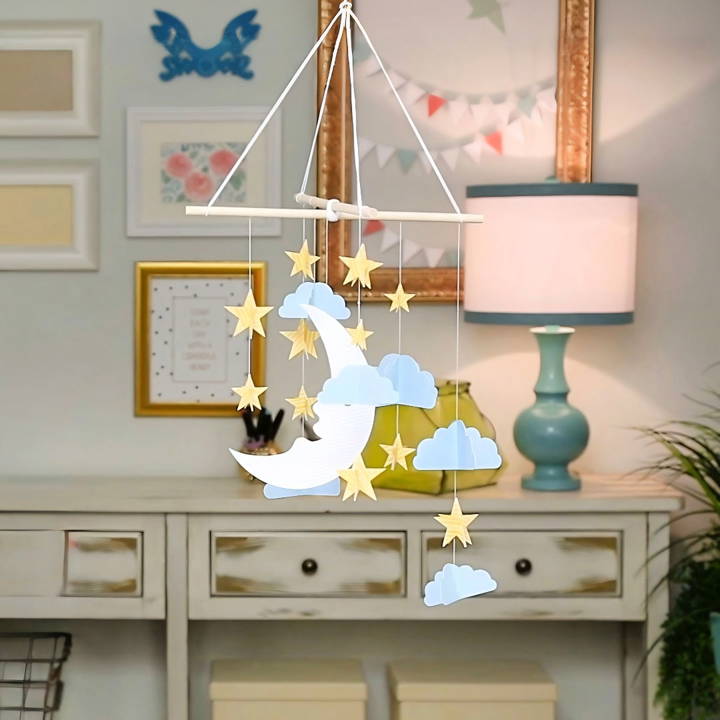
Completing this project filled me with pride. It was such a simple yet fulfilling task. Crafting the DIY baby mobile reminded me of how a little effort can build something special. If you want to try making your own, I believe you will find it rewarding, too. Give it a go; you'll enjoy the process.
Materials Needed and Why
- Artistry Cartridge or Similar Cutting Tool: Essential for cutting out the delicate shapes like stars and moons. The precision of these tools makes your work look professional and neat.
- Penelope Paper Packet (or paper of your choice): The patterns and colors bring life to your mobile. I chose softer tones to match my friend's nursery theme.
- Bone Folder: This is for scoring your paper shapes, giving them a 3D appearance and ensuring they fold nicely.
- Thick Twine: Acts as the backbone of your mobile, holding all your crafted pieces together in harmony.
- Scrapbook Adhesive: A strong adhesive keeps everything securely attached, an absolute must for the baby's safety.
- Mirror Function (if available on your cutting tool): This feature is crucial for duplicating patterns, especially for making your designs uniform and visually appealing.
Step by Step Instructions
Learn how to build a stunning baby mobile with our DIY baby mobile step-by-step instructions. Perfect for nurseries. Simple scoring, folding, and assembly!
Cutting Shapes
The first step was to cut out an assortment of stars, moons, and clouds in various sizes. The ability to use different pages in the cartridge for various shapes allowed for creative freedom. While Monica's guide suggested utilizing the mirroring function for patterns, I learned that careful placement and a little ingenuity could work just as well if your cutting tool lacks this feature.
Scoring and Folding
Using the bone folder, I scored a neat line down the center of each shape. This seemingly simple step made a world of difference, giving the stars and clouds a more three-dimensional, dynamic look. It's a tiny detail that significantly enhances the final product.
Assembling the Mobile
Stringing the shapes onto the thick twine required patience and a steady hand. I started by attaching the bigger elements first, spacing them out before adding in the smaller stars and moons. Securing each piece with scrapbook adhesive, it was crucial to apply a generous amount to ensure they adhered firmly to the twine.
The trickiest part was ensuring the twine stayed in place while the adhesive dried. I found that laying it flat on my work surface and carefully positioning the twine helped maintain its placement.
The Final Assembly
With all the elements ready and securely attached, the final step was to bring them all together. I took my time here, experimenting with different layouts until I was satisfied with the spacing and arrangement. The thick twine proved strong enough to support all the elements without sagging, which is crucial for maintaining the mobile's beautiful geometry.
Customization Ideas for Your DIY Baby Mobile
Crafting a DIY baby mobile means making a unique, meaningful piece for your baby's earliest memories. Here are trendy ideas to customize it:
- Choose a Theme That Resonates: Start by picking a theme that has a special meaning for you and your family. It could be anything from woodland creatures to starry nights. Consider what you love, what makes you smile, and what you think will captivate your baby's imagination.
- Play With Colors: Babies love bright and contrasting colors. Use a mix of shades that are visually stimulating to help with their visual development. Think about incorporating black and white patterns for contrast or soft pastels for a calming effect.
- Add Textures and Patterns: Incorporate different textures and patterns to make the mobile interesting. Felt, wood, and fabric are great materials to start with. You can build felt animals, wooden shapes, or fabric stars. Each material offers a different sensory experience for your baby.
- Make It Interactive: Consider adding elements that move or make a gentle sound when touched. This could be as simple as hanging ribbons that flutter or bells that jingle softly. These interactive features can be both soothing and engaging for your baby.
- Personalize With Names or Initials: Make the mobile even more special by adding your baby's name or initials. This could be done with alphabet beads or letter cut-outs. It's a lovely personal touch that adds sentimental value.
- Keep It Natural: If you prefer a more natural look, use elements from nature like branches, leaves, or flowers. Ensure they are clean and safe for use in a baby's room. A branch painted in a soft color can serve as a perfect base for hanging your creations.
- Think About Longevity: Design the mobile so it can grow with your child. Choose elements that can be educational, like shapes or numbers, which can be useful for toddlers as they start to learn and explore.
- Safety Is Paramount: No matter how you choose to customize your mobile, always prioritize safety. Ensure all parts are securely attached and that the mobile is hung well out of reach of your little one.
The key to a great DIY project is to have fun and let your creativity shine. Your love and effort will surely be felt in the masterpiece you build for your baby.
Safety First: Ensuring Your DIY Baby Mobile is Secure
When it comes to making a DIY baby mobile, safety is the most crucial aspect. Here's how you can ensure that your handmade mobile is safe for your little one:
- Sturdy Construction: Make sure that all parts of the mobile are firmly attached. Use strong threads or strings and double-check that all knots are tight and secure.
- Non-toxic Materials: Choose materials that are non-toxic and safe for babies. Avoid paints or glues that contain harmful chemicals. If you're unsure, look for products labeled as child-safe.
- Appropriate Size: Ensure that the items on the mobile are not too small. They should be large enough that they don't pose a choking hazard if they were to come loose.
- Proper Height: The mobile should be hung high enough above the crib so that it's out of reach of your baby. As a general rule, keep it at least 16 inches above the mattress.
- Regular Inspections: Periodically inspect the mobile to make sure that there are no loose parts or wear and tear that could cause pieces to fall off.
- Avoid Sharp Edges: If you're using materials like wood or metal, smooth out any sharp edges or corners to prevent any potential injuries.
- Soft Attachments: If the mobile has any attachments, make sure they are soft and lightweight. Heavy items can be dangerous if they were to fall.
Follow these safety guidelines to build a beautiful, entertaining, and safe DIY baby mobile.
FAQs About DIY Baby Mobile
Discover everything you need to know about DIY baby mobiles with our faqs, from materials to assembly tips, perfect for crafting a unique nursery piece.
Safety is paramount when it comes to anything for your baby. Make sure the mobile is securely installed and out of your baby’s reach. Never hang the mobile directly over the crib to avoid any safety hazards. Instead, place it over a changing table or in a corner of the nursery.
Yes, you can design a mobile that remains relevant as your child grows. For example, a geometric paper mobile can be used to teach shapes and colors to toddlers. Choose a design that can evolve with your child’s developmental stages.
There are many simple designs that even beginners can make. For instance, a felt ball mobile or a ribbon nursery mobile requires minimal crafting skills. You can use an embroidery hoop as a base and attach felt balls or ribbons in various textures and colors.
Inspiration for your DIY baby mobile can be found on crafting websites, blogs, and social media platforms dedicated to nursery decor. These resources often provide step-by-step guides, safety tips, and creative ideas to help you get started on your project.
When selecting a theme for your DIY baby mobile, consider the overall decor of your nursery and your personal interests. Popular themes include nature, animals, celestial bodies, and geometric shapes. Think about what might be visually appealing and stimulating for your baby, such as contrasting colors and varied textures. Remember, the mobile should be a harmonious addition to your nursery's atmosphere.
Conclusion: The Reward of Building
Taking time to make your own DIY baby mobile is both fun and meaningful. Building something from scratch brings a unique sense of accomplishment. I'm excited to share this simple and engaging project with you. It's all about adding a personal touch to your nursery. Try it and see the difference it makes!


