Making your own DIY backdrop stand for photography can be both fun and rewarding. This guide breaks down everything you'll need to know about how to make a backdrop stand yourself. From gathering materials to the step-by-step construction process, we provide the essential tips to get you started. Not only will this save you money, but you'll also have a customizable stand for your photoshoots.
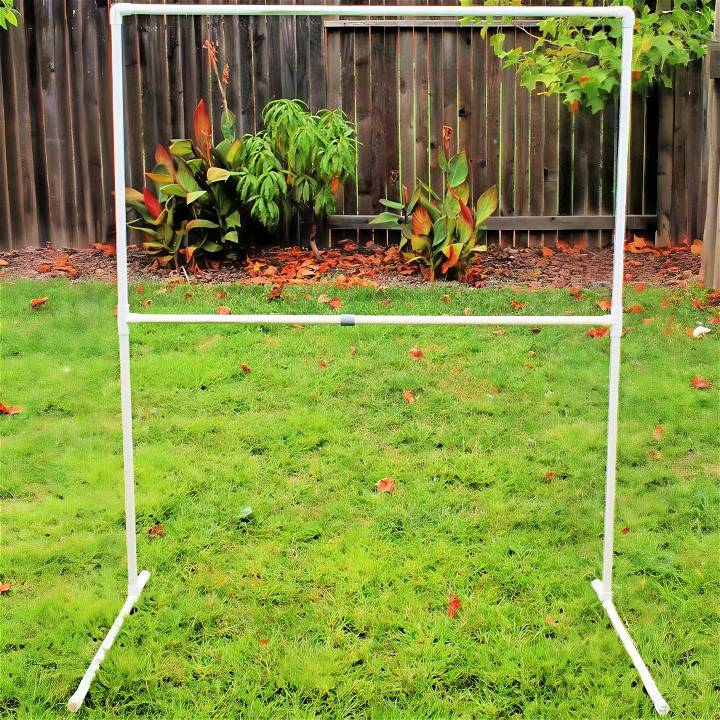
Building a DIY backdrop stand involves using simple materials like PVC pipes, connectors, and clamps. Following our instructions, you'll have a sturdy and reliable stand ready in no time. Plus, having your own stand can significantly improve the professionalism of your photos.
Gathering the Materials
The quest began with a visit to my local home improvement store, where I meticulously selected materials that were both cost-effective and of sufficient quality to meet my needs. Here's a breakdown of what I purchased and why:
- PVC Pipe (3/4" in diameter): Two 5-feet pieces for the vertical supports and additional lengths for the base and crossbar. PVC pipes were chosen for their affordability, durability, and ease of assembly.
- PVC Elbows and T-pieces (3/4"): Essential for connecting the PVC pipes without needing tools or screws. These components facilitated the structure's overall stability and adjustability.
- PVC Caps: To finish off the base legs, ensuring they wouldn't scratch the floor and adding to the stand's professional appearance.
Understanding the why behind each material not only guided my purchases but also ensured that I was prepared for a straightforward assembly process.
Step by Step Instructions
Step-by-step instructions are provided for constructing the base, building the uprights, and finalizing the frame. Get expert tips and reflections on perfecting your project.
Constructing the Base
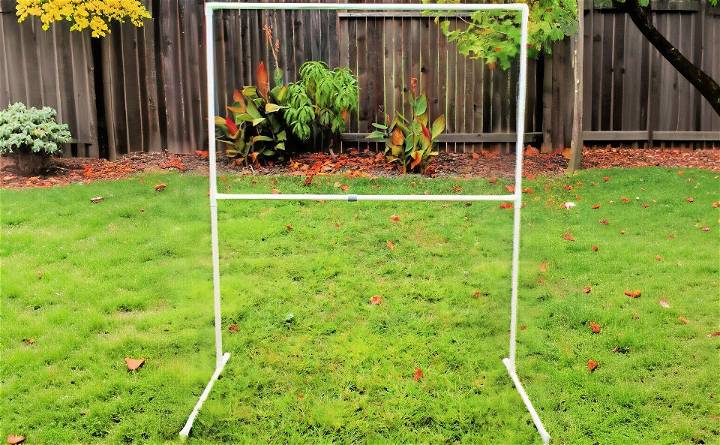
- Attach the T-pieces to Two 30-inch PVC Pipes: These formed the base's backbone, providing stability and support for the vertical elements.
- Secure 12-inch PVC Pipes to the T-pieces: These acted as feet, extending outwards to prevent the stand from tipping over. The end caps were then added to these feet for a clean finish and floor protection.
Building the Uprights
- Connect the Vertical 5-feet PVC Pipes to the Base: Here, the foundation of our backdrop stand began to take shape, transforming into a recognizably functional structure.
- Add Elbow Pieces to the Upper Ends: These directed the top crossbar forwards, ensuring the backdrop hung without interference from the stand's legs.
Finalizing the Frame
- Install the Top Crossbar: Sliding the remaining PVC pipe through the elbows united the structure, making a robust frame ready to support various backdrops.
- Cross-check Stability: After assembly, it’s crucial to ensure every joint is secure and the base is stable. This step is pivotal to guarantee the safety of your equipment and the effectiveness of the stand.
Reflections and Tips
Embarking on this DIY project was incredibly fulfilling, demonstrating that with a bit of creativity and manual effort, one can achieve professional-level outcomes on a shoestring budget. Here are a few additional tips garnered from my experience:
- Measurement and Precision: Take your time measuring and cutting (or having the pieces cut). Precision is key to ensure all parts fit seamlessly.
- Customization: Feel free to adjust the size based on your specific needs. The beauty of DIY is in its flexibility and adaptability.
- Support and Stability: For heavier backdrops, consider reinforcing the base with sandbags or weights to prevent any unwanted movement.
Customization Ideas for Your DIY Backdrop Stand
Making a DIY backdrop stand offers a world of possibilities for personalization. Here’s how you can tailor it to your needs:
Choose Your Theme
Start by deciding on the theme. Whether it’s for a wedding, birthday party, or professional photoshoot, your theme will guide the rest of your customization.
Selecting Colors
Match your stand with the event’s color scheme. Use spray paints or fabric drapes to add a splash of color that complements your theme.
Adding Textures
Introduce textures for a dynamic look. Attach tulle, sequin, or velvet materials to the backdrop for an elegant touch.
Incorporating Lights
String lights or LED strips can transform your backdrop into a luminous piece. They’re perfect for evening events and add a magical glow to your photos.
Using Props
Props like flowers, balloons, or thematic items can be attached to the stand to make it more engaging. Ensure they’re securely fastened to avoid any mishaps.
Interactive Elements
Consider adding interactive elements like a chalkboard for guests to write messages or set up a small shelf to hold props for a photo booth experience.
Portability
If you plan to use your stand in various locations, design it to be easily disassembled and transported. Use lightweight materials and quick-release joints.
Stability
Safety is paramount. Ensure your stand is stable by using a sturdy base. Sandbags or weights can help secure it, especially outdoors.
By following these ideas, you’ll make a backdrop stand that’s not only functional but also a memorable part of your event. Keep it simple, focus on what works for your occasion, and most importantly, have fun with it!
Troubleshooting Common Issues
When making a DIY backdrop stand, you might encounter a few hiccups along the way. Here’s a helpful guide to troubleshooting common issues, ensuring your backdrop stand is both functional and reliable.
Stability Concerns:
- Problem: The stand wobbles or feels unstable.
- Solution: Ensure all connections are tight. If using a PVC stand, consider gluing joints for permanent fixtures or using rubber mallets to secure connections for temporary setups. For wooden stands, double-check that all screws are properly tightened.
Size Adjustments:
- Problem: The stand is too tall or too short for the intended use.
- Solution: Measure the desired height before cutting materials. For adjustable stands, include telescoping sections or multiple holes for pegs that allow height variation.
Weight Support:
- Problem: The stand can’t support the weight of the backdrop.
- Solution: Use thicker pipes or stronger wood for more support. Add a middle support bar for extra stability, or use weighted bags at the base to prevent tipping.
Assembly Difficulties:
- Problem: Difficulty in assembling the stand.
- Solution: Label each part before assembly. Make a clear diagram or a video tutorial to assist with the process. Consider simpler designs with fewer parts for easier assembly.
Portability Issues:
- Problem: The stand is not easy to transport.
- Solution: Design the stand in sections that can be easily disassembled. Use lightweight materials and include a carrying case or bags for transport.
Backdrop Attachment:
- Problem: The backdrop does not stay in place.
- Solution: Use clamps or clips to secure the backdrop to the stand. If using fabric, sew pockets at the ends to slide over the stand’s poles.
Weather Resistance:
- Problem: Outdoor use leads to damage or instability.
- Solution: For outdoor stands, use materials that can withstand weather conditions. Secure the stand with stakes or sandbags to prevent it from blowing over.
By addressing these common issues, your DIY backdrop stand will be ready to support your creative endeavors, whether it’s for photography, events, or home decor.
Maintenance and Storage Tips
Keeping your DIY backdrop stand in top condition is crucial for ensuring it lasts through many uses. Here’s how you can maintain and store your backdrop stand effectively:
Regular Cleaning:
- After Use: Wipe down the stand to remove any dust or debris. If you’ve used a PVC stand, a damp cloth will do. For wood stands, use wood-friendly cleaners.
- Deep Clean: Occasionally, give your stand a more thorough clean. For metal parts, you can use a mild detergent. Always dry the parts thoroughly to prevent rust or deterioration.
Check for Wear and Tear:
- Inspect Joints: Regularly check the joints and connectors for any signs of wear. Tighten any loose screws or replace worn-out parts as needed.
- Look for Damage: Examine your stand for any cracks, especially if it’s made of PVC or wood. Repair or replace damaged sections to maintain stability.
Proper Storage:
- Disassemble if Possible: If your stand is designed to be taken apart, store it in pieces. This makes it easier to transport and prevents any bending or warping.
- Vertical Storage: Store the disassembled stand vertically against a wall to save space. Ensure both ends are supported to prevent falling.
- Avoid Moisture: Keep your stand in a dry place to prevent mold or rust. If storing in a shed or garage, consider using a cover to protect it from dampness.
Transportation:
- Carry Case: If you move your stand frequently, invest in a durable carry case. This protects the stand from damage and makes it easier to carry.
- Secure Parts: When transporting, make sure all parts are secured and won’t move around. This prevents scratches or dents.
Following these tips extends your DIY backdrop stand's life and readiness for events or photos. Simple care and proper storage preserve its quality and function.
FAQs About DIY Backdrop Stand
Discover answers to common questions about DIY backdrop stand, including tips, materials, and setup instructions in our comprehensive faqs guide.
Stability is key for a backdrop stand. For a PVC stand, ensure all connections are tight and consider using PVC cement for a firmer hold. For added stability, you can fill the base pipes with sand or water. A wooden stand will naturally be more stable due to the weight of the wood, but you can also add weights or sandbags at the base to prevent tipping.
Yes, both PVC and wooden stands can be made to be adjustable. For PVC stands, you can create an adjustable width and height by using different lengths of PVC pipes. For wooden stands, you can design a modular system where you can add or remove sections to change the size.
Absolutely! For a portable PVC stand, use connector joints that allow you to assemble and disassemble the stand easily. For a wooden stand, design it in sections that can be taken apart and reassembled without tools. Both options can break down for easy transport.
A backdrop stand can be used for more than just photography. It can serve as a display for paper flower walls at weddings, partition walls in your home, or even as a frame for a home theater screen. Get creative and tailor your backdrop stand to suit your specific needs.
Decorating your backdrop stand can add a personal touch to any event. For photography, consider using muslin or canvas backdrops that can be painted or dyed. For weddings, sheer fabrics or string lights make a romantic atmosphere. Paper flowers or balloons work well for parties. Use clamps or Velcro strips to attach decorations without damaging the stand.
Wrapping Up
In conclusion, making a DIY backdrop stand for photography can be both fun and rewarding. It allows you to customize your photoshoot space and save money. By following simple steps, you can craft a sturdy and reliable stand from easy-to-find materials.
This guide on how to make a backdrop stand ensures that you have all the information you need. Get creative and make your photography sessions more professional with your own DIY backdrop stand. Your perfect photos are just a DIY project away!


