Building a DIY balance board for home workouts is a fun and engaging way to improve your balance and core strength. These homemade balance boards are simple to make with a few materials and tools. Perfect for individuals who enjoy crafting or fitness enthusiasts, the process provides a rewarding experience while resulting in a useful piece of fitness equipment.
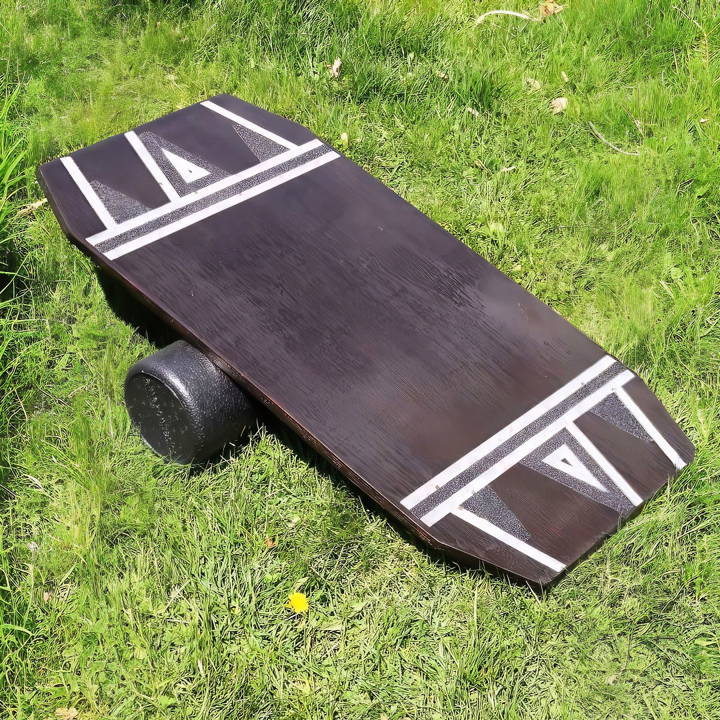
To get started, gather the necessary materials: a durable board, a roller or pipe, and some grip tape for safety. Follow basic instructions on how to make an indoboard to ensure you assemble it correctly and safely. This versatile equipment can enhance your workouts and add a fun element to your fitness regimen.
Introduction to Balance Training
Balance training is an essential component of a well-rounded fitness routine, often overlooked in favor of strength and cardio workouts. However, incorporating balance exercises can significantly enhance coordination, athletic skill, and overall physical stability.
What is Balance Training?
Balance training involves doing exercises that strengthen the muscles that help keep you upright, including your legs and core. These exercises can be as simple as standing on one foot or as complex as using balance boards or stability balls.
Why is Balance Training Important?
Good balance is crucial for everyone, from athletes to the elderly. It helps prevent falls and injuries, improves posture, and can even enhance brain function. For athletes, it can mean better performance and fewer injuries.
Starting with Balance Training
If you're new to balance training, start slow. Try exercises that you can do without equipment, like:
- Standing on one foot
- Walking heel-to-toe
- Standing up and sitting down without using your hands
As you get more comfortable, you can move on to more challenging exercises or add equipment like a DIY balance board.
Using a Balance Board
A balance board is a flat surface with a fulcrum that challenges your balance. Standing on the board and maintaining your balance can help strengthen your core and stabilizer muscles.
Safety First
Always prioritize safety when starting balance training, especially if you're using a balance board. Make sure the area around you is clear of obstacles, and consider having a chair or wall nearby for support.
Understanding the Importance of Each Material
Before we jump into the making process, let's talk about the materials needed and why each is essential for the project:
- Plywood (for the board): Plywood is sturdy and provides a good surface area for standing. I used a piece approximately 30 inches by 18 inches, but you can adjust the size based on your preference.
- PVC pipe (for the roller): The pipe acts as the rolling mechanism that the board balances on. I chose a 4-inch diameter pipe which I found to be an ideal size for stability and difficulty.
- Sandpaper: Sanding the board and edges of the PVC pipe ensures everything is smooth to prevent splinters and allows the board to roll smoothly over the pipe.
- Non-slip tape (optional): Applying this tape to the surface of the board where you'll stand can enhance grip, making it safer, especially for beginners.
- Sealant or varnish (optional): Applying a coat can protect the wood from wear and tear and give it a professional finish.
Step by Step Instructions
Build your own DIY balance board with our easy, step-by-step instructions. Perfect for improving balance and coordination.
Preparing the Board
- Cut the plywood to size: If you don't have the tools at home, many hardware stores offer cutting services. Remember, the size can be adjusted to your preference, but a 30x18-inch piece is a good starting point.
- Sand the board: Use sandpaper to smooth all surfaces and edges. This step is crucial to prevent any potential injuries from splinters.
- Apply non-slip tape (optional): If you've opted for additional safety, apply non-slip tape in strips where your feet will go. This will give you extra grip when using the board.
- Seal or varnish (optional): If you want to seal your board, now is the time to apply a coat of sealant or varnish and allow it to dry according to the product instructions. This step adds durability and a nice finish to your balance board.
Preparing the Roller
- Cut the PVC pipe: The length of the pipe should match the width of the board. In this case, 18 inches.
- Sand the PVC pipe: Smooth out the ends to prevent any sharp edges. This part is essential for both the safety and the longevity of your balance board.
Assembly and Safety Check
- Safety check: Ensure there are no sharp edges or splinters on the board and roller. Additionally, check the sturdiness of the materials.
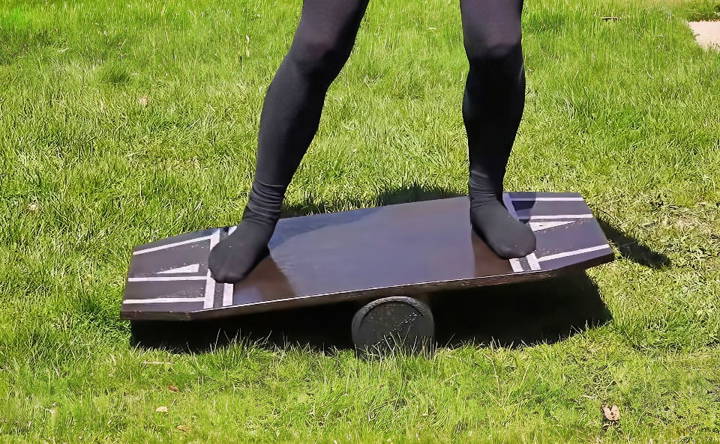
- Test the setup: Carefully place the board on the PVC pipe, start with your feet shoulder-width apart, and give it a try!
Tips for First-Time Users
- Start slow: If you're new to balance boards, take it slow. Try using it near a wall or something you can grab onto for balance.
- Wear shoes: Especially in the beginning, wearing shoes can provide extra grip and protect your feet.
- Consistency is key: Like any skill or workout, consistency will help you improve. Spend a little time each day on your board, and you'll notice progress.
Customization Ideas for Your DIY Balance Board
Building a balance board that reflects your personality and style can make your balance training more enjoyable. Here are some customization ideas that can help you personalize your DIY balance board:
- Choose Your Material Start by selecting the material for your board. Plywood is sturdy and widely available, but you can also consider bamboo for a lighter, eco-friendly option.
- Pick the Right Size The size of your board should match your skill level. Beginners may prefer a larger board for stability, while advanced users might opt for a smaller board to increase difficulty.
- Add Some Color. Paint your board in a color that motivates you. Bright colors can energize your workout, while calm tones might help you focus.
- Get a Grip Apply grip tape to the top surface of your board. This will not only prevent slipping but also allow for creative patterns and designs.
- Personalize with Stencils: Use stencils to add shapes, letters, or numbers to your board. This could be anything from your initials to a motivational quote.
- Seal and Protect: Finish your board with a sealant to protect it from wear and tear. This will keep your design looking fresh and extend the life of your board.
- Functionality Tweaks Consider adding stoppers on the bottom of your board to limit the tilt and make it safer for beginners.
- Eco-Friendly Finishes If you're environmentally conscious, use non-toxic paints and sealants to minimize your ecological footprint.
- Make It Portable Add a handle or straps to your board so you can easily carry it to the park or gym.
By following these tips, you can build a balance board that is not only functional but also a reflection of your unique style.
Advanced Modifications for Your DIY Balance Board
Taking your DIY balance board to the next level can provide a more challenging and varied workout. Here are some advanced modifications you can consider to enhance your balance training experience:
Adjustable Incline
- What It Is: An adjustable incline allows you to change the angle of the board, increasing or decreasing the difficulty.
- How to Add: Install hinges and a locking mechanism at one end of the board. This will let you adjust the height and secure it in place.
Interchangeable Bases
- What It Is: Different bases can change the stability and motion of the board.
- How to Add: Build a system where you can easily swap out the fulcrum – use a cylinder for a rocker board or a sphere for a wobbleboard.
Resistance Bands
- What It Is: Resistance bands add an upper-body workout to your balance training.
- How to Add: Attach hooks or loops to the sides of your board where you can hook in resistance bands.
Balance Cushions
- What It Is: Balance cushions increase the instability, making it harder to balance.
- How to Add: Place inflatable cushions under your board. You can adjust the air pressure to change the difficulty.
Mobile App Integration
- What It Is: Connecting your balance board to a mobile app can help track your progress and provide virtual coaching.
- How to Add: Integrate sensors into your board that connect to an app via Bluetooth, providing feedback on your balance and form.
Safety Rails
- What It Is: Safety rails provide something to hold onto while you get used to the board.
- How to Add: Install removable rails that you can hold onto and remove as you improve.
Slip-Resistant Surface
- What It Is: A slip-resistant surface helps prevent falls, especially as you attempt more difficult maneuvers.
- How to Add: Apply a textured rubber coating to the top of your board for extra grip.
Customize your balance board to meet your training needs and keep workouts engaging. Prioritize safety in modifications to maintain board integrity.
Maintenance and Care for Your DIY Balance Board
Taking care of your DIY balance board is crucial for ensuring it remains safe to use and lasts a long time. Here's a straightforward guide to maintaining your balance board:
Regular Inspection
- Check for Damage: Before each use, inspect your board for any cracks, splinters, or wear. This is especially important for wooden boards.
- Test the Stability: Make sure the fulcrum (the part that touches the ground) is secure and hasn't become loose over time.
Cleaning Your Board
- Wipe It Down: After use, clean the surface with a damp cloth to remove dirt and sweat.
- Avoid Harsh Chemicals: Use mild soap and water for cleaning; harsh chemicals can damage the board's material.
Storage Tips
- Keep It Dry: Store your balance board in a dry place to prevent warping and other moisture-related damage.
- Avoid Direct Sunlight: Prolonged exposure to sunlight can fade the paint and weaken the board.
Grip Tape Maintenance
- Check the Grip: Over time, the grip tape can wear down. If it's peeling or smooth, it's time to replace it.
- Replacing Grip Tape: Carefully remove the old tape, clean the surface, and apply new grip tape for continued safety and performance.
Hardware Checks
- Tighten Screws: If your board has screws or other hardware, periodically check to ensure they're tight.
- Lubricate Moving Parts: If your board has adjustable parts, keep them lubricated to prevent rust and ensure smooth operation.
Surface Care
- Refinishing: If the surface of your board gets scratched or worn, you can sand it down and reapply a finish to keep it looking new.
Mind the Weight Limit
- Know the Limits: Every balance board has a weight limit. Ensure you're not exceeding it to avoid damage and potential injury.
By following these simple maintenance and care tips, you can enjoy your DIY balance board safely for years to come.
FAQs About DIY Balance Board
Discover answers to common questions about DIY balance boards. Learn benefits, materials, and tips for making your own balance trainer.
A DIY balance board is a homemade platform used to improve balance, coordination, and core strength. It’s a versatile tool that can be used by anyone looking to enhance their physical fitness, whether you’re an athlete or just starting out. Using a balance board can also aid in injury recovery and prevention.
Yes, you can use a balance board daily, but it’s important to listen to your body. Start with short sessions and gradually increase the duration as your balance improves. Consistent practice can lead to better results over time.
There are several types of balance boards, such as rocker boards, wobble boards, and roller boards. Each type offers different levels of difficulty and targets various skills. You can choose to make one based on your skill level and the type of balance training you’re interested in.
Safety is paramount when making and using a DIY balance board. Make sure the materials you choose are durable and can support your weight. The board should be made of strong wood like plywood, and the roller should be sturdy enough to not collapse under pressure. Sand down any rough edges on the wood to prevent splinters. Apply grip tape or a non-slip surface to the top of the board to help maintain your footing. Always test your balance board carefully before full use to ensure it's stable.
A balance board can be used for a variety of exercises to improve balance, core strength, and coordination. Simple standing and squatting exercises are great for beginners. As you progress, you can try more challenging movements like single-leg stands, push-ups, or even yoga poses. For those looking to enhance their sports performance, specific drills related to surfing, skateboarding, or snowboarding can be practiced on the balance board. Remember to start slowly and increase the difficulty of exercises as your balance improves.
Conclusion
Wrapping up, making a DIY balance board for home workouts is both simple and effective. By making your own DIY balance board, you'll save money and have a personalized piece of equipment. Enjoy better balance and stronger muscles from the comfort of your home. Start today and see the benefits!


