Starting a project with clear steps can change your work into something amazing. Building a DIY bandsaw box is a fun and useful project that doesn't take much time. First, I chose a piece of wood and drew the box shape on it. Then, I set up my bandsaw and carefully cut along the lines. Taking slow, steady cuts helped me keep the shape accurate.
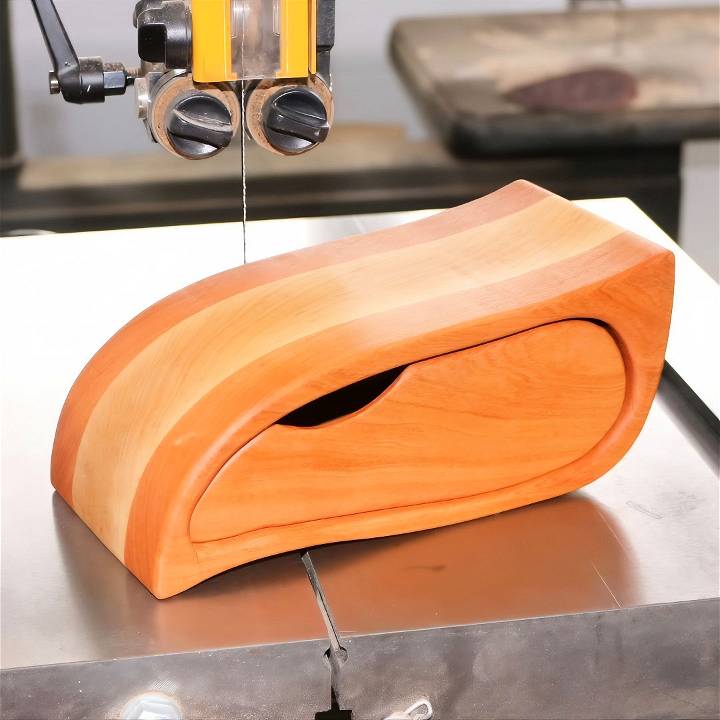
After cutting out the box, I sanded the rough edges to make it smooth. I then applied some paint and a layer of varnish for a smooth finish. As the final touch, I added a small drawer which made the box look great and functional. Now my DIY bandsaw box is ready, and it looks really cool.
Starting your own DIY bandsaw box can be a rewarding experience. You don't need a lot of time or materials to make something truly amazing.
Materials Needed
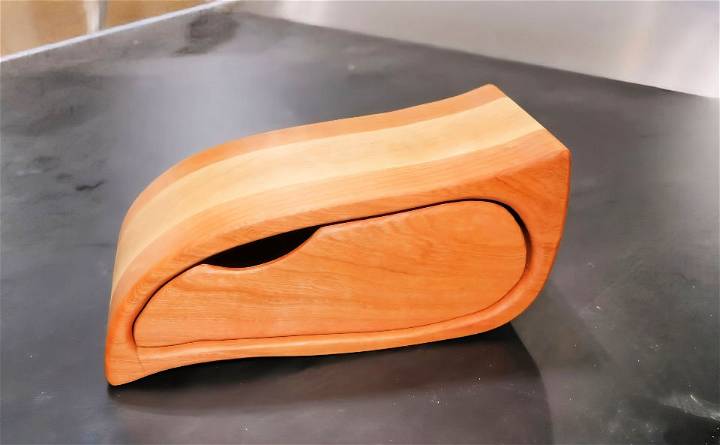
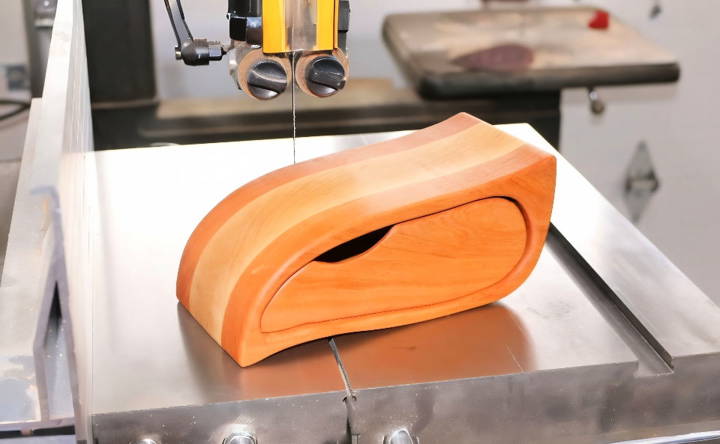
- Maple and Cherry Wood: I chose a thick piece of maple to be sandwiched between two narrower pieces of cherry for aesthetic contrast.
- Glue: Essential for bonding the wood layers securely.
- Clamps: To hold the wood pieces together while the glue dries.
- Template: I modified a template from a fine woodworking article to suit my bandsaw's capabilities.
- Spray Glue: For attaching the template to the wood.
- Sander: A belt sander or a spindle sander will be needed to smooth edges.
- Bandsaw: The heart of this project, used for cutting the outer shape, the drawer, and the back off.
- Router (Optional): This is for rounding the edges of the drawer front.
Step by Step Instructions
Discover step-by-step instructions on making a bandsaw box, from preparing the wood block to final assembly. Perfect for woodworking enthusiasts!
Preparing the Wood Block
The first thing I did was glue the maple and cherry wood strips together. The maple, being the centerpiece, was flanked by cherry strips for a visually appealing contrast. After evenly spreading the glue with my makeshift glue spreader, I applied several clamps to ensure a firm bond and left it to dry. It was intriguing to see how raw wood pieces slowly began to form a solid block, the canvas for my creation.
Cutting the Outer Shape
Once the wood block was ready, I realized I didn't need to join one edge as it wouldn't impact the final product. Attaching the template with spray glue, I carefully cut the external shape of the box with my bandsaw, making sure to stay just outside the drawn lines to allow room for sanding.
Sanding and Shaping
After cutting, I sanded the box to its perfect shape. A spindle sander might have been more efficient, especially for the curves, but a belt sander sufficed. The detailed sanding process was crucial for achieving a smooth finish and prepping the box for its internal drawer.
Cutting and Assembling the Drawer
Cutting out the drawer was a test of patience. I was mindful to enter the cut with the grain to make the entry point less noticeable. After the drawer was cut, assembling the shell and then sanding the insides to smoothness followed. The spindle sander proved invaluable here, making light work of what would otherwise have been a taxing task.
Gluing and Finishing Touches
With the drawer shaped, I glued its front and back panels, each cut at 3/8 of an inch - thicker than my initial attempt to ensure stability. A minor hiccup occurred when routing the drawer front, as the piece slipped, causing an unintended deep cut. However, this mistake was turned into a creative opportunity by shaping this error into a finger notch, adding a unique touch to my box.
Final Assembly
After sanding the shell flush and rounding all edges, it was time to focus on the finishing touches. I chose Rubio Monocoat for its natural look and ease of application. Its hard wax oil finish provided durability without the plasticky feel of a film finish.
Lessons Learned
Discover the vital lessons learned: Embrace Mistakes, be Patient, and use the Right Tools to achieve success. Find out more insights in our detailed guide.
Embrace Mistakes
Every error is an opportunity for creativity. The accidental cut turned into an innovative drawer pull is a testament to this mindset.
Patience is Key
Rushing can lead to mistakes. I took my time, especially during delicate steps like cutting the drawer, and it paid off in the precise fit achieved.
The Right Tools Make a Difference
While I managed with a belt sander, having a spindle sander on hand was invaluable. It's a reminder that investing in the right tools can significantly enhance the crafting experience.
Advanced Techniques for Experienced Crafters
Building a bandsaw box blends precision and creativity. Once basics are mastered, advanced techniques can turn a simple box into art, challenging skills and enhancing craftsmanship.
Layering and Stacking
One way to add depth and complexity to your bandsaw box is by layering and stacking different pieces of wood. This involves cutting out multiple identical patterns and then gluing them together to build a thicker piece. Once the glue has dried, you can shape and sand the piece to achieve a unique look.
Anticipating the Turns
When cutting intricate designs, it's not just about following the lines. You need to anticipate the turns and understand how to maneuver the blade through tight corners. Practice on scrap wood to gain confidence before attempting your final piece.
Decorative Techniques
Incorporate decorative techniques such as inlay or marquetry to add visual interest to your bandsaw boxes. Select contrasting woods or materials to build patterns or images that stand out against the base wood.
Complex Shapes and Drawers
Challenge yourself by adding complex shapes or multiple drawers to your bandsaw box. This requires careful planning and precision cutting. Use a thin blade to make tight turns, and pay close attention to the grain direction for a seamless finish.
Finishing Touches
The final look of your bandsaw box is greatly influenced by the finishing touches. Experiment with different finishes like oils, waxes, or varnishes to protect the wood and enhance its natural beauty. Consider hand-rubbed finishes for a personal touch.
Embrace these techniques to enhance your skills and build unique bandsaw boxes. Patience and practice are key to mastering them.
Design Inspiration and Template Creation
When it comes to making a bandsaw box, the design phase is where your creativity shines. This section will guide you through finding inspiration and making templates for your project.
Finding Your Muse
Look around you; inspiration can come from anywhere. Nature, architecture, and everyday objects can spark ideas. Browse online galleries, woodworking forums, and social media for patterns that catch your eye. Keep a sketchbook handy to jot down ideas or draw designs that inspire you.
Drawing Your Design
Once you have an idea, it's time to put pencil to paper. Start with simple sketches, refining as you go. Consider the size and shape of the box, the number of drawers, and how they will open. Remember, the only limit is your imagination and the width of your bandsaw blade.
Building a Template
After finalizing your design, build a full-size template. You can use regular paper for simple designs or sturdier materials like cardboard for more complex patterns. Ensure your template is accurate; it will be the blueprint for your cuts.
Transferring to Wood
With your template ready, attach it to your chosen piece of wood using a temporary adhesive. Make sure it's secure and won't slip while you're cutting. This step is crucial for precision and will affect the final outcome of your bandsaw box.
Tips for Success
- Keep designs simple if you're just starting out.
- Use a bandsaw blade suitable for the complexity of your design.
- Always prioritize safety when working with power tools.
By following these steps, you'll build a bandsaw box design that is not only unique but also a reflection of your personal style.
Common Mistakes and Troubleshooting
Building a bandsaw box is a rewarding project, but even experienced crafters can encounter issues. Here's a guide to common mistakes and how to troubleshoot them, ensuring your bandsaw box turns out beautifully.
Inaccurate Cuts
- Problem: Your cuts are not following the template lines.
- Solution: Ensure your blade is sharp and the correct type for the intricacy of your design. Practice cutting on scrap wood to improve your control.
Rough Surfaces
Problem: The interior of your box feels rough and unfinished. Solution: Use progressively finer sandpaper to smooth out the surfaces. Consider using a spindle sander for hard-to-reach areas.
Burn Marks
- Problem: The wood has scorch marks after cutting.
- Solution: This can happen if the blade is dull or you're pushing the wood through too quickly. Replace the blade and try to cut more slowly.
Weak Joints
- Problem: The box feels flimsy or falls apart.
- Solution: Check the quality of your glue and ensure you're clamping the pieces firmly while the glue dries.
Misaligned Drawers
- Problem: The drawers don't fit properly.
- Solution: Double-check the alignment before cutting and sand the edges for a smoother fit.
Uneven Finish
- Problem: The finish on your box is blotchy or uneven.
- Solution: Apply the finish in thin, even coats and sand lightly between layers.
Troubleshooting Tips
- Always double-check your measurements and template alignment before cutting.
- Test your finishes on scrap pieces first to see how the wood reacts.
- Keep your workspace clean to avoid dust that can affect glue and finishes.
Avoiding common mistakes and knowing their fixes ensures a sturdy, attractive bandsaw box. Patience and detail are key in woodworking.
Finishing and Decoration
The final steps of making a bandsaw box are finishing and decoration. These steps are crucial as they protect your creation and add to its beauty. Here's how to give your bandsaw box a professional and attractive finish.
Choosing the Right Finish
Selecting the right finish for your bandsaw box can enhance its natural grain and color. Oil finishes, such as linseed or tung oil, penetrate deep into the wood, providing a durable and natural look. For a glossy finish, consider using lacquer or varnish. These build a hard, protective layer that's also water-resistant.
Sanding for Smoothness
Before applying any finish, ensure your box is sanded smoothly. Start with a coarse grit sandpaper and work your way up to a fine grit. This step is vital for a flawless finish. Sanding removes any saw marks and prepares the surface to absorb the finish evenly.
Applying the Finish
Apply the finish with a clean brush or cloth, following the wood's grain. Work in a well-ventilated area and use thin coats to avoid drips or uneven application. Allow each coat to dry thoroughly before applying the next one.
Decorative Touches
Once the finish is dry, you can add decorative touches. Consider inlays of contrasting wood or materials for a unique look. You can also add hardware, such as knobs or pulls, that complement your box's style.
Maintaining the Finish
To maintain the beauty of your bandsaw box, keep it out of direct sunlight and away from extreme temperatures. Dust it regularly with a soft cloth, and if the finish dulls over time, apply a fresh coat to bring back its luster.
Follow these steps to protect and showcase your bandsaw box's craftsmanship. Enjoy both the process and the final result!
FAQs About How to Make a Bandsaw Box
Learn everything about how to make a bandsaw box with our comprehensive FAQs. Get expert tips, techniques, and step-by-step guidance.
A bandsaw box is a type of wooden box made using a bandsaw, which allows for intricate cuts and creative shapes. They are typically made from a single block of wood and can have one or more drawers.
Choose a wood that is easy to work with and visually appealing. Hardwoods like walnut, maple, or cherry are popular choices. You can also use softer woods like pine if you’re a beginner. Look for wood without cracks or knots for easier cutting and assembly.
Take your time with the cuts, and don't rush.
Use a narrower bandsaw blade for tighter curves.
Sand the pieces before final assembly for a cleaner look.
Apply finish carefully to avoid a sticky drawer.
Be creative with your design – bandsaw boxes are art pieces!
Remember, practice makes perfect. Don't be discouraged if your first box isn't flawless. Each box you make will improve your skills and creativity.
To ensure a snug fit for the drawers:
Measure carefully when marking out your drawer cuts.
Cut slowly and follow the line as closely as possible with the bandsaw.
After cutting, sand the drawer and the opening gently until you achieve a smooth, snug fit.
If the fit is too tight, sand gradually; removing too much material can make the drawer loose.
Finishing touches can greatly enhance your bandsaw box:
Flocking the drawer interiors gives them a soft, velvety feel.
Fine sanding and applying a quality finish like tung oil or lacquer can bring out the natural beauty of the wood.
Creative drawer pulls can be fashioned from contrasting wood, metal, or even glass for a unique look.
Consider adding felt pads to the bottom of the box to prevent scratching surfaces.
Final Thoughts
Starting your own DIY bandsaw box can be a rewarding experience. You don't need a lot of time or materials to make something truly amazing.


