The weather might be unpredictable at times, but with the right tools, it doesn't have to be a mystery. One of the oldest and simplest tools for forecasting weather is the barometer. While modern technology provides highly accurate weather predictions, making a DIY barometer at home is a fun and educational way to learn about atmospheric pressure and how it affects the weather. In this guide, you will learn how to build a simple barometer, explain how it works, and give tips on how to use it for forecasting short-term weather changes.
What Is a Barometer and Why Is It Important?
A barometer is a scientific instrument used to measure air pressure, also known as atmospheric pressure. Air pressure is the force exerted onto a surface by the weight of the air above that surface. Changes in atmospheric pressure are directly linked to weather patterns. For instance, high air pressure typically brings clear skies and dry weather, while low pressure often signals that rain or storms are on the way.
By observing changes in air pressure with a barometer, you can get a sense of whether the weather will remain calm or if you should grab an umbrella. Even though today's weather forecasts rely on satellites and radar, the basic principles of meteorology still depend on understanding atmospheric pressure.
Meteorology and Air Pressure: A Brief Overview
Meteorology, the study of the atmosphere, focuses heavily on predicting weather based on changes in air pressure. Atmospheric pressure varies as the air heats and cools, and by measuring these changes, meteorologists can predict whether you'll be experiencing sunny or rainy weather. The barometer you'll make in this DIY project will serve as a window into short-term weather changes, giving you a heads-up on whether it's a good day for outdoor activities or for staying indoors with a book.
Materials Needed
To create your barometer, you'll need the following household items:
- Straw
- Pencil
- Balloon
- Ruler
- Cardstock (thick paper)
- Tape
- Rubber band
- Glass jar
- Scissors
Each of these materials plays an essential role in building your barometer, and you can easily find most of them at home or at a nearby store.
Step by Step Instructions
Learn how to make a DIY barometer with step-by-step instructions. Prepare, assemble, and measure air pressure for accurate weather readings.
1. Prepare the Balloon and the Jar
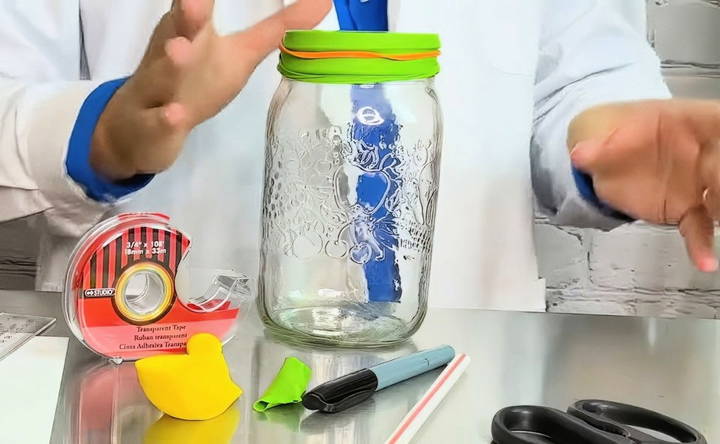
- Take the scissors and carefully cut the neck off the balloon. You only need the rounded part of the balloon for this project.
- Stretch the balloon tightly over the top of the glass jar. It's crucial that the balloon is stretched as smoothly as possible, with no wrinkles. This ensures that the pressure changes will be properly transmitted to the straw.
- Secure the balloon in place with a rubber band, making sure there's a tight seal and no air can escape.
2. Attach the Straw
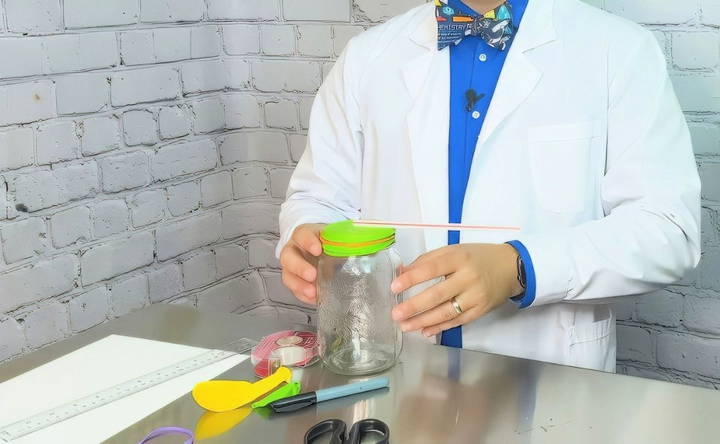
- Take a straw and tape one end of it to the center of the balloon stretched across the top of the jar. Be precise about positioning the straw's end in the middle of the balloon because this alignment ensures that pressure changes move the straw clearly.
- The straw will act as a pointer, responding to changes in atmospheric pressure by moving up or down.
3. Make a Measurement Scale
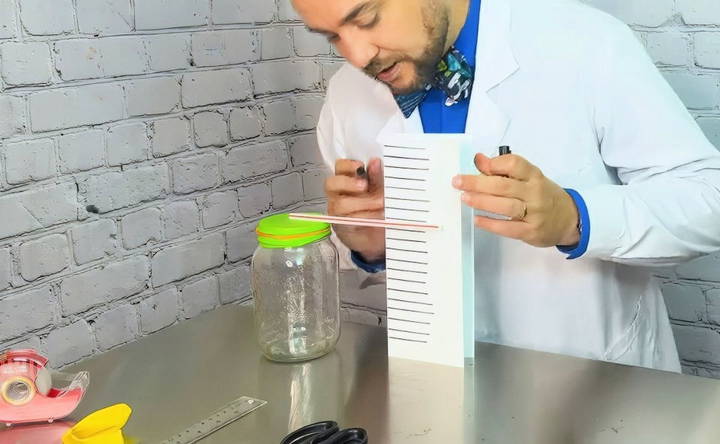
- To track the movements of your straw, you'll need to create a measurement scale. Fold a piece of cardstock (thick paper) lengthwise so that it can stand upright.
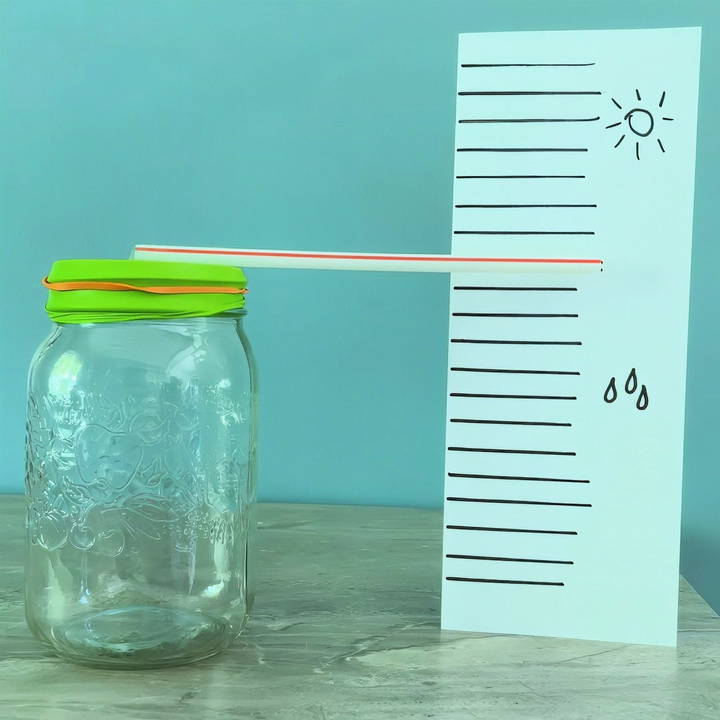
- Using a ruler, mark lines half an inch apart along the folded edge of the paper. These lines will help you measure how far the straw moves up or down.
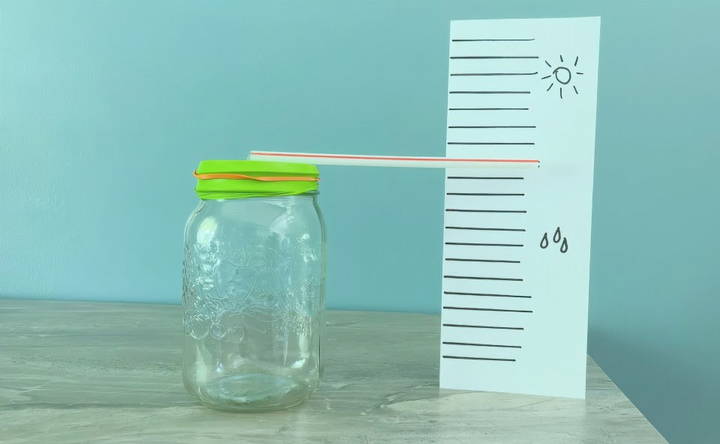
- To make it more fun, you can draw a sun at the top of the scale (for high pressure) and raindrops at the bottom (for low pressure). This visual cue will make it easier to interpret the barometer's readings.
4. Set Up Your Barometer
- Place your jar with the straw next to the measurement scale. The straw should be level with the middle of the scale when it's at rest.
- Find a place to set your barometer where the temperature remains consistent. Avoid placing it near windows, heating vents, or air conditioners, as temperature changes can interfere with accurate readings. Ideally, it should be in a place where you can easily observe it over time.
How a Barometer Works
The principle behind a barometer is simple: changes in atmospheric pressure affect the air inside the jar. When the air pressure outside the jar is higher than the air inside, it pushes down on the balloon, causing the straw to point upward. This indicates high pressure, often associated with clear skies and dry weather.
On the other hand, when the air pressure outside the jar is lower than the air inside, the balloon bulges slightly upward, causing the straw to point downward. This is a sign of low pressure, which usually means cloudy or rainy weather is on the way.
What the Straw Movements Mean
- Straw Moves Up (High Pressure): The air pressure outside is greater than inside the jar, meaning the weather will likely be dry and sunny.
- Straw Moves Down (Low Pressure): The air pressure outside is lower than inside the jar, signaling that clouds or rain could be on their way.
Making Accurate Observations
To use your barometer effectively, it's important to make regular observations and note the position of the straw at different times of the day. Over time, you'll begin to see patterns. For example, if the straw moves downward over several hours or days, it might be a good idea to prepare for rainy or stormy weather.
The key to predicting weather using a barometer is tracking these movements in relation to the current weather. If you notice that low pressure tends to bring rain to your area, you'll be able to better predict when you should bring an umbrella!
Tips for Better Readings
- Place your barometer in a consistent environment where the temperature doesn't fluctuate.
- Make observations at the same time each day to track how atmospheric pressure changes.
- Keep a notebook to log changes in pressure and compare them with weather patterns over time.
Fun Variations of the Barometer
Once you've mastered the basics of building your DIY barometer, there are plenty of ways you can experiment to make the project more fun or more accurate:
- Add a thermometer: Combine your barometer with a thermometer to track both temperature and pressure, giving you a more comprehensive weather station at home.
- Decorate your jar and scale: Make your barometer visually appealing by painting or decorating the jar and adding illustrations to your measurement scale.
- Try different sizes of jars: Experiment with jars of different shapes and sizes to see how they affect the barometer's sensitivity to air pressure changes.
Conclusion
Building your own barometer is a fantastic way to learn about meteorology, air pressure, and how the weather works. Not only does it offer practical use in predicting weather changes, but it's also a great hands-on science experiment that the whole family can enjoy.
By following the simple steps outlined above, you'll have a functional barometer that helps you forecast short-term weather patterns. And who knows? You may even impress your friends and family with your newfound ability to predict when it's going to rain or shine!
For more DIY science experiments, be sure to stay curious and explore the world around you. With your barometer in hand, you'll be better equipped to keep an eye on the skies and plan your days accordingly. Happy weather watching!
FAQs About DIY Barometer
Discover essential FAQs about DIY barometers. Learn how to measure air pressure at home with ease and accuracy in this comprehensive guide.
A barometer measures changes in air pressure, which helps predict short-term weather patterns. High pressure usually signals clear skies, while low pressure indicates cloudy or rainy conditions. Observing the straw's movement up or down lets you forecast upcoming weather changes.
Temperature fluctuations from windows or vents can alter the air pressure inside the jar, affecting the barometer's accuracy. Keeping it in a temperature-stable area ensures reliable readings.
If the straw isn't moving, ensure the balloon is stretched tightly over the jar and the straw is correctly centered. Additionally, place the barometer in a location with stable temperature and away from drafts for more accurate pressure readings.
Yes, but the size of the jar and balloon may affect sensitivity. Larger jars might result in smaller, harder-to-see changes, while smaller jars may respond more noticeably to pressure differences. Experiment with different sizes to find what works best for you.
For best results, check your barometer at the same time each day. This consistency will help you identify gradual shifts in air pressure and observe more accurate weather predictions.
Atmospheric pressure changes gradually, so it may take hours or even days to see noticeable movement in the straw. Observing over time will reveal trends related to local weather patterns.
For greater precision, you can create more frequent markings (e.g., ¼-inch increments) on the scale. This will help you track smaller movements of the straw, providing more detailed readings.


