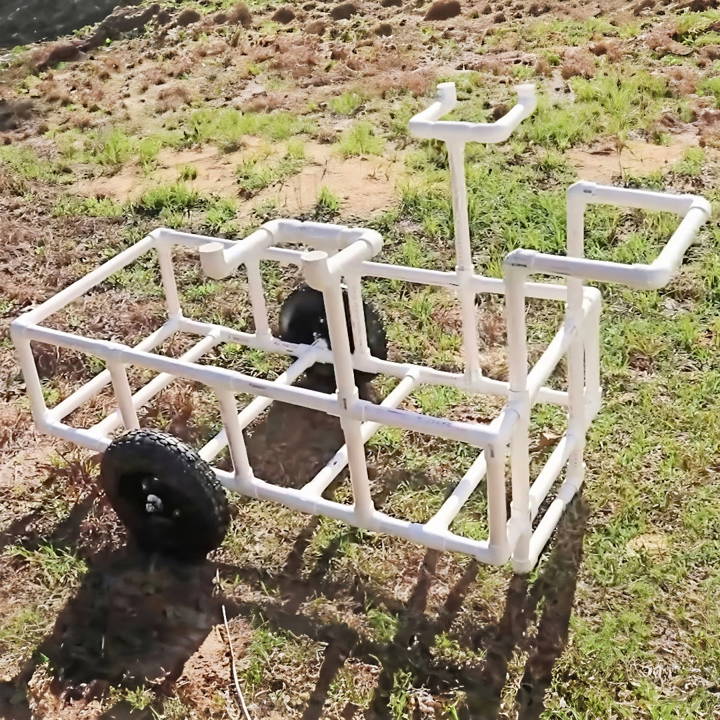
Making a beach cart from scratch was one of my most fulfilling projects. I started with simple materials and a clear plan. PVC pipes formed the frame of my DIY beach cart. I cut and joined them with PVC fittings to make a sturdy structure. Adding wheels made it easy to pull through sand. I attached a large mesh bag to hold my beach gear.
Working on this project was both fun and practical. I saved money by building the cart myself instead of buying one. Plus, it felt great to use something I made with my own hands. If you follow these steps, you, too, can make your own useful beach cart. Start building your cart today—it's easier than you think!
Building your own DIY beach cart can be simple and rewarding. Let this guide help you get started and enjoy your beach outings more.
Materials Needed and Why
For anyone looking to replicate or adapt this project, understanding the materials and their purpose is crucial. Here's what I used:
- PVC Pipes: The skeleton of the cart, providing a lightweight yet sturdy structure.
- PVC Fittings: Essential for connecting the pipes and building angles.
- Large Tires: To effortlessly glide over sand without sinking.
- 5/8 Threaded Rod (for the axle): To support the tires and provide mobility.
- PVC Adapters (one inch to a half inch): For attaching the axle securely to the frame.
- Saw: For cutting the PVC to the desired lengths.
Each material was selected for its durability, affordability, and ease of assembly, with an emphasis on ensuring the cart could withstand the sandy and often wet beach environment.
Step by Step Instructions
Learn how to build a DIY beach cart with our step-by-step guide. From cutting pvc to customizing for fishing gear, make your perfect beach companion today!
Step 1: Planning and Cutting the PVC
Starting with a rough sketch, I planned the dimensions based on the size of the cooler and estimated space for additional gear. Cutting the PVC pipes to the correct lengths was the first physical step, laying the foundation for the entire cart.
Step 2: Assembling the Frame
Utilizing four-way PVC fittings, I began piecing together the frame. This stage required trial and error, ensuring the cart was both balanced and spacious enough to hold the cooler and other fishing equipment securely.
Step 3: Attaching the Tires
The axle setup was perhaps the trickiest part. I used a 5/8 threaded rod, running it through the adapters and ensuring it fit snugly within the PVC frame. Ensuring the tires were aligned and securely attached was pivotal for the cart's mobility across soft sand.
Step 4: Customizing for Fishing Gear
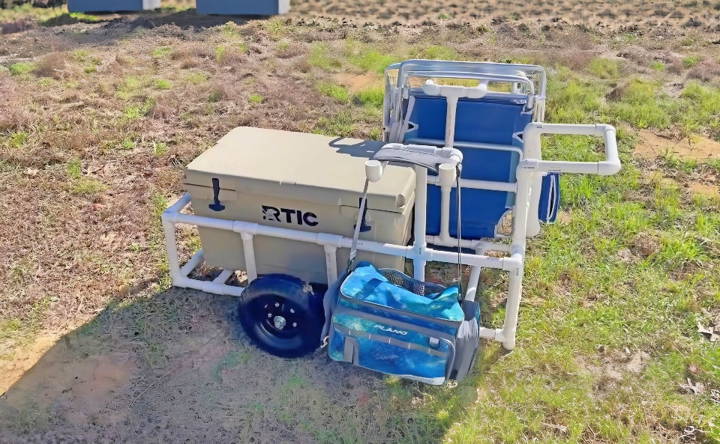
With the basic structure in place, my focus shifted to adding customized features. Rod holders were a must, designing them in a way that was both functional for transportation and easy access while fishing. Side hooks for extra bags and a secure spot for the cooler were also integrated.
Step 5: The Test Drive
Before making the decision to glue the pieces together, I opted for a trial run. This "soft launch" allowed me to evaluate the cart's performance on the sand and make necessary adjustments. Stability, weight distribution, and ease of pulling were my key focus areas.
Lessons Learned and Tips for Fellow DIYers
- Flexibility Is Key: Avoid gluing the components immediately. Test the cart's functionality to make necessary adjustments.
- Measure Thrice, Cut Once: Precision in cutting the PVC pipes is crucial for a seamless assembly.
- Invest in Quality Tires: They make all the difference in maneuvering through sand.
- Customization: Tailor the cart to fit your specific gear and needs, considering weight, balance, and accessibility.
Customization Ideas for Your DIY Beach Cart
Building a DIY beach cart gives you the freedom to tailor it to your specific needs and style. Here are some customization ideas that can enhance the functionality and appearance of your beach cart:
- Add a Personal Touch with Paint: Choose colors that reflect your personality or match your beach gear. Use spray paints suitable for outdoor use to ensure durability.
- Cup Holders for Convenience: Install cup holders to keep your drinks secure while you enjoy the beach. You can use PVC pipes or pre-made holders and attach them with waterproof adhesive or screws.
- Built-In Cooler: A cooler is essential for keeping your beverages and snacks chilled. Integrate a cooler into your cart's design, or modify a section to hold a portable cooler securely.
- Umbrella Holder: Stay protected from the sun by adding an umbrella holder to your cart. This can be as simple as a bracket that allows you to slot in a beach umbrella.
- Extra Storage Hooks: Attach hooks to the outside of your cart to hang beach towels, bags, or toys. Ensure they are rust-resistant to withstand the seaside environment.
- Detachable Bag: Sew a detachable bag with waterproof fabric to store wet clothes or collect shells. This makes it easy to remove and clean later.
- Adjustable Handle: An adjustable handle can make your cart more comfortable to pull, regardless of your height. Consider a telescoping handle for this purpose.
- All-Terrain Wheels: Upgrade to larger, wider wheels designed for sand to make pulling the cart easier. Pneumatic tires are a great option for soft, uneven terrain.
- Seat Attachment: For those who need a break, add a foldable seat to the side of your cart. Ensure it's sturdy and can be tucked away when not in use.
- Solar Charger: For the tech-savvy, install a small solar panel to charge your devices. This is a practical addition for long days at the beach.
- Reflective Tape for Safety: If you stay out until dusk, reflective tape can make your cart more visible and ensure safety as you return from the beach.
The key to a successful DIY beach cart project is to plan your customizations carefully and execute them with precision.
Troubleshooting Common Issues with DIY Beach Carts
When you're building your own beach cart, you might encounter a few hiccups along the way. Here's a helpful guide to troubleshoot some common issues you may face:
Wheels Getting Stuck in Sand
- Solution: If your wheels are getting bogged down, they might be too narrow. Consider switching to wider, balloon-style wheels that distribute weight more evenly and glide over sand.
Cart is Too Heavy to Pull
- Solution: A heavy cart can be a strain to pull. Use lightweight materials like aluminum or PVC pipes for the frame. Also, balance the load evenly and avoid overpacking.
Rusting Metal Parts
- Solution: Saltwater and humid air can lead to rust. Use stainless steel components or apply a rust-resistant coating to metal parts. Regularly rinse your cart with fresh water after use.
Difficulty in Maneuvering
- Solution: A cart that's hard to turn might need a different wheel configuration. Swivel casters on the front wheels can improve maneuverability.
Cart Tipping Over
- Solution: If your cart tips over easily, the base may not be wide enough. Widen the stance of the cart or lower the center of gravity by placing heavier items at the bottom.
Loose Fittings and Joints
- Solution: Check all connections regularly and tighten any loose screws or bolts. Use lock nuts or thread-locking fluid to prevent them from loosening over time.
Fabric Components Fading or Tearing
- Solution: Use fabrics designed for outdoor use, like marine-grade canvas, which resist fading and tearing. Inspect and repair any small tears before they get bigger.
Accessories Falling Off
- Solution: Secure any added accessories like cup holders or umbrella stands with waterproof adhesives or rust-proof fasteners. Make sure they're firmly attached before heading out.
Anticipate and fix these issues to keep your DIY beach cart reliable for all seaside adventures.
Safety Precautions for Building a DIY Beach Cart
When embarking on a DIY beach cart project, safety is paramount. Here are some essential safety precautions to keep in mind:
- Wear Protective Gear: Always wear safety glasses to protect your eyes from flying debris. Gloves can prevent splinters and cuts, especially when handling wood or metal.
- Tool Safety: Familiarize yourself with all tools before starting. Use them according to the manufacturer's instructions and never bypass safety features.
- Ventilation: If you're painting or applying adhesives, work in a well-ventilated area to avoid inhaling fumes. Outdoor spaces are ideal.
- Lifting Techniques: When lifting heavy materials, bend at the knees and keep your back straight to avoid strain. Ask for help with particularly bulky items.
- Secure Materials: Ensure all materials are securely fastened during assembly to prevent them from slipping or falling.
- Child Safety: If children are assisting, keep them away from sharp tools and heavy materials. Supervise them closely and give them age-appropriate tasks.
- Fire Safety: Keep a fire extinguisher nearby if you're working with flammable materials or tools that generate sparks.
- First Aid: Have a first aid kit on hand for minor injuries, and know how to use it. Include items like bandages, antiseptic wipes, and tweezers.
- Check Weather Conditions: If you're working outside, be aware of the weather. Don't work in adverse conditions like rain or high winds, which can make tools slippery and materials unstable.
- Stay Organized: Keep your workspace tidy to prevent tripping hazards. Store tools and materials properly when not in use.
By adhering to these safety precautions, you'll ensure that your DIY beach cart project is not only successful but also conducted in a safe and responsible manner.
FAQs About DIY Beach Cart
Discover essential answers in our faqs about DIY beach carts. Learn materials, assembly tips, and maintenance for your perfect beach adventure.
While you can use a regular cart or wagon, they may not be ideal for sandy beaches. For better maneuverability on sand, consider modifying the wheels or building a cart specifically designed for beach terrain.
The time it takes to build a DIY beach cart depends on your skill level and the complexity of the design. Generally, it can take a few hours to a day to assemble all the parts and ensure the cart is sturdy and functional.
You can customize your beach cart by adding features like a cooler holder, extra storage compartments, or hooks for beach umbrellas. Consider using bungee cords and zip ties to secure items during transport.
The best wheels for a beach cart are wide and made from materials like polyurethane or rubber, which can roll smoothly over sand without sinking. Look for balloon-style or wheeleez wheels, as they are specifically designed for sandy terrains.
To maintain your DIY beach cart, rinse it with fresh water after each use to remove salt and sand. Check all connections regularly and tighten any loose screws or bolts. Store the cart in a cool, dry place to prevent rust and wear.
Final Thoughts
Wrapping up, making your own homemade DIY beach cart offers a fun and functional project that can make your beach days more enjoyable. With basic materials and a bit of effort, a PVC beach cart can be built to transport all your beach essentials effortlessly. This project allows for customization, ensuring that your cart meets your specific needs. Start building your beach cart today, and enjoy the convenience and satisfaction it brings!


