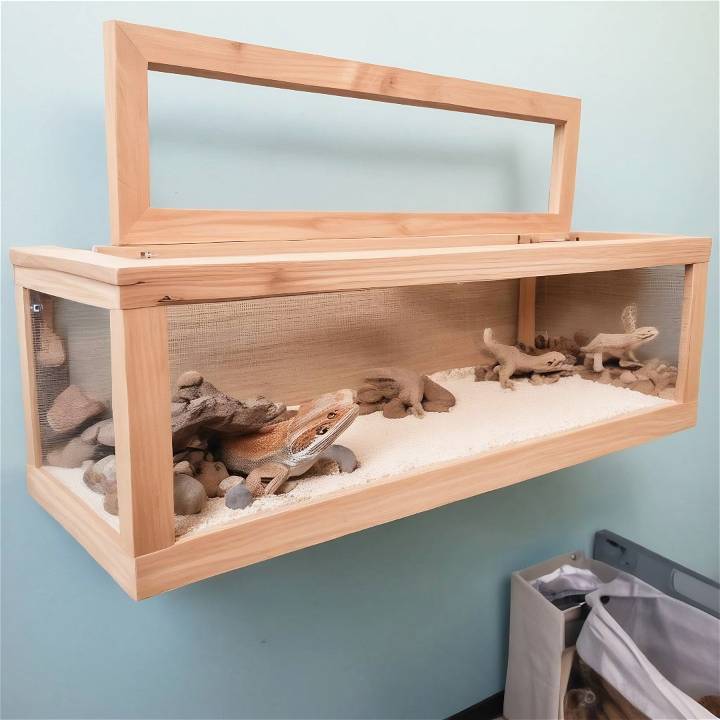
When we adopted Master Yeti, our bearded dragon, from the Humane Society, we were complete novices in reptile care. Initially, he lived in a small terrarium which was far from adequate for his size and needs. We quickly realized we had to learn fast and upgrade his home. Disappointed by the expensive and insufficient options available in pet stores, we decided to embark on a DIY journey to build a suitable terrarium for Master Yeti. Here's how we did it, step by step.
Why DIY?
Besides being cost-effective, building the terrarium ourselves allowed us to customize it according to Master Yeti's needs and our space. The process turned out to be an enriching learning experience about bearded dragon care.
Materials Needed and Why
- Solid Wood: Chosen for the main structure for its durability.
- Glass Sheets: Necessary for the sides of the terrarium to allow for visibility and light penetration.
- Wood Glue & Drywall Screws: For assembling the wood pieces securely.
- Plastic Wood (Filler): To cover imperfections and screw heads for a professional finish.
- Silicone Sealant (or Lexel): To secure the glass in place and ensure the enclosure is airtight.
- Aluminum Angles & Flat Bars: For framing the glass and adding extra support.
- Non-adhesive Shelf Liner: For the substrate, as it's easy to clean and gentle on Master Yeti's belly.
- Vents: For proper ventilation ensuring a healthy living environment for the bearded dragon.
Step by Step Instructions
Discover how to build your own DIY bearded dragon enclosure with step-by-step instructions for building, finishing, substrate choices, and final touches.
Building the Structure
- Getting the Wood Cut and Assembled: We visited our local home improvement store to get our materials cut to size. The solid wood frame was assembled using wood glue and screws, ensuring durability.
- Installing the Glass: We had three glass sheets cut. Installing them was probably the most nerve-wracking part. After watching several YouTube tutorials, we opted for a simple method of using silicone sealant to secure them in place within the wooden frame.
Achieving a Professional Finish
- Filling and Sanding: Once the structure was in place, we covered all screw heads and imperfections with plastic wood filler and sanded down for a smooth finish.
- Preparing for Glass Installation: We attached wooden ledges inside the frame where the glass would sit and secured it with adhesive (I chose Lexel for its clarity and strength).
- Securing the Glass & Finishing Touches: Frames for the glass were buildd using aluminum angles, adding not just support but aesthetic appeal.
The Substrate Dilemma
Choosing the right substrate was crucial. After much research, we opted for a non-adhesive shelf liner for its practicality. Not only was it affordable, but it also provided a safe, easy-to-clean surface for Master Yeti to roam on.
Final Touches
- Ventilation: We installed vents on both ends of the terrarium to ensure proper airflow.
- Sealing for Safety: We used a clear, semi-gloss acrylic finish to seal the wood, protecting it from moisture and making clean-ups a breeze.
- Installing the Lights: We fitted a UVB light and a basking bulb, carefully situating them to provide Master Yeti with necessary heat and UV without risking overheating or discomfort.
Reflections on the Process
Embarking on this DIY project was a labor of love. We made plenty of mistakes along the way, but each error was a valuable lesson. Master Yeti's upgrade from a small, inadequate terrarium to a spacious, custom-made home has been incredibly fulfilling.
Master Yeti's Verdict
Since moving into his new terrarium, Master Yeti seems happier and more active. He enjoys exploring, basking under his heat lamp, and lounging in the cooler parts of his habitat. His behavior reassured me that all the effort was worth it.
Temperature and Lighting
Building the right environment for your bearded dragon is crucial for its health and well-being. Two of the most important aspects of a bearded dragon enclosure are the temperature and lighting. Here's how to get them just right.
Temperature
Bearded dragons are cold-blooded reptiles that rely on external heat sources to regulate their body temperature. Your enclosure should have a warm side and a cool side to allow your pet to move around and regulate its body temperature throughout the day.
- Warm Side: This area should have a basking spot with a temperature between 95°F to 110°F (35°C to 43°C). You can achieve this with a basking lamp placed above a rock or branch where your dragon can lie.
- Cool Side: The cooler part of the enclosure should be between 75°F to 85°F (24°C to 29°C). This temperature range allows your dragon to cool down after basking.
Lighting
Proper lighting is essential for your bearded dragon's health, especially UVB light, which helps them synthesize vitamin D3, which is necessary for calcium absorption.
- UVB Lighting: Install a UVB fluorescent tube light that spans at least two-thirds the length of the enclosure. This ensures your dragon gets enough exposure while it moves around.
- Day/Night Cycle: Bearded dragons need a clear day/night cycle. Aim for 12 hours of light and 12 hours of darkness. Use a timer to help regulate the light cycle automatically.
Monitoring
Always monitor the temperatures in the enclosure with thermometers placed on both the warm and cool sides. For lighting, replace UVB bulbs every 6 months, as their effectiveness diminishes over time.
Maintain temp & light for a healthy, happy bearded dragon. Mimic warm environment in the enclosure. Simple, safe care = thriving dragon.
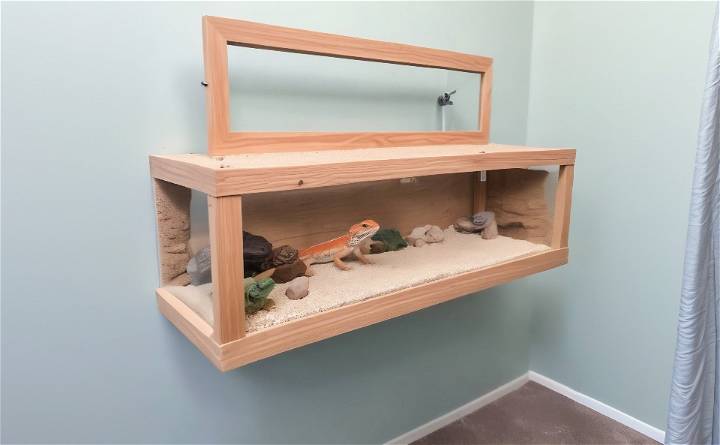
Substrate and Decoration
Choosing the right substrate and decorations for your bearded dragon's enclosure is not just about aesthetics; it's about making a safe and stimulating environment for your pet. Here's how to do it right.
Substrate
The substrate is the bedding material you use on the floor of the enclosure. It's important for several reasons:
- Comfort: It should be comfortable for your bearded dragon to walk on.
- Hygiene: It must be easy to clean to maintain a hygienic habitat.
- Safety: It should not pose any risk of ingestion or respiratory issues.
Good options for substrate include:
- Reptile Carpet: Easy to clean and reduces the risk of accidental ingestion.
- Newspaper: Inexpensive and easily replaceable, though not as enriching.
- Ceramic Tiles: Easy to clean and maintain proper nail length.
Avoid using sand or small gravel as they can cause impaction if ingested.
Decoration
Decorations serve multiple purposes in an enclosure:
- Enrichment: Provides mental stimulation and physical activity.
- Shelter: Offers hiding spots for stress relief.
- Basking: Allows for proper thermoregulation.
Include items like:
- Branches: For climbing and basking.
- Rocks: For basking and adding a natural look.
- Hides: For privacy and stress reduction.
Ensure all decorations are stable and won't collapse on your pet.
Maintenance and Cleaning
Keeping the enclosure clean is vital for preventing disease and ensuring your bearded dragon's health. Here's a simple routine:
- Daily: Remove uneaten food and waste. Spot clean substrate as needed.
- Weekly: Clean and disinfect food and water dishes. Check and clean decorations.
- Monthly: Replace substrate (if disposable) or deep clean (if reusable).
Use reptile-safe disinfectants and rinse the enclosure thoroughly to remove any chemical residue.
Focus on making a habitat that is visually appealing and promotes your bearded dragon's health and happiness. Keep things simple, safe, and clean.
FAQs About DIY Bearded Dragon Enclosure
Get answers to common DIY bearded dragon enclosure questions! Find tips on building, materials, size, and more in this informative FAQ guide.
How big should the enclosure be?
An adult bearded dragon requires an enclosure that's at least 36 inches long, 18 inches wide, and 18 inches high. Larger enclosures are better, as they provide more space for exercise and enrichment.
What is the ideal temperature and lighting setup?
Bearded dragons need a temperature gradient with a basking area between 95-110°F and a cooler area around 80-85°F. They also require UVB lighting to metabolize calcium properly. Use a UVB bulb that spans at least half the length of the enclosure and place it 12-15 inches from the basking area.
How can I ensure the enclosure is safe and secure?
To ensure safety, use sturdy materials and secure all fittings. The enclosure should have a well-fitting lid to prevent escapes. Electrical components like heating and lighting should be installed by following proper guidelines to avoid fire hazards.
Can I include live plants in the enclosure?
Yes, you can include live plants, but make sure they are non-toxic and safe for bearded dragons. Some safe plant options include haworthia, aloe, and certain succulents. Always research before adding any new plant to your pet's environment.
How often should I clean the enclosure?
Regular cleaning is crucial for your bearded dragon's health. Spot clean daily to remove waste and uneaten food. Perform a deep clean once a month, which includes replacing the substrate, cleaning all surfaces, and disinfecting the enclosure.
Making a good environment for your bearded dragon is important for their well-being. Plan and build a suitable enclosure.
Final Thoughts
This DIY project wasn't just about building a home for Master Yeti. It was an educational journey into the needs and care of bearded dragons. If you're considering a similar project for your reptile friend, remember to research thoroughly, plan meticulously, and don't fear making mistakes. They're part of the learning process. Watching Master Yeti explore his new environment was a heartwarming confirmation that we made the right choice.


