My weekend project was to build a DIY bike trailer. I needed something reliable to carry groceries and tools. So, I gathered simple materials like pipes, wheels, and nuts and bolts from my local hardware store. Following clear, step-by-step instructions, I assembled the frame and attached the wheels. It was easier than I thought, and I felt quite accomplished.
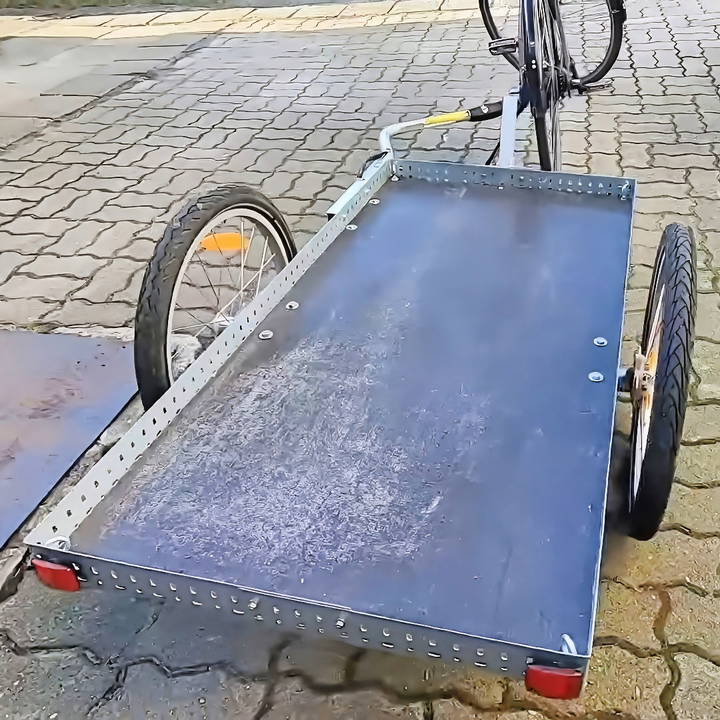
Completing the custom homemade bike trailer was a satisfying experience. Testing it out, I found it sturdy and smooth to pull. If you're considering making one, this guide can be incredibly helpful. I'm confident that my methods will work for you too. Dive in and start building your perfect trailer today!
Understanding the Basics
Before diving into the project, I identified the primary components required for a bike trailer: wheels, an axle, a drawbar, and a coupler. Reusing an old children's bike trailer became the crux of my plan, allowing me to repurpose essential parts and keep costs down.
Materials Needed and Why
- Old Bike Trailer: Serves as a goldmine for wheels, axle, and coupler.
- Sealed Non-Slip Plywood: Forms the trailer floor; selected for durability and size.
- Galvanized Steel Angle Profiles: Strengthen and secure the trailer edges.
- Square Aluminum Tubes: Framework for the drawbar; lightweight and sturdy.
- Screws and Securing Nuts: Essential for assembly and ensuring parts remain tightly fastened.
- Reflectors: For safety and legal compliance on the road.
I sourced an old bike trailer with a broken suspension for a bargain, focusing on one that shared many components with high-quality models, albeit with imperfections I could work around or repair.
Step by Step Instructions
Learn how to build your own bike trailer with our step-by-step instructions. From the trailer bed to test drives, we cover all the details and budget-friendly tips.
Preparing the Trailer Bed
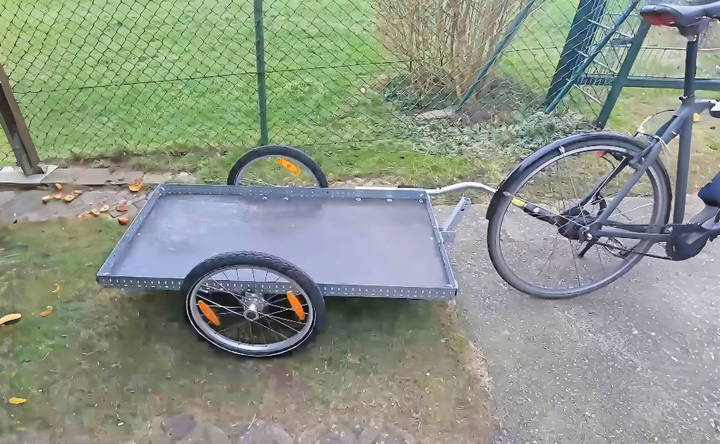
I opted for a plywood size of 60 by 120 centimeters to accommodate three Euro boxes comfortably—precision was key to ensuring enough margin for securing the boxes. The strength of the trailer bed was amplified by attaching galvanized steel angle profiles along the edges, making a sturdy frame.
Securing the Axle and Wheels
After reinforcing the trailer bed, I mounted the axle carefully, ensuring it was centered and secure. The wheels, harvested from the old bike trailer, attached smoothly. It was crucial to use securing nuts here to prevent any loosening during movement.
Crafting the Drawbar and Coupler
The drawbar required some creativity. I fashioned it from aluminum tubing, making sure it was long enough to ensure comfortable distance from my bike. Connecting the drawbar to the trailer and the bike induced a bit of a challenge, which I overcame by ensuring the fittings were precise and secure, utilizing the coupler from the old bike trailer for an easy attachment to my bike.
Finishing Touches
The final touches included adding reflectors to the front and back for visibility and adhering to road safety regulations. Their inclusion transformed my trailer from a mere functional piece into a road-worthy companion.
Test Drive and Tweaks
On its inaugural journey, the trailer performed admirably, maintaining stability and tracking almost perfectly behind my bike. The sense of accomplishment from building something not only functional but also robust and utility-driven was unparalleled. However, this first test drive also highlighted areas needing adjustment, particularly concerning the drawbar's attachment to the trailer for enhanced stability.
Budget Breakdown
Initially, I had set aside an 80-euro budget for this project, which covered:
- Old Bike Trailer: 30 euros
- Plywood: 21.40 euros
- Steel Profiles: 10 euros
- Aluminum Tube, Screws, and Hooks: 17 euros
Remarkably, after selling unnecessary parts from the old bike trailer, I found myself 18 euros in the green. This surplus was earmarked for a stand to prevent tipping and facilitate easier loading—a worthwhile addition to enhance functionality.
Embarking on this DIY bike trailer journey taught me valuable lessons in sustainability, creativity, and patience. The process not only satisfied my initial need but also spurred a deeper appreciation for building with intention and resourcefulness.
Customization Ideas for Your DIY Bike Trailer
When it comes to making a DIY bike trailer, customization is key. You want your trailer to fit your specific needs, whether that's hauling groceries, bringing your furry friend along for the ride, or embarking on a cross-country adventure. Here are some ideas to inspire your project:
For the Urban Shopper
- Foldable Sides: Add foldable sides to your trailer to make it compact and easy to store.
- Lockable Lid: Consider a lockable lid to secure your items during a quick stop.
- Removable Containers: Use removable containers for easy unloading of groceries.
For the Pet Owner
- Comfortable Padding: Line the trailer with comfortable padding for your pet's comfort.
- Safety Harness: Include a safety harness to keep your pet secure.
- Mesh Windows: Install mesh windows for ventilation and to let your pet enjoy the view.
The Long-Distance Traveler
- Lightweight Materials: Opt for lightweight materials to reduce the strain on your bike.
- Waterproof Cover: Ensure your belongings stay dry with a waterproof cover.
- Tool Pouch: Attach a tool pouch for easy access to repair kits and essentials.
For the Eco-Friendly Builder
- Recycled Materials: Use recycled materials where possible to reduce environmental impact.
- Solar Panel: Attach a small solar panel to power lights or charge devices.
- Plant Holder: Incorporate a plant holder to bring a bit of greenery along for the ride.
For the Tech Enthusiast
- USB Charging Ports: Install a USB charging port powered by a wheel dynamo.
- GPS Tracker: Add a GPS tracker for security and to log your travels.
- LED Lighting: Fit LED lighting for visibility and safety.
Plan ahead to make your bike trailer useful for your lifestyle. Keep it simple, focus on functionality, and have fun! Your DIY trailer shows your creativity and ingenuity.
Troubleshooting Common Issues with DIY Bike Trailers
Building a DIY bike trailer can be a rewarding project, but it's not uncommon to run into a few hiccups along the way. Here's a helpful guide to troubleshoot some common issues you might encounter:
Trailer is Too Wobbly
- Solution: Check all connections and tighten any loose bolts. Ensure that the hitch is properly aligned with the bike's axis for stability.
Trailer is Not Level
- Solution: Adjust the length of the connecting arm or the hitch height. Make sure the trailer's wheels are of equal size and properly inflated.
Difficulty in Turning
- Solution: Verify that the hitch allows for adequate turning radius. Lubricate any stiff joints and consider a wider wheelbase for better stability.
Trailer is Too Heavy
- Solution: Reassess the materials used. Replace heavy parts with lighter alternatives like aluminum or bamboo.
Persistent Squeaking Noises
- Solution: Identify the source of the noise. Apply lubricant to any moving parts that are causing friction.
Trailer Tips Over Easily
- Solution: Lower the center of gravity by placing heavier items at the bottom. Widen the wheelbase or add side supports for increased stability.
Items Falling Out
- Solution: Install higher side walls or a cover. Use bungee cords or nets to secure items during transit.
Brakes Not Functioning Well
- Solution: If your trailer has brakes, ensure they are correctly installed and adjusted. Regularly check for wear and tear and replace brake pads when necessary.
Rust and Corrosion
- Solution: Use rust-resistant materials during construction. Apply a protective coating and store the trailer in a dry place.
Tires Wear Out Quickly
- Solution: Use tires suitable for the load and terrain. Regularly check tire pressure and alignment.
Fix common issues to improve your DIY bike trailer. Maintain it regularly. For tough problems, get help from a bike shop or another DIYer.
Safety and Maintenance Tips for DIY Bike Trailers
Ensuring the safety and longevity of your DIY bike trailer is crucial. Here are some tips to help you maintain your trailer and keep it in top condition:
Regular Inspections
- Check for Wear and Tear: Before and after each use, inspect your trailer for any signs of damage, such as cracks, rust, or loose components.
- Tire Pressure: Keep the tires inflated to the recommended pressure to avoid flats and ensure smooth riding.
Safety Features
- Reflective Materials: Apply reflective tape or paint to increase visibility during low-light conditions.
- Lights: Attach lights to the front and back of your trailer, especially if you plan to ride at night.
Secure Attachment
- Hitch Safety: Make sure the hitch is securely fastened to your bike. Double-check that it's locked in place before you start riding.
- Load Distribution: Balance the weight evenly in the trailer to prevent it from tipping over or affecting your bike's handling.
Weather Protection
- Waterproofing: Use waterproof covers to protect your cargo from rain and moisture.
- Sun Protection: If your trailer is stored outside, cover it with a UV-resistant tarp to prevent sun damage.
Cleaning and Storage
- Regular Cleaning: Clean your trailer regularly to prevent dirt buildup, which can lead to rust and corrosion.
- Proper Storage: Store your trailer in a dry, covered area to protect it from the elements.
Component Maintenance
- Lubrication: Lubricate moving parts such as the hitch and wheel bearings to ensure they operate smoothly.
- Tightening Bolts: Periodically tighten all bolts and fasteners to prevent them from loosening due to vibration.
Emergency Kit
- Carry a Repair Kit: Include basic tools, spare tubes, and a patch kit in case of a flat tire or minor repairs on the go.
- First Aid Kit: Always have a first aid kit handy for any unexpected injuries.
Follow these tips to extend your bike trailer's life and ensure a safer ride. Maintenance is ongoing; a well-cared-for trailer is a reliable cycling companion.
FAQs About DIY Bike Trailer
Find answers to common questions about DIY Bike Trailers. Learn about materials, assembly tips, safety, and more in our FAQs section.
You can attach the trailer to your bike using a bicycle trailer hitch and arm kit. This typically involves connecting a hitch to the rear axle of your bike and attaching an arm from the hitch to the trailer. Ensure the connection is secure and allows for the trailer to pivot.
Yes, you can build a bike trailer without welding. There are methods that involve using pre-existing frames, such as a futon frame, and securing parts together with bolts, rivets, or heavy-duty adhesives.
The size of your DIY bike trailer should be based on what you plan to carry. A common size for a manageable trailer is about 32 inches long by 22 inches wide. However, don’t make the trailer wider than your shoulders for ease of maneuvering.
The weight capacity of your DIY bike trailer depends on the materials used and the construction quality. It's important to consider the weight limit of your bike as well. Generally, a well-built trailer can handle around 100 lbs, but always test your trailer with a load before use.
Safety is paramount when building and using a DIY bike trailer. Here are some steps to ensure safety:
Inspect Materials: Before starting, inspect all materials for any defects or weaknesses.
Follow Instructions: Use detailed guides or tutorials to ensure proper assembly.
Weight Distribution: Make sure the weight is evenly distributed to prevent the trailer from tipping.
Secure Attachment: Double-check that the trailer is securely attached to your bike with a reliable hitch system.
Braking System: Consider adding a braking system if you plan to carry heavy loads or travel on hilly terrain.
Visibility: Add reflective materials and lights to the trailer to ensure it's visible to other road users, especially in low-light conditions.
Test Runs: Perform test runs with the trailer empty and then with increasing loads to check for stability and handling.
Regular Maintenance: Regularly inspect the trailer for any wear and tear, especially the wheels and hitch points.
Conclusion:
Building something useful with your own hands brings joy. This DIY bike trailer project simplifies the process, making it accessible for everyone. Happy building!


