Making a bird feeder is one of those rewarding woodworking projects that not only allows you to indulge in your crafting passion but also brings the beauty of nature right to your backyard. Let me walk you through how I replaced an old bird feeder with a new one, detailing every step along the way.
Materials Needed and Why
- 1 by 4 Cedar Boards: Cedar is an excellent choice for outdoor projects due to its durability and resistance to rot and decay.
- Biscuits: These help align the panels during assembly, making the construction process smoother.
- Wood Glue: Essential for bonding the wood pieces together. Opt for an outdoor-grade glue for added weather resistance.
- Clamps: Necessary for holding the wood pieces together while the glue dries.
- Glass Panels: These build a transparent reservoir for the birdseed, making it easy to monitor the seed level while also adding a stylish look.
- Outdoor Decking Screws: These screws are designed to withstand the elements, securing the bird feeder's parts without rusting.
- Square and Saw: Essential tools for measuring and cutting wood accurately.
- Biscuit Joiner: Though not strictly necessary, this tool makes aligning and joining the panels much easier.
How to Make a Bird Feeder - Step by Step Guide
Learn how to make a bird feeder with this step-by-step guide. Perfect DIY project for bird lovers. Build a welcoming habitat for feathered friends.
Step by Step Instructions
Discover how to make a bird feeder with the step-by-step Instructions below:
Step 1: Preparing the Wood Panels
First, I cut the cedar boards into several sections using a miter saw. To ensure a snug fit during assembly, I sanded down the edges that would touch. This helps build a smooth surface for gluing and ensures a tighter bond.
Step 2: Joining the Panels
With the biscuit joiner set to the correct size for my biscuits, I cut slots into each board where the panels would join. It's important to remember to apply glue not only between each joining surface but also within the slots for the biscuits. Once assembled, I used clamps to press and hold the panels together until the glue dried.
Step 3: Shaping the Feeder
After removing the clamps, I trimmed the edges of the glued panels to ensure they were perfectly perpendicular. This was essential for the overall aesthetic and structural integrity of the bird feeder. Then, I drew out and sawed the side pieces to match the design of the old birdhouse.
Step 4: Constructing the Feed Trough
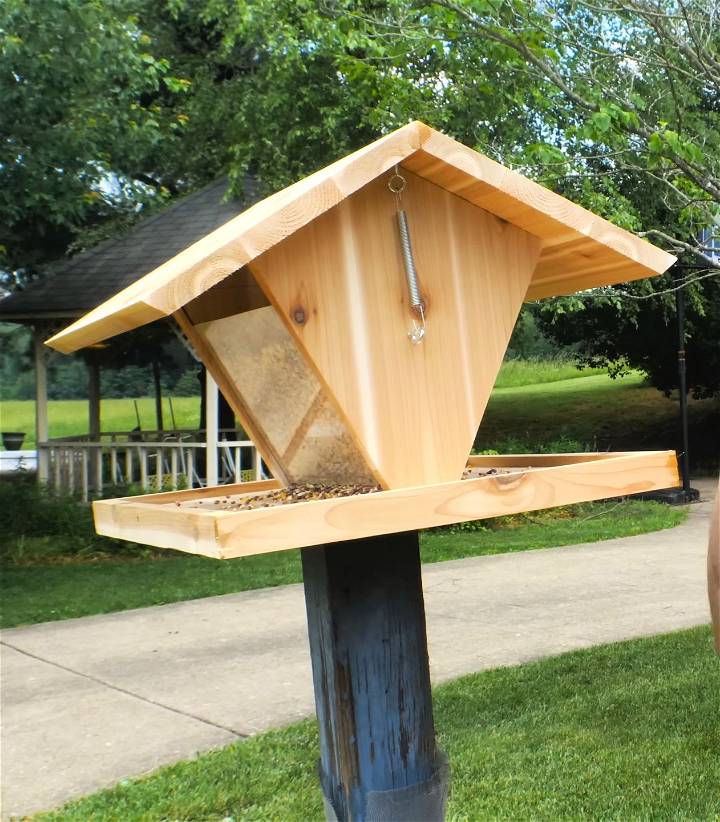
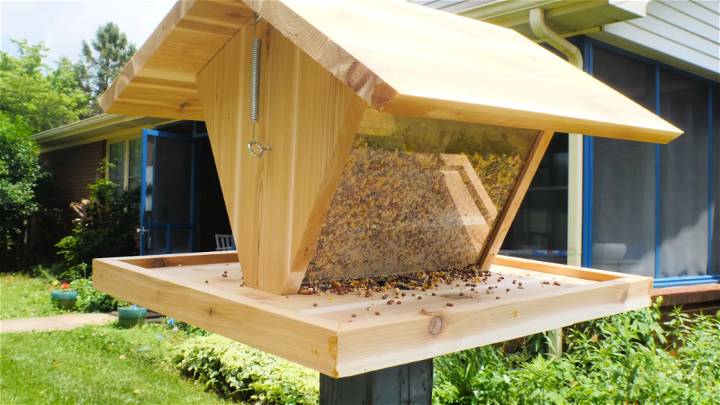
The unique aspect of this feeder is the slot cut for the glass panels, making a trough where birdseed will rest. I carefully cut notches on each side of the wood panels with a table saw, ensuring they were deep enough to accommodate the glass panels securely.
Step 5: Cutting and Installing the Glass
Cutting glass was a bit outside my comfort zone, but with some practice, I managed to score and snap the pieces to fit perfectly between the wood panels. Placing the glass in the slots, I then buildd a bottom section to hold the birdseed, ensuring it was high enough to keep the seed accessible to the birds.
Step 6: Assembling the Roof
Determining the angle for the roof pieces required a bit of trial and error. Once figured out, I cut the wood to size and glued the two pieces together, using the offcuts as spacers to ensure they dried at the correct angle.
Step 7: Adding the Finishing Touches
For ease of use, I made the roof removable by attaching it with springs. This way, the feeder can be easily filled with birdseed and cleaned when necessary. Lastly, I mounted the feeder on an existing post in my backyard, filling it with a general mix of birdseed.
Additional Tips and Care for DIY Bird Feeder
- Choosing Birdseed: Different seeds attract different birds. Experiment with various types to see who visits your new feeder.
- Maintenance: Check and refill the bird feeder regularly. Also, clean the feeder periodically to keep it safe and appealing to birds.
- Placement: Install your bird feeder in a place where you can easily see it from your house and where it's safe from predators.
Building this bird feeder upgraded my backyard and improved my woodworking. Encouraging others to try it to attract birds and beautify their outdoor space.
Bird Feeder Placement Tips
When it comes to attracting feathered visitors to your yard, bird feeder placement plays a crucial role. By strategically positioning your feeders, you can build a welcoming environment that encourages birds to visit regularly. Here are some helpful tips for optimal bird feeder placement:
1. Choose the Right Location
- Sunlight Exposure: Place your bird feeder where it receives adequate sunlight. Birds often prefer sunny spots, especially during colder months when they need warmth.
- Visibility: Position the feeder where you can easily observe it from indoors. This allows you to enjoy watching the birds without disturbing them.
- Safe Distance: Keep feeders away from windows to prevent bird collisions. A distance of at least 3 feet from glass surfaces is recommended.
- Predator-Free Zone: Avoid placing feeders too close to shrubs or structures where predators (such as cats) can hide. Birds feel safer when they have a clear view of their surroundings.
2. Feeder Height Matters
- Elevated Feeders: Hanging feeders at different heights attracts a variety of bird species. Some birds prefer elevated feeders, while others like ground-level ones. Consider offering both options.
- Squirrel Deterrence: To discourage squirrels, hang feeders at least 5 feet above the ground and 10 feet away from tree branches or structures.
3. Feeder Types and Surroundings
- Window-Mounted Feeders: These allow close-up views from indoors. Attach them securely to the window using suction cups.
- Pole-Mounted Feeders: Use sturdy poles to elevate feeders. Ensure the pole is squirrel-proof and has a baffle to prevent climbing.
- Natural Cover: Position feeders near trees, shrubs, or bushes. Birds appreciate nearby perches for safety and quick escapes.
4. Keep It Clean
- Regular Maintenance: Clean feeders at least once a month to prevent mold, bacteria, and disease transmission. Use a mild solution of water and vinegar.
- Fresh Water: Place a shallow birdbath nearby. Birds need water for drinking and bathing, especially during hot weather.
5. Seasonal Adjustments
- Winter: Offer high-energy foods like suet and black oil sunflower seeds. Birds need extra calories to stay warm.
- Migration: During migration seasons, provide fruits, mealworms, and nectar for hummingbirds.
- Spring and Summer: Focus on protein-rich foods for nesting birds. Insects, seeds, and fruits are essential.
Remember, observing bird behavior and adjusting your placement based on their preferences will enhance your bird-watching experience. Enjoy the delightful company of your feathered friends!
Feeder Height Matters
The elevation of your bird feeder significantly impacts the types of birds you attract and their overall feeding experience. Let's explore some essential considerations related to feeder height:
1. Elevated Feeders for Diversity
- Why Vary Heights? Birds have diverse feeding preferences. Some species are comfortable feeding at ground level, while others prefer elevated perches. By offering both options, you'll attract a wider variety of feathered visitors.
- Hanging Feeders: Suspended feeders provide an excellent elevated feeding spot. Consider using sturdy hooks or tree branches to hang them.
2. Squirrel Deterrence
- The Squirrel Challenge: Squirrels are notorious for raiding bird feeders. To keep them at bay:
- Height: Hang feeders at least 5 feet above the ground. This height discourages squirrels from reaching the food.
- Distance from Trees: Position feeders 10 feet away from tree branches or structures. Squirrels are agile climbers, so maintaining distance is crucial.
- Baffle Magic: Install a squirrel baffle (a cone-shaped guard) below the feeder. It prevents squirrels from climbing up the pole or rope.
3. Ground-Level Feeders
- Who Prefers Ground Feeding? Certain birds, such as sparrows, towhees, and juncos, feel safer feeding on the ground.
- Platform Feeders: Use flat trays or platforms close to the earth. Scatter seeds, cracked corn, or millet for ground-feeding species.
- Safety Note: Ensure the ground area around the feeder is clear of debris and predators.
4. Window-Mounted Feeders
- Up Close and Personal: Window-mounted feeders allow you to observe birds from indoors. They're especially popular for small spaces or apartments.
- Secure Attachment: Use suction cups to affix the feeder to the window. Make sure it's stable and won't fall.
5. Pole-Mounted Feeders
- Sturdy Poles: Invest in sturdy feeder poles made of metal or durable plastic. Wooden poles may rot over time.
- Adjustable Heights: Some poles come with adjustable hooks, allowing you to change the feeder's height as needed.
- Baffle Again: Attach a squirrel baffle to the pole. This prevents squirrels from climbing up.
Remember, the right feeder height enhances bird safety, prevents squirrel mischief, and invites a delightful avian community to your backyard.
Attracting Specific Bird Species
Building a bird-friendly environment that caters to specific species can be a rewarding way to enjoy wildlife. Here's how you can attract certain birds to your DIY feeder:
Hummingbirds
- Nectar Feeders: Use feeders designed for hummingbird nectar. These are usually red and have feeding ports that accommodate their long beaks.
- Homemade Nectar: Mix one part white sugar with four parts water. Boil the solution to eliminate any bacteria or mold.
- No Dyes: Avoid red dye in nectar; it's unnecessary and could be harmful to the birds.
- Regular Cleaning: Clean the feeder every few days to prevent mold growth, especially in hot weather.
Woodpeckers
- Suet Feeders: Offer suet cakes in wire cages. Woodpeckers are attracted to the high-fat content, which provides energy.
- Native Trees: Leave dead trees standing if safe to do so. They provide natural feeding sites and nesting cavities.
- Tail-Prop Feeders: Some feeders come with a tail-prop area to help woodpeckers balance while they feed.
Goldfinches
- Thistle Feeders: Also known as Nyjer feeders, these have small holes that dispense thistle seed, a goldfinch favorite.
- Plant Thistles: If you can, grow thistles and other seed-bearing flowers in your garden to provide a natural food source.
Bluebirds
- Mealworm Feeders: Bluebirds love mealworms. Offer them in a feeder with smooth sides to keep the mealworms contained.
- Water Source: Provide a water bath. Bluebirds are attracted to shallow water sources for drinking and bathing.
Cardinals
- Sunflower Seeds: Cardinals prefer sunflower seeds. Offer these in hopper or platform feeders with plenty of space to perch.
- Dense Shrubs: Planting dense shrubs or thickets provides cardinals with cover and nesting sites.
DIY Bird Feeders: Your Questions Answered
Building a DIY bird feeder is a fun and rewarding project that can help you connect with nature and provide a valuable resource for local wildlife. Here are some frequently asked questions to guide you through the process:
What materials do I need for a DIY bird feeder?
To start your DIY bird feeder project, you'll need basic materials such as:
- A container or platform to hold the birdseed (e.g., a plastic bottle, milk carton, or wooden board).
- A hanging mechanism if you're making a hanging feeder (e.g., string, wire, or a hook).
- Tools for assembly, which might include a drill, scissors, or a hammer and nails.
- Optional decorations to make your feeder attractive to both birds and humans.
How can I make my bird feeder squirrel-proof?
Squirrels are clever and persistent, but there are ways to deter them:
- Use a baffle (a dome-shaped barrier) above and/or below the feeder.
- Choose a feeder design with small feeding ports that only allow birds to access the seed.
- Hang the feeder from a smooth metal pole at least 5 feet off the ground and away from trees or structures.
What type of food should I put in my bird feeder?
The type of food you should put in your bird feeder depends on the birds you want to attract:
- For a general mix, use black oil sunflower seeds, which are popular with many species.
- To attract finches, fill your feeder with nyjer (thistle) seeds.
- Suet cakes are great for attracting woodpeckers and other insect-eating birds.
- For hummingbirds, provide a sugar water solution (4 parts water to 1 part white sugar).
How often should I clean my DIY bird feeder?
Clean your bird feeder regularly to prevent the spread of disease:
- A thorough cleaning is recommended every two weeks or more often if the feeder is heavily used.
- Remove old seeds and droppings, and scrub the feeder with a solution of one part vinegar to nine parts water.
- Rinse well and allow the feeder to dry completely before refilling.
Where is the best place to hang my bird feeder?
The best place to hang your bird feeder is:
- At least 5 feet off the ground to protect from ground predators.
- Near natural shelters like bushes or trees provide cover for the birds.
- It is in a quiet area away from loud noises and high traffic.
- Visible from a window so you can enjoy watching the birds.
By following these tips and frequently asked questions, you'll be well on your way to making a successful DIY bird feeder that brings joy to both you and your local bird population.
Conclusion:
In conclusion, making your DIY bird feeder can be a fun and rewarding project that adds a personal touch to your yard while benefiting local wildlife. Get started today and enjoy watching the birds flock to your feeders.


