Building a DIY book stand is a simple and fun project. It helps clear up my desk and keeps my books organized. I love having a tidy workspace, and this stand made a big difference. Not only does it hold books upright, but it also adds a personal touch to my desk. You don't need a lot of materials to make it, just a bit of creativity.
Purpose and Benefits of a Book Stand
A book stand isn't just for holding novels or textbooks. It serves a valuable purpose and offers benefits that enhance your reading experience. Here's why a book stand is a smart choice:
1. Improved Posture and Comfort
- Ergonomic Design: A well-designed book stand elevates your reading material to a comfortable eye level. This minimizes the need to hunch over or strain your neck, reducing the risk of discomfort or pain.
- Neck and Back Relief: By maintaining a natural posture, you can read for longer periods without feeling fatigued. Whether you're studying, cooking from a recipe book, or enjoying a novel, a book stand encourages better alignment.
2. Reduced Eye Strain
- Optimal Viewing Angle: Placing your book on a stand ensures that the text is at the right angle for your eyes. You won't have to squint or strain to read small print.
- Consistent Distance: The stand keeps the book at a consistent distance from your eyes, preventing eye fatigue during extended reading sessions.
3. Hands-Free Convenience
- Free Up Your Hands: With a book stand, you can turn pages effortlessly without needing to hold the book open. This is especially useful when following recipes or studying while taking notes.
- Multitasking: Use your hands for other tasks—like sipping tea, jotting down ideas, or using a tablet—while your book remains securely propped up.
4. Versatility
- Cookbook Stand: When cooking, a book stand holds your recipe book open, allowing you to follow instructions without messy spills or flipping pages.
- Study Aid: Students benefit from book stands during study sessions. They can keep textbooks, notes, or reference materials organized and accessible.
5. Display and Decor
- Showcase Your Books: A stylish book stand can double as a decorative piece. Display your favorite novels, poetry collections, or antique books on a stand to add character to your living space.
- Bookstore Vibes: Imagine your home library with neatly arranged books on elegant stands—it's like having your own mini bookstore!
6. Portable and Space-Saving
- Compact Design: Book stands are lightweight and portable. Foldable or collapsible versions are ideal for travel or studying on the go.
- Save Desk Space: If you're short on desk space, a book stand allows you to maximize the available area while keeping your reading material accessible.
A book stand is an investment in your reading comfort. Whether you're a reader, student, or cook, adding one can make a big difference!
Materials Needed and Their Purpose
- Plywood or any wood scraps: I opted for Baltic Birch plywood for its durability and clean look, but really any sturdy wood scraps you have will work.
- Walnut strips for edge banding: This adds a nice contrast to the plywood and finishes the edges neatly for a more polished look.
- Wood glue: Essential for joining the pieces securely.
- Masking tape: A quick and easy clamp for the edge banding while the glue sets.
- Finishing oil: I used Maker Brand Simple Finish for a natural look and protection.
Step by Step Instructions
Learn how to make a DIY book stand with our step-by-step guide. From cutting wood to assembly and finishing, we cover everything you need.
Step 1: Planning and Cutting Your Wood
First, you want to decide on the dimensions. For my bookstand, I settled on pieces that were 9 inches wide and 11 inches long, to comfortably accommodate even larger books. Using a table saw, I cut one large plywood sheet into three pieces with these dimensions. If you're new to woodworking, remember to measure twice and cut once to ensure accuracy.
Step 2: Edge Banding
Edge banding was my choice for a refined look and to cover the plywood edges. I cut thin strips of walnut for this purpose. Gluing these onto the edges of the plywood pieces added a visual pop and made the stand look more finished. In retrospect, applying the banding before cutting the individual pieces into their final dimensions would've been wiser and saved some time.
Step 3: Adding Details for Functionality
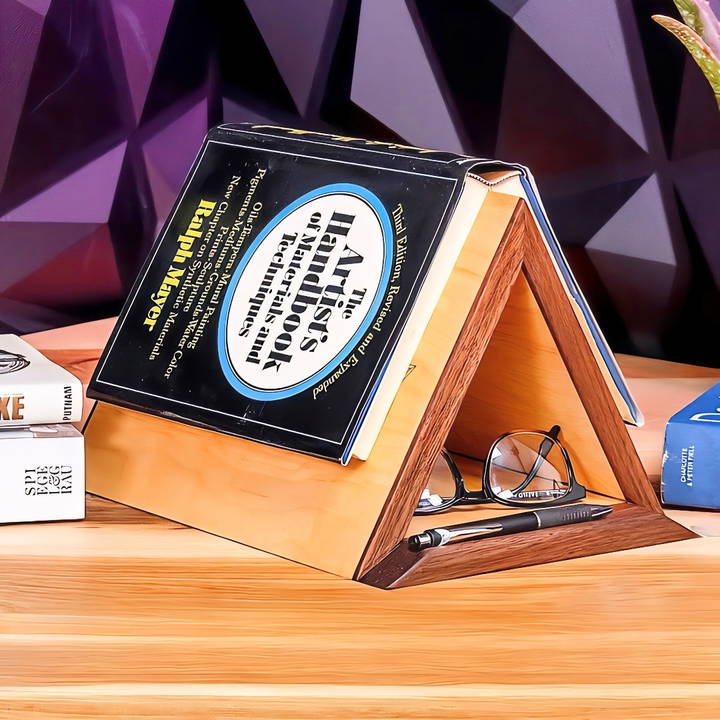
I wanted my book stand to be more than just a stand; I envisioned a slot for holding a pen and a recess to place glasses. To achieve this, I glued a wider piece of walnut to what would become the base of the stand, incorporating a small groove. This detail, while simple, significantly boosts the stand's utility.
Step 4: Assembly
The unique shape of the stand required making cuts at precise angles. To connect the pieces in a triangular configuration, I needed 30-degree angles. Here's where I faced a challenge: my saw could not directly achieve these cuts. I constructed a simple jig from scrap wood to hold the pieces at the correct angle to my fence, allowing me to make the cuts needed. Ensuring accuracy in this step was crucial for the pieces to fit together perfectly.
Step 5: Gluing and Finishing
With all the pieces cut and edge-banded, it was finally time to assemble the stand. I employed wood glue and strategically placed tape to hold everything together while the glue dried, eliminating the need for clamps. After assembly, I discovered minor gaps at the joins due to miscalculations in the angle cuts. A mixture of walnut sawdust and glue served well to fill these imperfections. To finish, I applied several coats of Maker Brand Simple Finish, enriching the stand's color and protecting the wood.
The Final Product
After letting the finish dry, I was left with a beautifully simple and highly functional book stand that looks right at home in my workshop or kitchen. It perfectly holds books open and offers a spot for my pen and glasses, making it an invaluable tool in my daily projects and cooking explorations.
Customization Ideas
Making a book stand isn't just about functionality; it's about showcasing your style. Here are fun, simple ways to make your stand unique:
1. Paint It Your Way
- Choose Your Colors: Pick colors that you love or that match your room's decor. Whether it's a single color or a mix of several hues, painting your book stand can transform its look.
- Patterns and Designs: Try adding stripes, polka dots, or even a stencil design. Use painter's tape to build clean lines or freehand a drawing for a personal touch.
2. Wood Staining
- Natural Look: If you prefer a more natural or rustic appearance, consider staining the wood. It enhances the grain and gives a warm, rich finish.
- Variety of Shades: Wood stains come in a range of shades, from light oak to dark walnut. Choose one that complements your furniture or book collection.
3. Decoupage
- Paper Crafts: Decoupage involves gluing paper cutouts onto your book stand. You can use pages from old books, colorful magazine clippings, or even wrapping paper.
- Seal and Protect: After arranging your paper cutouts, seal them with a clear varnish. This not only protects the surface but also gives it a glossy finish.
4. Add Textures
- Fabric Covering: Cover parts of your book stand with fabric for a soft, tactile feel. This can be particularly cozy if you're using the stand in a reading nook.
- Rope or Twine: Wrapping rope or twine around the edges or base can add a nautical or bohemian vibe to your stand.
5. Personalization
- Monograms and Names: Add your initials or name to the book stand with paint or wood-burning tools. It's a great way to claim your space and make it truly yours.
- Quotes and Images: Use transfer paper to add your favorite quotes or images. This can be inspirational and a great conversation starter.
6. Functional Add-Ons
- Bookmarks and Holders: Attach a ribbon or a clip to keep your place in the book. This is handy and ensures you never lose your spot.
- Adjustable Angles: Consider adding hinges to make the angle of the stand adjustable. This adds versatility for different reading positions.
7. Eco-Friendly Options
- Recycled Materials: Use reclaimed wood or recycled materials for an eco-friendly approach. It's good for the planet and adds a story to your stand.
- Plant-Based Decor: Incorporate small plant holders or succulent trays into the design. It brings life to your reading area and purifies the air.
Customizing your book stand, you not only build a functional piece but also a reflection of your personality and interests. Have fun with the process, and enjoy a book stand that's as unique as you are!

Safety Precautions
Making a book stand can be a rewarding DIY project, but it's important to keep safety in mind. Here are some safety precautions to ensure that your crafting experience is both enjoyable and secure:
1. Work Area Preparation
- Clear Space: Make sure your work area is clean and clear of any unnecessary objects that could cause accidents.
- Stable Surface: Use a stable workbench or table to avoid any wobbling while you're working.
2. Proper Tool Handling
- Sharp Tools: Always handle sharp tools, like saws or knives, with care. Keep them pointed away from your body.
- Power Tools: If using power tools, read the manual first, and wear appropriate safety gear like goggles and ear protection.
3. Personal Protective Equipment (PPE)
- Safety Glasses: Protect your eyes from flying debris or dust by wearing safety glasses.
- Gloves: Wear gloves to protect your hands from splinters and cuts, especially when handling wood.
4. Ventilation
- Good Airflow: Work in a well-ventilated area, especially if you're using adhesives or finishes that emit fumes.
- Dust Masks: If there's a lot of dust, consider wearing a dust mask to avoid inhaling small particles.
5. Fire Safety
- Keep Flammables Away: Store any flammable materials away from your work area.
- Fire Extinguisher: Have a fire extinguisher nearby just in case of an emergency.
6. Child and Pet Safety
- Supervision: If children or pets are around, make sure they are supervised and kept away from tools and materials.
- Safe Storage: Store tools and materials out of reach when not in use.
7. First Aid
- Kit Accessible: Keep a first aid kit accessible in case of minor injuries.
- Emergency Plan: Know what to do in case of a more serious injury, including how to contact emergency services.
Follow these precautions to focus on making a sturdy, beautiful book stand. Preparing and protecting yourself is key in any DIY project.
FAQs About DIY Book Stand
Discover answers to common questions about DIY book stands, including materials, tools, and step-by-step instructions for making your own.
One easy method involves using wire hangers and pliers. By bending the wire hangers with the pliers, you can form a supportive structure to prop your book open. This is a cost-effective solution that requires minimal tools.
Absolutely! You can make a book stand that doubles as a decorative piece. For example, using ice cream sticks or copper pipes can result in a functional and visually appealing book stand. These projects are not only practical but also add a touch of creativity to your space.
Yes, there are designs for collapsible book stands that are perfect for on-the-go reading. These stands can be easily packed and set up wherever you need, making them ideal for travel.
There are many online resources that provide detailed instructions and videos for making your own book stand. These guides will walk you through the process, from gathering materials to assembling the stand. Just search for DIY book stand tutorials, and you’ll find a variety of helpful content.
To ensure stability, make sure the base of your book stand is wide enough to support the weight of the book. You can also add weight to the base with materials like sand or pebbles. If you're using wood, ensure it's thick enough to withstand the book's weight without bending. For added grip, consider attaching rubber or silicone pads to the bottom to prevent slipping.
Reflections and Takeaways
In conclusion, taking on small projects like making a book stand gives me joy. It's satisfying to see my desk cleared up and my books neatly displayed. I find that keeping my space organized boosts my mood. I hope you feel inspired to start your own project!


