Making my own DIY bottle opener was such a fun and rewarding project. I went through my garage to find a sturdy piece of wood and some old nuts and bolts. Following a simple guide, I drilled a hole in the wood and attached a bolt to the top. It looked quite rustic but worked like a charm!
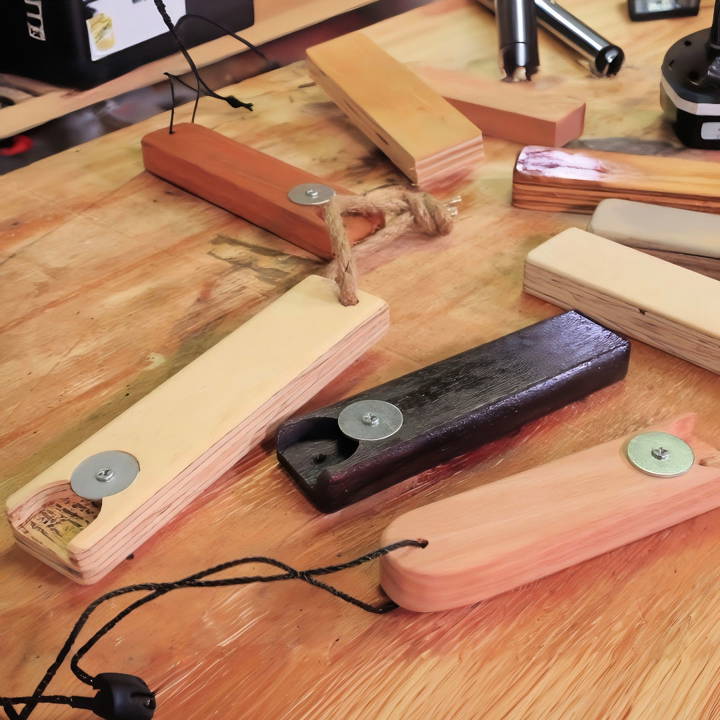
After assembling all the parts, I sanded the wood for a smooth finish and stained it to give it an elegant look. Now, whenever I have friends over, they admire my homemade bottle opener. It's satisfying to open bottles with something I built myself.
I encourage you to try it, too; the steps below will guide you through the process, and trust me, you'll enjoy it!
Getting Started: The Materials You Need
The materials for this project are quite straightforward and easy to procure. Here's what you'll need:
- Scrap timber: A piece of wood acts as the primary structure of the bottle opener. I chose a smooth, sanded-down piece for a refined look.
- Cordless drill: Essential for making the holes needed for the bottle opener mechanism.
- Forstner bits (25mm and 13mm): These are used to drill holes of precise diameters.
- Large 25mm flat washer: This component catches the underside of the bottle cap.
- Screws: To secure the washer onto the wood.
- Chisel and screwdriver: For fine-tuning the woodwork.
- Clamp, pencil, measuring tool: For accuracy and ease in the making process.
Each material was selected with intention. The scrap timber offers sustainability and personalization, the Forstner bits provide precision, and the flat washer serves as the pivotal bottle-opening mechanism. The remaining tools facilitate the bottle opener's assembly and finesse.
Step by Step Instructions
Learn how to make a personalized DIY bottle opener with our easy, step-by-step instructions. A perfect weekend project to impress your guests!
Step 1: Preparing and Marking the Wood
The first step involved preparing the scrap piece of timber. I made sure it was smooth and free of any rough edges. Then, using a pencil and a measuring tool, I marked the positions for the holes. This process required careful measurement to ensure the mechanics of the bottle opener would function correctly.
Step 2: Drilling the Holes
With the wood clamped securely, I drilled the designated holes using the 25mm Forstner bit for the larger recess and the 13mm bit for the smaller one. It was crucial to keep the drill straight and apply firm pressure to achieve clean holes.
Step 3: Chiseling for Precision
After drilling, I used a chisel to fine-tune the edges of the holes, making a seamless recess for the bottle cap to fit into. This step was about precision and careful handiwork to ensure the functionality and appearance of the bottle opener.
Step 4: Assembling the Opener
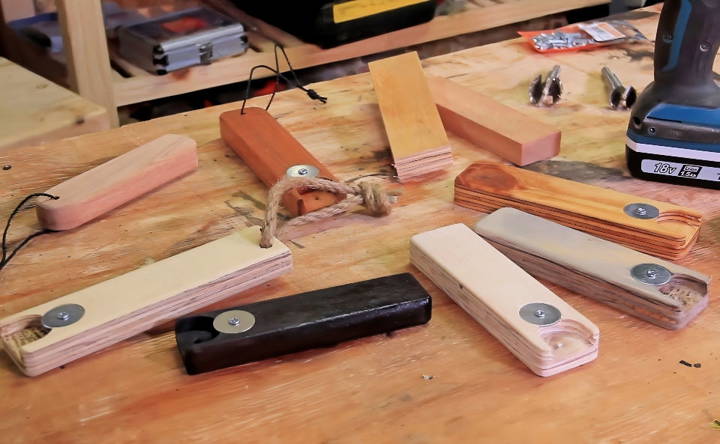
The next step was to secure the flat washer into place with screws. This component is vital as it catches and lifts the bottle cap when the opener is used. The positioning needed to be slightly offset to overlap the recess perfectly.
Step 5: Finishing Touches
To finish off, I sanded down the opener one more time to ensure all surfaces were smooth and treated the wood with a stain for a polished look. I opted for African mahogany to highlight the natural beauty of the timber.
Step 6: Adding a Rope Handle
For added functionality and aesthetic appeal, I threaded a rustic-looking rope through a hole at the top of the opener. This not only served as a practical handle but also added a charming touch to the homemade opener.
The result was a bespoke, functional bottle opener that carried much more meaning than any store-bought gift. It was a testament to the time, thought, and effort invested in making something genuinely special for Father's Day. I was thrilled with the outcome and even more so with the joy it brought.
Personalization Ideas for Your DIY Bottle Opener
Personalizing your DIY bottle opener can transform a simple tool into a memorable keepsake or a thoughtful gift. Here are some creative ideas to make your bottle opener uniquely yours:
- Choose Your Material: Start by selecting a material that resonates with you. Whether it's a piece of reclaimed wood with a story, a sleek piece of metal for a modern look, or even a durable plastic in vibrant color, the material sets the stage for your personal touch.
- Engraving: If you have access to an engraving tool, consider adding a name, date, or a special message. This could commemorate an event, celebrate a friendship, or simply add a bit of humor with a witty quote.
- Handle with Flair: The handle is the perfect place to express yourself. Wrap it in leather for a classic feel, or crochet a colorful sleeve for a cozy grip. You could also attach charms or beads that reflect your hobbies or interests.
- Paint and Decorate: Unleash your inner artist with paint. Go for a minimalist design with geometric shapes or get intricate with patterns and landscapes. Stickers and decals are also an easy way to add personality without the need for artistic skills.
- Functional Add-ons: Think about what else your bottle opener could do. Add a magnet for easy storage on the fridge, or integrate a small corkscrew for wine lovers. A fold-out knife could be handy for cutting the foil on wine bottles or tackling packaging.
- Eco-friendly Touch: For those environmentally conscious, use recycled materials or upcycle old items into parts of your bottle opener. An old key or a piece of driftwood can become a conversation starter as well as a tool.
- Themed Creations: Align your bottle opener with a theme. Love the beach? Use seashells or sand in the design. A fan of a sports team? Incorporate their colors or logo. Themes can connect the opener to your passions.
- Interactive Elements: Add elements that engage others. This could be a small game on the handle, like a tiny maze or puzzle, or a QR code that links to your favorite playlist.
The key to personalization is making it meaningful to you. It's not just about how it looks, but the story it tells and the conversation it starts.
Advanced Techniques for Crafting a DIY Bottle Opener
Enhancing your DIY bottle opener with advanced techniques can elevate its functionality and aesthetic appeal. Here are some sophisticated methods to consider for those looking to challenge their craftsmanship:
- Incorporate Multi-Tools: A multi-functional opener can be a standout feature. Integrate tools like a screwdriver, can opener, or small knife. This not only adds value but also makes your opener a versatile gadget.
- Woodworking Skills: If you're working with wood, try advanced woodworking techniques such as inlaying or wood burning to build intricate designs. These skills can add a professional touch to your opener.
- Metalworking Mastery: For those using metal, explore techniques like forging or soldering to shape and join pieces. You could even craft the opener from a single piece of metal for a sleek, durable design.
- Magnetic Magic: Embed a strong magnet within the handle or the head of the opener. This allows it to conveniently stick to metal surfaces and can catch bottle caps as they're removed.
- Electronics Integration: For the tech-savvy, incorporate LED lights or sound chips that activate when the opener is used. This can add a fun, interactive element to your opener.
- Ergonomic Design: Focus on the opener's grip and leverage. Design the handle to fit comfortably in the hand and position the opening mechanism for maximum efficiency.
- Personalized Packaging: Make a custom case or box for your opener. Use materials like leather or felt, and decorate it to match the style of your opener. This adds to the presentation and makes it great for gifting.
- Advanced Decoration: Use etching or engraving tools to build detailed artwork on the opener. This can be done by hand or with a computer-controlled machine for precision.
- Quality Finishing: Apply a high-quality finish to protect your opener and give it a polished look. Consider food-safe oils for wooden openers or clear lacquer for metal ones.
With these techniques, you'll build a standout bottle opener and gain new skills. Prioritize safety with tools and materials, and enjoy making something exceptional.
Troubleshooting Tips for DIY Bottle Openers
When crafting a DIY bottle opener, you might encounter a few hiccups along the way. Here are some troubleshooting tips to help you overcome common challenges:
The Opener Isn't Removing Caps Efficiently
- Solution: Check the angle of the opening notch. It should be sharp enough to catch the edge of the cap. If it's too blunt, file it down to build a sharper edge.
The Handle Feels Uncomfortable or Slips
- Solution: If the handle is too smooth, add some texture. Wrapping it with cord or applying a non-slip grip can provide better hold and comfort.
The Opener is Too Weak or Bends
- Solution: This usually means the material is too thin or not strong enough. Consider using a thicker piece of metal or wood, or reinforce the existing one with additional layers.
The Opener is Rusting or Corroding
- Solution: Apply a protective coating to prevent oxidation. For metal, use a clear lacquer or for wood, a sealant. Ensure the opener is dry before storing.
Difficulty in Aligning Parts During Assembly
- Solution: Use a template or jig to ensure consistent alignment. Measure twice and cut once to avoid misalignment.
The Opener is Too Bulky or Heavy
- Solution: Redesign the opener to be more streamlined. Remove any unnecessary material and focus on the essential parts.
The Decorative Elements are Falling Off
- Solution: Secure any decorative pieces with a stronger adhesive or consider integrating them into the design so they're less likely to detach.
The Opener Doesn't Reflect Personal Style
- Solution: Add personal touches through paint, engravings, or accessories that represent your interests or aesthetic preferences.
Anticipating issues and knowing solutions will help you build a durable DIY bottle opener. Patience and creativity are key in DIY projects.
FAQs About DIY Bottle Opener
Unlock answers to common questions with our faqs about DIY bottle openers. Get insights, tips, and solutions for your next homemade project!
Personalization can be done by engraving, painting, or adding unique designs to the handle or the mounting board. You can use stencils, wood-burning tools, or even decals to add a personal touch.
When working with tools and materials, always wear protective gear like gloves and safety glasses. Be cautious when handling sharp objects or power tools, and follow all manufacturer instructions for safe operation.
Yes, there are simple designs that require minimal skills. For example, you can build a wall-mounted opener using a pre-made opener attachment and a sturdy piece of wood, which only requires basic drilling and screwing.
A popular and creative solution is to build a cap catcher below the opener. This can be a simple box or a magnet that catches and holds the caps when they fall off. Some designs even include a mason jar or a custom container for added style.
For a one-handed operation, consider making a bottle opener that can be mounted to a wall or a sturdy surface. You can use a pre-made opener and attach it to a solid base. Ensure the opener is at a comfortable height and the base extends below the opener to act as a lever. When you press down on the bottle, the cap will pop off easily.
Conclusion:
Wrapping up, making a DIY bottle opener can be a fun and rewarding project. With the right materials and a bit of effort, you'll have a unique tool that adds a personal touch to any gathering. Making your own DIY bottle opener not only saves you money but also gives you the satisfaction of crafting something functional. Try it out, and enjoy the fruits of your labor!


