I remember the thrill when I completed my first DIY bread box. It was more than just building something; it was about making a special place in the kitchen. Having a custom bread box not only made our kitchen look organized but also gave our bread a fresher home.
Making the bread box was straightforward, even for a novice. With a few tools and clear instructions, I felt empowered to finish the project. This guide will provide you with bread box plans and step-by-step details on how to make a bread box. These steps will save you time and ensure a sturdy final product.
Gathering Materials
Discover why each material in gathering materials is essential for your projects, ensuring quality and effectiveness every time.
Why each material was essential:
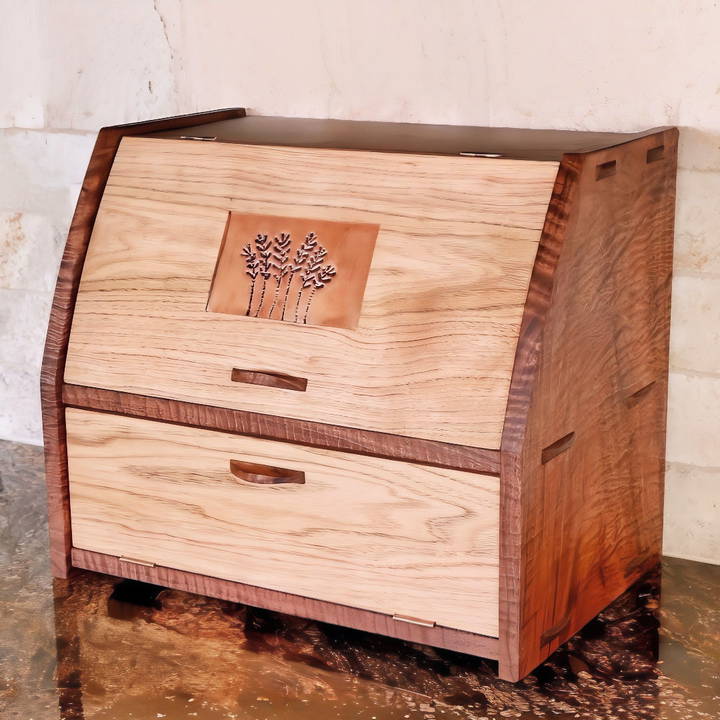
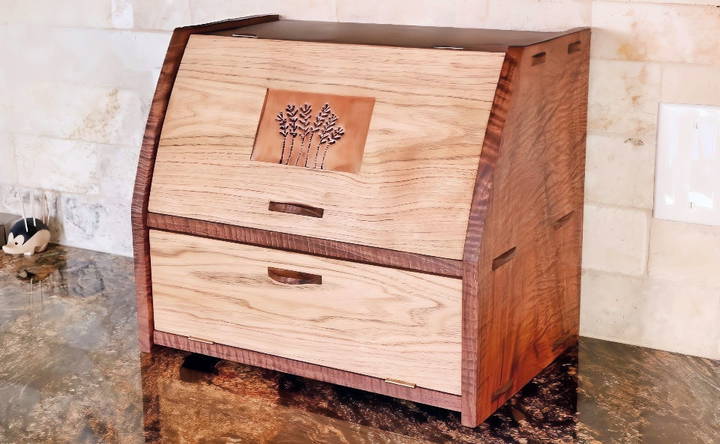
- Figured Walnut & Butternut: These woods were my primary materials, chosen for their durability and stunning patterns. Walnut's rich color contrasts beautifully with the lighter butternut, making the breadbox not just a storage unit but a piece of art.
- Copper Sheet: For the punch panel, copper was perfect due to its malleability and rustic appeal. It added a unique touch with a custom wheat pattern, symbolizing the essence of what the breadbox is all about.
- MDF (Medium Density Fiberboard): I used this for making a template for the mortises, thanks to its easy-to-cut nature and stability.
- Titebond & Hide Glue: Strong bonds were essential, and these glues promised durability. The hide glue was particularly useful for the final assembly due to its longer working time and easy cleanup.
- Brusso Hardware: The high-quality hinges and pulls from Brusso added a touch of elegance and functionality.
Step by Step Instructions
Learn to build a bread box with our step-by-step instructions. From planning and cutting to final touches, make a stylish, functional bread box.
Planning and Cutting
I started by meticulously planning the dimensions and cutting the walnut and butternut to size, ensuring I had pieces wide enough to avoid any panel glue-ups. Precision here was key to ensuring that the breadbox would come together seamlessly.
Building the Mortises and Tenons
Using MDF, I crafted a template for the through mortises. This step required an exacting eye for detail to ensure that the mortises would align perfectly with the tenons on the shelves. It was a process of trial and improvement, but once the tenons slid home snugly, the satisfaction was immense.
The Copper Punch Panel
Admittedly, working the copper sheet into a punch panel was daunting initially. I opted for a wheat design, paying homage to the bread that would fill the box. Each tap of the nail to emboss the design was made with care, making this perhaps the most meditative part of the process.
Assembly
Dry fitting the pieces together brought the project into clearer focus. Adding a curved profile to the tenons before assembly lent an extra flair to the piece. The hide glue provided enough working time to fit the pre-finished parts together without a rush, ensuring a clean assembly.
The Finishing Touches
Sanding, staining, and attaching the hardware were the final steps. The hard wax oil finish I selected provided a durable yet subtle sheen, enhancing the wood's natural beauty. Installing the Brusso hardware was straightforward, thanks to their quality craftsmanship, adding a seamless opening mechanism to the breadbox.
Lessons Learned
This project was not just about making a breadbox; it was a journey in patience, precision, and creativity. Here are a few insights I gathered along the way:
- Planning is essential: Every step, from selecting materials to the final assembly, needs forethought.
- Patience pays off: Especially when working with intricate designs or precision cuts.
- Quality materials make a difference: The choice of wood, glue, and hardware significantly impacts the final product.
- Don't fear creativity: The copper punch panel was a leap of imagination that became a project highlight.
Design Customization Ideas
Endless possibilities exist for designing a functional and personalized bread box. Here are customization ideas for a unique touch:
- Choose Your Wood Wisely: The type of wood you choose can greatly affect the appearance and durability of your bread box. Consider woods like bamboo for a light, eco-friendly option or oak for a sturdier, classic look.
- Paint and Finishes: A coat of paint can transform your bread box to match your kitchen's color scheme. Use food-safe paint and finishes to ensure safety. For a rustic look, try a distressed finish, or go for a glossy varnish for a modern touch.
- Add Intricate Carvings: If you're skilled with woodworking tools, consider adding decorative carvings to your bread box. Floral patterns, geometric shapes, or even a family monogram can make your bread box a piece of art.
- Functional Additions: Think about adding a built-in cutting board that slides out or a compartment for storing bread knives. These functional additions can enhance the usability of your bread box.
- Lid Designs: The lid of your bread box can be more than just a cover. Try a roll-top lid for a classic look or a flip-top with hydraulic hinges for ease of use.
- Handles and Knobs: The hardware on your bread box can be a small detail that makes a big difference. Choose handles or knobs that complement your kitchen's style, whether it's sleek and modern or ornate and vintage.
- Interior Dividers: For those who love organization, interior dividers can help separate different types of bread or baked goods, keeping everything neat and tidy.
- Ventilation: Proper ventilation is key to preventing mold. Design your bread box with small holes or a mesh panel to allow air circulation while keeping pests out.
- Personalized Engravings: For a truly personalized touch, add an engraved name, message, or special date to your bread box. It's a great way to commemorate a special occasion or build a family heirloom.
- Mix Materials: Don't be afraid to mix materials. Incorporating glass windows or metal accents can give your bread box a unique look and feel.
The goal is to build a bread box that reflects your personal style and meets your needs. Have fun with the process, and don't be afraid to experiment with different designs!
Advanced Techniques
For the woodworking enthusiasts looking to elevate their bread box project, advanced techniques can add both functionality and aesthetic appeal. Here are some sophisticated methods to consider:
- Dovetail Joints: Instead of basic joints, try crafting dovetail joints for the corners of your bread box. This classic technique not only strengthens the structure but also adds a touch of craftsmanship.
- Wood Inlays: Build a unique design on your bread box by incorporating wood inlays. You can use contrasting wood colors or materials like mother-of-pearl for intricate patterns.
- Adjustable Shelving: Implement a system of adjustable shelves inside your bread box. This allows for flexibility in storing different sizes of bread and baked goods.
- Magnetic Door Closure: For a sleek design, install a magnetic door closure system. It provides a clean look and ensures the door stays shut, keeping your bread fresh.
- Integrated Hygrometer: To monitor the humidity levels inside your bread box, fit it with a hygrometer. This advanced feature helps in maintaining the perfect environment for bread storage.
- LED Lighting: Install LED lighting inside your bread box to illuminate the contents. This is not only practical but also adds a modern touch to your creation.
- Acoustic Panels: If you're a fan of smart home devices, consider adding acoustic panels to the back of your bread box. This can help improve the sound quality of devices like smart speakers.
- Smart Locks: For added security or parental control, integrate a smart lock into your bread box. This can be controlled via a smartphone app.
- Temperature Control: Go a step further by incorporating a temperature control system. This can help keep bread at the ideal temperature, especially in varying climates.
- Solar Panels: If you're environmentally conscious, consider powering any electronic components in your bread box with solar panels. This sustainable option can power LED lights or temperature controls.
Using these advanced techniques, you'll challenge your woodworking skills and build a unique bread box. Prioritize safety and functionality, and enjoy crafting something exceptional.
Troubleshooting Common Issues
Building a bread box can be a rewarding DIY project, but sometimes, you might run into a few hiccups along the way. Here's a helpful guide to troubleshoot common issues you might encounter:
Wood Warping or Swelling
- Cause: Exposure to moisture or uneven drying.
- Solution: Choose kiln-dried wood and seal it properly with a waterproof finish. Store wood in a dry place before use.
Lid Doesn't Fit Properly
- Cause: Inaccurate measurements or wood movement.
- Solution: Double-check measurements before cutting. Allow wood to acclimate to your home's humidity for a week before constructing.
Screws or Nails Splitting the Wood
- Cause: Too much force or incorrect size.
- Solution: Pre-drill holes for screws and use the correct size nails. Drill at a consistent speed and don't force the screws.
Rough or Uneven Finish
- Cause: Inadequate sanding or using the wrong sandpaper grit.
- Solution: Start with a coarser grit and gradually move to finer grits. Sand evenly and finish with a tack cloth to remove dust.
Paint or Stain Not Adhering
- Cause: Surface not properly prepared or wrong type of paint/stain.
- Solution: Clean the wood surface thoroughly and apply a primer if necessary. Use paint or stain suited for the wood type.
Box is Not Airtight
- Cause: Gaps or poor construction.
- Solution: Ensure all joints are tight and well-sealed. Consider adding silicone sealant to gaps.
Difficulty in Opening or Closing
- Cause: Warped wood or hardware issues.
- Solution: Check for warping and replace if necessary. Lubricate hinges with a silicone-based product.
Mold Growth Inside the Box
- Cause: Lack of ventilation or high humidity.
- Solution: Add ventilation holes or a mesh panel. Keep the bread box in a cooler, less humid area of the kitchen.
By addressing these common issues, you can ensure that your bread box will be both functional and beautiful.
FAQs About How to Build a Bread Box
Discover essential tips and answers in FAQs about building a bread box, including materials, dimensions, and step-by-step guides.
Start by cutting a 16" wide piece from your plywood. Then, cut a 9-3/8" x 16" board for the sides. Mark and cut the angles on the sides, and then cut the pieces for the top, bottom, door, shelf, and back according to the required dimensions.
After cutting all the pieces:
Sand all parts with sandpaper.
Apply wood glue to the edges and join the sides, top, and bottom using brad nails.
Attach the pivot hinges to the door and sides.
Install the door and ensure it swings open smoothly.
A food-safe finish is best for a bread box. You can use mineral oil or beeswax to seal the wood and protect it from moisture. Apply the finish with a clean cloth and let it dry completely before using the bread box.
Absolutely! You can paint your bread box, add decorative knobs, or engrave designs to personalize it. Just make sure any paints or finishes you use are food-safe and non-toxic.
When building a bread box, consider the amount of bread your family consumes. If you eat a lot of bread, opt for a larger box that can accommodate multiple loaves. The standard size for a bread box is about 17 inches wide, 7 inches deep, and 7 inches high. However, you can adjust the dimensions to fit your space and needs. Remember to include a shelf or compartment for additional storage, and consider a design with a plexiglass cover so you can see the contents without opening the box.
Conclusion
In conclusion, a DIY bread box is a fantastic way to upgrade your kitchen storage. By taking the time to craft your own, you gain a practical solution that complements your kitchen's style. Plus, a well-made bread box helps keep your baked goods fresh for longer. Get started on your DIY project today and enjoy the perfect blend of functionality and creativity in your kitchen.


