Making a DIY cam stabilizer was a fun project for me. It started with gathering the necessary materials: a few metal rods, some screws, and a counterweight. I also used an old tripod head. Following a simple guide, I assembled these parts, ensuring everything was securely fastened. The stabilizer turned out better than I expected, and it made a noticeable difference in my video quality.
If you want to make a DIY cam stabilizer, I highly recommend giving it a try. It's affordable and effective. All you need is some basic tools and materials, which you might already have at home. This little gadget can help you shoot smoother, more professional-looking videos.
Why is stabilization important?
Imagine watching a movie where the camera is constantly moving; it would be hard to focus on the story. The same principle applies to any video. Stable footage helps to convey a clear message and keeps the audience engaged.
How does stabilization work?
There are several methods to stabilize a camera. Some rely on electronic assistance within the camera itself, while others use external equipment like tripods or gimbals. However, these can be expensive. This is where DIY (Do It Yourself) camera stabilizers come into the picture. They are a cost-effective alternative that can be just as effective when done right.
Keep your camera steady for smooth footage viewers will enjoy. Let's explore how you can achieve this with some creativity and know-how.
Materials Needed and Why
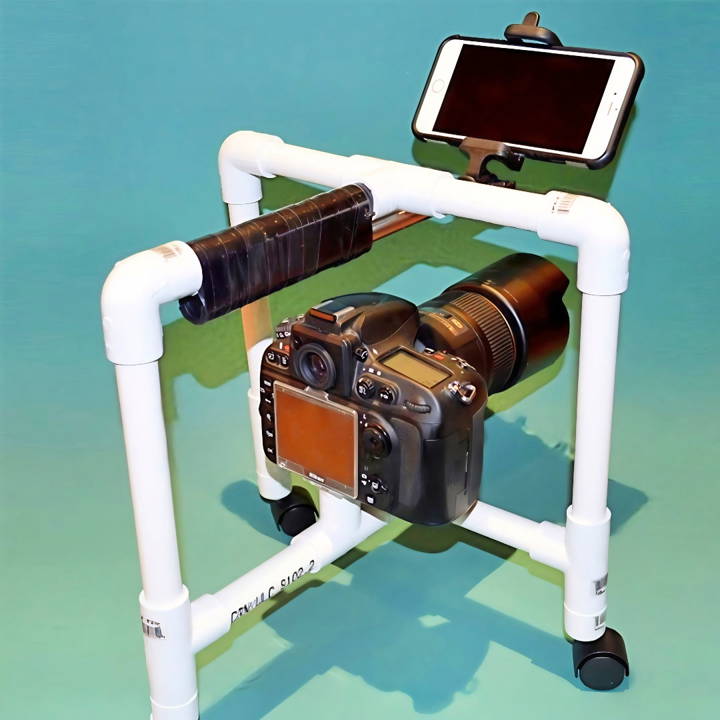
- PVC Tubes: We use various lengths for the structure. They're lightweight and easy to work with.
- PVC Elbows and T-joints: These help in connecting the tubes at right angles and T-shaped junctions.
- PVC Caps: To cap off the ends, giving our stabilizer a polished look.
- PVC Plug: Acts as a base for our camera mount.
- Quarter-inch Screw and Nut: To secure the camera onto the stabilizer.
- Optional: Old Selfie Stick: Great for adding a mount for your phone.
- Optional: Casters: For smoother movement if you're aiming for slider-like shots.
- PVC Cement: To permanently bond the pieces together once you're happy with the structure.
Step by Step Instructions
Learn how to build and customize a DIY camera stabilizer with step-by-step instructions and personal tips. Perfect for DIY enthusiasts and videographers.
Building the Base for the Camera
- Preparing the Mount: Start by drilling a hole in the PVC cap and T-joint for the camera mount. These holes need to align perfectly for the screw to fit through both.
- Assembling the Mount: Slide the quarter-inch screw through the holes in both the cap and the T-joint. Tighten the nut to secure everything in place. This is your camera mount, ready to be attached to the stabilizer.
Assembling the Stabilizer Frame
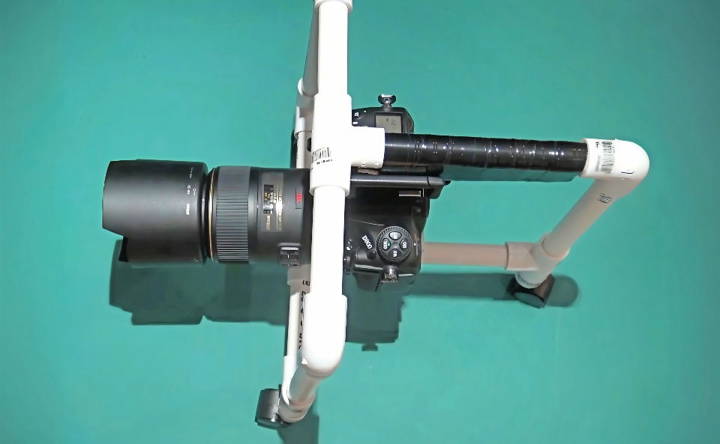
- Constructing the Handle: Connect two 4-inch PVC pipes to either side of a T-joint. At one end of this assembly, add a 1-inch piece followed by another T-joint. This forms a T-shaped handle.
- Adding the Vertical Support: Insert another 4-inch pipe into the open end of the last T-joint, attaching the camera base to the other end. Now, it should start looking like a stabilizer.
- Building the Side Supports: Attach a 7-inch pipe to each side of the bottom T-joint using 90-degree elbows, forming a U-shaped frame. This significantly increases stability.
- Final Touches: Place caps on the ends of each pipe for a clean finish. Optionally, if you want your stabilizer to glide smoothly, insert casters into the caps on the base.
Customizing Your Stabilizer
- Adding a Selfie Stick: For those who might want to use their phone, integrating an old selfie stick into the design adds versatility. Simply replace one of the 7-inch pipes with your selfie stick.
- Finishing Touches: Secure all connections with PVC cement. Once dry, wrap the handle with electrical tape for a comfortable grip or paint the entire stabilizer for a customized look.
My Personal Experience and Tips
Building this DIY camera stabilizer not only saved me costs on expensive gear but also allowed me to learn and apply basic engineering principles. A few tips based on my experience:
- Precision Matters: Ensure all holes are accurately drilled for the mounts to align properly.
- Test Before Cementing: Assemble the stabilizer and test it with your camera before applying PVC cement. This gives you a chance to adjust the design to your liking.
- Personalize: Feel free to add on to this design. Some may find adding spots for microphones or extra lighting useful.
Advanced DIY Techniques
Making a camera stabilizer doesn't have to be an expensive endeavor. With some ingenuity and basic materials, you can construct a device that rivals the performance of professional equipment. Here, we'll delve into advanced DIY techniques that will help you build a robust camera stabilizer using readily available items.
- Choosing the Right Materials: The key to a sturdy stabilizer is the material. While PVC pipes are lightweight and easy to work with, metal pipes offer increased durability and stability. Consider using aluminum or carbon fiber for parts that require strength without adding significant weight.
- Balancing Your Stabilizer: A well-balanced stabilizer is crucial for smooth footage. You can build a counterweight system using inexpensive materials like washers or fishing weights. Attach them to the opposite end of your camera's mounting point and adjust until you achieve a neutral balance.
- Gimbal Construction: A gimbal allows for fluid movement and can be quite complex to DIY. However, with some electronic components and a bit of soldering, you can build a functional gimbal. Use old hard drive motors for a homemade gyroscopic effect, ensuring your camera stays level during motion.
- Isolation Techniques: To reduce micro-vibrations, incorporate rubber bands or springs into your design. These can act as shock absorbers, isolating the camera from any small bumps or jitters.
- Ergonomic Handles: Comfort is important, especially during long shoots. Design handles that fit comfortably in your hands. You can repurpose bicycle grips or craft custom handles from wood, shaping them to your preference.
- Mounting Options: For versatility, include various mounting options on your stabilizer. A quick-release plate allows for easy camera attachment and removal, while multiple screw sizes accommodate different camera models.
- Fine-Tuning Adjustments: Once assembled, spend time fine-tuning your stabilizer. Adjust the counterweights and test different settings to find the perfect balance for your specific camera setup.
- Testing and Refinement: Finally, test your stabilizer in various filming scenarios. Take note of any instability and make incremental adjustments. With patience and precision, you'll refine your stabilizer to provide professional-level stabilization.
Save money and understand camera stabilization with these advanced DIY techniques. Enjoy the satisfaction of enhancing your videos with your own hands.
Troubleshooting Common Issues
When you're venturing into the world of DIY camera stabilizers, you might encounter a few hiccups along the way. It's all part of the learning process. In this section, we'll address some common issues you may face and provide straightforward solutions to keep your project on track.
Unbalanced Stabilizer
- Symptom: Your footage is tilting to one side or the camera doesn't stay level.
- Solution: Adjust the counterweights. Make sure the weight is evenly distributed across the stabilizer. Sometimes, adding or removing small weights can make a big difference.
Jittery or Vibrating Footage
- Symptom: The video shakes, especially when you're moving quickly.
- Solution: Check the tightness of all screws and joints. Loose parts can cause vibrations. Also, consider adding more padding where the camera mounts to absorb minor shocks.
Difficult Handling
- Symptom: The stabilizer is hard to hold steady or maneuver.
- Solution: Re-evaluate the handle design. It should be comfortable to grip for extended periods. If necessary, reshape the handles or add cushioning for better ergonomics.
Too Heavy to Carry
- Symptom: The stabilizer is cumbersome and causes fatigue.
- Solution: Lighten the load. Use lighter materials like aluminum or reduce the size of the counterweights. Balance is key, but so is portability.
Limited Movement Range
- Symptom: You can't move the camera as freely as you'd like.
- Solution: Loosen any overly tight pivot points. If your stabilizer has a gimbal, ensure it's not obstructed and can rotate fully.
Complex Assembly
- Symptom: Putting the stabilizer together is confusing.
- Solution: Simplify the design. A stabilizer should be easy to assemble and disassemble. Build clear instructions and label parts if necessary.
Improving these aspects will enhance your DIY stabilizer. Aim for an affordable tool for smooth footage. With some tweaks, you'll get stable, stunning videos.
FAQs About DIY Camera Stabilizer
Discover answers to common questions about DIY camera stabilizers, including tips, materials, and step-by-step guidance for making your own.
A DIY camera stabilizer is a homemade device that helps to keep your camera steady while shooting videos or taking photos. It's a cost-effective alternative to professional stabilizers and can be made from various materials like PVC pipes, metal, or even common household items.
Yes, you can use items like wheelchairs, skateboards, or even a simple camera strap to achieve a stable shot. For example, extending the camera strap and pressing it against your neck while holding the camera can provide a surprising amount of stability.
While a DIY stabilizer may not match the performance of high-end commercial gimbals, with careful construction and calibration, you can build a stabilizer that significantly improves the quality of your shots and rivals lower-cost commercial options.
You can get creative with household items for camera stabilization. For instance, a broomstick can be flipped upside down to serve as a monopod, or you can use a sandbag to rest your camera on for steady shots. Even a simple PVC tube attached to your camera cage can help stabilize it using gravity.
To ensure your DIY stabilizer performs well, balance is key. Make sure the weight is evenly distributed, and practice moving with it to get smooth shots. Regularly check all connections and joints for stability, and consider adding weights at the bottom of the stabilizer to lower its center of gravity, which can help with smoother movements.
Conclusion
Wrapping up, making a DIY cam stabilizer is a rewarding project that can greatly enhance your videography. By using simple materials and following easy steps, you can build a cost-effective tool to produce smooth and professional-looking videos. Remember to test and adjust your stabilizer to ensure optimal performance. With your own DIY cam stabilizer, you can capture stunning footage without breaking the bank. Happy filming!


