Building smooth, cinematic shots can be challenging, especially when working on a budget. A professional dolly system can cost hundreds or even thousands of dollars, but for filmmakers looking for a cost-effective solution, a DIY camera dolly can be the answer. In this tutorial, we'll demonstrate how to construct a budget-friendly camera dolly for under $50, with easy-to-find supplies. This dolly is great for adding dynamic movement to your shots, enhancing the quality of your video without breaking the bank.
What You'll Need
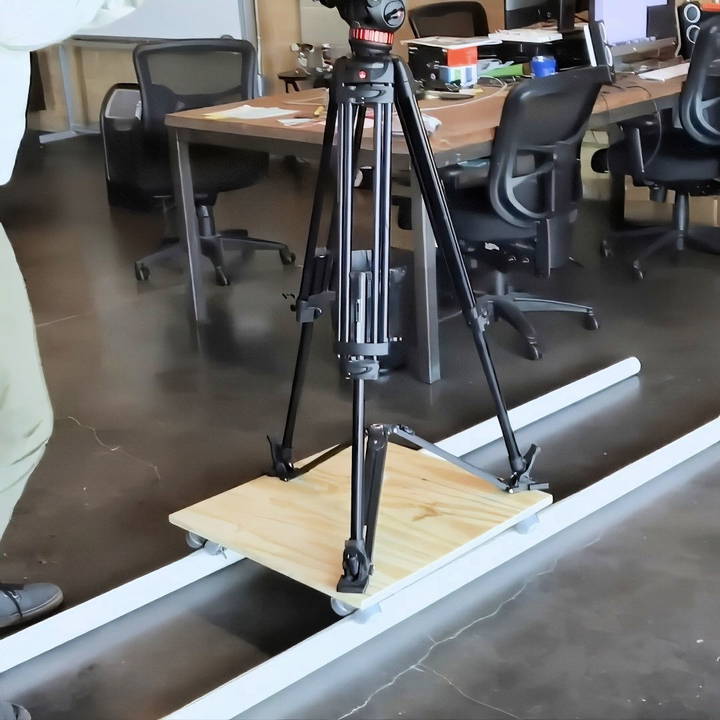
To build this DIY dolly, you'll need a few affordable materials, most of which can be found at your local hardware store. The key components include a small plywood board, wheels, L brackets, bolts, nuts, washers, and PVC pipes for the track.
Materials
Here's a complete list of materials you'll need for this DIY camera dolly:
- ¼ inch hex bolts - 8 pieces
- ¼ inch nuts - 16 pieces
- ¼ inch washers - 8 pieces
- 2' x 2' plywood board - this will be the base of your dolly
- L brackets - 4 pieces to hold the wheels securely
- Wheels - 8 wheels from either rollerblades or skateboards
- 2" PVC pipe - 2 long pieces (these will form the track)
Optional Tools
In addition to the materials, you'll need a few tools to assemble your dolly:
- Drill with appropriate drill bits
- Measuring tape or ruler
- Screwdriver
- Saw (to cut PVC to size if needed)
Budget Breakdown
Depending on where you shop and the quality of materials, the total cost for these items should range between $50 and $60, making this an affordable solution for those looking to improve their videography.
Step by Step Instructions
Learn how to build a DIY camera dolly with step-by-step instructions. From base prep to assembly, build smooth dolly shots affordably!
Step 1: Preparing the Base
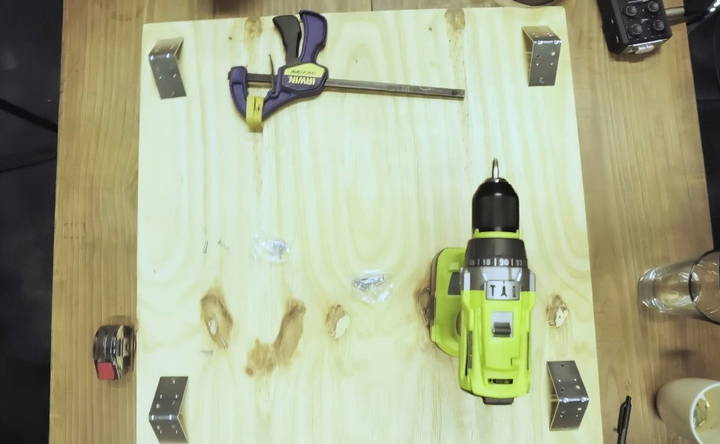
- Cut the plywood: If you haven't already, cut the plywood into a 2' x 2' square. This will serve as the base of your dolly.
- Sand the edges (optional): Sanding the edges will help prevent splinters and give the dolly a more polished look.
Step 2: Positioning the L Brackets
The L brackets will be used to attach the wheels to the base of the dolly.
- Measure and mark: Measure an equal distance from each corner of the plywood. In this example, a measurement of 2 inches by 1 inch from the edges was used.
- Attach the L brackets: Attach one L bracket at each corner, with the open ends facing outward to hold the wheels in place.
Step 3: Preparing the Wheels
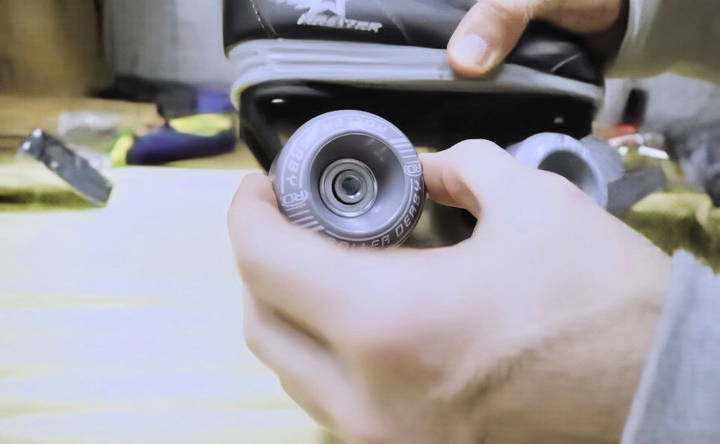
Your wheels will likely be sourced from rollerblades or skateboards. Either type will work as long as they are sturdy and provide smooth rolling motion.
- Remove the wheels from rollerblades or skateboard trucks if they aren't already detached.
- Drill additional holes in the L brackets: Most L brackets come with two holes, but these may not be big enough for the hex bolts needed to secure the rollerblade or skateboard wheels. Drill additional holes about an inch from the curve of the L bracket to accommodate the bolts.
Step 4: Attaching the Wheels to the L Brackets
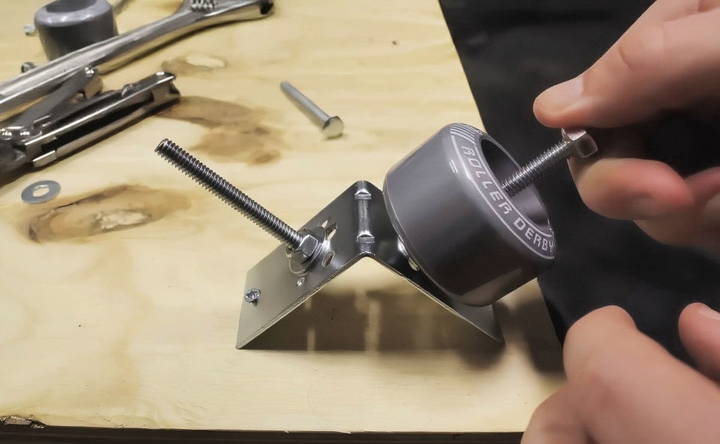
- Insert the bolts: After drilling the holes, insert the hex bolts through the new hole in the L bracket. Ensure they fit securely.
- Add washers and nuts: Place a washer and a nut on each side of the bolt to secure the wheels to the brackets.
- Tighten everything: Once the wheels are attached, tighten each nut to ensure they're stable. Repeat this process for all four corners of the plywood.
Step 5: Assembly of the Dolly
With the brackets and wheels attached, the basic structure of your dolly is complete.
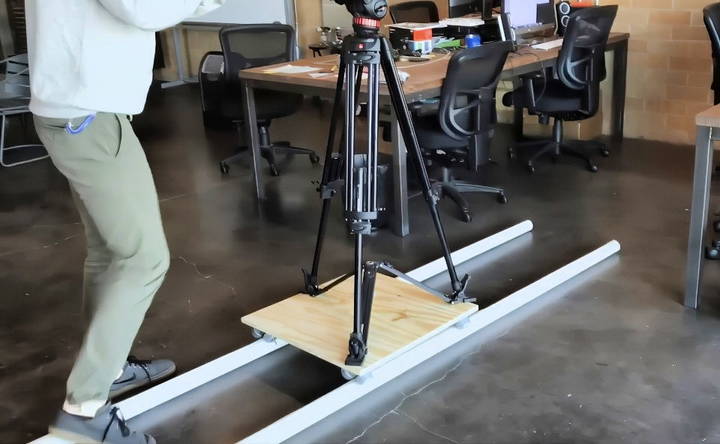
- Position wheels on track: Place your assembled plywood dolly onto the PVC pipes. These pipes will act as tracks and allow the dolly to roll smoothly.
Step 6: Setting Up the PVC Track
- Lay down the PVC pipes: Set up the two PVC pipes parallel to each other on a flat surface, spaced apart just enough to fit the wheel width of your dolly. This will be your dolly track.
- Secure the pipes (optional): To prevent the pipes from shifting during a shot, use small weights or tape to hold them in place.
Step 7: Testing Your Dolly
Now that your dolly is assembled, it's time to test it out.
- Place your camera on the dolly: You can use a tripod or simply place your camera directly on the plywood base.
- Test the movement: Roll the dolly along the PVC pipes, making adjustments as needed to ensure smooth movement.
- Adjust for weight: If your camera setup is particularly heavy, you may need to add extra support to the plywood base or reinforce the wheels.
Tips for Smooth Dolly Shots
Once your dolly is functional, here are a few tips to help you get the best possible shots:
- Use additional stabilization: A tripod or camera mount can add stability to your shots, reducing shake or wobble.
- Experiment with speed: Moving the dolly slowly tends to yield smoother, more cinematic results. Practice a few different speeds to see what works best for your scene.
- Add padding: For extremely smooth shots, place a thin foam pad or rubber mat under the plywood to minimize vibrations.
Troubleshooting Common Issues
As with any DIY project, you may encounter some challenges along the way. Here are solutions to a few common issues:
- Wheels aren't rolling smoothly: Check to ensure each wheel is securely attached to the L brackets and that there are no obstructions on the track. Adding a bit of lubricant to the wheels can also improve smoothness.
- Track shifts during shots: Use weights to hold the PVC pipes in place, or try a sturdier material like metal conduit pipes if PVC isn't providing enough stability.
- Camera shakes: If your dolly isn't stable enough, consider reinforcing the plywood base or adding a second layer of wood to increase the dolly's weight and stability.
Final Thoughts
Building a DIY camera dolly is an excellent project for filmmakers looking to add professional-looking movement to their shots without breaking the bank. With just a few materials and some simple steps, you'll be able to build smooth, dynamic footage that elevates the quality of your videos. Whether you're shooting a short film, a vlog, or a commercial, a dolly can give your work a polished, cinematic look.
In addition to saving money, building your own dolly allows you to customize the setup to fit your unique needs and style. So, grab your materials, follow these steps, and take your filmmaking to the next level!
FAQs About DIY Camera Dolly
Discover answers to common questions about DIY camera dolly setups, including tips, materials needed, and step-by-step guidance.
Using sandbags at each end of the PVC pipes or positioning them with weights can help keep them stable. Some users also suggest using angled wheels to help maintain alignment or adding notched blocks under each pipe end for extra support.
Yes, skateboard or roller skate wheels are ideal, as they have a flat surface that rolls smoothly over PVC. However, avoid using soft wheels, such as longboard wheels, which can skid. Some users recommend harder wheels or “U-groove” wheels for a more customized fit.
For this setup, ¼ inch bolts are typical, but their length depends on the thickness of the plywood and bracket type. Some users suggest 1 or 1.5-inch bolts, while others trim longer bolts to avoid snagging.
Adding weight to the dolly base, like extra wood or sandbags, can stabilize the dolly, reducing jitter. For smoother shots, apply lubricant to the wheels or place rubber padding on the plywood for additional shock absorption.
Yes, using flexible materials like PEX piping or heated PVC allows for custom curved tracks. Ensure your wheels can swivel to adapt to curved paths if using this design.
With a larger, thicker board and reinforced wheels, the dolly could potentially support a lightweight person. However, use stronger pipes, like EMT conduit, and ensure all components are secured and durable.
Alternatives like copper or EMT conduit offer more rigidity. EMT, in particular, is favored for its sturdiness and can be mounted on trestles for extra support and alignment.
Using titanium or metal drill bits will make drilling into L brackets easier. Start with a small pilot hole, or use a punch to guide the drill bit accurately.
A thickness of ¾ inch provides good stability without adding excessive weight. If you need extra support, consider layering plywood for increased strength.


