Building your own DIY camp kitchen can be a fun and useful project. I remember my first attempt at building a DIY chuck box. I was excited but a bit worried about making all the right measurements. With a sketch and some basic tools, I managed to put together a sturdy box over the weekend. This organized all my cooking supplies and utensils perfectly for our camping trips.
Feeling the relief of a well-planned camping experience was worth every bit of effort. My family was thrilled with how convenient it made our outdoor meals. Having everything in one place prevented the usual stress of misplacing items.
I'm confident this project can make your camping easier, too. Follow the plans below; these will help you enjoy DIY camping to the fullest.
Step by Step Instructions
Discover step-by-step instructions to build a DIY camp kitchen. From materials to finishing touches, build your perfect outdoor cooking setup.
Step 1: Gathering Materials
For this project, I opted for beautiful Baltic birch half-inch plywood. Why Baltic birch? It's durable, resistant to warping, and has a smooth finish that's perfect for a project like this. You're also going to need a Craig pocket screw guide, which is accessible at most hardware stores. It makes assembling the plywood pieces straightforward and ensures strong joints.
Step 2: Cutting and Assembling the Box
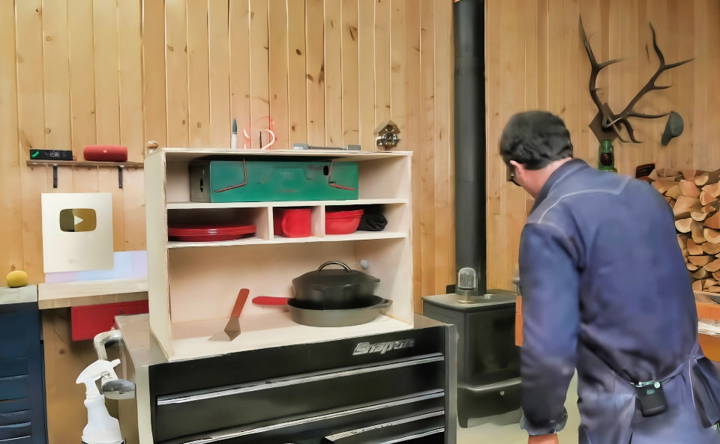
I began by cutting out all the pieces for my chuck box. The bottom, sides, back, and the lid needed precise measurements, so I double-checked them before cutting. Following Wranglerstar's advice, I used pocket screws for assembly, a choice I didn't regret because it made the assembly process manageable and the overall structure sturdy.
Step 3: Adding Dividers and Shelves
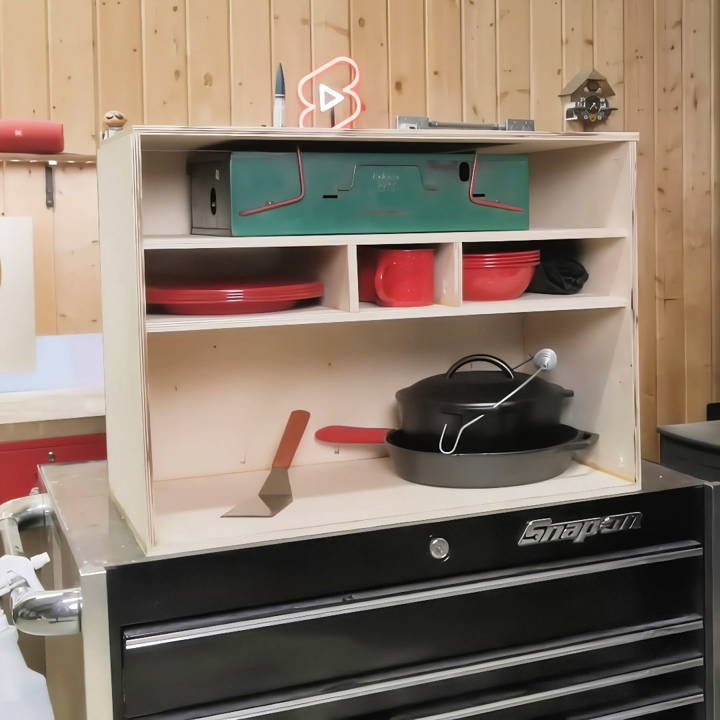
The real trick to making this chuck box my ultimate camping kitchen was the internal organization. I designed a shelf with dividers to hold my camp cookware set, enough for my family of four. This included space for four servings, porcelain plates, mugs, and a place for flatware—spoons, knives, and forks. The challenge here was making everything compact yet accessible. Measurement and careful planning were key.
Step 4: Accommodating the Stove
The cook stove placement was crucial. I needed my chuck box to accommodate either a two or three-burner stove. After measuring my stove, I decided on the height for the internal shelf, ensuring the stove didn't stick out above the box lid. This customization means your chuck box might vary based on your stove size. Remember, the goal is a comfortable and safe cooking experience while camping.
Step 5: Work Areas and Lids
I planned for the lid and a cover that could each fold down to build small work areas. This design required precise cutting and the installation of piano hinges. When not in use, these surfaces fold up, revealing the storage space inside, and then clamshell together for transport. It was a bit tricky to get right, but the added workspace was a game-changer at the campsite.
Step 6: Finishing Touches
Choosing a color and adding a personal touch came next. I went for a vibrant red to match some of my other camping gear. Painting required patience, especially waiting for each coat to dry, but it was worth it for the professional finish. Finally, stenciling my family's name on it added a personal touch, making it truly ours.
Tips for Success
- Precision is Key: Measure twice, cut once. For everything to fit snugly inside your chuck box, accurate measurements can't be overemphasized.
- Customization: Adapt the internal layout based on your cooking style and the cookware you plan to carry. What works for me might not work for you, so tweak it as necessary.
- Assembly: Take your time with the assembly, and make sure all screws are tight. The box needs to withstand the rigors of travel.
- Personalization: Whether it's the color, stencils, or additions like a bottle opener, make it yours. These personal touches not only make your chuck box unique but also fun to use and display.
Cooking Techniques and Recipes
Cooking in the wilderness can be a fun way to enjoy tasty meals. Here's a simple guide to make your camp kitchen a success.
Simple Cooking Techniques
- Dry Heat Cooking: This involves cooking food without the use of water or steam. It's perfect for getting that crispy texture and deep flavors. Think of grilling your favorite veggies or searing a steak over the open flame.
- Moist Heat Cooking: Using water, broth, or steam, this method is great for tenderizing meat and cooking delicate veggies without losing moisture. Boiling potatoes or steaming fresh corn are perfect examples.
- Combination Cooking: Start with a quick sear or sauté, then slow cook your meal in liquid. This method brings out a rich blend of flavors and textures, ideal for a hearty stew or braised dish.
Easy and Nutritious Recipes
- Campfire Chili: Start with a base of onions and garlic, add ground meat or a vegetarian protein, then throw in beans, tomatoes, and your favorite spices. Let it simmer over the fire for a filling meal.
- Foil Packet Fish: Place a fish fillet on a foil sheet, add slices of lemon, herbs, and a splash of white wine. Seal the packet and cook it over the coals for a moist and flavorful dish.
- Skillet Cornbread: Mix cornmeal, flour, eggs, and milk to build a batter. Pour it into a hot, greased skillet and cook until golden. It's the perfect side for any camp meal.
Successful camp cooking relies on preparation. Measure and mix dry ingredients at home and plan simple meals.
Safety and Hygiene
Maintaining safety and hygiene in your camp kitchen is crucial for a healthy and enjoyable camping experience. Here's a straightforward guide to keeping your cooking space clean and safe.
Food Storage and Handling
- Keep It Cool: Use insulated coolers with ice packs to store perishable items like meat, dairy, and eggs. Keep the cooler in a shaded area and avoid opening it frequently to maintain a low temperature.
- Separate Raw and Cooked: Always use separate containers and utensils for raw and cooked foods to prevent cross-contamination. This simple step can help you avoid foodborne illnesses.
- Water Purification: If you're using natural water sources, purify the water by boiling it for at least one minute or using water purification tablets. Safe water is essential for drinking and cooking.
Cleanliness in the Camp Kitchen
- Wash Stations: Set up a washing station with biodegradable soap for cleaning dishes and utensils. Use hot water if possible, and dispose of the used water at least 200 feet away from streams or lakes.
- Hand Sanitizer: Keep alcohol-based hand sanitizer handy for times when water isn't available. Clean hands before and after handling food to keep germs at bay.
- Trash Management: Use sealable bags to store trash and keep it in a secure location away from your sleeping area. Dispose of it properly at designated disposal sites.
Fire Safety
- Clear the Area: Before starting a fire, clear a 10-foot diameter area around the fire pit of any flammable materials. Keep a bucket of water or sand nearby for emergencies.
- Monitor the Fire: Never leave your campfire unattended. Extinguish it completely before going to sleep or leaving the campsite by dousing it with water and stirring the ashes.
By following these simple yet effective safety and hygiene practices, you can ensure that your camp kitchen is a safe place to prepare and enjoy meals.
FAQs About DIY Camp Kitchen
Discover essential answers to FAQs About DIY Camp Kitchen, guiding your next adventure with tips and tricks for a seamless outdoor experience.
A DIY camp kitchen is an outdoor cooking setup that you can build yourself. It’s designed to help you prepare and cook meals while you’re enjoying the outdoors. Typically, it includes areas for food prep, cooking, storage, and cleaning. You might use a portable stove, grill, or open fire for cooking.
To set up your camp kitchen, start by organizing your space. Decide where you’ll prepare food, cook, and clean up. Bring containers for storage and a portable stove or grill for cooking. Remember to include a dishwashing station with biodegradable soap. Make sure everything is easily accessible to make cooking and cleaning more efficient.
For a basic setup, you’ll need food, water, a cooler, a frying pan, a pot, and outdoor serving ware. If you’re car camping, a portable grill or a 2-burner stove may be enough. Always consider the length of your trip and the amount of storage space you have when packing.
Yes, you can build a camp kitchen box, also known as a chuck box, to keep your cooking gear organized. You'll need some plywood, hinges, latches, and basic tools. Measure your gear to determine the size of the box and customize it to fit your needs. This box can store your stove, cooking utensils, and other essentials.
Plan your meals ahead and prep as much as you can before your trip. Use multi-purpose tools and cookware to save space. Keep your cooking area tidy and organized. Consider a portable griddle for easy and versatile cooking. And always follow Leave No Trace principles to minimize your impact on the environment.
Conclusion
I encourage you to start building your DIY camp kitchen today. It's simpler than you think and incredibly rewarding.


