Starting my own DIY camper van was one of the best decisions I made. I loved the idea of turning a regular van into my personalized travel home. I began with basic tools and a simple plan. While it was challenging at times, the process was very rewarding. I learned so much along the way and enjoyed making decisions about every detail.
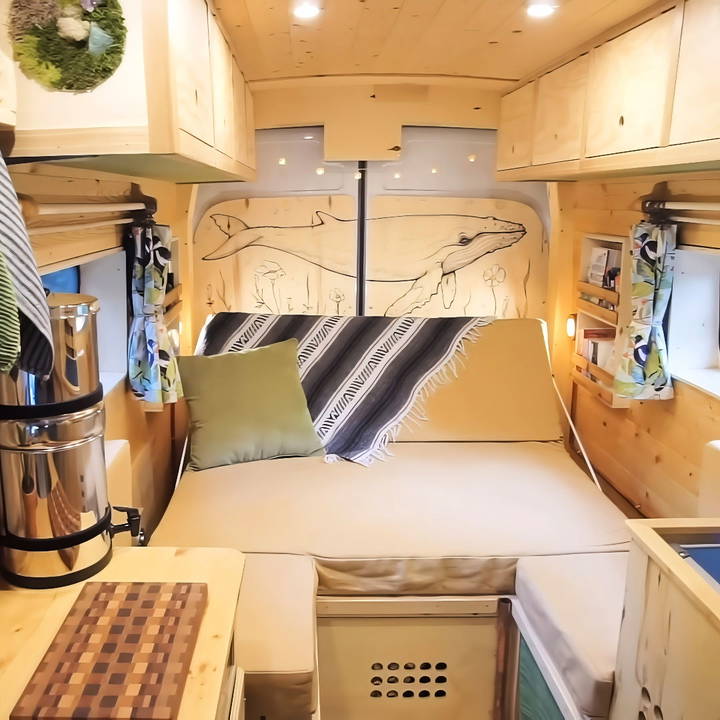
If you're interested in making a DIY camper van, there are many resources to help you. From choosing the right van to installing solar panels, the journey is both exciting and educational.
With patience and determination, anyone can do it. I'm helping with this guide so you can start your own DIY adventure.
Choosing the Right Van
Our adventure began with choosing the right vessel for our journey, a 2015 Ford Transit with a high roof and a 148-inch wheelbase. The spacious interior and potential for customization made it the perfect canvas for our dream van life setup.
Initial Planning and Design
With enthusiasm bubbling, we dove into the planning phase. We sketched our layout ideas, focusing on must-haves like a multipurpose bed/dinette, ample storage, a practical kitchen setup, and a compact bathroom area. Our designs were basic, allowing for flexibility and adjustments on the fly.
Essential Materials and Why They Matter
For the conversion, selecting the right materials was crucial. Here's a brief overview of what we used and why:
- Recycled Cork Insulation: For eco-friendly insulation in the floor, ensuring warmth and sustainability.
- Hemp Insulation: Chosen for the walls and ceiling for its natural, non-toxic properties, providing excellent insulation.
- Low VOC Paints: To maintain air quality and ensure the safety of our living space.
- Solar Panels and Generator: To ensure off-grid capabilities and sustainability.
- Recycled or Sustainable Wood: For the build-out, ensuring our conversion was as environmentally friendly as possible.
Step by Step Instructions
Master DIY van transformation with step-by-step instructions. From insulation to electricity, get expert tips and tackle common challenges effortlessly.
Starting with Insulation
Our insulation choice was aimed at sustainability and practicality. The recycled cork for the floor and hemp for the walls and ceiling were not only eco-friendly but also provided excellent thermal properties. Initially concerned about potential moisture issues, we were diligent in making a breathable structure to avoid condensation.
Window Installation and Leak Checking
Early on, we installed high-quality, screened windows for ventilation. Checking for leaks became an unexpected yet vital step, revealing a few problem areas that were swiftly addressed. This step was crucial in ensuring a dry and comfortable indoor environment.
The Importance of a Functional Layout
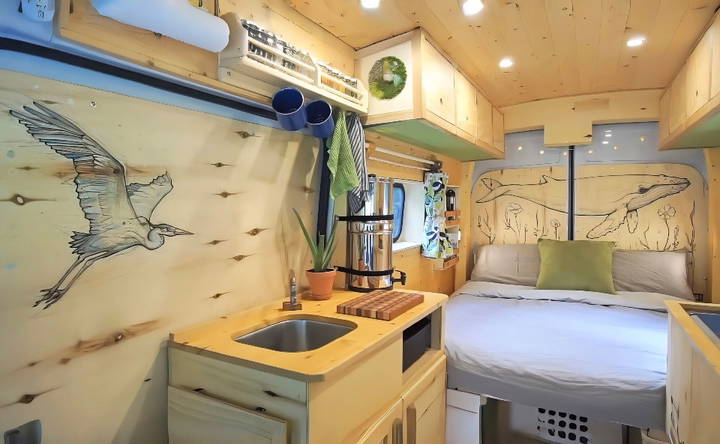
Our layout was designed with functionality, comfort, and maximizing space in mind. The multipurpose bed/dinette area and strategic kitchen layout were planned to make the most of our van's interior. This required a balance between structural stability and weight considerations, challenging us to be innovative with the materials and design.
Electricity and Plumbing
Opting for a solar generator and panels ensured our energy needs were met sustainably. For plumbing, a simple, manually operated system proved to be efficient and reliable, minimizing water waste and avoiding the need for electric pumps.
Building the Furniture
Each piece of furniture was crafted with particular attention to weight, functionality, and space optimization. From the kitchen cabinets custom-built around our appliances to the versatile bed/dinette setup, every element was designed to support our van life needs fully.
Finishing Touches
As the build drew to a close, we focused on the aesthetics and practical aspects, like ventilation and privacy solutions. Hemp oil was used extensively for its natural finish and breathability, contributing to the van's overall cozy and inviting ambiance.
Overcoming Challenges
Discover how to overcome challenges in dealing with moisture and insulation issues, and balance customization vs. flexibility effectively.
Dealing with Moisture and Insulation Issues
Despite our careful planning, we encountered challenges with moisture and insulation. Some areas where cold metal met warm air without sufficient airflow developed condensation. Removing insulation in these spots and considering alternative solutions like spray foam for future improvements was an invaluable lesson.
Customization vs. Flexibility
Customizing our van to fit specific appliances and components perfectly made for a snug, efficient layout. However, it also posed a risk for future replacements or upgrades, something we'd advise others to consider carefully.
Our van conversion taught us that flexibility, creativity, and patience matter as much as the right tools. DIYers should embrace the process, expect changes, and build a space that suits their style and needs.
Technology Integration
Integrating technology into your DIY van conversion can significantly enhance your on-the-road experience. Here's how you can make your van smarter, more connected, and more efficient.
Smart Van Systems
- Smart Home Technology: Transform your van into a smart home on wheels. Install devices that allow you to control lighting, temperature, and even security systems remotely via your smartphone. Products like the SuperStructure Panel Kit offer modular mounting for these smart devices.
- Voice-Activated Assistance: Consider adding a voice-controlled assistant like Amazon Alexa or Google Assistant to help you with tasks hands-free, whether it's playing music, setting reminders, or finding the nearest gas station.
Connectivity on the Road
- Wi-Fi and Internet Access: Staying connected is crucial. Install a reliable mobile Wi-Fi router to ensure you have internet wherever you go. Look for routers that offer strong signal reception and data plans that suit your travel needs.
- Signal Boosters: To improve your internet connection in remote areas, use a signal booster. This device can amplify a weak signal, providing you with better access to online resources.
Electrical and Charging Solutions
- Solar Power: Harness the power of the sun with solar panels. They're eco-friendly and can keep your batteries charged. Companies like AM Solar provide kits that include everything you need for a solar setup.
- Battery Management: Use a smart battery management system to monitor and optimize your van's energy usage. It ensures that your electrical devices run efficiently and your batteries remain healthy.
Entertainment and Comfort
- Audio-Visual Systems: Install a compact and high-quality sound system for entertainment. You can also include a foldable screen for movie nights in your van.
- Climate Control: Maintain a comfortable temperature with a climate control system. Options like New Way Van Life's climate control system are tested for road use and can keep you cool or warm in any environment.
Safety and Security
- GPS Tracking: Protect your van with GPS tracking. In case of theft, you'll be able to locate your vehicle quickly.
- Backup Cameras: For safer maneuvering, install a backup camera. It helps in tight spots and prevents accidents.
By integrating these technologies, you'll make your van not just a vehicle but a modern, mobile living space that caters to your needs and comforts.
Maintenance and Troubleshooting
Keeping your DIY van in great shape is key to ensuring a smooth and enjoyable journey. Here's a straightforward guide to maintaining your van and solving common issues.
Regular Maintenance Checks
- Oil and Filter Changes: Regularly changing the oil and filters is crucial. It keeps the engine running smoothly and prevents long-term damage.
- Tyre Pressure and Tread: Check your tyre pressure often and inspect the tread for wear. Properly inflated tyres with good tread are essential for safe driving.
- Brake Inspection: Have your brakes checked twice a year. This will help you avoid brake failure and ensure your safety on the road.
- Battery Health: Test your battery regularly, especially before long trips. A healthy battery means you won't get stranded with a van that won't start.
Troubleshooting Common Problems
- Engine Overheating: If your van overheats, check the coolant level and look for leaks. Overheating can cause serious damage, so address it quickly.
- Electrical Issues: Flickering lights or non-responsive gadgets? Check your van's fuses and electrical connections. Loose wires can often be the culprit.
- Strange Noises: Hear a rattle or a squeak? It could be anything from loose tools to a problem with the suspension. A quick inspection can help pinpoint the issue.
- Water Leaks: Found a puddle inside your van? Check the seals around windows and doors. Keeping water out is vital for a comfortable van life.
Regular maintenance can prevent many problems. But when issues do arise, addressing them promptly will keep your van life adventure on track.
FAQs About DIY Van Conversion
Discover answers to common questions about DIY van conversion. Learn tips, costs, and steps for transforming your van into a mobile home.
A DIY van conversion is the process of transforming a standard van into a customized living space or camper. It involves outfitting the van with features like beds, kitchen units, storage, and sometimes even bathrooms, to make it suitable for travel or full-time living.
The cost of converting a van can vary widely, depending on factors such as the type of van, the materials used, and the complexity of the conversion. On average, a basic conversion can start from a few thousand dollars and go up to tens of thousands for a fully equipped, high-end conversion.
Yes, many people opt to convert their vans themselves. It requires some research, planning, and a range of skills from carpentry to electrical work. There are numerous resources available online, including step-by-step guides and forums where you can seek advice and share experiences.
Essential features typically include insulation, ventilation, a bed, storage space, and basic kitchen facilities. Other common features might include solar panels, a water system, and a heating system. The specific features will depend on your personal needs and the intended use of the van.
Start by researching and planning. Determine your budget, the layout you want, and the features you need. Next, purchase a suitable van and gather the necessary tools and materials. Then, you can begin the conversion process, starting with insulation and moving on to installing the essential features you've planned for.
Final Words
These will help you learn and motivate your DIY camper van project to get going. Start planning today and transform your van into a cozy, traveling home. The experience is truly empowering, and you'll cherish every moment on the road.


