When you venture into the wilderness for a camping trip, it's easy to overlook one crucial item: a sink. Washing dishes or cleaning up in nature can be a real hassle, but with a DIY camping sink, you can build a portable, functional sink system that will transform your outdoor experience. In this guide, I'll show you how to build a durable, collapsible camping sink using lightweight, easy-to-assemble, and cost-effective materials.
This guide is divided into two main parts. In the first part, we'll cover the basic concept, list all the materials you need, and walk you through building the sink frame. We'll also discuss setting up the collapsible sink and adding an efficient drainage system. In the second part, we'll explore optional features like adding a water pump, and a soap dispenser, and tips for keeping your camping sink clean and hygienic. Let's dive in and make your camping experience easier and more enjoyable!
Why Build a DIY Camping Sink?
Imagine packing everything you need for a camping trip: clothes, food, sleeping gear, and even a few comforts from home. The one thing missing? A proper sink for washing dishes, cleaning hands, or filling water bottles. Sure, you can always use a bucket or a nearby water source, but nothing beats the convenience of having your own portable sink system.
A DIY camping sink provides several benefits:
- Convenience: Easily wash dishes or your hands.
- Hygiene: Avoid washing with dirty or standing water.
- Portability: With the right materials, the entire system is lightweight and collapsible, making it easy to transport.
- Customization: You can tailor it to your specific needs and upgrade it over time.
Materials Needed for a DIY Camping Sink
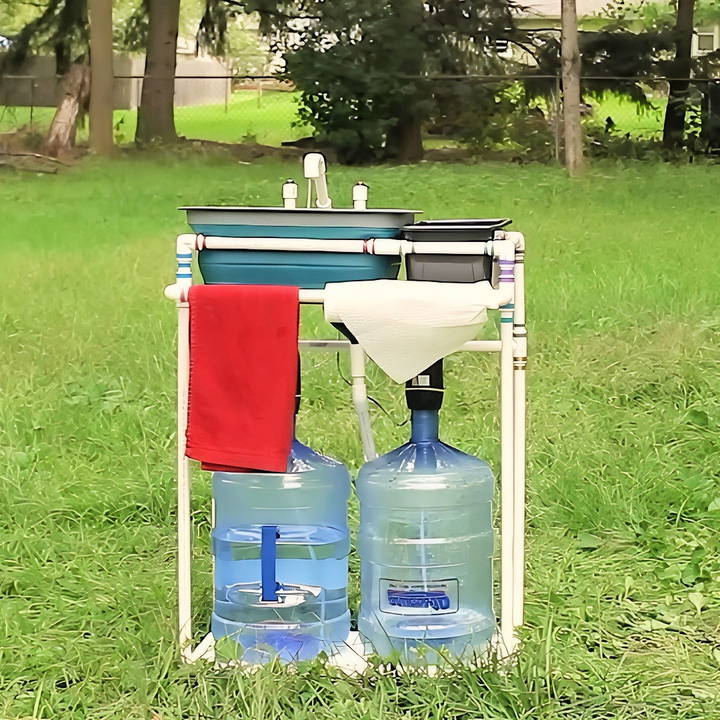
The beauty of a DIY camping sink lies in its simplicity. By using PVC pipes and collapsible items, you can build a sturdy yet portable sink that can be easily broken down and packed for transport. Here are the basic materials you'll need:
PVC Frame Components
- 1/2-inch Schedule 40 PVC Pipe: This forms the structure of the sink. PVC pipes are lightweight, durable, and easy to work with.
- PVC Tees and Elbows: You'll need these for connecting different sections of the PVC pipe to build a sturdy frame.
- 90-Degree Elbow: Connects pipes at right angles.
- 45-Degree Elbow: For sloping or angled parts.
- 1/2-inch x 1/2-inch x 1/2-inch 90-Degree Side Outlet Elbow: This part allows for more complex angles and attachments.
Sink Components
- Collapsible Tub: A simple, collapsible sink or dish rack will form the basin. Look for one with a drain plug so you can easily direct wastewater away from your campsite.
- Collapsible Kitchen Draining Basket: This will sit inside the tub to hold dishes and utensils as they dry.
Water System Components
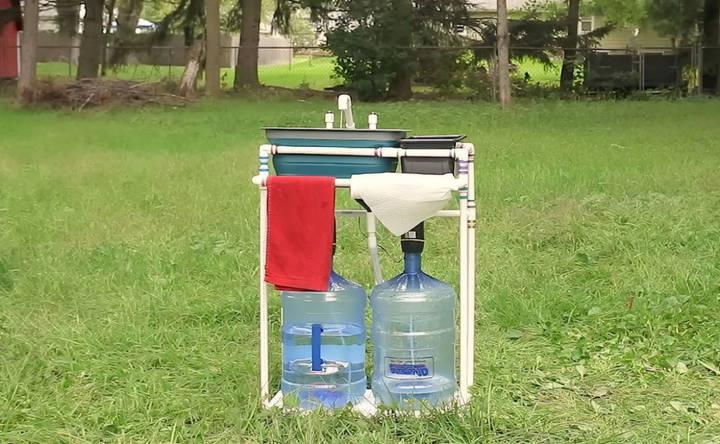
- Water Cooler Jugs (5 Gallons): Use one filled with clean water and another to collect wastewater. You can adapt the system to your needs, but this setup provides enough water for several washes.
- Waterproof Momentary Push Button and Electric Water Pump: This allows for easy, battery-powered water flow. You'll press the button, and the pump will deliver water through a hose.
- Rinseroo Attachment: A handy attachment that turns almost any faucet into a hose, making it easy to refill your water jugs at campgrounds or nearby water sources.
Step by Step Instructions
Build a DIY camping sink with our step-by-step guide. Easily build and customize a portable sink with storage, towel racks, and efficient drainage.
Building the Frame for the Sink
Now, let's move on to the actual construction of the sink frame. Building the frame is straightforward and only requires a few basic cuts and fittings.
Step 1: Cutting and Assembling the PVC Pipes
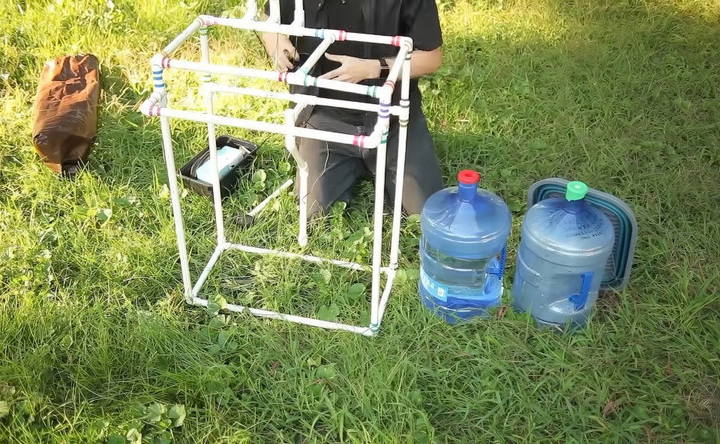
- Measure and Cut: Using a handsaw or PVC pipe cutter, cut your PVC pipes into the necessary lengths. For a basic rectangular frame, you'll need four longer pieces for the sides and two shorter pieces for the width.
- Connecting the Pieces: Use the PVC elbows and tees to connect the pipes into a frame. Start by connecting the four corners with 90-degree elbows. Depending on your desired height, you can add vertical supports using tees. The goal is to build a sturdy base that can hold the weight of the sink, water jugs, and other accessories.
- Base Support: Consider adding crossbars to reinforce the base. This will provide more stability, especially when you add water jugs on top to weigh it down.
Step 2: Fitting the Collapsible Sink
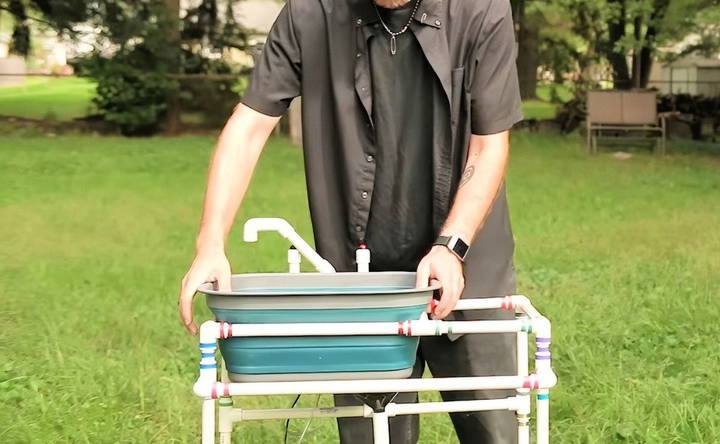
Now that the PVC frame is constructed, it's time to place the collapsible sink. Many collapsible sinks come with grooves or a drain plug, which will help direct water flow.
- Fitting the Sink in Place: Simply place the collapsible sink inside the frame, ensuring it sits securely. If your sink has a drain plug, align it with a funnel or small piece of PVC pipe that directs the wastewater away from your campsite.
- Drainage Setup: You can dig a small hole at the outlet of the drain or use a wastewater container. Either option will help manage wastewater efficiently and keep your campsite clean.
Setting Up the Water System
One of the standout features of this DIY camping sink is its running water system. Using a small, rechargeable water pump, you can turn a simple water jug into a fully functional faucet.
Step 1: Preparing the Water Jugs
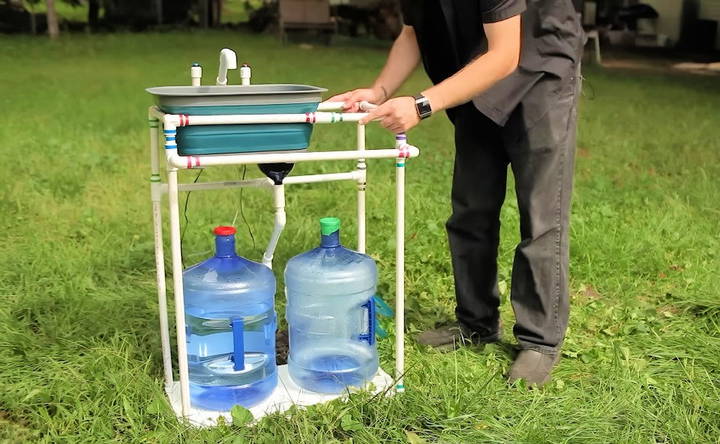
For this system, you'll use two water jugs—one for clean water and one for wastewater.
- Clean Water Jug: Place the first jug on one side of the frame, filled with potable water.
- Wastewater Jug: Set up the second jug, empty, to collect the used water from the sink.
Step 2: Attaching the Water Pump
The key to making this DIY sink work like a real faucet is the electric water pump. These pumps are easy to find online and typically cost around $10.
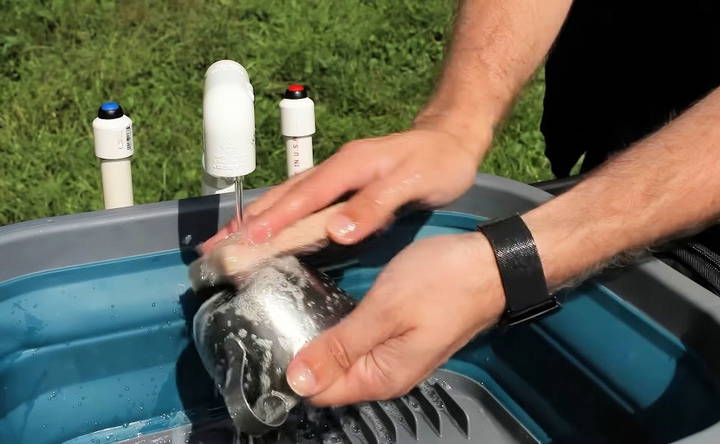
- Connecting the Pump: Attach the water pump to the clean water jug by feeding a hose through the opening. Secure the pump in place and attach the spout to the other end.
- Powering the Pump: The pump runs on a rechargeable battery, making it perfect for camping. Simply press the waterproof momentary push button to turn it on and off, allowing water to flow through the spout.
Step 3: Customizing the Water Flow
To give the sink a more “faucet-like” appearance, consider adding faucet handles or knobs. You can connect these to the pump using a simple mechanism like a momentary rotary switch, which activates the pump when the knob is turned.
- Making the System Portable: If you want an even more compact system, consider swapping the large water jugs for smaller, collapsible ones. These are lighter and take up less space when empty, making them ideal for long hikes or trips where space is limited.
Adding Finishing Touches
Before you take your DIY camping sink into the wild, there are a few finishing touches that can enhance its functionality and appearance.
Step 1: Adding a Storage Compartment
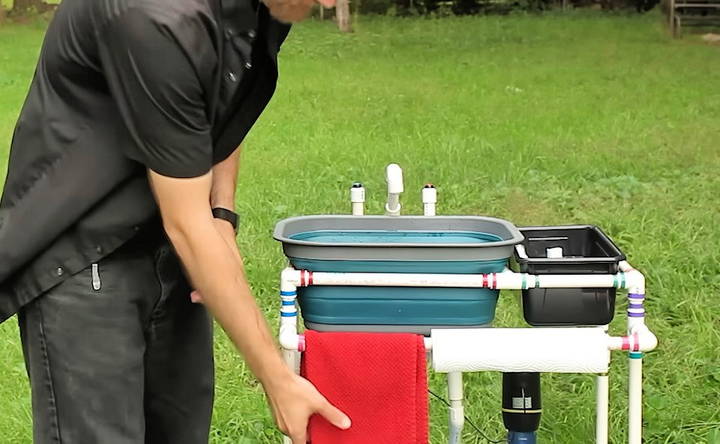
One practical addition is a storage bin or small compartment to hold your cleaning supplies. Drill a few holes in the bottom for drainage and attach it to the side of the PVC frame.
Step 2: Customizing with Towel Racks and Hooks
You can also install towel racks or hooks on the sides of the frame for added convenience. Use PVC pipe or metal rods to build simple, collapsible towel racks that can be folded when not in use.
Step 3: Upgrading the Sink Drain
For a more efficient drainage system, consider cutting a hole in the bottom of the collapsible sink and installing a sink strainer. This will allow you to trap food particles and debris, making the cleaning process easier.
Modifying and Upgrading Your DIY Camping Sink
Now that you have the basic setup for your DIY camping sink, it's time to explore ways to modify and enhance its functionality. Depending on your needs and preferences, there are several upgrades you can implement. In this section, we'll look at how to improve the water pump system, add features for better storage, and optimize the sink's usability for long-term camping trips.
Step 1: Upgrading the Water Pump System
While the basic water pump system described earlier is functional, there are ways to make it more efficient and user-friendly. Here are a few ideas for upgrading the pump and water flow:
Adding a Faucet-Style Handle
If you want your DIY camping sink to feel more like a traditional kitchen sink, you can modify the water pump system to use faucet handles or knobs. Here's how:
- Use a Momentary Rotary Switch: Instead of the push button, replace it with a rotary switch that mimics a faucet handle. This switch will activate the pump when turned, giving you more control over the water flow. You can install the handle on the frame using a simple bracket or clamp, making a more polished and functional design.
- Detachable Sprayer Handle: Another upgrade is to add a detachable sprayer handle, similar to what you find in home kitchen sinks. This can be useful for rinsing larger items or directing water where it's needed. Attach the sprayer handle to the hose from the pump, and secure it to the side of the sink frame when not in use.
Simplifying the Pump Connection
One of the biggest benefits of the water pump system is that it's easy to modify without causing permanent changes. You can switch between different setups based on your needs:
- Quick Disconnect System: Install a quick-connect fitting between the pump and the water hose. This will allow you to quickly swap out the pump for different configurations without having to disconnect the entire system. You can find quick-connect adapters online, which make setup and breakdown even faster.
- Integrated Rechargeable Battery: If you're worried about battery life, consider upgrading to a pump with a longer-lasting or higher-capacity rechargeable battery. Some pumps come with USB ports for charging, which is perfect if you have a solar panel or portable power bank at your campsite.
Step 2: Adding Storage and Utility Features
Having a place to store all your cleaning supplies and other accessories can greatly improve the convenience of your camping sink. Here are a few simple storage upgrades that can make a big difference:
Storage Bin for Cleaning Supplies
One of the easiest ways to keep everything organized is by adding a small, dedicated storage bin to your sink setup. This could be as simple as a plastic bin with holes drilled in the bottom for drainage. Here's how to add it:
- Placement: Place the bin on the side of the PVC frame, using hooks or a small shelf for support. This bin will be used to store items like sponges, soap, brushes, and even the pump when it's not in use.
- Collapsible Options: If you want to keep everything compact, look for a collapsible bin that folds flat when not in use. These bins can be found at most outdoor gear stores and are lightweight and durable.
Towel Racks and Hooks
Adding a towel rack or hooks for hanging items can improve the functionality of your DIY sink. This will provide a place to hang washcloths, towels, or other kitchen essentials:
- PVC Towel Rack: You can easily build a towel rack by adding horizontal bars to the side of the PVC frame. Use small sections of PVC pipe and elbows to build a collapsible towel rack that folds down when not in use.
- S-Hooks for Additional Storage: Another option is to install S-hooks on the frame. These can be used to hang utensils, towels, or even a portable soap dispenser. The hooks are easy to remove and won't interfere with the collapsibility of the frame.
Step 3: Optimizing the Drainage System
While the basic drainage setup (a funnel or simple PVC tube) is effective, you can further refine it to improve performance and make the sink more efficient at handling wastewater.
Installing a Sink Strainer
If you plan to wash dishes that have food particles or debris, installing a sink strainer can be a smart upgrade. The strainer will catch any debris, preventing it from clogging the drainage system or making a mess.
- How to Install: To install a strainer, simply cut a hole in the bottom of the collapsible sink and insert a standard kitchen sink strainer. Most strainers come with a rubber gasket and locknut, making it easy to secure to the sink. You can remove and clean the strainer as needed to keep everything working smoothly.
- Flexible Drain Hose: Replace the rigid PVC pipe with a flexible hose, allowing you to direct the wastewater more precisely. This is especially useful if you're camping in areas where you need to direct wastewater away from the campsite.
Making a Greywater System
For longer camping trips, consider building a greywater system to handle the used water from your sink. This involves digging a small trench or setting up a container to collect wastewater for later disposal.
- Simple Greywater Pit: Dig a small hole or trench beneath the sink outlet to allow the water to filter back into the ground. Make sure to follow local regulations and guidelines when disposing of greywater, especially if you're in a protected or sensitive environment.
Practical Applications for Your DIY Camping Sink
Now that your DIY camping sink is fully built and customized, let's talk about the different ways you can use it on your next adventure. This portable sink is more than just a place to wash dishes—it can serve multiple purposes during your camping trip.
Outdoor Cooking and Dishwashing
The primary use of your DIY camping sink is, of course, for washing dishes and cooking utensils. Having a designated sink area will keep your campsite cleaner and more organized. You'll no longer need to rely on makeshift washing stations or lugging water back and forth from a river or lake.
- Washing Dishes: The collapsible sink basin provides plenty of room to wash larger items like pots, pans, and dishes. The running water system makes rinsing quick and easy.
- Food Preparation: The sink can also double as a prep area for washing fruits, vegetables, or meat. Having clean, running water available makes it easier to prep food safely.
Personal Hygiene
Camping often involves getting dirty, so having a sink available for personal hygiene is a huge bonus. Use your DIY sink for washing hands, faces, or even small items of clothing.
- Handwashing Station: With running water on demand, the sink serves as a perfect handwashing station. Keep soap and towels nearby for convenience.
- Washing Clothes: The collapsible tub can be used to handwash small items of clothing, making it perfect for longer trips where you may not have access to laundry facilities.
Drinking Water Source
Since the sink's water system is powered by a clean water jug, it also doubles as a source of potable water. Just make sure to keep the water jug separate from any soapy or dirty water areas.
- Drinking Water: The pump can easily be used to fill water bottles or hydration bladders. You can even swap the sink nozzle for the pump's original spout for more precise control when pouring drinking water.
- Cooking Water: Use the sink to quickly fill pots and pans for cooking. No more awkwardly tipping over large jugs to get water into small containers.
Final Thoughts and Future Modifications
Your DIY camping sink is now ready to go, but the beauty of a project like this is that it's highly adaptable. As you use the sink on different trips, you may find new ways to modify or improve it. Here are some ideas for future upgrades:
- Protective Cover: Add a waterproof cover or tarp to protect the sink from rain. This will also help keep your paper towels, sponges, and other items dry.
- Sink Stand Modifications: If you want to make the sink stand even more stable, consider adding adjustable legs or feet that can be extended on uneven ground.
- Portable Sprayer: Installing a portable sprayer hose can make cleaning larger items or rinsing off dirty shoes even easier. A detachable sprayer head is a simple addition that adds a lot of functionality.
- Solar-Powered Pump: For those looking to be more eco-friendly, consider upgrading the water pump to a solar-powered option. This will reduce your reliance on batteries and make your sink even more sustainable.
With this DIY camping sink, you'll have the convenience of a full-function sink no matter where your adventures take you. Whether you're camping for a weekend or an extended trip, this portable sink system will help you stay clean, organized, and efficient.
FAQs About DIY Camping Sink
Discover everything you need to know with FAQs about DIY camping sink, from setup tips to materials, enhancing your outdoor experience.
In many places, draining water onto the ground is not allowed or practical. To avoid this, use a second 5-gallon jug as a greywater collection tank. You can place the jug under the sink’s drain and store the wastewater for proper disposal later.
Yes, you can adapt the setup to connect with a garden hose for continuous water supply. Simply modify the PVC frame to attach a faucet or hose adapter, allowing you to utilize existing water sources without needing to use water jugs.
The most common size used is 1/2-inch Schedule 40 PVC pipe. It’s lightweight but strong enough to support the sink, water jugs, and any other items like soap or sponges. Adjust based on the weight and size of your setup.
Yes, you can use a foot pump instead of an electric water pump if you prefer. Foot pumps are more eco-friendly, don’t require batteries, and are quieter. Just make sure the pump you choose is compatible with your tubing and water jugs.
To prevent the sink from tipping, make sure the base is properly weighted. You can add crossbars or place your water jugs on the base to provide stability. Tent stakes or securing the frame to a stable object (like a tree) also helps.
One option is to use an immersion heater to heat the water in the jugs. Alternatively, a camping shower bag that absorbs sunlight can be used to provide warm water, though this may not work as well in cooler climates.
Yes, you can modify the size by using smaller jugs or a smaller collapsible tub. Additionally, switching to collapsible water containers instead of rigid jugs can reduce the footprint and make it easier to transport.
A simple fix is to place a rubber flap over the top of the paper towel roll to prevent it from unraveling in the wind. You can also install a cover over the towel rack or wrap a bungee cord around the roll to keep it secure.
Use biodegradable soap when washing dishes or hands. For wastewater, ensure it's collected in a greywater container instead of letting it drain onto the ground. This helps minimize environmental impact, especially in sensitive areas like national parks.
Yes, with a few modifications, this system can also be adapted for an outdoor shower. Simply extend the PVC frame and add a showerhead attachment. Use the same water jugs or connect to a larger water source for a consistent water supply.
The exact tubing size depends on your specific pump. Common sizes are 1/4-inch or 3/8-inch diameter tubing, which you can find at hardware or pet stores (in the aquarium section). Make sure it fits snugly to avoid leaks.


