Building a DIY cat hammock was such a fun project. One weekend, I noticed my cat, Whiskers, loved sitting on small ledges. I decided to make something extra special for him. The process was simple, using materials I already had at home. It felt good knowing I could make something functional and cozy for my furry friend without spending a lot.
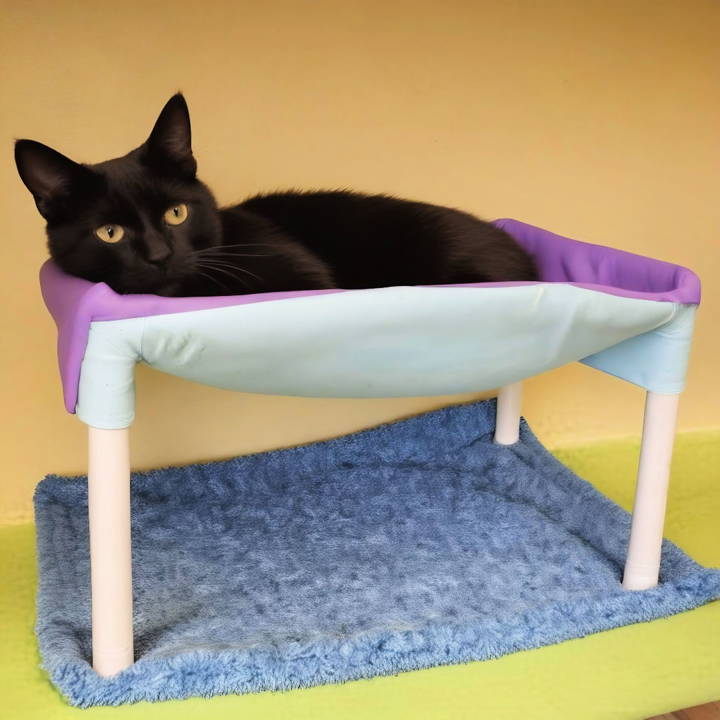
Making a cat hammock is straightforward. I used some old fabric, sturdy hooks, and ropes. I measured the space and cut the fabric accordingly. After attaching the hooks to a stable spot, I tied the ropes securely. Whiskers approved immediately, curling up on it for nap time.
I'm happy to share this simple and fun DIY cat hammock project with you. Use the steps below and watch your cat enjoy their new cozy spot.
Materials Needed and Why
- PVC Pipes (* ½ inch in diameter, about 10 feet): These serve as the frame of the hammock. The lightweight yet sturdy nature of PVC pipes makes them ideal for supporting the weight of a cat.
- PVC Connectors (Four 90-degree elbows and Four T-connectors): These are crucial for joining the PVC pipes to form the hammock's framework. Their role is akin to the corners and sides of a puzzle, bringing everything together.
- Pillowcase: This acts as the hammock bed where your cat will lounge. I chose an old queen-sized pillowcase, considering its soft fabric and breathability.
- Saw: For cutting the PVC pipes to the desired length. While I opted for a handsaw with fine teeth for precision, a power saw can expedite the process.
Step by Step Instructions
Learn how to make a DIY cat hammock with our step-by-step instructions. Build the frame, prepare the hammock bed, and add the final touches.
Crafting the Frame
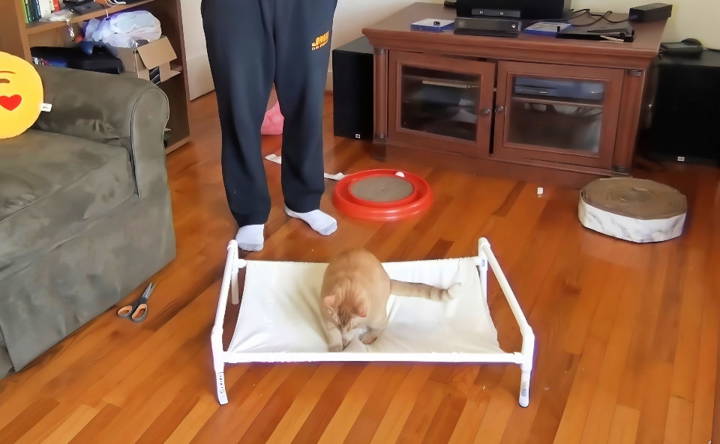
Initially, I envisioned the hammock's frame to resemble a small table without a solid top, made entirely out of PVC. After sketching a rough blueprint, I felt confident enough to start.
- Measure and Cut the PVC Pipe: I aimed for a rectangle frame that would snugly fit the pillowcase, leaving enough room for slight stretching. After some trial and error, measuring twice before cutting proved to be a lifesaver.
- Assemble the Frame: Connecting the pipes with the elbows and T-connectors was like completing a 3D puzzle. Each piece clicked into place, gradually forming a sturdy rectangle that would support the fabric.
Preparing the Hammock Bed
The pillowcase choice was due to its simplicity and ease of use. Plus, it spared me from measuring and cutting fabric, a task I wasn't too keen on.
- Trim the Pillowcase: I removed the closed end of the pillowcase to make an open tube. This adaptation would allow me to easily slide the pillowcase onto the PVC frame.
- Attach the Pillowcase to the Frame: Sliding the open-ended pillowcase over the frame was slightly challenging with my overexcited cat trying to help. However, once in place, it looked exactly as I envisioned—a cozy, suspended bed awaiting its occupant.
Adding the Final Touches
No project is complete without a few adjustments and personal flair.
- Fixing the Length: My initial excitement turned into mild frustration upon realizing the pillowcase stretched a bit too snugly across the frame. A quick trim of the PVC pipes allowed a perfect fit, snug yet flexible.
- Erecting the Legs: Deciding on the hammock's height was the final step. Opting for short legs to keep the hammock close to the ground, I cut four equal lengths of PVC. This not only ensured stability but also made it easier for my cat to climb in and out.
The Moment of Truth
With the structure assembled and the fabric in place, it was time for the ultimate test. Watching my cat cautiously inspect, then contentedly settle into the hammock, was a proud moment. The entire process, fraught with small challenges and learning opportunities, culminated in a simple yet effective space for my cat to relax.
Why This Project Matters
This DIY journey underscored the essence of making something meaningful with one's hands—a tangible expression of care for a beloved pet. Moreover, it highlighted the simplicity behind what might seem like a complex task. The no-sew cat hammock project, beyond its practical outcome, was a reminder that with a bit of patience and creativity, anyone can enhance their pet's living space.
Customization Ideas for Your DIY Cat Hammock
Making a DIY cat hammock is not just about providing a cozy spot for your feline friend; it's also an opportunity to add a personal touch to your home decor. Here are some customization ideas that can help you tailor the perfect hammock for your cat and your living space:
- Choose the Right Fabric: Select a fabric that complements your interior design. Consider durable materials like canvas or denim for a long-lasting hammock. For a luxurious feel, opt for velvet or faux fur. If your cat loves to snuggle, a fleece or cotton fabric might be the best choice.
- Play with Patterns: Don't shy away from patterns. Stripes, polka dots, or even animal prints can add a fun element to the hammock. If you're crafty, you could even try hand-painting a design or using fabric markers for a truly unique look.
- Adjustable Sizing: Make the hammock adjustable to fit different spaces. Add extra loops or hooks so you can hang it in various spots around your home, ensuring it's always the perfect fit.
- Personalize with Embroidery: Embroider your cat's name or a cute design onto the hammock. This not only makes it special but also helps if you have multiple cats, so each one knows which hammock is theirs.
- Incorporate Toys: Attach toys or strings to the hammock to keep your cat entertained. This is especially helpful if your cat is energetic and enjoys playing while lounging.
- Safety First: Ensure all customization options are safe for your cat. Avoid small parts that could be swallowed, and make sure any additions are securely attached.
- Seasonal Themes: Change up the hammock's look with the seasons. Use light, airy fabrics for summer and warmer materials for winter. Seasonal colors and patterns can also refresh the hammock's appearance throughout the year.
- Eco-Friendly Options: Consider using recycled materials or eco-friendly fabrics. This not only benefits the environment but also adds a story to your DIY project.
The goal is to make a comfortable and enjoyable space for your cat that also fits your style. Keep it simple, safe, and fun, and you'll have a happy kitty and a beautiful addition to your home.
Troubleshooting Common Issues with DIY Cat Hammocks
When crafting a DIY cat hammock, you might encounter a few hiccups along the way. Here's a straightforward guide to solving some common issues, ensuring your feline friend can lounge safely and comfortably:
Hammock Sags Too Much
- Solution: If the hammock sags excessively, it may be due to the fabric stretching or insufficient support. Reinforce the hammock by adding more support ropes or using a tighter weave fabric.
Hammock is Unstable
- Solution: Stability is key for your cat's safety. Ensure that all attachment points are secure. If the hammock swings too much, consider adding more anchor points or adjusting the tension in the ropes.
Fabric Frays or Tears
- Solution: A fraying or tearing hammock can be dangerous. Choose durable, high-quality materials, and double-stitch the seams. If fraying occurs, apply fray-check products or sew a hem around the edges.
Cat Avoids the Hammock
- Solution: Cats can be finicky. Place the hammock in a location your cat frequents, and encourage them to explore it with treats or catnip. Ensure it's at a comfortable height and away from loud noises or high-traffic areas.
Hammock Collects Hair and Odors
- Solution: Opt for materials that are easy to clean and resist odors. Removable covers can be machine washed, and materials like microfiber can be wiped down easily.
Difficulty Hanging the Hammock
- Solution: If you're struggling to hang the hammock, use adjustable straps for easy installation. Ensure you have the right tools for the job, like a stud finder for wall attachments.
Hammock Doesn't Fit the Space
- Solution: Measure your space before starting the project. If the hammock is too large or small, adjust the dimensions accordingly before cutting the fabric.
Fixing these issues improves your DIY cat hammock's durability and appeal, making it a favorite for your pet.
Safety Tips for Crafting a DIY Cat Hammock
When making a DIY cat hammock, safety is paramount. Here are some essential tips to ensure your cat can enjoy their new hammock without any risks:
- Choose Non-Toxic Materials: Always select materials that are non-toxic and pet-friendly. Avoid paints or glues that could be harmful if ingested by your cat.
- Secure Knots and Fastenings: Make sure all knots are tight and fastenings are secure. This will prevent the hammock from collapsing while your cat is using it.
- Smooth Edges: If you're using wood or metal frames, ensure all edges are smooth and rounded to prevent injury.
- Test the Weight: Before letting your cat use the hammock, test it with a weight similar to your cat's to make sure it can hold up safely.
- Avoid Loose Decorations: While decorations can make the hammock more attractive, avoid anything that could be a choking hazard, such as beads or buttons.
- Regular Inspections: Periodically inspect the hammock for any signs of damage or wear and tear, and repair it immediately if necessary.
- Appropriate Placement: Place the hammock in a safe area away from potential hazards like open windows or heaters.
- Fire Safety: Keep the hammock away from open flames and heat sources to prevent fire risks.
By following these safety tips, you can make a secure and enjoyable environment for your cat to relax in their DIY hammock. The well-being of your pet should always come first.
FAQs About DIY Cat Hammock
Discover everything about DIY cat hammock with our faqs guide. Learn how to make one, materials needed, and key tips for your feline friend.
Safety is paramount when making a DIY cat hammock. Make sure all materials are non-toxic and free of sharp edges. The hammock should be securely attached to its frame or hooks, and the fabric should be strong enough to support your cat's weight without tearing. Regularly inspect the hammock for wear and tear to prevent accidents.
Yes, there are no-sew options available for making a cat hammock. For example, you can use an old towel and tie it securely under a coffee table or between two sturdy points. There are also macrame patterns that only require knotting skills. Choose a method that suits your comfort level with crafting.
Cats love to be up high and observe their surroundings, so consider placing the hammock near a window or in a quiet corner where they can relax. Make sure the location is away from busy areas to reduce stress and avoid accidental bumps. Wall-mounted hammocks can save space and become a cozy lookout point for your feline friend.
Cats can be hesitant to try new things. Place the hammock in an area your cat frequents, and make it inviting by adding a familiar blanket or toy. You can also sprinkle some catnip on the hammock to attract them. Be patient, and give your cat time to explore the hammock at their own pace.
For an easy-to-clean DIY cat hammock, choose materials that are machine washable and durable. Consider making a hammock with a removable cover or using waterproof fabrics. Some DIYers use fleece or canvas and add grommets to the corners to attach it to a frame with hooks or rope. This way, you can easily unhook the hammock and throw it in the wash. Always follow the care instructions for the fabric you choose to ensure it stays in good shape.
Final Thoughts
Wrapping up, making a DIY cat hammock at home is a fun and rewarding project that your feline friend will surely appreciate. By following the steps outlined in this article, you can easily learn how to make a cat hammock with minimal cost and effort. This cozy resting spot will give your cat a comfortable place to relax and play. Enjoy the process and watch how much your cat loves their new homemade hammock!


