Making something useful is incredibly rewarding. My first project was a DIY cat scratching post. I wanted a sturdy, attractive place for my cat to scratch without spending a lot of money. I gathered materials like a wooden base, sisal rope, and some fabric. The process was simple and enjoyable, and my cat loved it immediately.
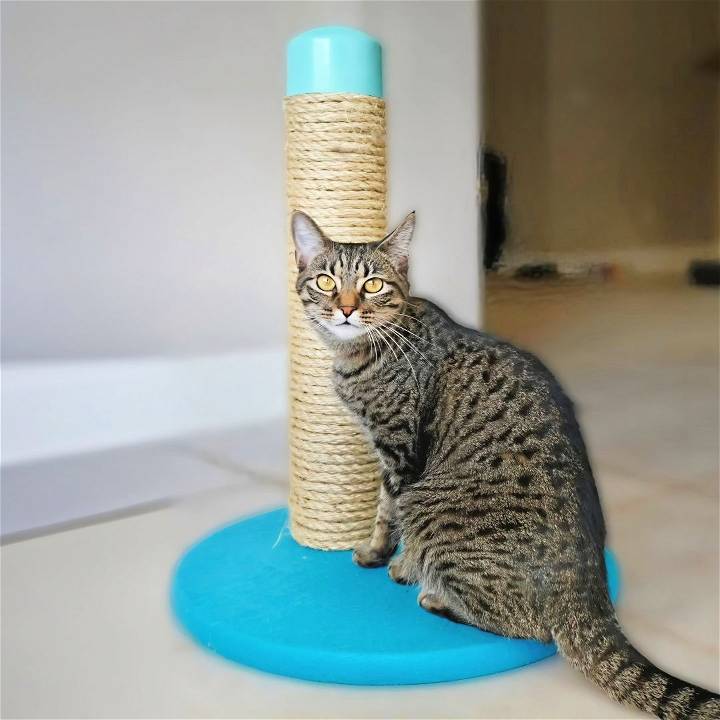
Making my DIY cat scratcher saved me money and helped me learn new skills. I felt proud seeing my cat happily use it. Building it was a meaningful experience that connected me more with my pet. If you're considering this project, I'm here to help you get started. These steps will guide you in making your own DIY cat scratching post.
By sharing my experience, I hope you feel inspired to make your own DIY cat scratching post. It's easier than you think, and your cat will thank you!
Materials You Need and Why
- A wood round: This serves as the base to ensure stability.
- A 3-inch PVC pipe: Acts as the scratching post itself.
- A 3-inch PVC cap: To give a finished look at the top of the pipe.
- 50 feet of rope: This is wrapped around the pipe for the cat to scratch.
- Felt: Used to cover the base for an aesthetically pleasing look.
- Scrap piece of wood: For internal support within the pipe.
- Spray adhesive & hot glue: To securely attach the felt and rope.
- Gloves: To protect your hands from hot glue.
Step by Step Instructions
Learn how to make a DIY cat scratching post with our step-by-step guide. From preparing the base to the finishing touches, follow these simple instructions!
Step 1: Preparing the Base
I began by tracing the inside circle of the PVC pipe onto the scrap wood and felt, making a guide for cutting. The scrap wood piece would later fortify the setup inside the pipe, while the felt ensured a soft landing for Luna's paws.
Step 2: Attaching the Felt to the Base
After cutting the felt slightly larger than the wood round, I used spray adhesive to attach it, smoothing out any bubbles or wrinkles. Flipping it over, I secured the edges with hot glue, taking care to wear gloves to avoid burns.
Step 3: Mounting the Post
Placing the PVC pipe off-center on the wood base, I screwed it in for stability, ensuring it was secure enough to withstand Luna's energetic scratching sessions. I then covered the joining screws with felt, adding both to the aesthetic and preventing Luna from any sharp encounters.
Step 4: Adding the Rope
I started by applying hot glue to the bottom of the PVC pipe, then tightly wrapping the rope around, applying more glue every few turns to ensure it stayed in place. This was perhaps the most tedious yet satisfying part of the project.
Step 5: The Finishing Touch
Removing the barcode from the PVC cap with acetone, I then painted it blue to match the felt. This not only hid the unsightly barcode but also added a personal touch reflecting Luna's playful spirit.
The Result
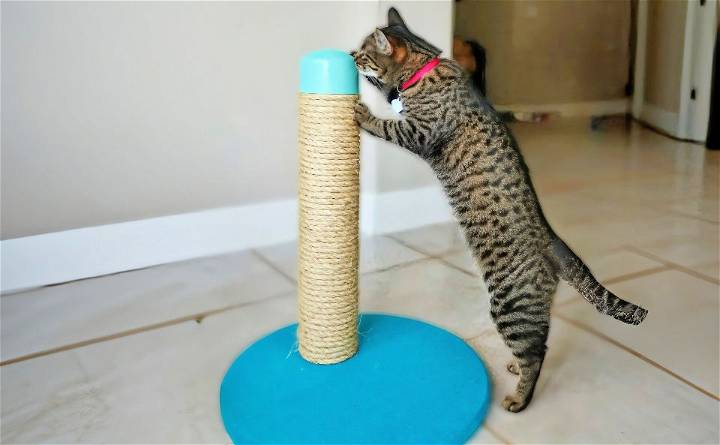
Luna was immediately captivated by her new toy. Watching her stretch and scratch away with delight was all the validation I needed for this project.
What I Learned
Reflecting on the process, there were a few adjustments I'd make for the future:
- Height matters: Luna enjoyed stretching up as she scratched. A taller post would accommodate that natural behavior better.
- Central placement: Centering the pipe might enhance stability and aesthetics.
- Durability: While felt was easy to work with, a more durable material like a carpet might withstand Luna's claws better in the long run.
Customization Ideas for Your DIY Cat Scratching Post
Making a DIY cat scratching post is not just about functionality; it's also an opportunity to add a personal touch to your home that reflects your style and your cat's personality. Here are some ideas to customize your scratching post that are both practical and stylish:
Choose the Right Material
Cats have different preferences when it comes to scratching materials. Some common options include:
- Sisal Fabric: Durable and provides a good grip for cats to scratch.
- Carpet: Soft and readily available, but ensure it's a loop-free variety to avoid catching claws.
- Cardboard: Affordable and easy to replace, plus many cats love the texture.
Pick a Color Scheme
Select colors that match your home decor. You can paint wooden parts of the scratching post or choose fabric wraps in complementary colors.
Add Fun Elements
Consider incorporating toys or dangling items at the top of the post for your cat to swat at. This adds an element of play and encourages interaction with the post.
Adjustable Height
Make a scratching post with adjustable height to cater to kittens that grow quickly. This way, the post remains useful throughout your cat's life stages.
Multi-Purpose Design
Integrate shelves or platforms to turn the scratching post into a small cat tree. This provides your cat with a place to lounge and survey their surroundings.
Easy Assembly
Design the post so it can be easily assembled and disassembled. This is especially helpful if you move frequently or want to replace parts.
Personal Touch
Add a small nameplate with your cat's name or stencil a design onto the base for a personal touch.
The key to a successful DIY project is to keep it simple, safe, and suited to your cat's needs.
Maintenance and Upkeep of Your DIY Cat Scratching Post
Keeping your DIY cat scratching post in top condition is essential for the safety and enjoyment of your feline friend. Here's a straightforward guide to maintaining and caring for your scratching post:
Regular Inspection
Check the scratching post regularly for any signs of wear and tear. Look for loose parts, exposed nails or staples, and worn-out scratching surfaces. Safety first: if any part looks unsafe, fix it immediately.
Cleaning Tips
Cats are clean animals, and a clean scratching post will encourage them to use it. Here's how to keep it tidy:
- Vacuum: Use a hand vacuum to remove fur and debris from the fabric or carpeted areas.
- Spot Clean: For small stains, use a mild detergent and warm water to spot clean. Avoid harsh chemicals that could harm your cat.
- Replaceable Parts: If you've designed your post with replaceable parts, swap them out when they become too worn.
Refreshing the Post
Cats may lose interest in the scratching post over time. To rekindle their interest:
- Catnip: Sprinkle catnip on the post to attract your cat back to it.
- New Textures: Add new materials like rope or different fabrics to renew your cat's curiosity.
Preventive Measures
To prolong the life of the scratching post:
- Sturdy Base: Ensure the base is heavy and stable to prevent tipping.
- Quality Materials: Use high-quality materials that can withstand frequent scratching.
Encouraging Use
If your cat isn't using the post as much:
- Location: Move the post to your cat's favorite area in the house.
- Demonstration: Gently guide your cat's paws along the post to show them how to use it.
By following these simple maintenance and upkeep steps, you'll ensure that your DIY cat scratching post remains a beloved and safe fixture in your cat's daily routine.
Safety Tips for Crafting a DIY Cat Scratching Post
When making a DIY cat scratching post, safety is paramount. Not only for the person making it but also for the furry friend who will be using it. Here are some safety tips to keep in mind:
Select Safe Materials
Always choose materials that are non-toxic and safe for cats. Avoid using:
- Treated woods that may contain harmful chemicals.
- Loose staples or nails that can cause injuries.
- Strings or ribbons can be a choking hazard if detached.
Ensure Stability
A wobbly scratching post can scare your cat and might even cause injury. Make sure the base is:
- Heavy and wide enough to prevent tipping over.
- Securely attached to the post to maintain stability.
Smooth Edges
During construction, pay attention to the details:
- Sand down any rough edges on the wood.
- Check for splinters or sharp points on the post.
- Cover exposed ends of materials like sisal rope with fabric or caps.
Appropriate Height
Design the post to be tall enough for your cat to stretch fully but not so tall that it becomes unstable. A good rule of thumb is:
- Measure your cat from nose to tail and make the post at least that height.
Regular Maintenance
Inspect the scratching post regularly for:
- Loose parts that need tightening.
- Worn materials that need replacing.
- Stability issues that need addressing.
Follow these tips to make a fun and safe scratching post for your cat. Precaution ensures your pet's well-being and your peace of mind.
FAQs About DIY Cat Scratching Post
Discover answers to your most common questions about DIY cat scratching posts, from materials to assembly tips. Get started on crafting the perfect post today!
Cats have individual preferences, but most enjoy scratching on sisal rope. To encourage your cat to use the post, place it in an area where they spend a lot of time. You can also sprinkle some catnip on the post or hang a toy from the top to make it more appealing.
Absolutely! There are simple designs available that require minimal tools and skills. For example, you can create a scratching post by wrapping sisal rope around a sturdy vase and securing it with glue. This requires no cutting or drilling and can be a fun, quick project.
Start by securing one end of the sisal rope to the bottom of the post with a staple or glue. Then, wrap the rope tightly around the post, making sure there are no gaps. Once you reach the top, secure the end of the rope with another staple or more glue.
Yes, making your own scratching post can be significantly cheaper than buying a pre-made one. By using materials like leftover wood and sisal rope, you can make a sturdy and functional scratching post at a fraction of the cost of store-bought options.
To make your DIY cat scratching post irresistible to your feline friend, consider adding some visual or sensory appeal. Here are a few tips:
Visual Appeal: Cats are attracted to movement. Attach a dangling toy or a feather at the top of the post to catch your cat's eye.
Texture Variety: Cats enjoy different textures. Along with sisal, you can add sections of carpet or softwood for variety.
Scent: Rubbing the post with catnip or a catnip spray can entice your cat to scratch the post instead of your furniture.
Stability: Ensure the base is heavy and stable so it doesn't wobble when used. Cats prefer sturdy surfaces that mimic tree trunks in nature.
Location: Place the scratching post in a social area where your family spends time. Cats like to be where the action is and may use the post more if it's in a central location.
Conclusion
In conclusion, building your own DIY cat scratching post is a wonderful way to cater to your cat's needs while also saving money. This DIY cat scratcher project can add a personal touch and ensure it's tailored perfectly for your furry friend's enjoyment. By following these simple steps, you can make a fun and functional piece that both you and your cat will love. Building a DIY cat scratching post is not only fulfilling but also beneficial for your pet's well-being.


