Adding a DIY chair rail to your home can be a simple and effective way to give any room a stylish makeover. By installing a chair rail, you can not only protect your walls from damage but also add a unique design touch. This method allows you to experiment with various styles and colors, making a space that reflects your personality.
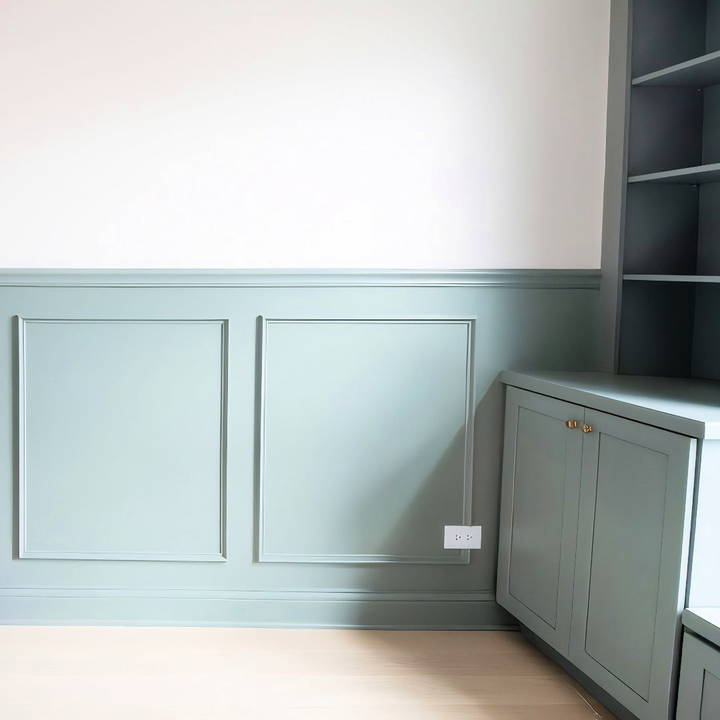
A chair rail can be crafted from wood, PVC, or other materials, making it a versatile choice for any home decor project. The installation process is straightforward, involving basic measurements and tools. DIY chair rail techniques empower you to transform your space affordably and efficiently.
Ready to get started? Explore the next section to learn more about the steps and materials you'll need for this home improvement project.
Getting Started: Materials Needed
Before jumping into the project, it's crucial to gather all the materials. Here's what you'll need:
- Prime Chair Rail Sections (8-foot lengths): These form the main feature of your chair rail. We got ours from Lowe's.
- PVC Base Cap Moldings: These will work in conjunction with the chair rail for the lower part of the wall.
- Painter's Tape: This is necessary for marking the placement of your chair rail.
- Liquid Nails: A strong adhesive to help attach the chair rail.
- Brad Nailer and Nails: For securing the chair rail to the wall.
- Miter Saw: To cut the chair rail at precise angles.
- Oscillating Saw: If you need to make cuts around light switches or sockets.
- Painter's Putty and Caulk: To fill nail holes and seams.
- Respirator and Gloves: Especially important if you're pregnant or sensitive to fumes.
- Paint Sprayer: Optional, but recommended for a smoother finish.
- Primer and Paint: Choose a color that matches your room's theme. We went with a sage green from the Valspar Simplicity line, which is low in VOCs, making it safer for nurseries.
Step by Step Instructions
Learn how to install a DIY chair rail with our step-by-step guide. From planning to painting, get professional results with our easy instructions.
Step 1: Plan Your Design
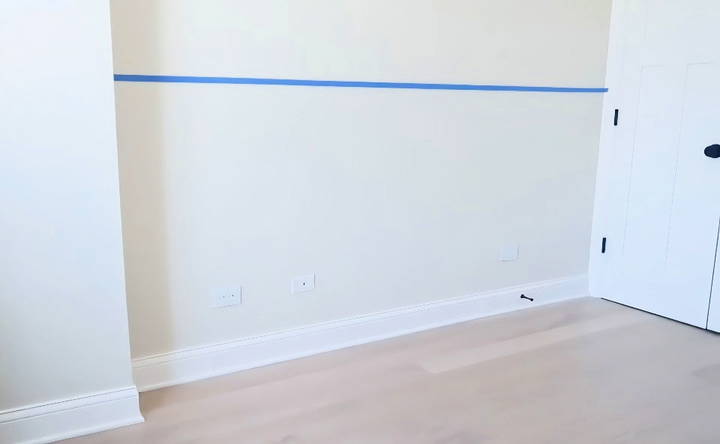
First, determine where you want your chair rail. Traditionally, it is installed on the lower third of the wall, but we decided to place ours approximately 45 inches from the floor. Use painter's tape to visualize the height and placement, giving you a good sense of how it will look before making any permanent marks.
Step 2: Mark Your Walls
Using a pencil, mark a level line at the height where you want the chair rail. Starting from the middle of a wall can make it easier to move outward. Repeat this process on all four walls, ensuring your lines are even and level.
Step 3: Cut and Install the Chair Rail
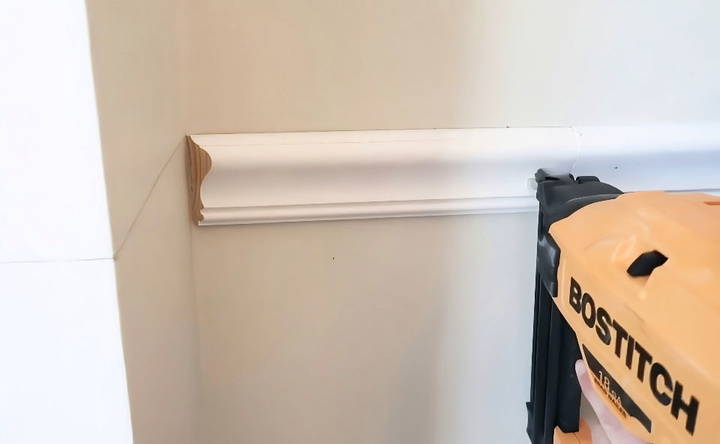
Using your miter saw, cut the chair rail pieces to match the lengths of your walls. For corners, cut them at 45-degree angles so they fit together neatly. Lay each piece against the wall to double-check measurements before making the cuts.
Once cut, apply liquid nails to the back of each piece and press it firmly against the wall. For extra security, use a brad nailer to nail the chair rail into the studs of the wall.
Step 4: Navigate Corners and Obstacles
Around corners, cut complementary 45-degree angles to ensure the pieces fit together smoothly. If you encounter obstacles like light switches, use an oscillating saw to make precise cuts to fit the pieces around these features.
Step 5: Install Picture Frame Molding
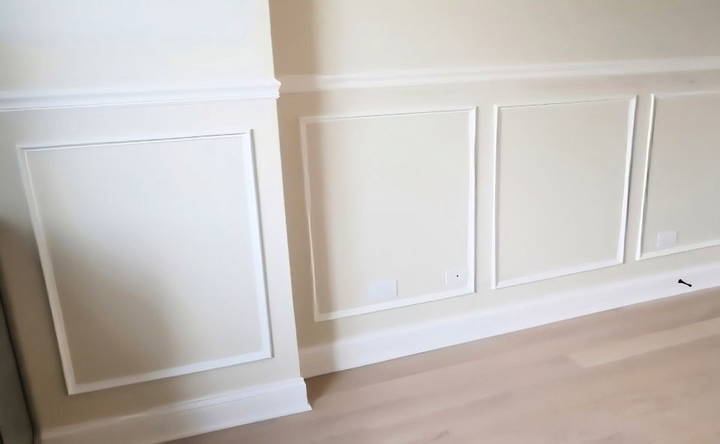
Below the chair rail, install picture frame molding to add visual interest. Measure the size of each "frame" based on your wall dimensions. Ensure you leave about 4 inches of space between the chair rail, baseboards, and any two frames.
Cut each piece of molding at a 45-degree angle so they fit together at the corners, forming a rectangular or square shape. Attach these with liquid nails and the brad nailer, just like the chair rail.
Step 6: Prep for Painting
Fill all nail holes with painter's putty and let it dry. Once dry, sand the surfaces to ensure a smooth finish. Next, use caulk to fill all seams between the moldings and the wall. Run a thin bead of caulk and smooth it out with a wet finger, wiping away any excess with a damp rag.
Step 7: Prime and Paint
After all prep work, protect areas you don't want painted with painter's tape and drop cloths. Using a paint sprayer can save you time and give a professional finish. We used a paint sprayer for a smooth and even coat. First, apply a light coat of primer and let it dry thoroughly.
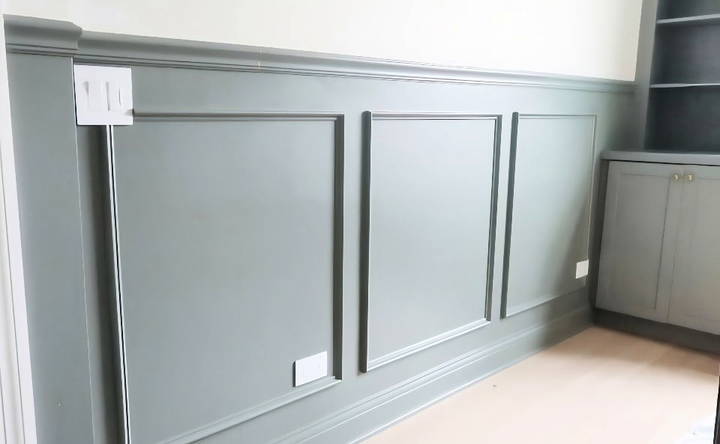
When the primer is dry, spray two light coats of your chosen paint color. We used a lovely sage green, which gave our nursery a calming and charming feel.
Customization Ideas for Your DIY Chair Rail
When it comes to adding a personal touch to your DIY chair rail, the possibilities are endless. Customizing your chair rail can transform a room, making it reflect your unique style and taste. Here are some ideas to inspire your creativity:
Choose a Color Scheme:
- Match or Contrast: Decide whether you want your chair rail to blend in with your wall color or stand out as a feature.
- Paint Techniques: Consider using techniques like sponging, rag-rolling, or stenciling for a textured look.
Incorporate Patterns:
- Stripes or Shapes: Use painter's tape to build stripes or geometric shapes for a modern twist.
- Wallpaper Borders: Attach a strip of wallpaper above or below the chair rail for added visual interest.
Add Dimension:
- Layering: Install a second, narrower rail above or below the main one to build depth.
- Molding: Add decorative molding pieces to the chair rail for a more elaborate design.
Mix Materials:
- Wood and Metal: Combine wood with metal accents for an industrial vibe.
- Fabric: Upholster a section of the wall beneath the chair rail with fabric for a soft, textured look.
Functional Customizations:
- Hooks and Shelves: Attach hooks for hanging coats or shelves for displaying decor.
- LED Strips: Install LED lighting along the chair rail to add ambiance and highlight artwork.
Eco-Friendly Options:
- Reclaimed Wood: Use reclaimed wood for an eco-friendly and rustic appeal.
- Low-VOC Paints: Choose paints with low volatile organic compounds for better indoor air quality.
Ensure your customization matches your room's design. Enjoy the process, and let your chair rail show your personality and style.
FAQs About DIY Chair Rail Installation
Discover essential FAQs about DIY chair rail installation. Get expert tips and answers to common questions in this comprehensive guide.
A chair rail is a type of molding that is installed horizontally along the walls of a room. It’s traditionally used to protect walls from being scuffed by chair backs. Today, chair rails serve both a functional and decorative purpose, adding character and detail to a room.
The standard height for a chair rail is approximately one-third the height of the room from the floor. For an 8-foot ceiling, a safe bet is to install the chair rail at about 32 inches from the floor. However, this can vary depending on personal preference and the room’s design.
Yes, installing a chair rail is a manageable project for beginners. It involves measuring, cutting, and nailing the molding to the wall. There are many tutorials available that provide step-by-step instructions to guide you through the process.
Once installed, you can maintain your chair rail by dusting it regularly and touching up any paint as needed. If the chair rail becomes damaged, you can fill in nail holes with spackle and reapply caulk to the edges to keep it looking fresh.
When installing chair rail molding, corners can be a bit tricky. For inside corners, you'll want to use a coping saw to cut along the profile of one piece of molding so it fits snugly over the other piece. For outside corners, you'll typically miter cut the ends of the molding at a 45-degree angle so they fit together neatly. Always dry-fit your pieces before applying adhesive or nails to ensure a clean, professional finish.
Final Thoughts
Installing a DIY chair rail with picture frame molding was a fulfilling project that significantly elevated the room's aesthetic. The process, while detailed, is straightforward and rewarding. This DIY project not only added elegance and character to our nursery but also provided a personal touch that made the room feel special and welcoming for our baby girl.


