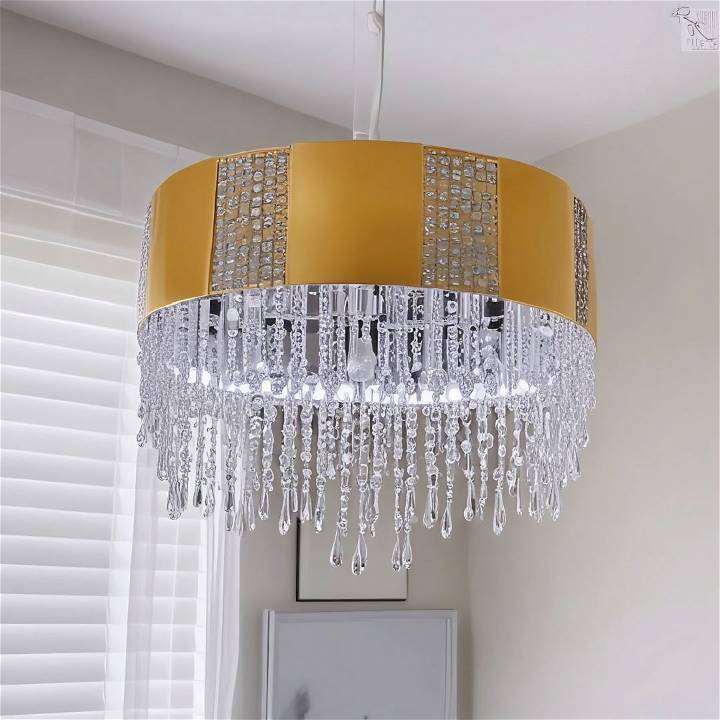
When I first decided to tackle the task of making a DIY gold chandelier, inspired by a stunning but seemingly expensive design I had seen, I possessed little more than determination and a love for glitzy home decor. The journey from inspiration to the finishing touches taught me invaluable lessons on creativity, patience, and the joy of DIY. Here's how I achieved elegance on a budget, along with tips and tricks for anyone looking to embark on this rewarding project.
Materials Needed and Their Purpose
- Plastic Board: I chose a sturdy, yet easy-to-cut plastic board from Michael's craft store as the base for my chandelier circles. The durability and light weight of the plastic were key for easy hanging.
- Beads: Acquiring affordable beads in bulk was central to this project, considering the volume needed to make the desired opulent effect.
- X-acto Knife: Essential for precise cutting of the plastic board.
- Gold Reflective Paper: This gave the chandelier its glamorous golden hue, instantly elevating the look.
- LED Strip Lights (Remote Controlled): These lights were a game-changer, providing the bright or soft lighting options while being energy efficient.
- Decorative Placemat: I found a beautiful design at Walmart that added texture and depth, closely mirroring the original inspiration.
- Foam Sheets/Hard Poster Board: Initially, I used foam sheets for decorative squares but later switched to poster board for a sleeker look.
- Fishing Line & Book Rings: The strong fishing line ensured safe hanging, while the book rings served as simple, yet effective connectors to the ceiling.
Step-by-Step Process
Learn how to make a gorgeous DIY chandelier with our step-by-step guide. Transform your space with this creative and budget-friendly project.
1. Crafting the Base
I embarked on the project by drawing two circles on the plastic board using a compass. The circles, with radii of 10 inches and 8 inches, would form the layered structure of the chandelier. Cutting these out neatly with an X-acto knife set the stage for the elaborate work ahead.
2. Prepping and Attaching the Beads
After preparing the beads by cutting them into varying lengths for a tiered effect, I made random points on the plastic circles where each bead would be glued. It became immediately clear that eyeballing the spacing was necessary for an evenly balanced look. This step required patience and a steady hand.
3. Bringing Gold to Life
Covering the plastic sheet cutouts with gold reflective paper transformed the project. The material didn't adhere well initially, but a bit of hot glue fixed that promptly. This step was thrilling as the chandelier began to shimmer with a golden brilliance.
4. Adding Textures and Details
Utilizing a decorative placemat for texture provided an inspired solution to mimic the intricate background seen in my inspiration photo. Cutting and attaching it carefully around the base added an impressive depth to the piece. For the decorative squares atop, I opted for hard poster board covered in the same gold paper, giving it a polished finish.
5. Lighting It Up
The self-adhesive LED strip lights were a breeze to apply around the bottom part of the chandelier. Choosing remote-controlled lights allowed for easy adjustments to brightness and mood, crucial for setting the perfect ambiance.
6. Secure Hanging Mechanism
Attaching the fishing line strategically to distribute weight evenly was critical. I made six strong lines attached to book rings, which then connected to a single larger ring for easy mounting to a cup hook in the ceiling. It was essential to ensure that the hook and mounting could support the chandelier's weight, although mine was relatively light.
Customization Ideas for Your DIY Chandelier
Making a DIY chandelier is not just about adding light to a room; it's about infusing your space with a piece of your personality. Here are some ideas to help you customize your chandelier in a way that reflects your style and creativity.
- Choose Your Color Palette Select colors that complement the room where your chandelier will hang. If you're aiming for a warm, cozy atmosphere, consider earth tones or soft pastels. For a more vibrant setting, bold and bright colors can make a statement.
- Incorporate Patterns Patterns can add depth and interest to your chandelier. Think about using geometric shapes, stripes, or floral designs. You can paint these directly onto parts of the chandelier or add patterned elements such as fabric or paper.
- Add Textural Elements Texture can be just as impactful as color. Consider materials like beads, crystals, or even items from nature like shells or driftwood. These can be attached to the chandelier frame to make a unique look.
- Personalize with Memories Make your chandelier a centerpiece that tells a story by hanging mementos from its arms. This could be anything from family photos enclosed in small frames to trinkets collected from travels.
- Go Green with Upcycled Materials Upcycling is not only eco-friendly but also gives your chandelier a one-of-a-kind appeal. Look for old materials that can be repurposed, such as glass bottles, vintage lace, or reclaimed wood.
- Play with Light The type of bulbs you choose can drastically change the ambiance. LED lights come in various colors and temperatures, from warm yellows to cool blues. You can also use dimmable bulbs to adjust the brightness according to the mood.
- Safety First Always ensure that any additions to your chandelier are securely attached and that electrical components are handled safely. If you're unsure about the electrical aspects, consult with a professional.
By using these ideas, you'll make a stylish chandelier that reflects your creativity and style. Remember, DIY projects should showcase your personality.
Troubleshooting Common Issues
When you're making a DIY chandelier, you might encounter a few hiccups along the way. Here's a guide to help you troubleshoot some common issues in a straightforward and easy-to-understand manner.
Lights Not Working
- Check the Bulbs: Make sure the bulbs are properly screwed in and that they're the right type for your chandelier.
- Inspect the Wiring: Loose or disconnected wires can cause lighting failures. Ensure all connections are secure.
- Test the Power Source: Sometimes the issue is with the power outlet, not the chandelier. Try plugging in another device to check.
Uneven Hanging
- Balance the Frame: Adjust the chains or cords to make sure the chandelier hangs evenly.
- Check the Ceiling Anchor: A secure anchor is crucial. If it's not centered or firmly attached, the chandelier may tilt.
Flickering Lights
- Secure Connections: Flickering often results from loose bulbs or wiring. Tighten everything up.
- Dimmer Compatibility: If you're using a dimmer switch, ensure it's compatible with your light bulbs.
Overheating
- Bulb Wattage: Using bulbs with too high wattage can cause overheating. Stick to the recommended wattage for your chandelier.
- Adequate Ventilation: Ensure there's enough airflow around the bulbs to prevent heat buildup.
Too Dim or Too Bright
- Adjust the Bulb Type: Switch to higher or lower wattage bulbs, or try different types like LED for brightness control.
- Consider a Dimmer: Installing a dimmer switch gives you the flexibility to adjust the light intensity.
Decorative Elements Falling Off
- Reinforce Attachments: Use stronger adhesives or more secure fastening methods for hanging decorations.
- Distribute Weight Evenly: Make sure decorative elements are evenly distributed to avoid imbalance.
Remember: Safety is paramount. If you're ever in doubt, especially with electrical issues, it's best to consult a professional. With these tips, you should be able to solve the most common problems and enjoy your beautiful, handcrafted chandelier. Happy DIY-ing!
FAQs About DIY Chandeliers
Explore our FAQs about DIY chandeliers and discover expert tips, tricks, and inspiration for making your own stunning light fixtures at home.
How can I ensure my DIY chandelier is safe to use?
Safety is crucial when making a chandelier. Use UL-listed electrical components, ensure all wiring is properly insulated, and connections are secure. If you're not experienced with electrical work, consult a professional. Always turn off the power when installing your chandelier.
Can I make a chandelier if I have no experience with electrical wiring?
Yes, you can start with non-electrical chandeliers using candles or battery-operated lights. For electrical chandeliers, it's best to learn the basics of wiring or seek help from someone experienced to ensure safety.
How do I choose the right size chandelier for my room?
The size of your chandelier should be in proportion to your room size and ceiling height. A common method is to add the room's length and width in feet, and that number, in inches, should be the diameter of your chandelier.
How can I update an existing chandelier?
Give an old chandelier a new life with paint, replacing old shades, or adding new decorative elements like crystals or beads. You can also rewire it to use modern, energy-efficient LED bulbs.
By addressing these common questions, you can embark on your DIY chandelier project with confidence and creativity.
Reflections and Tips
While the project was more time-consuming than anticipated, the end result was worth every minute. One major lesson learned was the value of improvisation—switching from foam sheets to poster board for the decorative squares, for instance, significantly improved the end product.
For anyone attempting this project, my advice is to be patient and flexible. Don't hesitate to tweak the design to suit your materials, skill level, or aesthetic preferences. Whether you choose bright white or soft white lighting, the beauty of a DIY chandelier is that it reflects your personal touch—a unique, elegant statement in your home.


