Making a DIY chia pet is a fun, hands-on activity that you can do at home with a few simple materials. Whether you're looking to craft a personalized pet for yourself, to bond with kids, or simply for the joy of growing your very own mini garden on a pet-shaped sculpture, this project offers a great way to get creative while embracing nature. In this tutorial, we'll walk you through the process of making a clay Chia turtle from start to finish, and we'll provide some helpful tips for ensuring your chia seeds thrive.
What Is a Chia Pet?
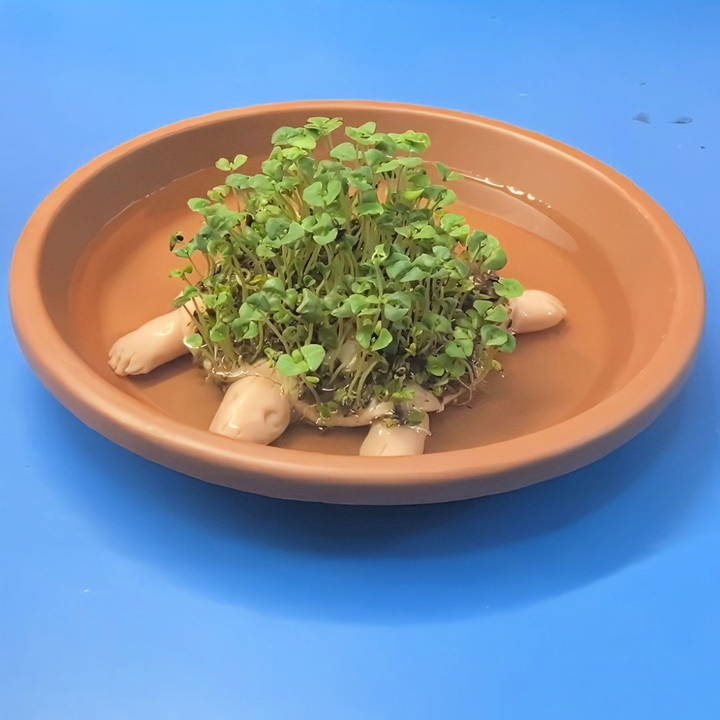
Before diving into the DIY version, let's take a quick look at the famous Chia Pet. You've likely seen them advertised on TV—those fun, animal-shaped figures covered in sprouted chia seeds that resemble fur or grass. Chia Pets are simple yet magical: add water, apply the chia seeds, and in a few days, you have a lush, green pet that comes to life. While the store-bought versions are made of ceramic, we'll be making our own using clay. This allows for endless customization!
Materials You'll Need:
- Baking Clay (such as Sculpey clay) – This is the base material for sculpting your Chia turtle.
- Chia Seeds – The magical seeds that sprout into your pet's green “fur.”
- Water – For both shaping the clay and activating the chia seeds.
- Simple Sculpting Tools – A butter knife, fork, and your hands are all you need.
- Paper Plate or Baking Tray – To work on and bake the clay turtle.
- Oven – To bake your clay turtle and harden it into the perfect base for your Chia Pet.
- Spray Bottle – To keep the chia seeds moist during the growing process.
Now that we have everything ready, let's get started on making your very own Chia Pet!
Step by Step Instructions
Learn how to make a DIY chia pet turtle with step-by-step instructions, from sculpting and baking to seed application and care tips.
Step 1: Sculpting the Turtle Base
The first step in making a Chia turtle is sculpting the clay base. This will act as the foundation for your Chia Pet and hold the chia seeds in place as they grow.
Instructions for Sculpting:
- Shape the Turtle's Body: Begin by cutting a small piece of your clay—about an inch in size—and roll it into a ball using your hands. Once you have a round shape, flatten it slightly to make the turtle's body, keeping it about ¼ inch thick. This thickness is important for ensuring the clay bakes evenly without cracking.
- Add the Turtle's Limbs: Next, form the turtle's legs, head, and tail by shaping smaller pieces of clay. These can be simple cylinders or elongated shapes. Attach them to the turtle's body by gently pressing the ends into the sides of the body. Make sure each limb is securely attached, so it stays in place after baking.
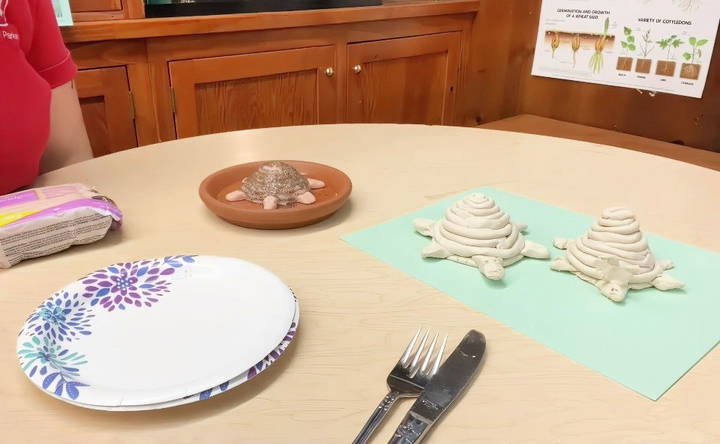
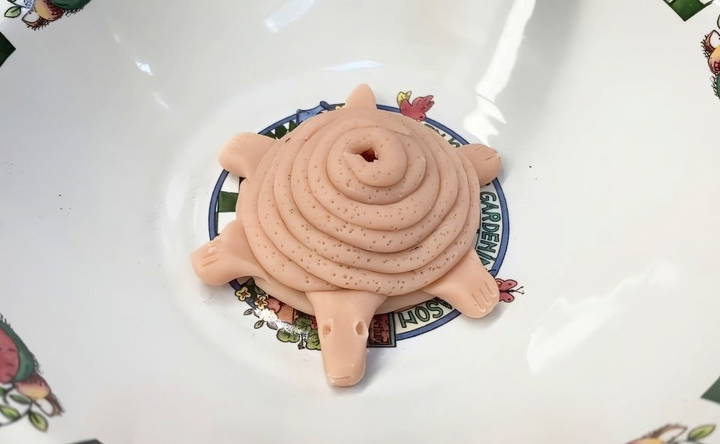
- Make the Turtle's Shell: To make a raised, spiral shell effect, roll a long, thin coil of clay (this can be done by rolling clay between your hands to form a cylinder). Begin coiling the clay around the back of the turtle, starting from the outer edge and working inward, to form a shell-like structure. Gently press the coil into the body to make a watertight seal for holding the chia seeds.
- Add Details: You can customize your turtle by adding eyes, toes, and other features. For the eyes, you can use small balls of clay or indentations made with a tool. Additionally, use a fork to add texture to the turtle's shell. This texture will help the chia seeds stick to the surface once they are applied.
- Poke Drainage Holes (Optional): If you'd like, you can use a tool or a toothpick to poke small holes into the shell to help water drain through to the chia seeds. This will also help the seeds absorb water more efficiently, though it's not necessary.
Step 2: Baking the Clay Turtle
Once you're happy with the design of your turtle, it's time to bake it to harden the clay. This will make the turtle sturdy enough to hold the chia seeds and water without losing its shape.
Baking Instructions:
- Preheat the Oven: Set your oven to 275°F (135°C). Make sure to start with a cold oven to avoid cracking the clay, which happens when it heats up too quickly.
- Bake the Turtle: Place your clay turtle on a baking tray lined with parchment paper or aluminum foil. Bake the turtle for about 15 minutes per quarter-inch of thickness. For example, if your turtle is ¼ inch thick, bake it for 15 minutes. If it's ½ inch thick, bake it for 30 minutes.
- Cool the Turtle: Once your turtle is fully baked, remove it from the oven and let it cool completely. It will become hard as a rock, ready to be transformed into a Chia Pet.
Step 3: Preparing the Chia Seeds
While your turtle is cooling, you can start preparing the chia seeds. Chia seeds need to absorb water to become sticky and sprout effectively, so this step is crucial for the success of your DIY Chia Pet.
Instructions for Soaking Chia Seeds:
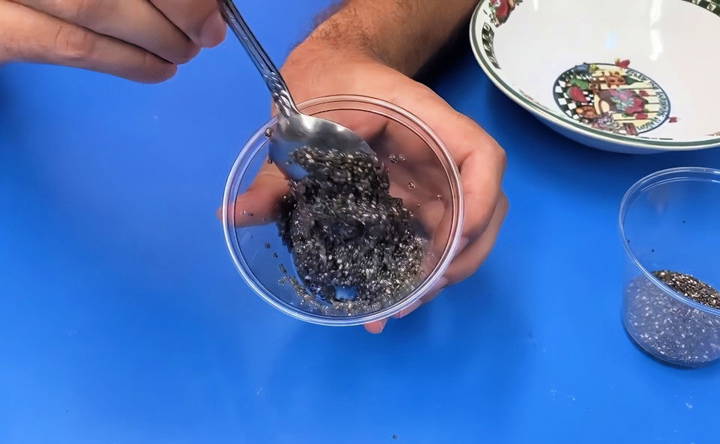
- Mix Chia Seeds with Water: In a small bowl, combine 1-2 tablespoons of chia seeds with enough water to cover them. Chia seeds are highly absorbent, so they will quickly soak up the water and form a gel-like consistency. This usually takes about 30 minutes to an hour, but for best results, you can let them sit for a few hours.
- Check the Consistency: After soaking, the chia seeds should have expanded and become sticky. This sticky consistency is what will allow them to adhere to your turtle's shell and grow in place.
Step 4: Applying Chia Seeds to the Turtle
Now comes the fun part—applying the chia seeds to your turtle and getting ready for the growing process!
How to Apply the Seeds:
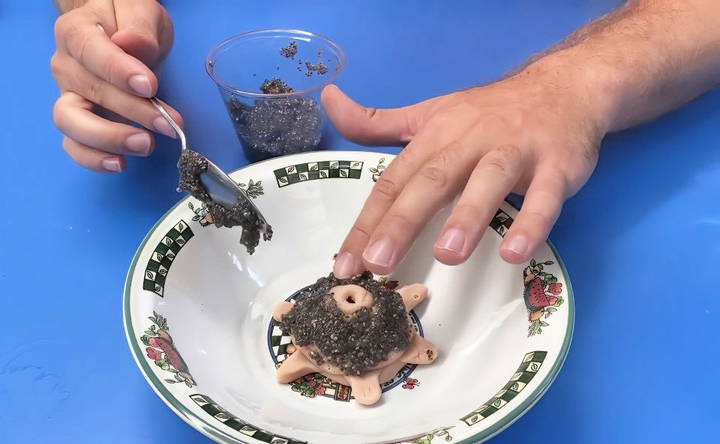
- Spread the Seeds: Using your fingers, a spoon, or a butter knife, apply the soaked chia seeds to the textured areas of your turtle's shell. Be sure to spread them evenly so that your Chia Pet grows a uniform coat of greenery. Don't worry about using too many seeds—the more you apply, the fuller your turtle's “fur” will look!
- Ensure Good Coverage: Pay attention to the nooks and crannies on your turtle's shell. Make sure the chia seeds are securely pressed into the clay, especially in any textures or holes you maked earlier.
- Optional Tip: If you didn't poke holes in the shell during the sculpting phase, you can now make small indentations to help the seeds sit more securely on the surface.
Step 5: Caring for Your Chia Pet
Now that you've sculpted and applied the chia seeds to your turtle, it's time to care for your new green friend! The key to a thriving Chia Pet is ensuring it has the right environment to grow. Here are the steps to take care of your Chia Pet and make sure it sprouts into a lush, green wonder.
Where to Place Your Chia Pet
Chia seeds need light, water, and warmth to grow. Choosing the right location for your Chia Pet is crucial to success. Here are some tips:
- Sunlight: Place your turtle in a location where it can get plenty of indirect sunlight. A windowsill is an ideal spot. Chia plants grow best in bright, indirect light. If the spot gets too much direct sunlight, however, it could dry out the seeds too quickly, so be sure to check on them regularly.
- Temperature: Chia seeds sprout best in moderate, room-temperature conditions, around 65–75°F (18–24°C). Avoid placing your Chia Pet in overly hot or cold environments, as extreme temperatures can hinder growth.
- Humidity: If you live in a dry climate, your chia seeds may benefit from a bit more moisture in the air. You can place a small dish of water nearby or even mist the area around your Chia Pet to increase the humidity.
Watering Your Chia Pet
Water is essential for the chia seeds to grow and stay hydrated. Here's how to water your Chia Pet to ensure optimal growth:
- Misting: For the first few days, use a spray bottle to mist your turtle's chia seeds about 2–3 times a day. This will keep the seeds moist but not overly saturated. Be gentle when misting, as heavy water droplets could displace the seeds or damage the fragile sprouts.
- Watering the Base: If your clay turtle has drainage holes in its shell, you can add water to the inside of the shell, allowing it to seep out gradually to keep the seeds moist. If your turtle doesn't have holes, simply place it on a shallow plate of water. The clay will absorb water from the plate, providing moisture to the seeds from underneath.
- Watch for Dryness: Keep an eye on your Chia Pet to ensure that the seeds stay moist. If the surface starts to dry out, increase the frequency of misting. However, be cautious not to oversaturate the seeds, as too much water can lead to mold growth.
Sprouting Time: What to Expect
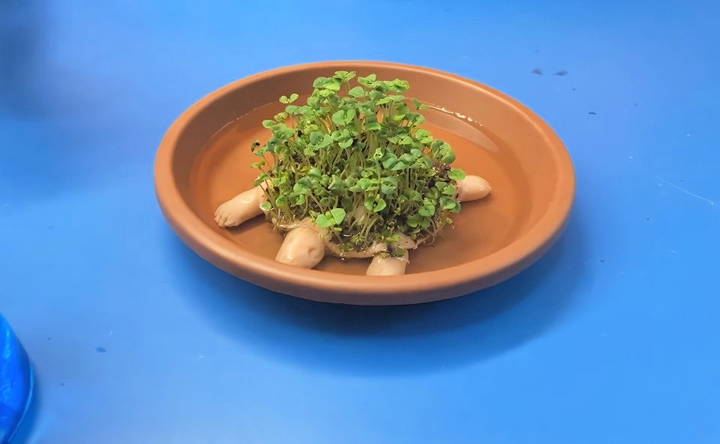
After a few days of consistent misting and proper placement in sunlight, you should begin to see tiny sprouts emerging from the chia seeds. The timeline for sprouting can vary depending on the environment, but typically, chia seeds start to sprout within 4-7 days.
Day-by-Day Growth Stages:
- Days 1–3: During the first few days, you may not see much change. Be patient, as the seeds are still absorbing water and preparing to sprout.
- Days 4–7: Small green shoots will start to appear. These are the first signs that your Chia Pet is coming to life! Continue misting and watering as needed to keep the seeds moist.
- Days 7–14: Your Chia Pet should now have a healthy covering of green sprouts. The sprouts will grow taller and fuller over the next week. Be sure to keep the turtle in a sunny spot and maintain consistent moisture.
Trimming and Maintenance
Once your chia seeds have sprouted and grown, they'll continue to thrive with a little care and attention. Here's how to keep your Chia Pet looking its best:
- Trimming the Growth: As the chia plants grow, they may start to look a bit wild and unkempt. You can use a pair of scissors to give your Chia Pet a little “haircut,” trimming any overgrown sections to keep it looking neat. Trim as needed, but avoid cutting too close to the base of the sprouts to ensure they keep growing.
- Dealing with Mold: If you notice any mold forming on your Chia Pet (usually caused by excess moisture), don't panic! Mold is a common issue when growing chia seeds. To combat this, reduce the amount of water and make sure the Chia Pet is in a well-ventilated area. You can also remove the affected seeds and continue caring for the rest.
- Reapplying Seeds: Over time, your Chia Pet's sprouts will begin to dry out and eventually die off. When this happens, simply remove the old chia plants, soak a fresh batch of seeds, and apply them to the turtle again. You can regrow new sprouts as often as you'd like!
Step 6: Troubleshooting Common Issues
Even with the best care, you might encounter a few hiccups while growing your Chia Pet. Here are some common problems and how to fix them:
Chia Seeds Aren't Sticking to the Turtle
- Problem: The chia seeds keep sliding off the turtle's shell or won't stick properly.
- Solution: Make sure you've soaked the chia seeds long enough to make the sticky gel-like consistency. The stickiness is essential for the seeds to adhere to the surface. Also, check if your clay turtle has enough texture for the seeds to grab onto. If needed, add some additional indentations or texture to the surface.
Seeds Aren't Sprouting
- Problem: After several days, the chia seeds are not sprouting.
- Solution: Check to ensure the seeds are getting enough light and water. If they've been kept too dry or too wet, they may not sprout. You can also try moving your Chia Pet to a warmer location, as chia seeds need moderate warmth to grow.
Sprouts Are Turning Yellow
- Problem: The chia sprouts are growing, but they're turning yellow or pale.
- Solution: This is often a sign that the seeds aren't getting enough sunlight. Move your Chia Pet to a brighter spot, but avoid direct sunlight, which can cause the sprouts to burn. Also, ensure the seeds are staying consistently moist.
Step 7: Fun Variations and Creative Ideas
Now that you know how to make a basic Chia turtle, why not get creative and try different variations? The possibilities are endless when it comes to DIY Chia Pets, and you can customize them to suit your style or personality.
Other Creatures to Try
- Chia Hedgehog: Use the same coiling technique to make a hedgehog shape, then apply chia seeds to its back to grow “spikes.”
- Chia Dinosaur: Sculpt a small dinosaur and let the chia seeds grow on its back, giving it a wild and prehistoric look.
- Chia Cat or Dog: Make a simple cat or dog shape, and let the chia seeds grow as fur!
Decorating Your Chia Pet
Don't stop at just sculpting and growing! You can also decorate your Chia Pet with paint, markers, or googly eyes after the clay has hardened. Add facial features, colorful shells, or anything else that brings your Chia Pet to life.
Make it a Science Experiment
For kids (or adults who love science!), you can turn your DIY Chia Pet into a fun learning experiment. Document the growth of the chia seeds by taking daily pictures and recording the plant's progress. You can measure how tall the chia sprouts grow each day and compare different growing conditions, such as light exposure, temperature, or water levels.
Final Thoughts
Making your own DIY Chia Pet is a rewarding and creative project that combines art and nature in a simple, hands-on way. Whether you're sculpting a classic turtle or experimenting with your own designs, the process is easy and fun for all ages. Plus, caring for your Chia Pet provides a great opportunity to learn about plants, growth, and nurturing living things.
So gather your materials, tap into your imagination, and enjoy the magic of watching your homemade Chia Pet come to life! Happy crafting!
By following these steps, you'll not only have a unique and personalized Chia Pet, but you'll also have an ongoing project to nurture and enjoy for weeks to come. The best part? You can start all over again as soon as your chia plants finish growing!
FAQs About DIY Chia Pet
Discover everything you need to know about DIY chia pets with our comprehensive FAQs, ensuring a thriving homemade green companion.
For best results, use baking clay like Sculpey, which can be hardened in an oven at 275°F. Avoid air-dry clay, as it may disintegrate when exposed to water. Baking clay is durable and ideal for holding moisture required by chia seeds.
While chia seeds are ideal because they form a sticky gel when wet and sprout quickly, you can experiment with other small seeds like mustard or flax. However, these may not stick as well or sprout as evenly.
Make sure the seeds are soaked long enough to form a sticky gel. You can also add texture to the turtle’s shell by pressing in small indentations with a fork or tool, which will help the seeds stay in place.
Mist your Chia Pet 2-3 times a day using a spray bottle to keep the seeds moist. You can also place the clay base in a shallow dish of water to allow absorption from the bottom, keeping the seeds hydrated.
Ensure your Chia Pet is in a spot with bright, indirect sunlight and moderate warmth (65–75°F). If it’s too cold, seeds may not sprout. Keep the seeds consistently moist but not overly saturated to avoid drowning them.
To avoid mold, maintain proper airflow around your Chia Pet and don't oversaturate it with water. If you spot mold, scrape off the affected area, reduce watering, and move your Chia Pet to a sunnier, well-ventilated location.
Yes! Once the clay has been baked and fully cooled, you can use acrylic paint to add colors and designs to your Chia Pet. Make sure the paint is dry before applying chia seeds to avoid interfering with growth.
Chia sprouts usually last about 1-2 weeks before they start to dry out. You can reapply soaked chia seeds after the initial growth cycle to continue enjoying your Chia Pet. Just remove the old sprouts and start the process again.


