Building a DIY chicken roost is a simple way to make your chicken coop more comfortable. Chickens naturally want to perch on something high off the ground while they sleep, so adding roosts will help them feel safe and relaxed. You don't need many tools or materials to get started, just some basic supplies and a bit of time.
By adding a proper roost, you're ensuring your chickens are happy and healthy. In turn, they'll produce better eggs and have a better quality of life. With this guide, you can easily build a chicken roost that fits your coop perfectly. Follow along, and these steps will make it easy to get started.
Introduction to Chicken Roosting Needs
Understanding chickens' roosting needs is vital for their well-being. Chickens seek high ground to sleep, feeling secure from predators. A well-designed roost imitates this, giving your flock a comfy resting place.
Why Roosting Is Important:
Roosting is more than just sleeping; it's a critical part of a chicken's daily routine. It helps them maintain their pecking order, as higher positions on the roost are often taken by more dominant birds. Moreover, a proper roost allows chickens to stretch out, relax their muscles, and stay warm during colder nights.
Ideal Roosting Conditions:
The perfect roost should be:
- Sturdy and stable: It must support the weight of your chickens without wobbling.
- Spacious: Provide at least 8-10 inches of roosting space per chicken to prevent overcrowding.
- Elevated: Position the roost at least 2-3 feet off the ground to protect it from ground-level threats.
- Comfortable: Use materials like natural wood that are easy on the chickens' feet.
Health Considerations:
A poorly designed roost can lead to health issues such as foot injuries or respiratory problems due to poor ventilation. Ensure the roost is placed in a well-ventilated area and made from non-toxic materials.
A safe, cozy roost keeps your chickens happy and healthy. A content chicken lays more eggs, so ensure their roost feels like home.
Why This Project Matters
Before we dive into the nuts and bolts of building a roost, let's take a moment to understand why a proper roost is critical for your chickens' health and happiness. Chickens naturally seek high ground to sleep, away from potential predators and ground-level parasites. A well-designed roost not only offers them a sense of security but also promotes healthy sleeping habits. Plus, it keeps the coop cleaner by concentrating droppings in one area, making your life easier when it comes to cleanup time.
Round vs. Flat Roosting Bars: A Quick Overview
One common debate among poultry keepers is whether to use round or flat roosting bars. In my experience, chickens seem to prefer flat bars. Flat surfaces allow them to cover their feet with their bodies, which is essential for keeping warm during colder months and preventing frostbite. Today, we're focusing on making a flat bar roost using materials most of us have lying around.
Materials You'll Need
- 2x4 Lumber: Flat surfaces provide the comfort chickens prefer. We'll be using these for both the frame and the roosting bars. The size can vary based on your coop size, but for this project, five-foot lengths work well.
- Circular Saw: To cut the lumber to the required lengths.
- Impact Driver and Screws: For assembling the roost securely.
- Tape Measure, Pencil, Speed Square: For measuring and marking your cuts accurately.
- Safety Glasses: Always prioritize safety when using tools.
Step by Step Instructions
Learn how to build a DIY chicken roost with our step-by-step instructions. From cutting lumber to installation, get your chickens comfy today!
Step 1: Cutting the Lumber
Start by measuring and marking your 2x4s. You'll need:
- Five lengths at five feet for the sides and the roosting bars.
- Two 18-inch pieces for the legs.
- Two 12-inch pieces for the top standoffs to keep the roost away from the wall (this helps minimize soiling the walls of your coop).
Use your circular saw to cut these pieces, and don't forget to wear your safety glasses.
Step 2: Assembling the Frame
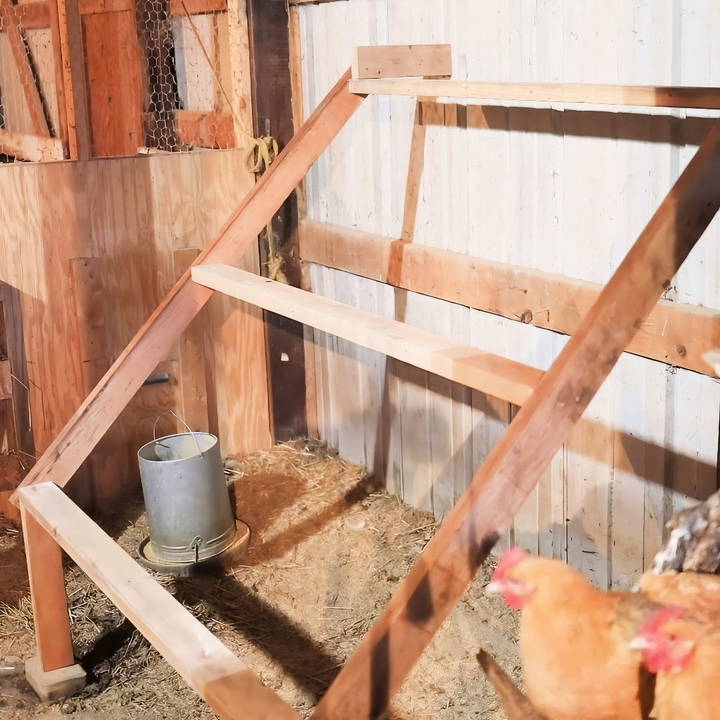
- Building Angles for Stability: Your side rails will be positioned at a 45-degree angle, providing a sturdy base for the rungs (your roosting bars). Mark both ends of your five-foot sides at this angle using your speed square.
- Attaching Legs and Standoffs: Attach the legs and standoffs to your side rails with screws. Ensure the legs are fastened at the bottom end and the standoffs at the top, both aligned with the 45-degree cut you've made for a flush fit.
Step 3: Adding the Rungs
- Positioning: Starting at the bottom, position your first rung (five-foot 2x4) to align with the angle on your side rails. Secure with screws from the outside of the rail into the ends of the rung.
- Spacing: Leave equal space between each rung. This will depend on the size of your chickens but generally, 8-10 inches between rungs is suitable.
- Securing: Ensure each rung is securely fastened to withstand the weight of multiple chickens. Two screws on each side should suffice.
Step 4: Installation
With all components assembled, carefully position your roost in the desired location within your coop. The legs should rest firmly on the ground, and the standoffs will keep the top bar distanced from the wall, reducing wall soiling.
Observing Your Flock
After introducing your new roost, take some time to observe how your chickens interact with it. Do they prefer the flat bars over any existing round ones? Are they able to find comfortable positions easily? This feedback is invaluable and can inspire adjustments to improve their sleeping arrangements further.
Customization Tips for Different Flock Sizes
Designing a chicken roost fit for your flock's size is key for their comfort and well-being. A well-tailored roost keeps chickens happy and healthy, no matter the scale of your setup.
Small Flocks:
For those with a small number of chickens, simplicity is key. A single roosting bar may be sufficient, but ensure it's:
- Easily accessible: Lower heights help bantams or less agile birds.
- Spacious: Even with fewer birds, each chicken should have its personal space.
Medium Flocks:
A medium-sized flock requires a bit more planning. Consider:
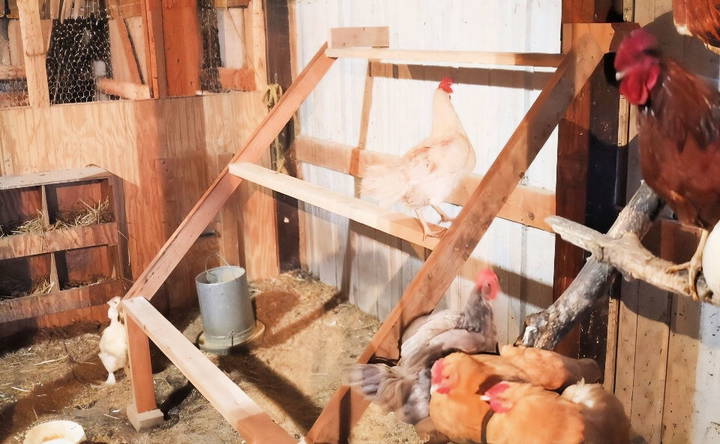
- Multiple levels: Staggered bars allow more birds to roost without feeling cramped.
- Varied heights: Different heights cater to the pecking order and help maintain harmony.
Large Flocks:
Large flocks need a robust solution. Think about:
- Durability: Strong materials will support the weight of many birds.
- Design efficiency: Space-saving designs like A-frames maximize roosting area.
Space Per Chicken:
Regardless of flock size, each chicken should have about 8-10 inches of roosting space. This prevents pecking and overcrowding, which can lead to stress and health issues.
Accessibility:
Ensure that every bird has easy access to the roost. Ladders or gently sloping ramps can help chickens reach higher levels without difficulty.
Adjustability:
Consider a design that allows for adjustments. As your flock grows, you'll appreciate being able to add or reconfigure roosting bars easily.
Customizing your chicken roost size supports flock instincts, reduces stress, and leads to healthier, happier chickens, enhancing your chicken-keeping experience.
Predator Deterrence Strategies
Safeguarding your chickens from predators is essential. Predators may be aerial, like hawks and owls, or terrestrial, like foxes and raccoons. Here are some effective ways to protect your flock:
Secure the Coop and Run:
- Fencing: Use hardware cloth instead of chicken wire for enclosures. It's more durable and prevents predators from reaching through.
- Buried Edges: Bury the fence edges at least 12 inches deep to deter digging animals.
- Locks: Install predator-proof locks on doors and nesting boxes. Raccoons, for instance, can open simple latches.
Elevate the Roost:
- Height: Keep the roost bars high enough off the ground, typically 2-3 feet, to protect from ground predators.
- Positioning: Place the roost away from walls to prevent predators from reaching in.
Natural Deterrents:
- Guard Animals: Dogs, geese, or guinea fowl can be effective at deterring predators.
- Plants: Some plants, like lavender and rosemary, can repel pests and small predators.
Lighting:
- Motion-activated Lights: These can startle and scare away nocturnal predators.
- Solar-powered Lights: These are sustainable options that keep the area illuminated at night.
Regular Inspections:
- Check for Vulnerabilities: Regularly inspect the coop for any signs of attempted entry or weak spots.
- Maintenance: Repair any damages promptly to ensure continuous protection.
Noise and Distraction:
- Radios: Playing a radio can build the illusion of human presence.
- Reflective Items: Hanging CDs or reflective tape can disorient aerial predators.
Use these strategies to keep your chickens safe. Be proactive and consistent to deter predators. A secure coop and vigilant care protect your birds.
Seasonal Considerations
When building a chicken roost, it's important to consider the changing seasons and how they affect your chickens. Here are some tips to ensure your roost is comfortable year-round:
Warm Weather:
- Ventilation: Good airflow is crucial to keep chickens cool. Ensure your roost design allows for cross-ventilation.
- Shade: Position the roost so it's shaded during the hottest part of the day.
- Water Access: Provide easy access to fresh water to help chickens stay hydrated.
Cold Weather:
- Insulation: Proper insulation helps retain heat. Use materials that provide warmth but still allow for air exchange.
- Draft Protection: Block any drafts, especially in the sleeping area, while maintaining ventilation to prevent moisture buildup.
- Roost Bars: Wooden bars are better than metal as they don't get as cold, making them more comfortable for the chickens' feet.
Rainy Season:
- Roofing: A waterproof roof over the roost keeps chickens dry.
- Elevation: Raise the roost off the ground to prevent flooding and dampness.
Autumn Preparations:
- Pest Control: As the weather cools, pests seek warmth. Seal any gaps to keep them out.
- Cleaning: A thorough clean in the autumn prepares the roost for winter.
Spring Adjustments:
- Nesting Boxes: Spring is laying season. Ensure your roost has comfortable nesting boxes.
- Molting Support: Provide extra protein in their diet as chickens molt and regrow feathers.
Consider seasonal factors to build a year-round comfortable, safe roost for your chickens.
FAQs About DIY Chicken Roost
Discover essential FAQs about DIY chicken roost for effective poultry care. Tips, materials, and best practices for your backyard chickens.
A chicken roost is essentially a perch where chickens can rest and sleep. It’s similar to how wild birds find high spots in trees for safety at night. Chickens have an instinct to seek elevated spots to avoid predators and feel secure. Providing a roost in your coop mimics their natural behavior and contributes to their well-being.
The height of a chicken roost can vary depending on the breed. Generally, it should be high enough to keep chickens off the ground but low enough to prevent injuries when they jump down. For heavier breeds, a lower height is recommended, while lighter, flight-capable breeds may enjoy higher perches. Adjustable or multiple levels can cater to a mixed flock.
Yes, natural branches can be used for roosts and are often preferred by chickens for their natural texture. Ensure the branches are strong enough to support the weight of your chickens and are free of pests. Sanding down any sharp edges can help prevent injuries.
Common issues include overcrowding, which can lead to pecking and stress among chickens. Mites and lice can also be a problem if the roosts aren’t kept clean. Regularly inspecting and cleaning the roosts, along with providing adequate space for each chicken, can help prevent these problems.
The positioning of roosts should reflect the social hierarchy of your flock. Chickens establish a pecking order, and those higher in rank will choose the topmost perches. To maintain harmony, provide multiple levels of roosting space so that each chicken can find a spot where they feel secure. Ensure the highest perches are reserved for the most dominant chickens, as this mimics their natural behavior and helps prevent conflict.
Final Thoughts
Taking the time to set up a simple DIY chicken roost will benefit your flock and give you peace of mind, knowing they're comfortable and secure.


