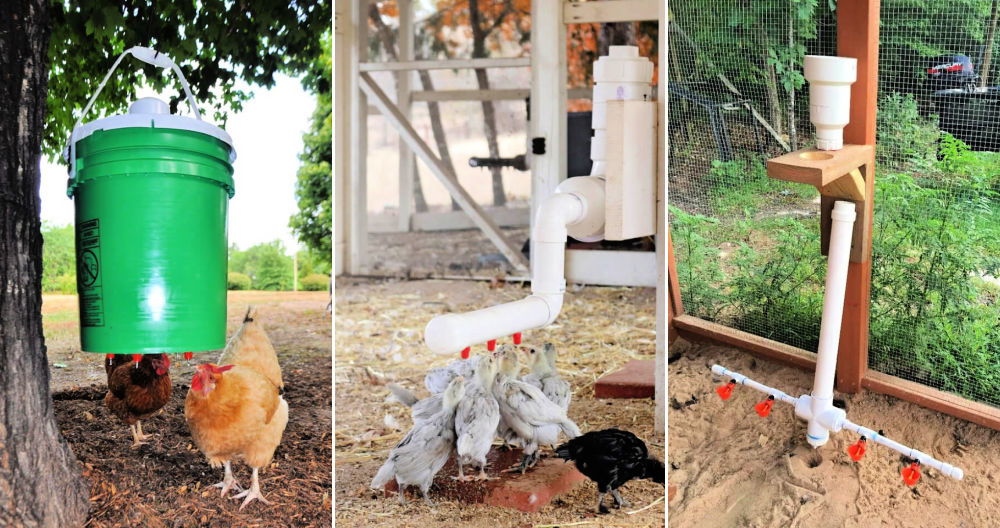
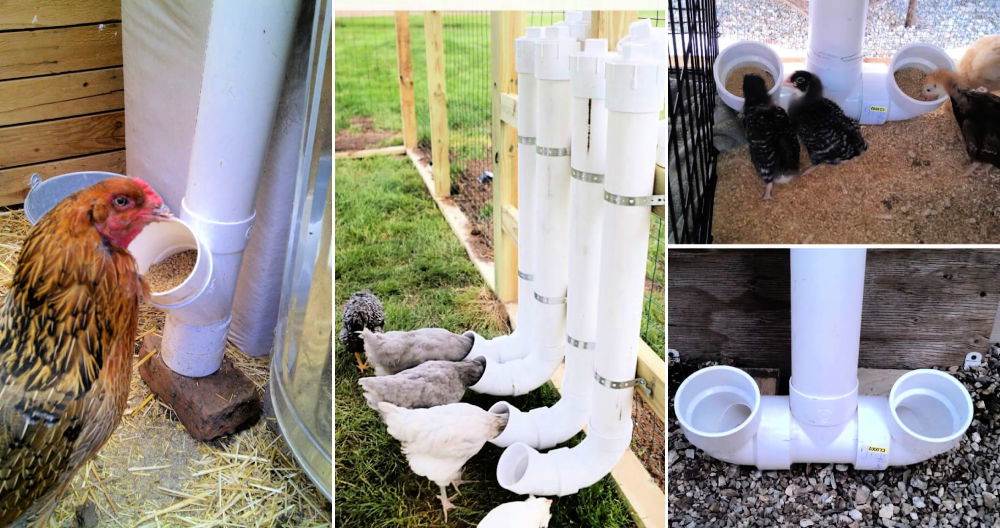
My journey into backyard farming recently led me to tackle an interesting yet essential project for my feathered friends – building a DIY PVC pipe chicken waterer. It was a project inspired by the need to provide a consistent and clean water supply to my chickens with minimal refilling and maintenance. I stumbled upon a helpful resource online, which I then adapted to suit my needs. Below, I share my experience and insights, hoping to simplify the process for fellow backyard chicken enthusiasts.
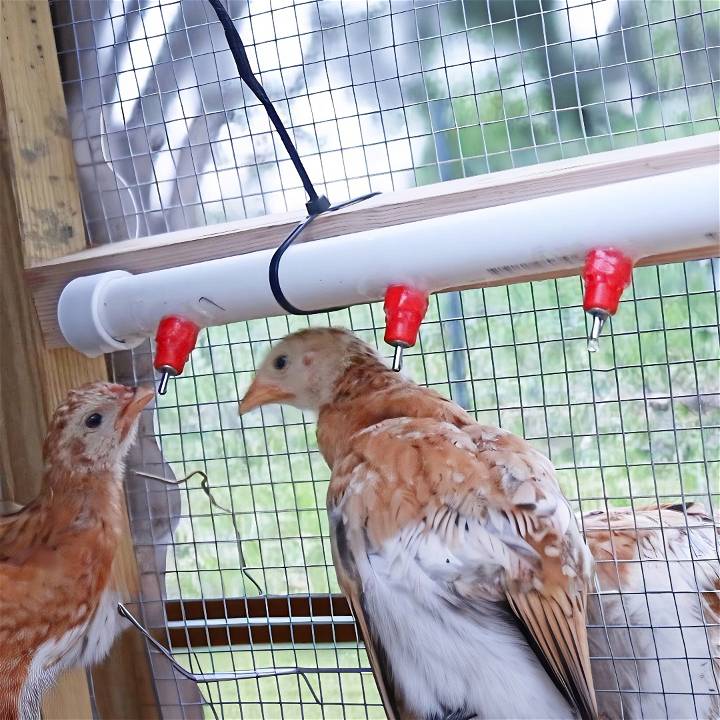
Materials Needed and Their Importance
First off, gathering the right materials is crucial. Here's what I used and why:
- Icemaker Water Line: This acts as the main water supply line from your water source to the waterer.
- Pliers and Drill Gun: Essential tools for assembly and installation.
- 3/4 Inch PVC Pipe: Serves as the frame for the waterers.
- 1 1/32 Drill Bit & 1/8 Hole Saw Bit: For building precise holes for the chicken nipples and bucket connection.
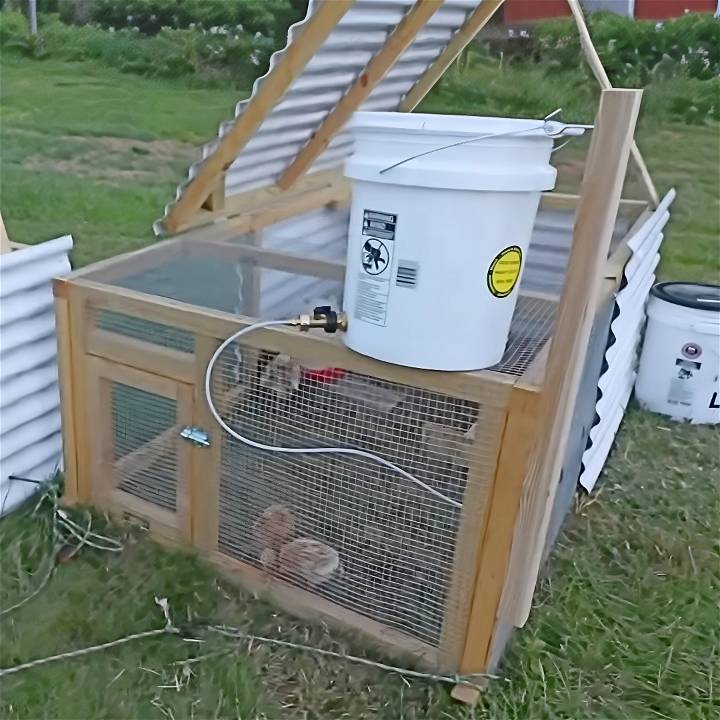
- Bucket: Acts as the water reservoir.
- PVC End Caps: To seal the ends of the PVC pipe.
- Chicken Nipple Waters: Allows chickens to drink and prevents water waste.
- All-purpose Cement: For securing PVC connections.
- Teflon Tape, Silicone, Various Adapters and a Valve: Essential for ensuring leak-proof connections.
- Sleeve Inserts, Sandpaper, and a Sow the Land Bucket: Miscellanea for final touches and function improvement.
Step by Step Instructions
Learn how to make a DIY chicken waterer with step-by-step instructions for preparing the bucket, setting up the PVC pipe, assembling the waterers, connecting the water line, and installing the system.
Step 1: Preparing the Bucket
I started by drilling a hole about 1.5 inches from the bottom of the bucket using the 1/8 hole saw bit. This hole is crucial for connecting the bucket to the PVC pipe, ensuring water flows from the bucket into the pipe.
Step 2: Setting Up the PVC Pipe
Next, I took the 3/4 inch PVC pipe and spaced out where I would install the chicken nipple waterers. I opted for four nipples, evenly spaced. Using the 1 1/32 drill bit, I maked the holes, then cleaned any rough edges with sandpaper to prevent injury to the chickens.
Step 3: Assembling the Waterers
After setting up the PVC frame, it was time to attach the end caps using all-purpose cement, ensuring a tight and secure fit. This step was crucial to prevent any water leakage. I added a bit of silicone to the threads of the nipple waterers before screwing them into the pre-drilled holes in the PVC pipe for an extra leak-proof seal.
Step 4: Connecting the Water Line
Using the icemaker water line, I connected one end to the adapter that fitted the PVC pipe system and the other directly to my external water source. This was perhaps the trickiest part, requiring careful attention to ensure all connections were tight and leak-proof. Teflon tape was my best friend here, ensuring a water-tight seal on all threaded connections.
Step 5: Installing the System
Finally, it was time to set up the DIY chicken waterer in the coop. Given my coop is on a slight incline, I had to innovate a bit. I attached a hook to the coop framework and hung the bucket slightly above the PVC pipe to ensure gravity did its job, allowing water to flow into the pipe and to the nipple waterers.
Addressing Common Waterer Issues
Discover solutions to common waterer issues like algae build-up, freezing challenges, leaks, and maintenance tips in this concise guide. Find easy fixes to keep your waterer in top condition.
1. Algae Build-Up: A Slimy Situation
Problem: Algae growth inside chicken waterers can be a nuisance. Not only does it look unsightly, but it can also affect water quality and potentially harm your feathered friends.
Solution:
- Regular Cleaning: To prevent algae, clean your waterer frequently. Empty it, scrub the interior with a mild detergent, and rinse thoroughly. Algae thrive in stagnant water, so keeping it fresh is crucial.
- Sunlight Exposure: Position the waterer where it receives direct sunlight. Algae dislike UV rays, and sunlight helps inhibit their growth.
- Add Vinegar: Occasionally, add a splash of white vinegar to the water. The acidity helps deter algae without harming your chickens.
2. Freezing Woes: Winter Waterer Challenges
Problem: Cold weather can lead to frozen waterers, leaving your chickens thirsty and frustrated.
Solution:
- Insulation: Insulate your waterer using materials like foam or bubble wrap. Wrap it around the container to retain heat.
- Heated Base: Invest in a heated base specifically designed for poultry waterers. These keep the water from freezing during chilly nights.
- Frequent Checks: Regularly inspect the waterer. If it's frozen, replace it with a fresh one to ensure your flock stays hydrated.
3. Leaky Dilemmas: Waterer Spills and Wastage
Problem: Leaky waterers not only waste water but also make a mess in the coop.
Solution:
- Seal Joints: Check for any cracks or loose parts. Seal them using food-safe silicone or waterproof tape.
- Gravity-Fed Systems: Opt for a gravity-fed waterer design. These minimize spills by releasing water only when chickens drink.
- Elevate: Raise the waterer slightly off the ground. This prevents dirt and bedding from getting into the water, reducing the chances of leaks.
4. Maintenance Made Easy: Quick Tips
- Scrub and Rinse: Regularly clean your waterer to maintain hygiene.
- Check Valves and Seals: Inspect valves, seals, and gaskets. Replace any worn-out parts promptly.
- Backup Waterer: Always keep a spare waterer on hand. Accidents happen, and having a backup ensures your chickens won't go thirsty.
Remember, a well-functioning waterer contributes to your chickens' health and happiness. By addressing these common issues, you'll make a reliable water source that keeps your feathered companions clucking contentedly!
User-Friendly Designs
Discover user-friendly designs prioritizing chicken comfort with easy fill and clean features, weather-ready construction, and durable materials. Simplify your coop setup now!
1. Prioritizing Chicken Comfort
When designing a DIY chicken waterer, think about your feathered companions. After all, they're the ones using it daily! Here's how to make a user-friendly waterer:
- Ergonomic Height: Place the waterer at a comfortable height for chickens. They shouldn't have to stretch too much or bend awkwardly to access water. A raised platform or sturdy cinder blocks work well.
- Easy-to-Reach Spout: The waterer spout should be within easy reach of your chickens' beaks. Avoid designs where they need to peck excessively or strain their necks.
- Smooth Edges: Sand down any rough edges or sharp corners. Chickens can be clumsy, and you don't want them hurting themselves while drinking.
2. Simplicity Rules
- Minimal Parts: Keep the waterer design simple. Fewer parts mean fewer things that can go wrong. A basic gravity-fed system with just a few components is ideal.
- Tool-Free Assembly: Imagine you're assembling the waterer in a hurry during a sudden downpour. Make sure it doesn't require specialized tools or complex instructions. Snap-on connections or twist-lock mechanisms work well.
3. Easy Fill and Clean
- Wide Mouth: Design the waterer with a wide opening. This makes filling it a breeze. A 5-gallon bucket with a large lid is perfect.
- Detachable Base: Consider a waterer with a detachable base. This allows you to clean it thoroughly without wrestling with the entire unit.
- Smooth Interior: Avoid intricate designs inside the waterer. Chickens don't care about aesthetics; they just want water. A smooth interior ensures easy cleaning and prevents dirt buildup.
4. Weather-Ready Features
- Freeze-Proof: If you live in colder climates, incorporate freeze-proof features. Insulate the waterer or use a heated base to prevent ice formation.
- Rain Protection: Shield the waterer from rain. A simple roof or an inverted bucket can keep the water clean during wet weather.
5. Durability Matters
- Sturdy Materials: Choose materials that withstand pecking, scratching, and the occasional chicken dance. Food-grade plastic or galvanized metal are excellent options.
- Secure Lid: Ensure the lid or cover stays put. Chickens love to explore, and a loose lid can lead to spills or contamination.
Remember, a well-designed chicken waterer not only keeps your flock hydrated but also simplifies your daily chores. Happy chickens make for a happy coop!
FAQs About DIY Chicken Waterer
Discover the answers to all your burning questions about DIY chicken waterers in this comprehensive FAQ guide. Save time and money with expert tips.
1. How Often Should I Clean My Chicken Waterer?
Answer: Regular cleaning is essential to maintain water quality. Aim for weekly cleaning. Empty the water, scrub it with mild soap, rinse thoroughly, and refill it with fresh water. If you notice algae or debris, clean it more frequently.
2. Can I Use Any Container as a Waterer?
Answer: While you can get creative, some containers work better than others. Food-grade plastic buckets or galvanized metal containers are popular choices. Avoid porous materials that can harbor bacteria.
3. How Do I Prevent Water from Freezing in Winter?
Answer: Cold weather can cause waterers to freeze. Try these solutions:
- Insulate: Wrap the waterer with foam or bubble wrap.
- Heated Base: Invest in a heated base designed for poultry waterers.
- Frequent Checks: Swap out frozen waterers promptly.
4. What About Algae Growth?
Answer: Algae love stagnant water. Combat it by:
- Regular Cleaning: Empty and scrub the waterer.
- Sunlight: Position it where it gets direct sunlight.
- Add Vinegar: A splash of white vinegar helps deter algae.
5. How Can I Make Refilling Easier?
- Wide Opening: Opt for a waterer with a wide mouth for easy filling.
- Detachable Base: Choose a design that allows you to remove the base for thorough cleaning.
- Smooth Interior: Keep the inside simple for hassle-free maintenance.
6. What's the Best Height for a Chicken Waterer?
Answer: Place the waterer at a comfortable height for your chickens. They shouldn't have to stretch too much or bend awkwardly. Consider using a raised platform or sturdy cinder blocks. Happy chickens, happy waterer!
Final Thoughts
Making this DIY PVC pipe chicken waterer was more than a crafting project; it was an exercise in problem-solving and innovation. It addressed my need for a reliable water system for my chickens, significantly reducing the time spent refilling and cleaning traditional waterers.
I hope sharing my process, from gathering materials to installation, helps you build your chicken waterer. Remember, the key to a successful DIY project lies in preparation, patience, and a bit of creativity. Good luck, and may your chickens stay hydrated and happy!


