I recently realized my workshop was a mess. Clamps were everywhere, taking up space and hard to find. I needed a solution to organize them because it was stressing me out and slowing my work. Building a DIY clamp rack seemed like the perfect idea. I decided to make it myself, saving money and making exactly what I needed.
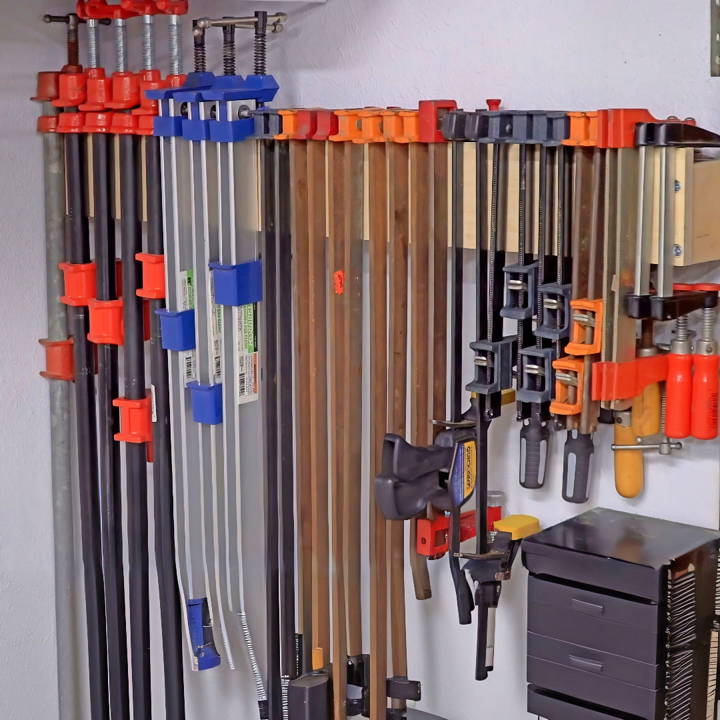
I gathered my tools and some spare wood. Following simple clamp rack plans, I began cutting and assembling the pieces. It was surprisingly easy. With each step, my excitement grew as I watched my new clamp storage rack take shape. Now, I finally have a neat space, and I can easily find all my clamps.
Get started with the clamp rack plans, and enjoy a clutter-free workshop soon.
Why A Clamp Rack?
Before diving into the how-to, let's talk about why a clamp rack is an essential addition to any workshop. Clamps come in various shapes, sizes, and styles, easily cluttering workspaces or becoming difficult to find when needed. A well-organized clamp rack not only saves space but also keeps these vital tools within arm's reach, streamlining the woodworking process.
Materials Needed
- Plywood Strip (3 inches wide): Serves as the backbone of the rack, providing a mount for the clamps.
- Plywood Strip (3.5 inches wide): Acts as the front barrier to ensure clamps hang straight without tilting.
- Small Plywood Pieces (2.5 inches x 3 inches): Builds a space between the two main plywood strips, allowing clamps to hang freely.
- Wood Glue & Pin Nails: For assembling the rack securely without waiting for glue to dry.
- Screws (with adequate length): To mount the rack to the wall, ensuring it can hold the weight of the clamps.
- Tools (saw, drill, level, etc.): For cutting the wood to size, assembling the rack, and ensuring it's level when mounted.
Step by Step Instructions
Learn how to make a DIY clamp rack with our step-by-step instructions. Perfect for organizing your workspace easily and efficiently!
Planning & Measurement
My first step was to lay out all my clamps, measuring to ascertain the necessary space. After attempting a prototype with individual notches for each clamp—which proved inefficient—I realized a universal approach was better. Hence, the design pivoted to a simple, straight rack approach.
Cutting & Preparing Materials
I cut one strip of plywood at 3 inches wide and another at 3.5 inches wide. The smaller pieces, which would space the two strips apart, were cut at 2.5 inches by 3 inches. The crucial insight here was ensuring the rack depth accommodated clamps without hitting the wall, with the front strip slightly taller to facilitate this.
Assembly
Using wood glue and pin nails, I attached the smaller pieces between the two longer strips, making a simple but effective spacing mechanism. This assembly was then secured with screws (after drilling pilot holes and countersinks) to ensure robustness. The front strip's extra half-inch height was key in allowing the clamps to hang straight and not tilt forward.
Mounting
I chose the back corner of my garage, which was underutilized space, for mounting the rack. After locating the studs with a magnet (a handy trick for precision), I drilled pilot holes and mounted the rack using long screws, two for each stud connection point. It was essential to use a level during this process to ensure the rack was perfectly horizontal.
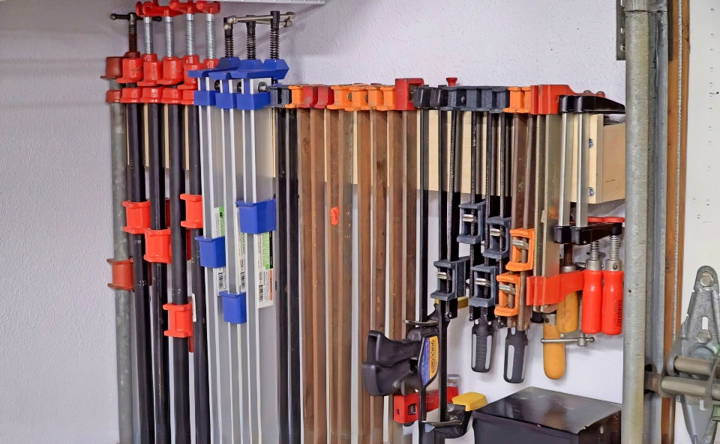
I created a 30.5-inch rack fitting 30 F-style clamps, saving workshop space and improving access. The simple design adapts to hold any type of clamp without needing modifications.
Customization Tips for Your DIY Clamp Rack
Building a DIY clamp rack is not just about building a functional space to store your clamps; it's also about tailoring it to your specific needs and preferences. Here are some tips to customize your clamp rack:
- Choose the Right Size: Measure the space where you plan to install the rack. Consider the number and types of clamps you have. Your rack should be large enough to accommodate all your clamps without crowding yet compact enough to fit in the designated space.
- Select Appropriate Materials: Depending on your budget and the weight of the clamps, choose sturdy yet affordable materials. Plywood is a popular choice for its durability and ease of work. Hardwoods like oak or maple can be used for a more aesthetic look.
- Design for Versatility: Make your rack versatile by adding adjustable slots. This allows you to reconfigure the rack as your collection of clamps grows or changes. Slots can be made adjustable with simple bolts and wing nuts for easy modification.
- Incorporate a Tool Shelf: If space allows, add a small shelf above or below the rack to hold related tools like screwdrivers or measuring tapes. This keeps all your necessary tools within reach when working on projects.
- Add Labeling: Label each section of the clamp rack according to the type or size of the clamp it holds. This not only helps in finding the right clamp quickly but also in returning them to their proper place after use.
- Consider Mobility: If you often work in different areas, consider adding casters to the bottom of your rack. This way, you can easily move it around your workspace as needed.
- Safety Features: Ensure that the rack is securely mounted to the wall or bench. Use appropriate anchors and brackets to prevent the rack from tipping over when loaded with clamps.
- Finish for Protection: Apply a finish to the wood to protect it from moisture and dust. A clear varnish or sealant can help maintain the wood's appearance and make cleaning easier.
By following these customization tips, you'll create a clamp rack that serves its purpose and enhances the overall organization of your workflow and workspace.
Advanced Features
When you're ready to take your DIY clamp rack to the next level, consider incorporating some advanced features. These enhancements can improve functionality, efficiency, and the overall user experience. Here's how you can upgrade your clamp rack:
- Adjustable Clamping Slots: Introduce slots with movable components that can be adjusted to fit various clamp sizes. This can be achieved by installing metal runners and using wing nuts to secure the clamps in place.
- Magnetic Tool Holders: Attach magnetic strips to the sides or underside of the rack to hold small metal tools. This keeps them accessible and neatly organized.
- Integrated Measuring Tools: Fix a durable measuring tape along the top edge of the rack for quick measurements. This is especially handy when you need to measure cuts on the go.
- Foldable Design: If space is a premium, make a foldable rack that can be retracted when not in use. Hinges and locking mechanisms can be used to ensure stability when the rack is extended.
- Casters for Mobility: Add heavy-duty casters to the base of your rack, making it easy to move around. Ensure they have locking mechanisms to keep the rack stationary during use.
- Tool Trays and Holders: Build in additional trays or holders for frequently used tools like pencils, rulers, or safety glasses. Attaching PVC pipes or making wooden compartments is as simple as this.
- Lighting: Install LED strips under each shelf to illuminate the clamps. This is particularly useful in dimly lit workshops and adds an extra layer of functionality to your rack.
- Digital Inventory Tags: For the tech-savvy woodworker, use RFID tags or QR codes on each clamp that link to a digital inventory system. This helps you track and manage your tools efficiently.
By adding these advanced features, your clamp rack will not only store your clamps but also enhance your overall workflow.
Troubleshooting Common Issues
When building and using a DIY clamp rack, you might encounter a few common issues. Here's how to troubleshoot them effectively:
Clamps Slipping Off the Rack
- Solution: Ensure that the rack slots are slightly angled upwards to prevent clamps from sliding off. If the issue persists, consider adding a small lip or edge at the end of each slot for additional security.
Rack Becoming Unstable
- Solution: Check that the rack is securely fastened to the wall or workbench. Use appropriate anchors for your wall type and heavier brackets if the rack holds many heavy clamps.
Difficulty in Finding the Right Clamp
- Solution: Organize your clamps by size or type and label each section clearly. This will save time and frustration when searching for the right clamp.
Wood Warping or Damage
- Solution: Protect the wood with a suitable finish to prevent moisture damage. If you notice warping, ensure that the rack isn't exposed to direct sunlight or extreme temperature changes.
Screws or Joints Loosening
- Solution: Periodically check and tighten any loose screws or bolts. Consider using lock washers or thread-locking fluid to prevent hardware from loosening over time.
Rack Takes Up Too Much Space
- Solution: If the rack is too large for your space, redesign it to be more compact, or consider a wall-mounted vertical design to save floor space.
Difficulty in Accessing Clamps
- Solution: Arrange the clamps in a way that the ones used most frequently are easiest to reach. If necessary, make a secondary rack for less commonly used clamps.
By anticipating these common issues and knowing how to address them, you'll ensure that your DIY clamp rack remains a reliable and efficient part of your workspace.
FAQs About DIY Clamp Rack
Discover essential faqs about DIY clamp racks. Learn how to build, customize, and organize your clamps efficiently with our expert tips.
A DIY clamp rack is a storage solution that you can make yourself to organize and hold various types of clamps in your workshop. It's designed to keep clamps within easy reach while saving space and reducing clutter.
Using a DIY clamp rack helps you:
Organize your clamps neatly.
Save space in your workshop.
Access your clamps quickly and easily.
Protect your clamps from damage.
Yes, you can customize your DIY clamp rack to fit the types and sizes of clamps you have. You can adjust the:
Size of the rack.
Number of slots or holders.
Spacing between the clamps for easy access.
To ensure your DIY clamp rack is sturdy:
Use thick plywood or solid wood for durability.
Secure the rack to wall studs for added support.
Add L-brackets if needed for heavy clamps.
Follow detailed project plans for proper construction.
To maintain and organize your DIY clamp rack, follow these tips:
Regularly check for loose screws or damage and tighten or repair as needed.
Sort clamps by type and size for easy identification and access.
Label sections of your rack if you have a large collection of clamps.
Clean your clamps and rack periodically to prevent dust build-up.
Consider adding wheels if you want a portable solution.
Conclusion
In conclusion, organizing your workshop with a DIY clamp storage rack is super simple and effective. It's a small project, but it makes a big difference. You'll see how easy and helpful it can be.


