Making a DIY clay pot heater can be a simple way to add some warmth to your home. I remember the first time I built one; I gathered all the materials and marveled at how easy it was to assemble. All I needed was a terracotta pot, a few tea lights, and some basic tools. It was quick, cost-effective, and gave off just enough heat to make my room cozy.
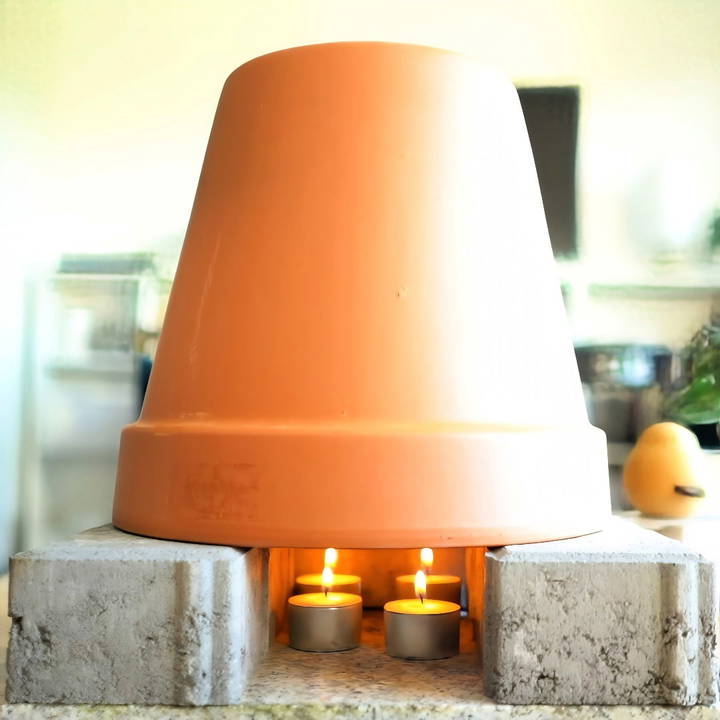
The satisfaction of making my own heater from scratch was immense. I carefully placed the tea lights under the clay pot and watched as the heat began to radiate. It provided a gentle, consistent warmth that was perfect for chilly evenings.
If you're looking for a simple, DIY method to warm up your space, a clay pot heater could be a fantastic solution. These steps and tips will really help you get started.
Gathering Materials
Before making the heater, it's essential to gather all the necessary materials, which are the backbone of this project.
Materials Needed:
- Stone Plate: A sturdy and heat-resistant base to prevent any accidental fires.
- Three Bricks: These will elevate the pots and allow for proper air circulation.
- Two Different Size Clay Pots: To make the heat distribution system.
- Four 8-hour Tea Lights: The primary heat source.
- Metal Washer: To cover the hole in the smaller pot.
Each material serves a specific purpose. The stone plate and bricks ensure safety, while the clay pots and tea lights make the heating mechanism.
Step by Step Instructions
Learn to make a DIY clay pot heater with our step-by-step instructions. Ensure safety and efficiency while warming your space. Ideal for home projects.
Setting Up the Base
Learn how to set up the base safely. Follow step-by-step instructions on choosing a secure location and implementing safety measures.
Step 1: Choose a Safe Location
First, select a safe spot for your DIY heater. I chose my coffee table, which is central and sturdy.
Step 2: Safety First
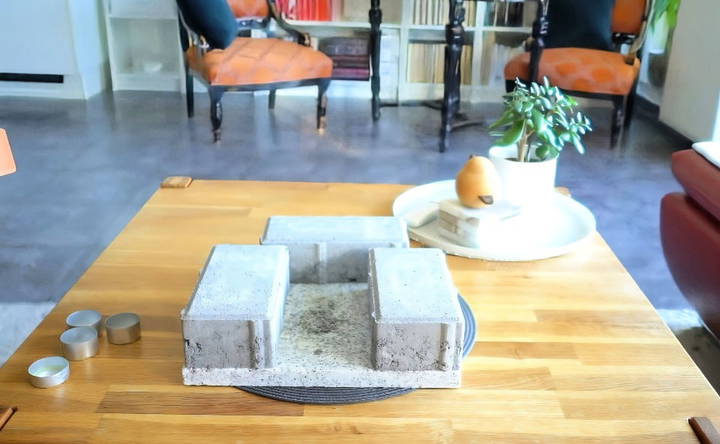
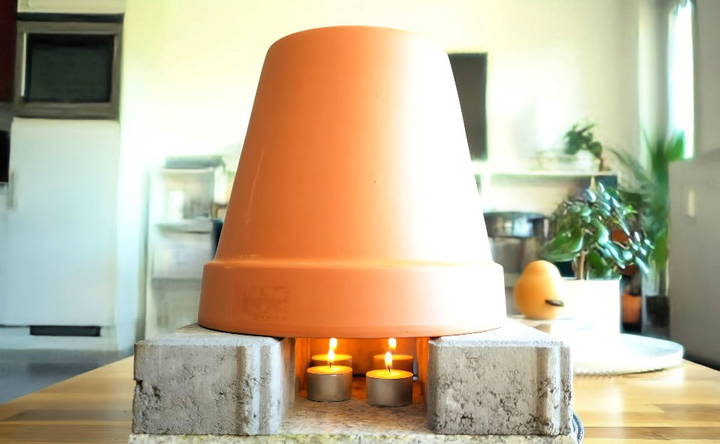
Place the stone plate on the table, followed by arranging the three bricks in a triangle on the stone plate. This setup forms a solid base for the clay pots. Make sure you leave gaps between the bricks for adequate air circulation, which is essential for keeping the candles lit.
Preparing the Clay Pots
Master the art of preparing the clay pots with steps like covering the hole and layering the pots. Perfect guide for beautiful, durable results.
Step 3: Cover the Hole
The smaller clay pot will have a hole at the bottom, which needs to be covered to prevent the heat from escaping. I used a metal washer to cover this hole. A burnt tea light can also work if you don't have a washer handy.
Step 4: Layer the Pots
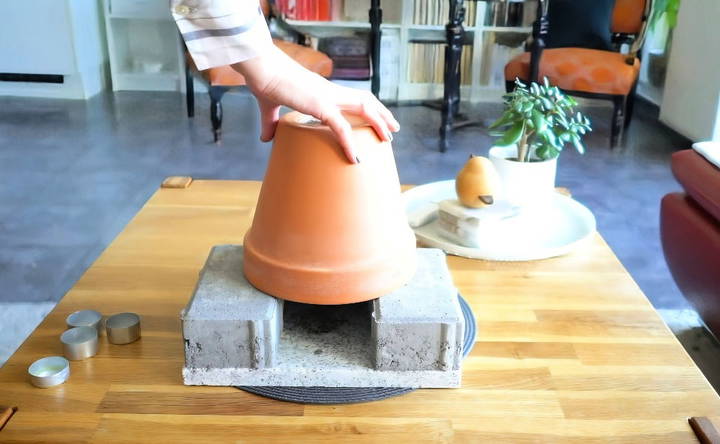
Place the smaller clay pot upside down on the bricks. This will allow it to heat up effectively. On top of this, place the larger pot. This layering helps make a thermal mass that will distribute the heat evenly.
Lighting the Candles
Learn how to perfectly position tea lights and ignite them with our step-by-step guide. Master lighting the candles in just a few simple steps!
Step 5: Position the Tea Lights
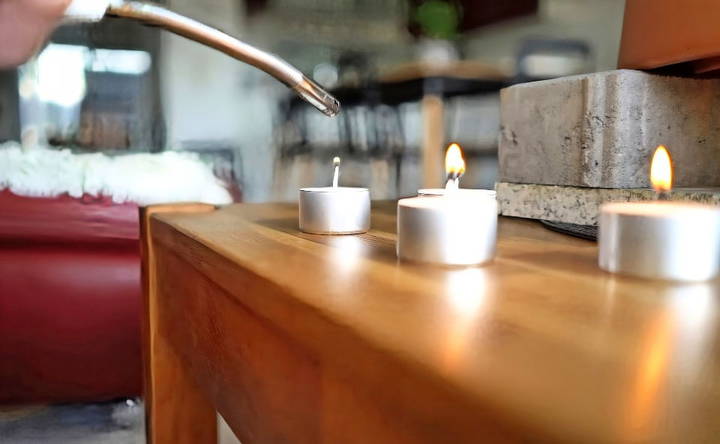
Place the four 8-hour tea lights within the triangle of bricks. It's crucial to keep them apart to ensure safety and adequate oxygen supply for them to burn efficiently.
Step 6: Ignite
Light the tea lights carefully. Always ensure you have a match or a lighter handy.
How It Works
Discover the science behind how it works. Learn the detailed process and technology driving efficiency and innovation.
The Science Behind It
Burning candles generates heat, which is trapped by the clay pots. Clay has a high thermal mass, meaning it heats slowly but retains and disperses heat over time. By covering the hole in the smaller pot, you prevent hot air from escaping, thereby heating the entire pot. The larger pot on top makes a type of thermos effect, circulating warm air between the pots and gradually increasing the room's temperature.
Realistic Expectations
Learn how to monitor the temperature and follow essential safety precautions to set realistic expectations for your projects.
Step 7: Monitor the Temperature
Let's be realistic about the clay heater. It won't make you sweat, but it will raise the room temperature significantly. In my case, it increased the temperature in a 34-square-meter room by 2 to 3 degrees Celsius. The warmest spot is right next to the heater, much like sitting by a campfire.
Step 8: Safety Precautions
- Never leave the heater unattended.
- Keep it out of reach of pets and small children.
- Always place it on a heat-resistant surface.
Troubleshooting Common Issues
When using a DIY clay pot heater, you might encounter some issues that can affect its performance. Here's a helpful guide to troubleshoot common problems:
Candle Won't Stay Lit
- Check for drafts: Ensure the heater is placed in an area without drafts that could extinguish the flame.
- Trim the wick: If the wick is too long, it may cause the candle to burn inefficiently. Trim it to about 1/4 inch.
Heater Isn't Producing Enough Heat
- Increase the number of candles: Adding more candles can generate more heat.
- Use larger pots: A larger clay pot will capture more candle heat.
Smoke is Being Produced
- Ensure proper ventilation: Smoke indicates incomplete combustion. Make sure the area is well-ventilated.
- Check the candles: Use high-quality, smokeless candles designed for indoor use.
Clay Pot Cracks
- Avoid sudden temperature changes: Don't move the pot from a very hot to a very cold environment quickly.
- Preheat the pot: Before lighting the candles, warm up the pot with warm water to reduce thermal shock.
Candles Burn Out Quickly
- Use longer-lasting candles: Opt for candles that have a longer burn time.
- Protect from wind: Even indoors, a breeze can cause candles to burn faster. Shield the heater from any airflow.
Difficulty Lighting the Candle
- Check the match or lighter: Ensure your match isn't damp, and your lighter has enough fuel.
- Position the wick properly: The wick should be centered and upright for easy lighting.
Pot Doesn't Get Warm
- Check the setup: Ensure the pot is correctly assembled according to the instructions.
- Inspect the candles: Verify that the candles are the right size and placed directly under the pot.
Always watch your clay pot heater and never leave it unattended. If problems persist, seek advice from DIY experts or online forums. Your safety and the heater's effectiveness are key.
FAQs About DIY Clay Pot Heater
Get answers to common questions about DIY clay pot heaters. Learn how to build, use, and ensure safety with your homemade heater.
A DIY clay pot heater is a simple, cost-effective way to generate heat during emergencies or when you need a bit of extra warmth. It uses candles to heat a clay pot, which then radiates heat into the surrounding area.
For minimal soot and smoke, it’s best to use soy-based or beeswax-based candles with essential oils. These types of candles burn cleaner than paraffin-based candles, which can produce smoke and soot. The size of the candle will determine how much heat is produced; larger candles with multiple wicks will provide more heat.
Yes, but with precautions. Never leave the candle burning unattended, and ensure the heater is placed on a non-flammable surface away from flammable materials. If you have pets or children, use a screen to prevent access to the flame. Always monitor the heater while in use to prevent accidents.
A clay pot heater can be surprisingly effective for heating a small space. However, it’s not a replacement for a traditional heating system. It’s best used for supplemental heat or during power outages. A single heater can warm a small room, but for larger spaces, you may need multiple heaters.
A DIY clay pot heater is not designed to be a primary heat source. It's intended for use as a supplemental heat source or for emergency situations when traditional heating options are unavailable. While it can provide warmth to a small area, it does not have the capacity to heat an entire home effectively. For larger spaces or for consistent, reliable heating, it's best to use a conventional heating system.
Conclusion
Building and using a DIY clay pot candle heater has been an intriguing experience. It won't replace your central heating system but can serve as an additional source of warmth, helping to reduce overall energy costs. I hope this step-by-step guide inspires you to try it out for yourself.
Additional Tips
- Experiment with Candle Types: Different candles produce different levels of heat.
- Adjust the Size of Pots: Depending on your room size, you might need larger or smaller pots.
- Monitor Air Quality: Burning candles can affect indoor air quality, so ensure adequate ventilation.


