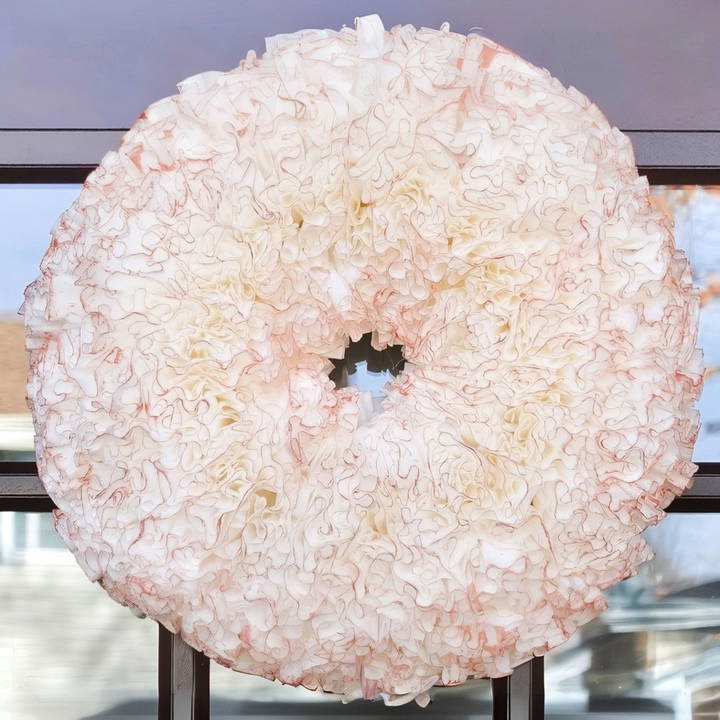
Making a DIY coffee filter wreath is an enjoyable and cost-effective way to add a unique, handmade decoration to your home. Coffee filters may seem like an unconventional material, but their delicate, ruffled texture is perfect for making a wreath with a soft, elegant appearance. With some basic supplies, a few hours, and a bit of creativity, you'll have a beautiful piece that can adapt to any season or holiday just by changing the accessories or paint. Follow this step-by-step guide to learn everything you need to make a coffee filter wreath of your own.
Materials Needed for a Coffee Filter Wreath
Here's what you'll need to get started on your coffee filter wreath:
- Wreath Form (9.8 inches): This guide uses a standard foam wreath form from Dollar Tree. Foam wreaths are ideal as they provide a sturdy base for gluing.
- 200-500 Coffee Filters: The number varies based on the wreath size, but a 9.8-inch form requires about 200 filters.
- Hot Glue Gun and Glue Sticks: A low-temperature glue gun is essential for working with foam, as high temperatures can damage the wreath form.
- Scissors or Rotary Cutter: For cutting and shaping the filters if needed.
- Rose Gold or Other Acrylic Paint (optional): Adds a stylish metallic touch.
- 20-gauge Wire: For hanging the wreath.
- Finger Protectors: Useful when working with hot glue to prevent burns.
Step by Step Instructions
Learn how to make a coffee filter wreath with step-by-step instructions. Customize it for any season and troubleshoot common issues with ease!
Step 1 – Prepare Your Coffee Filters
The coffee filters are the main element of this project. Preparing them correctly is crucial to achieving the right texture and fullness in your wreath.
- Choose Filter Size: Use standard-size coffee filters, around 9-10 inches in diameter. They provide a balance between fullness and workability.
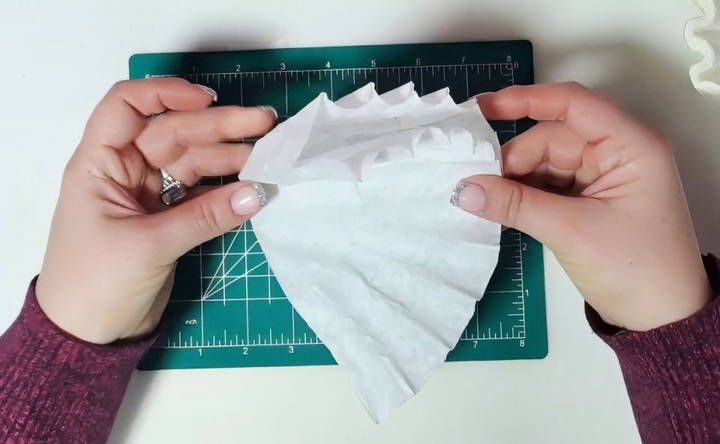
- Folding the Filters: Fold each coffee filter into a “ruffle.” There are a few ways to do this:
- Method 1: Fold the filter in half, then in half again, to make a small, thick triangle. You can further fold it or twist it slightly for a tighter ruffle.
- Method 2: Gather the filter by finding the center and bringing the edges toward the middle, forming a ruffled “petal” shape. This makes a softer, rounder look.
- Secure the Folds: Twist the folded filter lightly to secure it in shape, being careful not to tear the paper. This step helps ensure that the filters hold their form when glued to the wreath.
Step 2 – Start Attaching the Filters to the Wreath Form
Once your coffee filters are prepared, it's time to start attaching them to the wreath form. Here's how:
- Apply Hot Glue Carefully: Use a low-temperature hot glue gun for this step. Low temperatures prevent the foam from melting and help the glue adhere better.
- Glue in Layers: Starting from the innermost part of the wreath form, attach each folded filter by gluing the pointed end to the wreath. Press firmly but gently to secure.
- Layer by Layer: Continue adding filters, working in rows. Place each filter close to the previous one to avoid gaps and make a fuller look. Make sure to offset the filters slightly for a natural, layered effect.
- Fill the Wreath Form Completely: Work your way around the wreath form until it is entirely covered in ruffles. This layering gives the wreath a lush, full appearance.
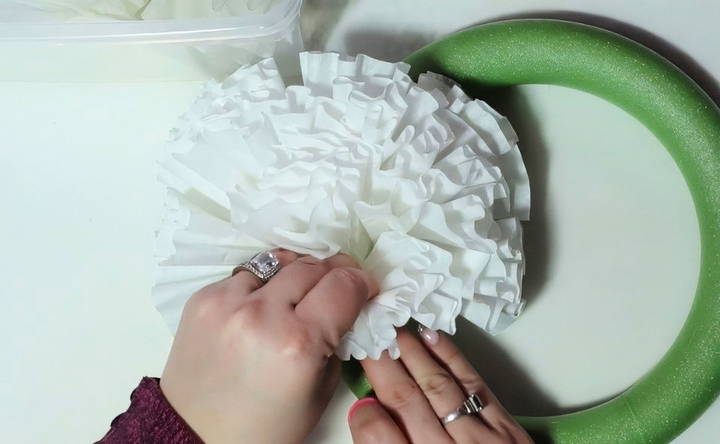
Pro Tip: To achieve a seamless, professional finish, position each new layer slightly over the one before. This adds depth and ensures that no foam is visible.
Step 3 – Add Paint for a Personal Touch
While a plain white coffee filter wreath looks elegant on its own, you can add extra personality by lightly painting the filters. Rose gold paint, in particular, adds a modern, metallic touch.
- Choose Your Paint: Acrylic paint works best. A rose gold hue was used in this example, but other colors can make seasonal effects (e.g., gold or red for Christmas, pastels for spring).
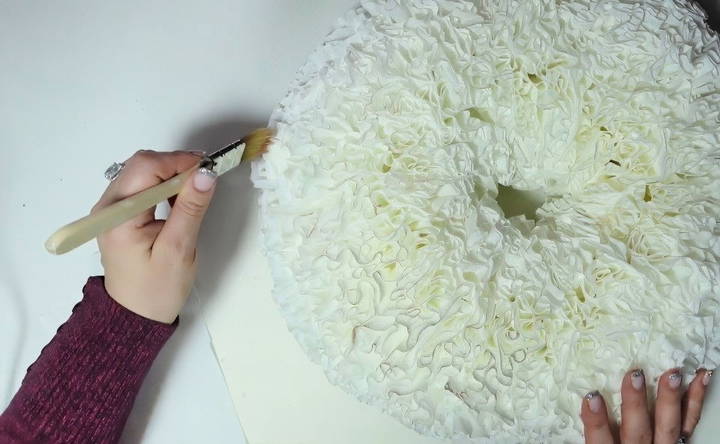
- Use the Dry Brush Technique: Dip a dry brush into the paint and wipe off most of the excess on a towel. Lightly brush the paint over the ruffled filters. This technique allows the paint to highlight the filter edges without fully covering them, adding a subtle sheen.
- Focus on Texture: Brush only the top layer of the filters to accentuate their natural folds and curls. This adds dimension and brings out the wreath's ruffled texture.
Step 4 – Prepare the Wreath for Hanging
Once your wreath is fully assembled and painted, it's time to add a hanger.
- Attach Wire: Cut a piece of 20-gauge wire long enough to make a loop. Insert the wire through the foam wreath form and twist the ends to secure it.
- Make a Loop for Hanging: Form the twisted wire into a loop, giving you an easy way to hang your wreath. For a cleaner look, tuck the wire ends into the foam and add a dab of hot glue to secure them.
Alternatively, you could use a ribbon if you prefer a more decorative hanger. Tie the ribbon around the wreath, making sure it's secure, and use it to hang your wreath.
Step 5 – Customize for Different Seasons
One of the best things about a coffee filter wreath is its versatility. By adding different colored ribbons or small accents, you can customize it for any season or event.
- Spring: Use pastel-colored ribbons or add small faux flowers for a springtime feel.
- Summer: Attach mini seashells or a bright-colored ribbon for a beachy, summer vibe.
- Fall: Choose an orange or brown ribbon and consider lightly brushing on orange paint for an autumnal touch.
- Winter and Christmas: A red or green ribbon works well, and you can add glitter to the edges of the filters for a frosty look.
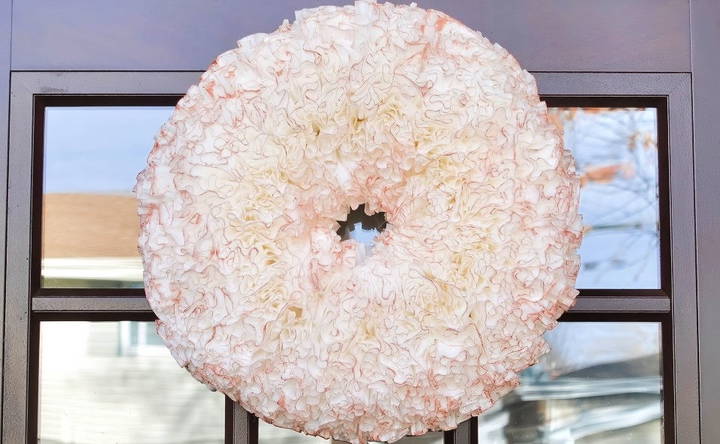
Each season brings new possibilities, allowing you to reuse the wreath year-round with minor adjustments.
Tips for Perfecting Your Coffee Filter Wreath
Making a coffee filter wreath is a straightforward project, but here are a few tips to help ensure the best results:
- Protect Your Hands: Hot glue can burn, so use finger protectors, especially when working with so many small, delicate pieces.
- Low-Temperature Glue Gun: Foam wreath forms can melt if exposed to high heat, so use a low-temperature setting to preserve the wreath base.
- Even Layers: For a full look, ensure you're placing each coffee filter close enough to prevent gaps.
- Experiment with Folding Techniques: Try different folding methods to see which texture you prefer. Each method makes a unique look.
- Keep It Light on Paint: If you choose to paint, avoid overdoing it. A light touch keeps the wreath soft and elegant.
Troubleshooting Common Issues
Making a coffee filter wreath can sometimes come with small challenges. Here's how to address them:
- Gaps Between Filters: If you see gaps, try using smaller filters or refolding them to cover exposed areas.
- Foam Base Shows Through: Adding extra filters can help cover thin areas. You can also lightly spray paint the wreath form beforehand to mask any exposed spots.
- Uneven Paint Application: If paint looks too heavy in some areas, use a clean, dry brush to gently blend it out.
Final Thoughts: Why a Coffee Filter Wreath is the Perfect
A coffee filter wreath is an ideal project for crafters of any skill level. With just a few materials, you can make a beautiful, affordable decoration that enhances your home's decor. Plus, the flexibility to customize it for any season makes it a practical choice for year-round display.
Whether you're a seasoned DIYer or a beginner, this coffee filter wreath offers a fun, rewarding experience and leaves you with a piece of decor you'll be proud to show off. Gather your materials, put on some music, and enjoy the process—you might even find this becomes your go-to DIY craft for gifts and seasonal decor updates.
So grab those coffee filters and let your creativity flow. Happy crafting!
FAQs About DIY Coffee Filter Wreath
Find answers to FAQs on making a DIY coffee filter wreath, including materials, step-by-step techniques, and creative styling tips.
You’ll need about 200-500 coffee filters, depending on the wreath size and desired fullness. For a standard 9.8-inch wreath form, approximately 200 filters should be sufficient for a full, layered look.
There are a few popular folding techniques. A simple option is folding the filter in half twice, forming a small triangle. Alternatively, gather the edges towards the center to make a rounder, petal-like shape. Each method adds different textures to the wreath, so you can choose based on your style preference.
Foam wreath forms can melt or get damaged by high temperatures, so a low-temperature glue gun is crucial. This ensures the glue adheres without damaging the protective layer on the wreath form, preserving its structure and ensuring a secure bond.
Place each filter close to the last to prevent gaps. If you notice gaps later, you can add smaller or folded filters to cover them. This layering technique will keep the wreath looking full and seamless.
Yes, you can add a personal touch with dry brushing. Rose gold paint is a popular choice, but you can adapt it to suit different seasons—use red for Christmas or pastels for spring. Lightly dab a dry brush with paint and gently sweep it over the filters for a subtle accent.
You can attach a 20-gauge wire to the back of the wreath form for hanging. Thread the wire through the form, twist the ends to secure, and tuck any excess wire into the foam. Alternatively, you can use a ribbon looped around the wreath for a decorative touch.
Yes, this is a fun craft to do with children! The "lazy folding method" is simple and safe, and kids can help with folding and arranging the filters. Just supervise them around the hot glue to avoid burns.
If a filter tears, you can fold it to hide the rip or glue it between two intact filters for support. Alternatively, replace it with a new filter, as coffee filters are inexpensive and available in large packs.
Adding seasonal ribbons or changing the paint color can easily customize your wreath. For instance, use a red ribbon for Christmas or a yellow one for spring. A simple ribbon swap lets you enjoy the wreath throughout the year.


