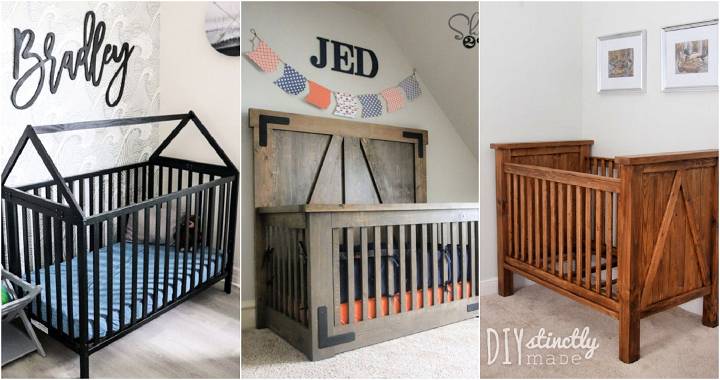
Building a DIY crib can be an incredibly rewarding project. I remember the first time I decided to build a crib for my little one. It felt a bit overwhelming at first, but I quickly realized that with a bit of planning and patience, it's pretty straightforward. I started by gathering all the necessary materials: wood, screws, a saw, and some sandpaper. Once I had everything, I carefully measured and cut the wood to the required sizes.
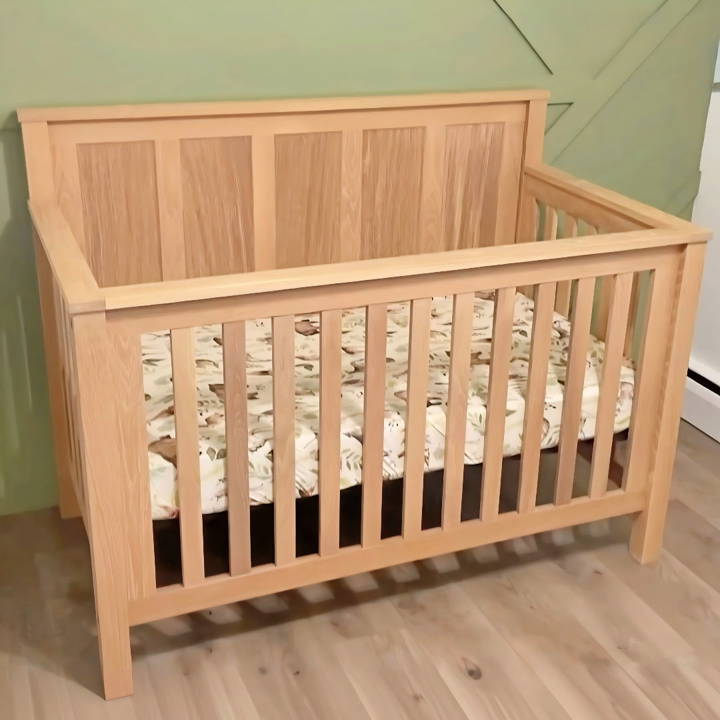
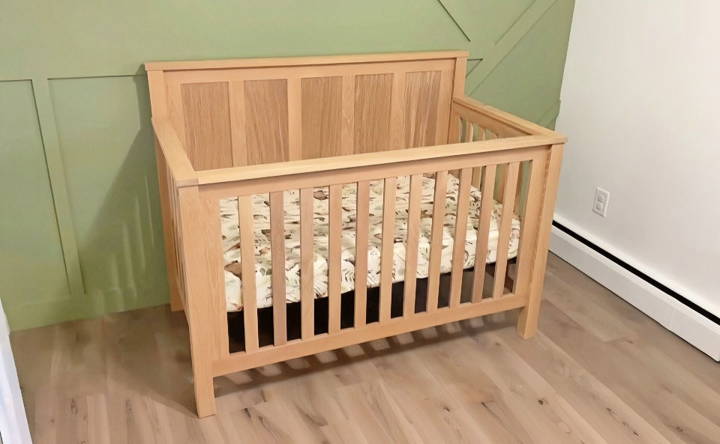
With all the pieces prepared, I began assembling the crib. This step required attention to detail because safety was a top priority. I tightly screwed all parts together, sanded the edges to ensure smooth surfaces, and double-checked the stability. It took a few hours, but seeing the finished crib was incredibly satisfying.
If you're interested in making one, my experience shows that it's a doable crib project for anyone with basic DIY skills.
Why Opt for a DIY Crib?
Before diving into the how-tos, let me share why I chose the DIY route. Firstly, the ability to customize the size, style, and color to perfectly match our nursery theme was immensely appealing. Moreover, it was a cost-effective option, and most importantly, it allowed me to ensure the use of safe, non-toxic materials, giving me peace of mind about my baby's health.
Materials You'll Need and Why
Essential materials for your DIY project: wood, screws, sandpaper, non-toxic paint, saw, drill, measuring tape, and level for quality results.
Wood
- Type: Hardwoods like maple or beech are durable and safe once properly finished.
- Why: The crib's framework needs to be sturdy and free from splinters or sharp edges.
Screws and Fasteners
- Type: High-quality wood screws and corner brackets.
- Why: Secure joints are crucial for the crib's stability and safety.
Sandpaper
- Type: Various grits, ranging from coarse (80 grit) to fine (220 grit).
- Why: Smoothing the wood surfaces is essential to prevent any potential splinters.
Non-toxic Paint or Varnish
- Type: Water-based products labeled as non-toxic and child-safe.
- Why: To ensure the crib is safe for a baby who might chew or lick the surfaces.
Tools: Saw, Drill, Measuring Tape, and Level
- Why: Precision cuts, holes, and measurements are key to a well-assembled crib.
Step by Step Instructions
Learn how to build a DIY crib with our step-by-step guide. From planning to safety checks, follow these instructions for a secure and stylish crib.
Step 1: Planning and Design
Firstly, I spent time researching and sketching a simple, sturdy design. I opted for a classic slatted style with adjustable mattress height. It's essential to adhere to the standard crib size (52 3/8 x 28 inches) to ensure your mattress fits perfectly. Also, ensure slats are no more than 2 3/8 inches apart for safety.
Step 2: Cutting and Preparing the Wood
Following the design, I measured and cut the wood. This step requires precision, as uneven lengths can lead to assembly issues later. After cutting, I meticulously sanded each piece, starting with coarse sandpaper and finishing with a fine grit for a smooth surface.
Step 3: Assembling the Frame
I began by constructing the sides of the crib, attaching the slats to the top and bottom rails with screws, ensuring tight and secure fittings. For added stability, corner brackets were used at each joint. The process was repeated for all four sides.
Step 4: Attaching the Sides Together
The next step was to connect the sides to form the crib's frame. This is where a level comes in handy, ensuring everything is perfectly aligned before tightening the screws.
Step 5: Preparing the Mattress Support
I built a separate frame that fits snugly inside the crib to support the mattress. Holes were drilled on the crib's interior sides, allowing for adjustable height as my baby grows.
Step 6: Finishing Touches
Choosing a non-toxic, water-based varnish, I applied several coats to every surface, sanding lightly between layers. Not only did this step make the crib look beautiful, but it also sealed the wood, making it easier to clean and maintain.
Step 7: Safety Checks
Before the mattress even touched the frame, I scrutinized every inch for potential hazards—sharp edges, loose screws, anything. Safety was my utmost priority throughout this project.
Post-Build Reflections
Building my baby's crib was profoundly fulfilling. Beyond the practicalities of providing a safe sleeping space, the process connected me to a tradition of craftsmanship and care that I hope to pass down. Watching my child sleep peacefully in a crib crafted with love and care remains an indescribable joy.
Customization Ideas
Customization is key to making a DIY crib unique and special for your baby. Here are some ideas to inspire you:
Adjustable Features
- Convertible Designs: Start with a crib that can transform into a toddler bed as your child grows. This not only saves money but also provides a familiar sleeping environment for your child.
- Adjustable Mattress Heights: Incorporate multiple mattress heights to accommodate your growing baby safely. This feature allows you to lower the mattress as your baby begins to sit or stand.
Themes
- Nature-Inspired: Consider a crib with elements from nature, like leaves or animals, carved into the wood. It's a charming way to introduce your baby to the beauty of the outdoors.
- Nautical Theme: For sea-loving families, a boat-shaped crib with gentle waves and a sail can be both fun and soothing for a baby.
Personal Touches
- Hand-Painted Designs: Add a personal touch with hand-painted designs. Use baby-safe, non-toxic paint to build patterns or characters that are meaningful to your family.
- Family Heirlooms: Incorporate parts of a family heirloom, like a blanket or a small toy, into the crib design to pass on the family legacy.
Interactive Elements
- Sensory Boards: Attach a sensory board with different textures and colors to the side of the crib for your baby to explore.
- Built-In Mobiles: Build a custom mobile that matches the theme of the crib and stimulates your baby's developing senses.
Practical Additions
- Storage Solutions: Build-in storage compartments or drawers underneath the crib to keep baby essentials handy and organized.
- Teething Rails: Cover the edges with a soft, chewable material to protect your baby's teeth and the crib during the teething phase.
Ensure DIY project customizations are safe. Prioritize the baby's safety. Keep the crib free of small parts and use non-toxic materials.
Troubleshooting
Building a DIY crib can be a rewarding project, but sometimes you might run into issues. Here's a troubleshooting guide to help you solve common problems:
Wobbly Frame
- Solution: Check all the joints and tighten any loose screws or bolts. If the wobble persists, reinforce the frame with corner brackets or additional supports.
Misaligned Parts
- Solution: Measure all parts again and ensure they match the design specifications. For pre-drilled holes that don't line up, fill them in and re-drill them at the correct spots.
Sticking Drawers
- Solution: Sand the edges of the drawers for a smoother glide. Apply a thin layer of beeswax or soap to the runners to reduce friction.
Uneven Paint Finish
- Solution: Sand down the uneven areas and apply a new coat of paint. Make sure to use even strokes and let each layer dry completely before adding another.
Splintered Wood
- Solution: Gently sand the area with fine-grit sandpaper until smooth. If the splinter is large, use wood filler to repair it before sanding.
Crib Too High or Low
- Solution: Adjust the legs or base to level the crib. If you've designed an adjustable mattress height, ensure it's set to the appropriate level for your baby's age and mobility.
Loose Hardware
- Solution: Periodically check all hardware and tighten as needed. Use lock washers or thread-locking fluid to prevent screws from loosening over time.
Teething Marks
- Solution: Install a teething guard along the rails. Choose a soft, chewable material that's easy to clean and safe for your baby.
Safety first in troubleshooting. Unsure? Consult a professional carpenter or child safety expert. Ensure your DIY crib is safe, sturdy, and comfy for your baby.
Safety Standards
Ensuring the safety of your DIY crib is paramount. Here's what you need to know about current safety standards:
Slats and Spacing:
- The distance between slats should be no more than 2 3/8 inches. This prevents a baby's head from getting trapped.
Sturdy Construction:
- Use high-quality hardware to ensure the crib is sturdy and durable.
- Regularly check for any loose parts and tighten them as needed.
Safe Sleep Surface:
- The mattress should fit snugly within the crib with no gaps.
- Ensure the sleep surface angle is 10 degrees or lower to prevent the risk of suffocation.
No Drop Sides:
- Drop-side cribs are prohibited due to the risk of injury and suffocation.
- Opt for a fixed-side crib design for maximum safety.
Non-Toxic Materials:
- Use paints and finishes that are non-toxic and safe for babies.
- Avoid lead-based paints and any materials that could off-gas harmful chemicals.
No Cutouts or Protrusions:
- The headboard and footboard should not have cutouts or spaces.
- Ensure there are no protruding nuts, bolts, or screws that could catch clothing or injure the baby.
Regular Maintenance:
- Perform maintenance checks to ensure all parts are secure and in good condition.
- Address any signs of wear or damage immediately to keep the crib safe.
Follow these standards to make a beautiful, unique, and safe crib for your baby. Ensuring the crib's safety is about providing a secure space for your baby to grow and dream.
FAQs About DIY Crib
Discover essential FAQs about DIY cribs. Find answers on safety, materials, tools, and step-by-step guidance for building your own baby crib.
To ensure your crib is safe, adhere to government regulations which specify details like the spacing of bars and the height of the mattress. The spacing between crib slats should be no more than 2 3/8 inches to prevent a baby’s head from getting stuck, and the mattress should be positioned at a safe height.
Yes, you can build an adjustable-height crib. This type of crib allows you to change the mattress height, accommodating your baby’s growth stages and ensuring their safety and comfort. It’s a practical feature that can make your crib last longer.
Absolutely! With careful planning and some basic carpentry skills, you can build a crib for around $200. This involves selecting affordable materials without compromising on the safety and comfort of your baby.
Certainly! If you’re looking for something unique, you can explore designs like a baseball bat crib for sports enthusiasts or a submarine crib for a nautical theme. There are many creative plans available that can help you build a crib that stands out in the nursery.
The best way to finish a DIY crib is to use non-toxic, water-based finishes that are specifically labeled as child-safe. Avoid lead-based paints and opt for natural or organic options if possible. Always allow the finish to fully cure before allowing your baby to use the crib, which can take several days. It's essential to ensure the product you choose complies with safety standards to prevent any health risks to your baby.
Conclusion:
Building a DIY crib was both challenging and enjoyable. It's a gratifying project that results in a safe and comfortable place for your baby to sleep. Having done it myself, I believe that the steps I've shared can help you get started on your project. With patience and care, you can build a wonderful crib for your little one.


