Building a DIY dance floor is very fulfilling. I remember the first time I made my own dance floor in the backyard. The excitement was real. I wanted a space where my friends and I could dance freely. Making it was easier than I thought. This guide I'm sharing will help you do the same with basic materials and steps.
First, you need a solid plan. Measure the space you want to use, gather the needed materials, and follow each step carefully. Think about the surface where your dance floor will sit and make sure it's level.
By using this guide, you will have a strong and safe dance floor to enjoy. I believe this simple guide will truly help you begin.
Gathering the Materials
Before diving into the process, it's crucial to understand why each material was chosen.
Poster Board
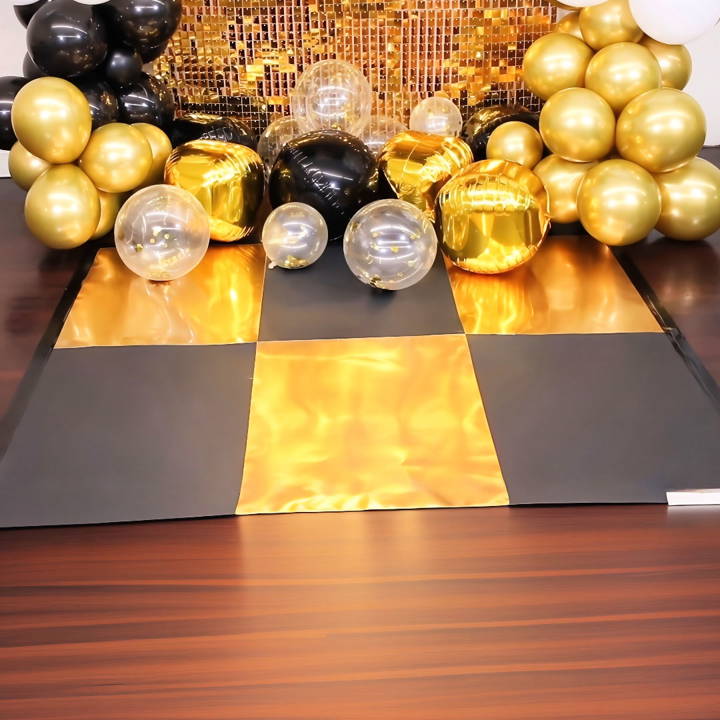
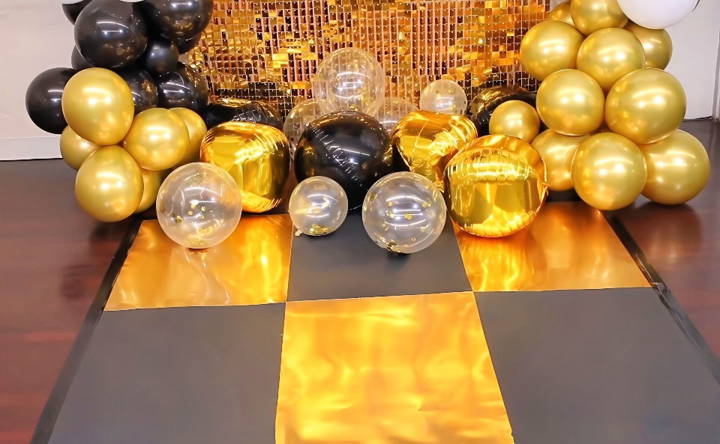
I needed something cost-effective yet durable enough to withstand a night of dancing. I found poster boards at a local craft store for 87 cents each, measuring 22 inches by 28 inches. Opting for gold and black for a chic look, I purchased nine pieces in total—five gold and four black. The choice of colors was to add a festive yet elegant touch to our New Year's Eve decor.
Scotch Packing Tape
The backbone of the project. This tape ensured the poster boards stayed connected throughout the night. Its strength and reliability were key to avoiding any dance mishaps.
Additional Decorative Elements
Given it was New Year's Eve, I wanted to add some thematic elements to elevate the dance floor's appeal. Balloons and a shimmer wall backdrop were my go-to's, making a festive ambiance without overshadowing the dance floor itself.
Step by Step Instructions
Learn how to build a DIY dance floor with our step-by-step instructions. Perfect for any event, build your own dance space easily and affordably.
Laying Out the Poster Board
Start by arranging the poster boards on the floor to form a checkerboard pattern. This step is crucial for visualizing the final layout and ensuring you have enough materials.
Flipping and Taping
Once satisfied with the layout, flip each board over (in place) to tape them together from the back. This method preserves the aesthetic of the checkerboard pattern and provides uniformity.
Pro Tip:
Be meticulous in aligning the boards. Even slight discrepancies can become noticeable once the dance floor is assembled. Patience is key here, ensuring a seamless look.
Securing the Dance Floor
After taping, flip the connected boards to reveal your dance floor's face. Next, use the Scotch Packing Tape to secure the perimeter of the dance floor to the ground. For those worried about floor damage, a painters' tape can be a safe alternative, offering strong hold without the residue.
Final Touches
Now, the dance floor is almost ready. The finishing touches involved outlining the dance floor with tape to build clean edges and adding decorative elements like balloons and perhaps some LED lights for that festive sparkle.
Reflections and Recommendations
The DIY dance floor was a hit at our New Year's Eve party. Not only did it serve its purpose, but it also added a unique element to our home decor. However, a couple of lessons stood out:
- Precision Matters: Taking the time to accurately measure and align the poster boards is crucial. Any rushed work can lead to a less-than-perfect aesthetic.
- Durability: While poster boards worked wonderfully for our small, indoor gathering, those planning for a larger event might consider reinforcing the floor with a more robust material underneath.
- Customization is Key: The beauty of this project lies in its versatility. Don't shy away from experimenting with different colors, sizes, and additional decors to match your theme.
Customization Ideas for Your DIY Dance Floor
Making a dance floor that reflects your personal style or the theme of your event can make dancing even more enjoyable. Here are some customization ideas that are both practical and creative:
- Choose Your Base Wisely: Start with a sturdy base. Plywood is a popular choice because it's durable and easy to work with. Ensure the surface is smooth to prevent tripping.
- Paint It Up: Use floor paints to add color or patterns to your dance floor. Consider using stencils to build intricate designs. Remember to use non-slip paint to keep dancers safe.
- Light It Up: Incorporate LED strip lights around the edges or beneath a clear surface for a touch of glamour. This is especially effective for evening events.
- Make It Modular: Design your dance floor in sections that can be easily assembled and disassembled. This allows for flexibility in size and shape, adapting to different spaces and events.
- Add a Personal Touch: Personalize your dance floor with initials, logos, or images that are meaningful to you. This can be done through painting or using adhesive decals.
- Go Green: Use eco-friendly materials where possible. Recycled wood or sustainable bamboo can be great options for the environmentally conscious.
- Think About Texture: Adding texture not only enhances the look but can also improve grip. Textured wallpaper or rubber matting can serve this purpose.
- Consider the Edges: Smooth out the edges of your dance floor to prevent trips and falls. Adding a beveled edge can be both functional and aesthetically pleasing.
- Accessorize: Add accessories like a mirrored ball or spotlights to build a disco atmosphere. Just ensure they don't interfere with the dancers' space.
- Maintenance Matters: Choose customization options that are easy to clean and maintain. This will ensure your dance floor stays looking great for years to come.
Incorporate these ideas to make a functional dance floor that reflects your personality or event theme.
Event Planning Tips
When planning an event, it's essential to be organized and considerate of every detail to ensure a successful and memorable experience. Here are some practical tips to guide you through the process:
- Start Early: Begin planning as soon as possible. For large events, start at least 4-6 months in advance. Smaller events need at least one month to plan.
- Set Clear Objectives: Understand the purpose of your event. Is it to educate, celebrate, or network? Your goals will drive the decisions you make.
- Make a Budget: Know how much you can spend, and keep track of all expenses. Be realistic and leave a little wiggle room for unexpected costs.
- Choose the Right Venue: Select a location that aligns with your event's theme and size. Consider accessibility, parking, and layout.
- Develop a Theme: A strong theme can add interest and excitement to your event. It should be engaging and relevant to your audience.
- Plan the Food and Drink: Cater to your guests' dietary preferences and consider the style of the event. Options should be diverse and plentiful.
- Organize Entertainment: Whether it's a DJ, band, or speaker, ensure the entertainment is appropriate for your audience and event tone.
- Promote Your Event: Use social media, email newsletters, and community calendars to spread the word. Tailor your message to your target audience.
- Have a Backup Plan: Always plan for the unexpected. Have a contingency plan in case of bad weather or other unforeseen circumstances.
- Evaluate the Event: After the event, gather feedback to understand what worked and what didn't. This will help you improve future events.
The key to a successful event is in the details. By following these tips, you'll be well on your way to making an event that your guests will remember fondly.
Troubleshooting Common Issues
When making a DIY dance floor, you might encounter a few hiccups along the way. Here's how to tackle some of the most common issues:
- Slippery Surface: A dance floor that's too slick is a hazard. If you find your floor is too slippery, consider applying a non-slip coating or adhesive grip tape. For a more permanent solution, sanding the surface and applying a matte sealant can increase traction.
- Uneven Flooring: An uneven dance floor can cause dancers to trip. To fix this, ensure the base is level before you start building. Use a spirit level to check and adjust the height with shims or sand down high spots.
- Weak Spots: If your dance floor feels a bit too bouncy or soft in spots, it may need additional support. Check the joists and add more if necessary. Using thicker plywood can also help distribute weight more evenly.
- Weather Damage: Outdoor dance floors are prone to weather damage. Protect your floor by using weather-resistant materials and applying a waterproof sealant. When not in use, cover the floor or store it in a dry place.
- Difficult Assembly: If your dance floor is hard to put together, simplify the design. Use interlocking tiles or build a modular system that snaps together easily.
- Stains and Spills: Accidents happen, but they don't have to ruin your floor. Choose materials that are easy to clean and stain-resistant. For quick clean-ups, keep a supply of cleaning products nearby during events.
By addressing these common issues, you can ensure your DIY dance floor remains a safe and enjoyable place for everyone to dance the night away.
FAQs About DIY Dance Floor
Discover everything you need to know about DIY dance floors. Our faqs provide expert tips and solutions for your perfect dance floor setup.
Firstly, ensure your plywood is sealed with a polyurethane sealant to enhance durability. If you’re placing the dance floor on a carpet, consider building a foldable version for easy storage. For a cushioned dance floor, use multiple layers of flooring with an impact-absorbing subfloor.
Yes, you can build an affordable dance floor by sourcing materials like linoleum from hardware store scrap sections or garage sales. For padding, martial arts pads are a great option, and they can sometimes be found at a lower cost from closing studios or online marketplaces.
Clean the dance floor surface with a damp mop before use, especially if the linoleum is second-hand. After each use, wipe down the surface to remove sweat or dirt. Periodically, give the floor a deeper clean to maintain its smoothness.
Clear the area where you'll lay down the padding and linoleum. Secure the edges of the linoleum with durable tape to prevent sliding. If you need to adjust the size or repair damages, use a sharp utility knife for cutting and duct tape for tears.
Safety is paramount when building a DIY dance floor. Make sure the floor is level and securely fastened to prevent tripping hazards. Use a non-slip finish or add a layer of non-slip material on top for extra grip. Regularly check for any loose screws or protruding nails and repair any damages immediately to maintain a safe dancing environment.
Conclusion
Now, let's conclude this teaching moment here. I know how rewarding it is to build something with your own hands. With this guide, you can make your own DIY dance floor easily. Start now, and you'll have your dancing space in no time. It's worth it!


