Building my own DIY deadlift platform was one of the best decisions for my home gym. It started with a simple idea to make a dedicated space for lifting. I gathered all the materials: plywood, rubber mats, and screws. By following a basic plan, I made a strong platform on a weekend.
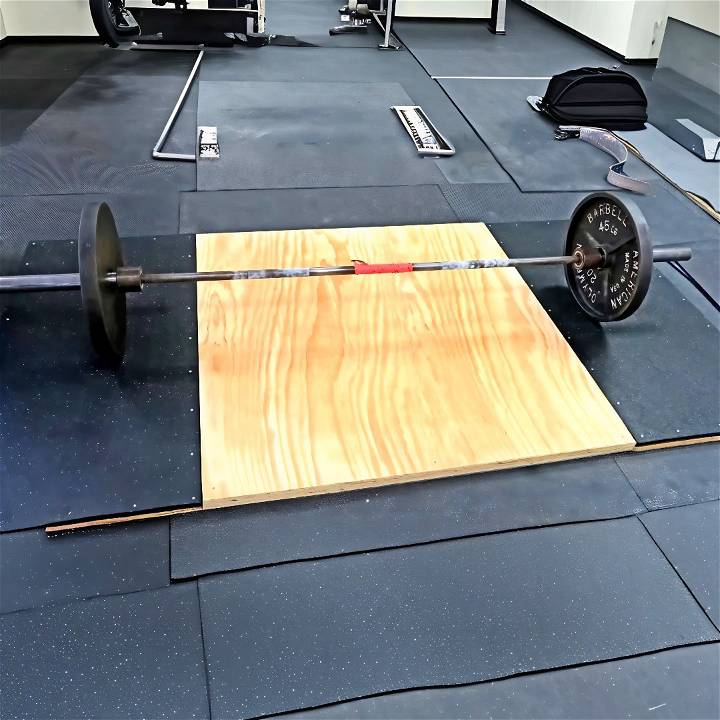
Making this DIY lifting platform was not only satisfying but also practical. It saved me money and fit perfectly in my garage gym. The platform provides a stable surface for my workouts and protects the floor.
I'm confident that sharing my experience will motivate you to start your project. This guide will help you build a solid platform, just like I did.
Deadlift Platforms
Deadlift platforms are a staple in any serious weightlifter's training area. They serve a crucial role in both protecting your equipment and your floors, and they can significantly reduce the noise that comes from heavy lifting. Here's why they're important and how they can benefit your workouts:
Why Use a Deadlift Platform?
A deadlift platform provides a dedicated space for lifting weights, particularly for the deadlift exercise, which involves lifting a loaded barbell off the ground. The platform absorbs the shock and sound when weights are dropped, protecting both the floor and the weights.
Benefits of a Deadlift Platform:
- Protects Your Floors: Whether you're lifting in a garage, basement, or dedicated gym space, floors can be damaged by heavyweights. A platform acts as a shield, preventing cracks and dents.
- Reduces Noise: Dropping weights can be loud, and the sound can travel through your home or annoy neighbors. A platform muffles the sound, making your workout less disruptive.
- Improves Safety: A stable platform prevents the weights from rolling and provides a flat surface to lift from, reducing the risk of injury.
- Enhances Performance: Knowing that your equipment and space are protected allows you to focus on your form and performance without worrying about damaging your surroundings.
Choosing the Right Materials:
When building your own platform, you'll want materials that are durable and can withstand the weight and impact of your workouts. Typically, a combination of plywood and rubber mats is used. The plywood provides a solid base, while the rubber mats offer cushioning and grip.
Designing for Your Space:
Consider the size of the area where you'll place your platform. Standard platforms are usually 8 feet by 4 feet, but you can adjust the dimensions to fit your space. Just ensure it's large enough to perform deadlifts comfortably and safely.
By incorporating a deadlift platform into your home gym, you're investing in the longevity of your equipment and the safety of your workouts. It's a practical addition that will enhance your weightlifting experience.
Gathering the Materials
The first step was to gather all the necessary materials. Here's a detailed breakdown of why each item was crucial:
Stall Mat
I headed to the Tractor Supply store to pick up a 4x6 stall mat for about $34.99. These mats, typically used in horse stalls, are incredibly durable, making them perfect for withstanding the impact of deadlifts.
Plywood
Next, I visited Home Depot for a 4x8 piece of plywood, costing around $30. This would serve as the base of the platform. I had it cut into a 4x2, a 4x4, and another 4x2 piece, ensuring that the platform would be easy to dismantle and store.
Additional Plywood for the Top Layer
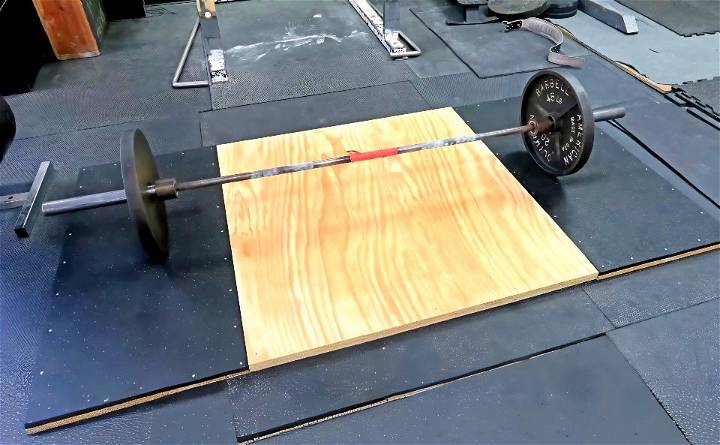
For the top layer, where the actual lifting would take place, I opted for a nicer, albeit more expensive, 4x4 piece of plywood. While options like oak or maple were available, a $15 pine sheet was a perfect fit for my budget. To protect it, I coated it with polyurethane, enhancing its durability.
Step by Step Instructions
Learn step-by-step instructions for building a DIY deadlift platform. Perfect for home gyms. Practical advice on stall mats, top layer assembly, and final touches.
Preparing the Stall Mats
After coating the top layer of plywood with polyurethane and allowing it to dry, it was time to focus on the stall mats. Laying them flat, I placed the 4x2 pieces of wood on top and traced their outline with a box cutter. While a jigsaw might be more efficient for cutting through the mat's thickness, a box cutter did the job with enough patience. Once cut, these mats were screwed onto the 4x2 wood pieces using 1* ¼-inch wood screws.
Assembling the Top Layer
While the sides were set, I applied another coat of polyurethane to the top layer, ensuring it was well-protected. Once dry, I positioned the two 4x4 plywood pieces on top of each other, making sure their edges aligned perfectly before screwing them together. This double layer ensured the platform was sturdy enough to withstand the rigors of deadlifting.
Final Assembly
With all the pieces prepared, the final step was to assemble them at my gym. The beauty of this design was its simplicity and portability. The sides could easily be attached or detached, making the platform adaptable for sumo deadlifts or allowing for deficit deadlifts by removing the sides.
Reflecting on the Project
Looking at my completed portable deadlift platform, I felt a sense of pride. Not only had I saved money, but I had also buildd something that met my specific needs. The platform was sturdy, looked professional, and, most importantly, it was portable. I could easily store it away, leaving space in my garage for other activities.
Practical Advice
For those looking to embark on this DIY journey, here's some advice:
- Choose your materials based on both budget and necessity. While more expensive wood might offer better aesthetics, it's the functionality that truly matters.
- Be patient during the construction process, especially when cutting the stall mats. Precision here will pay off in the long run.
- Don't be afraid to customize. This guide is a great starting point, but your needs might lead you to adjust the dimensions or materials.
Customization Ideas
When it comes to building a DIY deadlift platform, customization is key to making it your own. Not only does it add a personal touch, but it also allows you to tailor the platform to your specific training needs. Here are some ideas to inspire your creativity:
Personalize with Paint
- Choose Your Colors: Pick colors that motivate you or match your gym's theme. Use durable, non-slip paint suitable for wood and rubber.
- Design Patterns or Logos: Add your initials, a motivational quote, or a stencil design. This can be done using painter's tape or custom-made stencils.
Adjust the Size
- Fit Your Space: Measure your available space and adjust the platform size accordingly. Ensure there's enough room around the platform for safe movement.
- Consider Your Reach: If you're taller or have a wider stance, you might want a wider platform. Make sure it's comfortable for your lifting style.
Enhance the Surface
- Add a Center Wood Piece: For a smoother surface where the barbell makes contact, consider adding a polished wood section in the center.
- Non-Slip Coating: Apply a clear, non-slip coating over the paint to maintain grip and safety when lifting.
Incorporate Storage
- Built-In Storage: Add racks or hooks on the sides to hold weights and bars. This keeps your space tidy and everything within reach.
- Mobile Design: If you need to move the platform, attach caster wheels that can lock in place when you're lifting.
Eco-Friendly Materials
- Recycled Rubber: Use recycled rubber mats or tiles for the shock-absorbing areas. This is both environmentally friendly and often more affordable.
- Sustainable Wood: Opt for sustainably sourced plywood or consider reclaimed wood for a rustic look.
Tech Integration
- Add LED Lights: Install LED strips underneath or around the platform for better visibility and a modern look.
- Smartphone Dock: Build a small shelf or holder for your smartphone or tablet to easily access training apps or music.
Customize your deadlift platform to reflect your fitness dedication. Keep it simple, prioritize, and enjoy the process.
Advanced Modifications
Advanced modifications can enhance functionality and performance for those who have experience in DIY projects and want to take their deadlift platform to the next level. Here are some sophisticated upgrades you can consider:
Adjustable Height Platform
- Build a Mechanism: Incorporate a hydraulic lift or screw jacks to adjust the height of the platform. This is especially useful for athletes of different heights or for exercises requiring varying platform levels.
- Safety Locks: Ensure that any adjustable mechanism has secure locks to prevent accidental movement during use.
Integrated Rack System
- Build a Rack: A squat rack or power cage can be integrated into the design of the platform for a multi-functional workout space.
- Sturdy Construction: Use heavy-duty steel for the rack to ensure it can handle the weight and stress of use.
Shock Absorption System
- Advanced Materials: Replace standard rubber mats with high-density foam or specialized shock-absorbent tiles designed for Olympic lifting.
- Layering: Experiment with different layering techniques, such as sandwiching foam between plywood, for optimal shock absorption.
Sound Dampening Enhancements
- Acoustic Foam: Line the bottom of the platform with acoustic foam to further reduce noise when dropping weights.
- Vibration Isolators: Install vibration isolator pads under the platform to minimize the transfer of sound to the floor.
Embedded Technology
- Weight Sensors: Embed weight sensors within the platform to track the weight lifted and provide feedback on lifting form.
- LED Indicators: Install LED indicators that light up to confirm proper weight distribution and balance during lifts.
Mobility and Storage
- Retractable Wheels: Add retractable wheels to easily move the platform without compromising its stability during use.
- Hidden Compartments: Design hidden compartments within the platform for storing accessories like weightlifting belts and chalk.
Enhance your deadlift platform with these upgrades, making it a standout in your home gym and showcasing your dedication to fitness and craftsmanship. Prioritize safety and seek professional advice if needed.
Maintenance and Care
Taking care of your deadlift platform is essential to ensure it remains a safe and reliable part of your home gym. Regular maintenance not only extends the life of your platform but also ensures it looks good and performs well. Here's how to keep your platform in top condition:
Regular Cleaning
- Sweep Daily: Use a soft-bristle broom to sweep away dust and debris after each workout.
- Wipe Spills Immediately: If you spill any liquids, wipe them up promptly to prevent the wood from warping or the rubber from deteriorating.
Periodic Deep Cleaning
- Mop the Surface: Every few weeks, use a damp mop with a mild cleaner on the rubber mats to remove grime and sweat.
- Sanitize: Especially in shared spaces, it's important to sanitize the platform to prevent the spread of germs.
Inspect for Damage
- Check for Wear: Regularly inspect the platform for signs of wear, such as cracks in the wood or tears in the rubber.
- Repair Promptly: If you find damage, repair it immediately to prevent further deterioration.
Protect the Wood
- Seal the Surface: Apply a sealant to the wood annually to protect it from moisture and heavy use.
- Avoid Harsh Chemicals: When cleaning, avoid harsh chemicals that can strip the wood of its protective coating.
Maintain the Rubber
- Condition the Mats: Use a rubber conditioner to keep the mats flexible and prevent them from drying out and cracking.
- Secure Loose Edges: If the edges of the mats start to peel up, secure them back down to prevent tripping hazards.
Update as Needed
- Refresh the Paint: If the paint starts to chip or fade, give it a fresh coat to keep the platform looking new.
- Replace Worn Parts: Over time, you may need to replace the rubber mats or the top layer of plywood.
Following these tips ensures your deadlift platform stays durable and functional. A maintained platform is safer and more enjoyable.
Safety Precautions
When making and using a DIY deadlift platform, safety is paramount. Not only do you want to protect yourself during construction and workouts, but you also want to ensure the longevity of your equipment. Here are some essential safety precautions to keep in mind:
During Construction:
- Wear Protective Gear: Always wear safety glasses, gloves, and ear protection when cutting wood or drilling.
- Secure Materials: Make sure all materials are stable and secured before making any cuts or drilling to prevent accidents.
- Ventilation: Work in a well-ventilated area to avoid inhaling sawdust or fumes from sealants and paints.
Using the Platform:
- Stable Surface: Place your platform on a flat, even surface to prevent wobbling or tipping during use.
- Proper Footwear: Wear shoes with good grip to prevent slipping while lifting weights.
- Clear Space: Keep the area around your platform clear of clutter to avoid tripping hazards.
Lifting Technique:
- Warm-Up: Always warm up before lifting to prepare your muscles and reduce the risk of injury.
- Form First: Focus on proper lifting form. If you're unsure, consult a professional trainer or watch instructional videos.
- Listen to Your Body: Don't push beyond your limits. If you feel pain or discomfort, stop and rest.
Equipment Check:
- Regular Inspections: Before each use, check the platform for any damage or wear that could pose a risk.
- Weight Limits: Be aware of the weight capacity of your platform and do not exceed it.
- Barbell Maintenance: Ensure your barbell is in good condition, with no bending or rust that could weaken its integrity.
Emergency Preparedness:
- First Aid Kit: Keep a first aid kit nearby in case of cuts or scrapes during construction or workouts.
- Emergency Plan: Have a plan in place for what to do in case of a more serious injury, including who to call and how to get help.
By following these safety precautions, you can enjoy a productive and injury-free lifting experience on your DIY deadlift platform. Safety is just as important as the lift itself.
FAQs About DIY Deadlift Platform
Get answers to your faqs about DIY deadlift platforms, including materials, construction tips, and cost-effective solutions for home gyms.
A standard pre-made deadlift platform is typically four feet tall by eight feet wide. However, if you’re building your own, you can customize the size to fit your space. The common DIY size is 8’x8’.
Building a deadlift platform can:
Minimize noise during workouts.
Protect your floor and weightlifting equipment from damage.
Enhance concentration by making a dedicated space for lifting.
Absolutely! One of the best parts of building your own platform is the ability to customize it. You can choose the size, materials, and even add a personal touch with a painted logo or wood stain.
Maintaining your DIY deadlift platform is crucial for its longevity and performance. Here are some tips:
Clean Regularly: Wipe down the platform after each session to remove chalk, sweat, and debris.
Inspect for Damage: Check for any loose screws or splintering wood and repair as needed.
Reapply Finish: If you’ve applied a finish or paint, reapply it annually to protect the wood from moisture and wear.
Rotate Mats: If possible, rotate the horse stall mats to ensure even wear.
While not strictly necessary, using a higher quality wood like oak or maple for the center of your deadlift platform can be beneficial. These types of wood are more durable and provide a smoother surface for lifting. They can better withstand the repeated impact of heavy weights without warping or cracking. If you're on a budget, plywood can work as well, but make sure it's at least ¾ inch thick to ensure stability and longevity. Remember, the centerpiece is where most of the action happens, so it's worth investing in quality if you can.
Final Thoughts
Building a DIY deadlift platform was an immensely rewarding project. It not only served my practical needs but also provided me with the satisfaction of making something valuable with my own hands. For anyone considering a similar project, I say go for it. The experience, expertise, trustworthiness, and authority you gain in the process are well worth the effort.


