Not long ago, I noticed my patio was cluttered with gardening tools, kids' toys, and other items. I realized I needed a better storage solution. Instead of buying something off the shelf, I decided to build a DIY deck box that fit my exact needs. This project not only organized my outdoor space but also gave me a sense of pride.
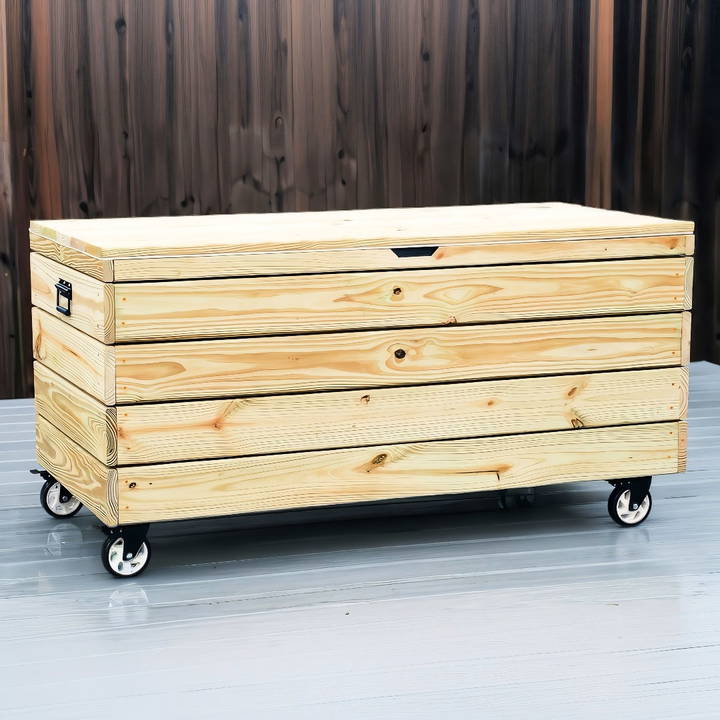
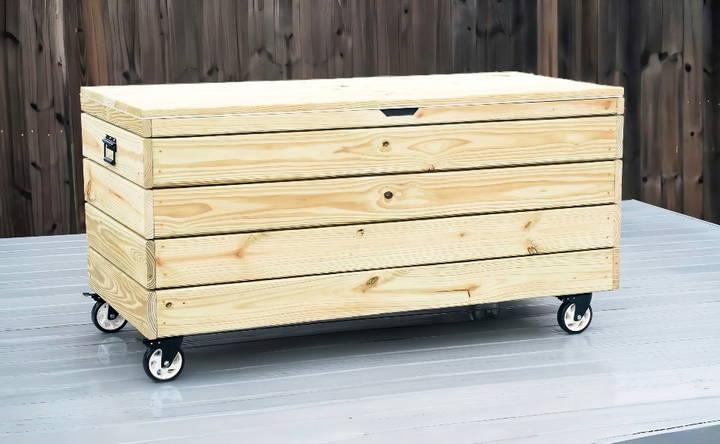
Using simple deck box plans, I constructed a sturdy and attractive storage box. I chose weather-resistant materials so it would last through all seasons. Now, this DIY outdoor storage box keeps everything neatly stored, making my patio look tidy and spacious.
I hope my experience shows that building your own deck box is both achievable and rewarding. With the right plans and a bit of effort, you can build a custom storage solution that enhances your outdoor space.
Why I Needed a Deck Box
I've always loved lounging in my backyard, surrounded by cozy cushions and the tranquility of nature. However, storing these cushions became a hassle, cluttering my indoor space. The solution? A sturdy, weather-resistant outdoor storage deck box.
Materials Needed and Their Purpose
- Pressure-Treated Lumber: Essential for outdoor projects. It resists rot, insects, and the elements.
- Deck Boards and Plywood: For the body and lid of the box. Deck boards add a nice finish, while plywood forms a strong base.
- Deckmate Screws with Tens Technology: They're rust-resistant and designed for outdoor use, ensuring durability.
- Wood Glue (Exterior Grade): To reinforce the structure, providing extra hold and weather resistance.
- Casters: To make the box movable. This is crucial if you, like me, prefer the flexibility to rearrange your outdoor space.
- Hinges and Lid Supports: For a functional lid that opens and closes smoothly. I learned the importance of choosing robust mechanisms the hard way.
- Corrugated Plastic: For waterproofing the lid. It's a simple solution to prevent water ingress.
Step by Step Instructions
Learn how to build a DIY deck box with step-by-step instructions, including cutting, assembling, waterproofing, and adding final touches for a perfect finish.
Getting Started: Prepping and Cutting
I handpicked my lumber carefully, ensuring each piece was as straight as possible. After sketching out my design and measurements, I cut the wood according to my plan. Having a clear layout before you start cutting is invaluable.
Cutting the Frame
The frame is the backbone of the deck box. I used 2x4 lumber to craft the sides and then framed the plywood panels that would form the inner walls of the box. Rabbit cuts were crucial here for a snug fit.
Assembling the Frame
Using exterior-grade wood glue and Deckmate screws, I started piecing together the frame. The screws' tens technology really made a difference in ease of assembly.
Building and Wrapping the Body
After the frame, I wrapped the body with deck boards, leaving a quarter-inch gap between each for aesthetic purposes and slight ventilation. Wrapping was tedious but rewarding, as the box began to take shape.
Waterproofing the Lid
I opted for corrugated plastic as a waterproof barrier underneath the lid. This was a step I hadn't seen in many online tutorials, but it seemed like a no-brainer for keeping contents dry.
Final Touches: Casters, Lid, and Hinges
Installing casters was straightforward. The real challenge was adjusting my lid design on the fly and selecting the right hinges. Traditional soft-closing hinges weren't up to the task, so I switched to heavy-duty lid supports which worked like a charm.
The Final Product
The storage box not only looked great but was also incredibly functional. The corrugated plastic layer kept all moisture out, and the casters allowed me to easily move the box regardless of its heavy load.
Lessons Learned
- Measure Twice, Cut Once: This age-old adage saved me from many potential mistakes.
- Flexibility in Design: Be prepared to adjust your plans based on the materials and tools you have.
- Right Tools for the Right Job: Investing in quality screws and hinges made a significant difference in the durability and functionality of the deck box.
Design Considerations for Your DIY Deck Box
When planning to build a DIY deck box, it's essential to consider the design that best suits your needs and complements your outdoor space. Here's a detailed guide to help you through the process:
- Size and Capacity: Think about what you'll store in your deck box. Will it be used for garden tools, cushions, or pool toys? Measure the items and plan for extra space. A good rule of thumb is to add about 10-15% more room than you think you'll need.
- Shape and Style: The shape of your deck box should match the style of your outdoor area. If you have a modern patio, consider a sleek, rectangular design. For a more traditional space, a deck box with a curved top or intricate woodwork might be more appropriate.
- Accessibility and Convenience: Your deck box should be easy to open and close. If you're planning to access it frequently, consider a design with hydraulic arms that prevent the lid from slamming shut.
- Integration with Outdoor Decor: Choose a color and finish that blend with your existing outdoor furniture. If you're unsure, neutral colors like brown, gray, or white are safe choices.
- Material Durability: Select materials that can withstand your local weather conditions. If you live in a wet climate, consider using cedar or teak, which are naturally water-resistant.
- Eco-Friendly Options: If sustainability is important to you, look for recycled materials or wood certified by the Forest Stewardship Council (FSC).
- Safety Features: If you have children, ensure the design is safe for them. Rounded corners, smooth edges, and a soft-close lid are important features to include.
- Assembly Ease: Consider how you'll put the deck box together. If you're not an experienced DIYer, opt for a simpler design or one that comes with clear, step-by-step instructions.
Consider these design tips to build a functional, stylish, and durable deck box that meets your storage needs and enhances your outdoor space.
Weatherproofing Techniques for Your DIY Deck Box
Protecting your DIY deck box from the elements is crucial to ensure it lasts for years to come. Here's a straightforward guide to weatherproofing your outdoor storage solution:
- Select the Right Wood: Start with a wood that naturally resists rot and insects, like cedar, redwood, or teak. These woods have oils that repel water and pests, making them ideal for outdoor use.
- Use Water-Repellent Finishes: Apply a water-repellent finish to your deck box. Look for products labeled as “deck finish” or “wood sealer.” These finishes form a barrier that water can't penetrate.
- Regular Reapplication: Remember, no finish lasts forever. Plan to reapply the finish every year or two to maintain its effectiveness. Check the manufacturer's instructions for the best results.
- Seal the Joints: Water often seeps in through joints and seams. Use a silicone caulk to seal these areas. Make sure the caulk is suitable for outdoor use and can flex with the wood's movement.
- Elevate from the Ground: Keep the bottom of your deck box off the ground to prevent moisture from wicking up. You can use feet or spacers made of plastic or rubber for this purpose.
- Consider a Lid Overhang: Design the lid of your deck box to overhang the sides. This helps to shed water away from the box, much like the eaves of a house.
- Ventilation: Good airflow can prevent mold and mildew. Consider adding small vents or gaps at the bottom of the box to allow air to circulate.
Use these weatherproofing techniques to extend your deck box's life and keep items dry. Regular maintenance is essential.
Safety Measures for Your DIY Deck Box
Ensuring the safety of your DIY deck box is as important as its functionality and aesthetics. Here are some straightforward safety measures to consider:
- Childproofing: If children have access to your deck box, it's crucial to make it child-friendly. Use safety hinges that prevent the lid from slamming shut, and consider rounded corners to avoid sharp edges.
- Secure Assembly: Make sure all parts of your deck box are securely assembled. Use screws and bolts that are appropriate for the weight they will support. Check them periodically to ensure they haven't loosened over time.
- Proper Lid Support: A heavy lid can be a hazard. Install lid supports or gas springs that hold the lid open safely and prevent accidental closures.
- Non-Slip Surface: If your deck box will double as a seat, add a non-slip surface to the top to prevent falls, especially in wet conditions.
- Ventilation: Proper ventilation within your deck box will prevent the build-up of mold and mildew, which can cause structural weakness and health issues.
- Weather Considerations: In areas prone to high winds, secure your deck box to the ground or another stable structure to prevent it from tipping over.
By implementing these safety measures, you'll make your deck box a secure addition to your outdoor space. Safety is not just a feature; it's a necessity for a well-rounded DIY project.
FAQs About DIY Deck Box
Get answers to common questions about DIY deck boxes, including materials, tools, and step-by-step instructions for making your own.
To waterproof your deck box:
Use waterproof wood glue during assembly.
Apply a sealant or stain that provides a waterproof finish.
Install weather stripping around the lid to prevent water ingress.
Yes, you can customize your deck box to fit your space. Adjust the measurements of the boards according to the size you need, ensuring all pieces are cut to match your design specifications.
Cedar is often recommended for deck boxes due to its natural resistance to rot and insects. However, pressure-treated wood is a more economical choice and can be painted or stained to match your preference.
For maintenance:
Regularly check and tighten any loose screws or hardware.
Clean the box periodically to prevent mold and mildew buildup.
Reapply sealant or stain as needed to maintain waterproofing and appearance.
To enhance your deck box, consider adding:
Built-in seats or cushions for additional seating.
Dividers or trays inside for better organization.
Locks or latches for added security.
Wheels or handles for mobility.
Decorative elements like trim or paint to match your outdoor decor.
Conclusion
Don't hesitate to start your own DIY deck box project. Making a deck box is practical and fun, and I'm glad I took the plunge. I'm sure you will be too.


