Building your own DIY dice tower is not only fun but also a great way to improve your gaming experience. I remember the first time I made one, using simple materials I had at home. The process was straightforward, and the end result was satisfying. It improved how I rolled dice during games and added a personal touch to my game nights.
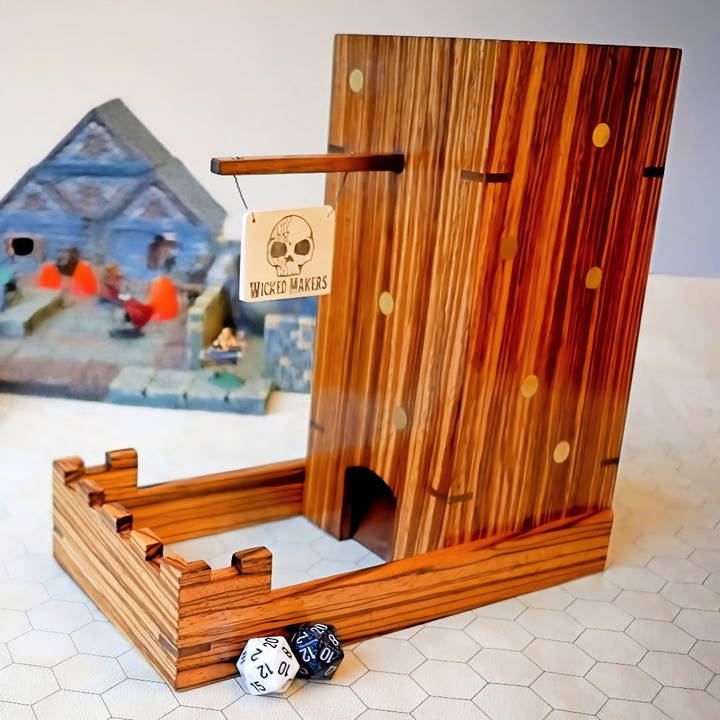
I'm helping with this so you can craft your own DIY dice tower and enjoy your next gaming session even more. These steps are easy to follow, and you'll love the final result. Start today, and you'll have your own custom dice tower in no time!
Materials Needed and Their Purpose
- Wood: I chose a combination of woods for aesthetics and durability. The primary structure is made of pine for its ease of working and lightness, while accents were done in walnut for contrast.
- Glue: Wood glue is essential for making strong bonds between the wood pieces.
- Miter saw/Table saw/Band saw: These tools are vital for accurate cuts, especially for the miter joints.
- Dowels: Walnut dowels not only added structural integrity but also aesthetic appeal.
- Brass dowels: For decorative plugs, giving the tower a unique flair.
- Sandpaper: Necessary for smoothing out all surfaces and edges.
- Shellac and Waterlox: These finishes protect the wood and enhance its natural beauty.
- Miscellaneous: This category includes smaller yet crucial items like a foam brush for applying finishes, tape for precise glue-ups, and drill bits for making holes.
Step by Step Instructions
Learn how to make a dice tower with our step-by-step guide! From planning to final touches, we cover everything you need to craft the perfect dice tower.
Step 1: Planning and Designing
The first step was sketching out my design. Inspired by geek chic designs and modifications to suit my taste, my dice tower plan included a main tower and a ramp for the dice to roll out smoothly. The dimensions were carefully chosen to ensure regular-sized dice could easily tumble through without getting stuck.
Step 2: Cutting the Wood
Using the table saw, I cut the pine and walnut wood to the desired dimensions. Accuracy here was crucial to ensure all pieces fit together perfectly later on. I buildd four walls for the tower, with the front wall including a space for the dice to exit. The ramp was cut from walnut to match the dowels.
Step 3: Crafting Miter Joints
For a clean look, I chose miter joints to assemble the tower's walls. This required precise cuts at 45-degree angles. I used the table saw for the long cuts and a hand saw for the finer, crosscut miter work.
Step 4: Applying Joinery and Building the Ramp
To enhance the tower's durability, I opted for splines in the miter joints. Cutting grooves and inserting contrasting walnut splines not only strengthened the structure but also added a decorative touch. The ramp was angled by hand for a perfect fit.
Step 5: Adding Dowels
The fun part was drilling holes and inserting the dowels inside the tower. I spaced them randomly to ensure the dice would tumble and turn for a truly random roll. The dowels were glued firmly in place.
Step 6: Pre-finishing
Before final assembly, I applied a coat of shellac to all interior surfaces. This was crucial because once the tower was assembled, reaching inside to finish would be impossible.
Step 7: Assembly
With all the pieces cut, refined, and prefaced, it was time to assemble. I glued the mitered edges of the tower walls, holding them together with tape as they dried. The outer walls were also assembled and then joined with the main tower structure. Clamping everything securely ensured a tight fit as the glue dried.
Step 8: Final Touches
After the glue dried, I addressed any unevenness and filled gaps with wood filler for a seamless look. The brass dowels were cut, sanded down, and inserted into pre-drilled holes in the walls for decorative splines. Sanding was thorough, moving from coarse to fine grit until the wood was smooth to the touch.
Step 9: Finishing
The last step involved applying several coats of Waterlox to protect the wood and bring out its natural beauty. This process took a few days, allowing each coat to dry before applying the next.
Use and Enjoyment
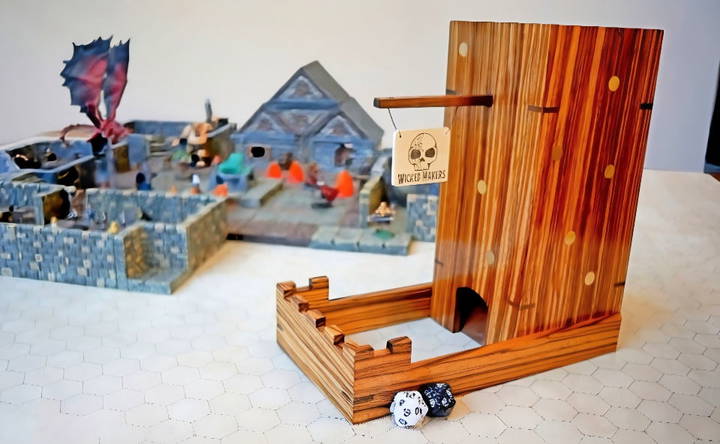
After the final coat of Waterlox dried, my DIY dice tower was ready for action. It's been a fantastic addition to our gaming table, both functional and aesthetically pleasing. Building it was a challenging yet enjoyable project, and the satisfaction of rolling dice through a tower I made myself is incomparable.
Design Variations
When it comes to making a dice tower, the possibilities for design variations are as vast as your imagination. Here's how you can add a personal touch to your dice tower and make it a standout piece:
Choose Your Shape
Start with the shape of your tower. The classic rectangular form is straightforward and functional, but why not try a cylindrical or hexagonal tower for a change? Each shape will give the dice a unique roll and can be a conversation starter.
Theme It Up
Themes add an exciting twist to your dice tower. Are you a fan of medieval fantasy? Craft a tower that resembles a castle turret. Love sci-fi? Design your tower to mimic a spaceship. This is your chance to let your interests shine through your craftsmanship.
Color Your World
The color scheme of your dice tower can reflect your favorite hues or match the aesthetic of your gaming room. Use paints, stains, or colored materials to bring your vision to life. Remember, lighter colors may show wear and tear less than darker ones.
Add Textures and Patterns
Textures can add a tactile element to your tower. Consider materials like felt for a soft interior or embossed paper for an intricate exterior. Patterns, whether painted or constructed, can add depth and interest to your design.
Personalize with Details
Engrave your initials, add figurines, or use symbols that have personal significance. These details make your dice tower uniquely yours and can also serve as a lucky charm during game nights.
Functionality Meets Style
Don't forget that your tower needs to be functional. Ensure that the dice can roll smoothly and that the tower is stable. A stylish tower is great, but it should also do its job well.
Build a unique dice tower that reflects your style and personality. Explore design variations for a fun and functional gaming experience.
Maintenance and Care
Congratulations on building your dice tower! Now, let's ensure it stays in top shape for countless gaming sessions. Follow these simple maintenance tips to keep your dice tower rolling smoothly:
Regular Cleaning:
- Dust Off: Dust and debris can accumulate inside the tower, affecting the dice's movement. Use a soft brush or compressed air to remove any particles.
- Wipe Down: If your tower has an exterior finish (paint, stain, or varnish), wipe it gently with a damp cloth to maintain its appearance.
Inspect the Ramp:
- Check for Wear: Regularly inspect the ramp or chute where the dice roll down. Look for signs of wear, such as scratches or rough edges. Smooth out any imperfections to prevent dice from getting stuck.
- Lubricate if Needed: If the dice don't glide smoothly, consider applying a light coat of silicone spray or furniture wax to the ramp. Be cautious not to overdo it; a little goes a long way.
Stability Matters:
- Secure the Base: Ensure that the base of your dice tower is stable. If it wobbles or tips easily, adjust or reinforce it. A stable tower ensures accurate rolls.
- Felt Pads: If your tower sits on a table, attach felt pads to the bottom. These prevent scratches and provide a better grip.
Storage Solutions:
- Vertical Storage: When not in use, store your dice tower vertically. This prevents any warping or damage to the ramp.
- Cover or Bag: Consider using a soft cloth bag or a custom-made cover to protect your tower from dust and accidental bumps.
- Handle with Care:
- Avoid Dropping: Accidental drops can chip or crack the tower. Handle it gently, especially during transport.
- Keep Away from Moisture: Moisture can warp wood or affect glue joints. Store your tower in a dry area.
Your dice tower is more than a functional accessory—it's part of your gaming experience. Treat it well, and it will serve you faithfully in rolling those critical hits!
FAQs About How to Make a Dice Tower
Discover easy steps and tips on how to make a dice tower. Get answers to common FAQs about building your own dice tower at home.
A dice tower is a clever device that ensures your dice rolls are random and fair every single time. Whether you’re playing board games, tabletop RPGs, or just enjoying a family game night, a dice tower eliminates accusations of cheating and keeps the game fun. Here’s why you should consider making one:
Random Rolls: Dice towers prevent dice from falling off the table, landing outside the board, or bumping into other objects. They ensure consistent randomness.
Fair Play: Everyone gets a fair chance, and no one can manipulate the outcome.
DIY Fun: Crafting your own dice tower is a rewarding project that adds a personal touch to your gaming experience.
Absolutely! Customization is part of the fun. Consider these ideas:
Themes: Build a dice tower that matches your favorite game theme (e.g., medieval castle, sci-fi spaceship, or mystical forest).
Painting: Use acrylic paints to add intricate designs, symbols, or patterns.
Engravings: If you're using wood, consider laser engraving for a professional touch.
Fair rolls are essential. Follow these tips:
Baffles: Inside the tower, add baffles (angled surfaces) to ensure dice tumble and bounce randomly.
Smooth Surfaces: Sand any rough edges to prevent bias.
Entry and Exit Points: Keep them high enough to prevent dice from escaping.
Certainly! For a portable option:
Use lightweight materials like foam board or thin wood.
Design a collapsible tower that folds flat for easy storage.
Attach hinges to allow folding and unfolding.
Level up your dice tower with LEDs:
Light Strips: Line the baffles with LED strips for a cool glow.
Color Options: Choose colors that match your gaming setup.
Battery-Powered: Use small batteries to keep it wireless.
Final Thoughts
In conclusion, making your own DIY dice tower is a fun and rewarding project that adds a personal touch to your gaming experience. With just a few materials and a bit of creativity, you can craft a unique and functional tower that enhances your dice rolls. Whether for personal use or as a gift, this DIY dice tower project is an exciting way to improve your tabletop sessions and show off your crafting skills. Get started today and enjoy the benefits of your epic rolling experience!


