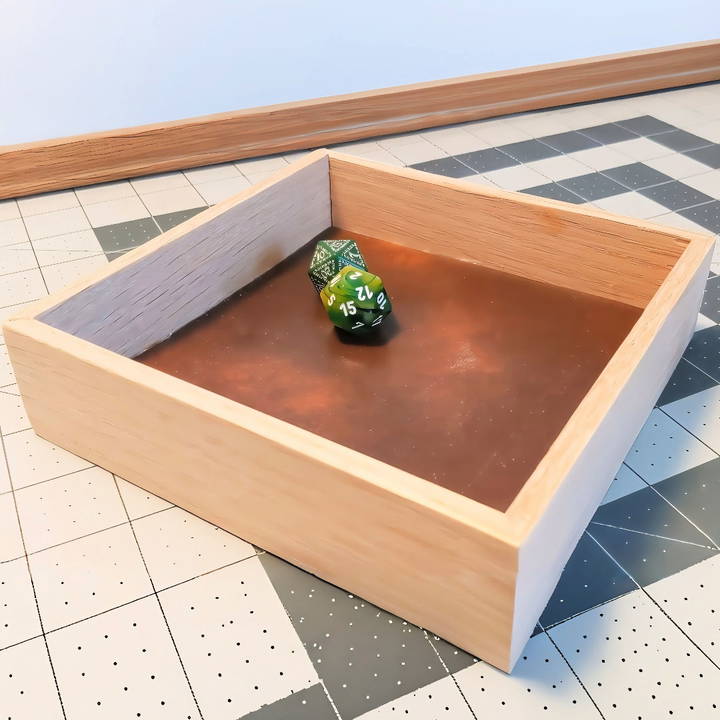
Making a DIY dice tray can be a great way to improve your game nights. It keeps the dice from rolling off the table and makes your games feel more organized. I made mine with just a few simple materials from around the house, and it was fun and rewarding. This project requires only basic tools, and it's a practical addition to any gaming setup.
When I started, I was a bit unsure about how to begin, but it turned out easier than I thought. By following a few simple steps, I had a sturdy and attractive tray in no time. I'm sharing this with you so that you can make your own and enhance your gaming experience. These tips will help you get started easily!
The Essential Tools and Materials
First, let's break down what you'll need for this project. The simplicity of the toolset makes this a perfect weekend venture:
- Miter Saw or Miter Box Saw Combo: Essential for cutting precise 45-degree angles.
- Measuring Tape or Ruler: Accuracy is key for measuring cuts.
- Wood Glue: The bonding agent that holds our project together.
- Sandpaper (At least 120 grit): For smoothing out rough edges.
- Utility Knife or Scissors: To cut the lining for the tray.
- Super Glue or Hot Glue: This is used to secure the lining of the tray.
Materials:
- Quarter Inch Thick Wood Board: I chose oak for its durability and attractive grain.
- Faux Leather: For the lining, add a classy touch to the finished tray.
Each tool and material plays a pivotal role in the project. The choice of oak was based on its resistance to wear and attractiveness, ensuring the tray would look great and last long. The faux leather was a personal touch, inspired by a desire to give the tray a rugged, adventurous look fitting for epic gaming nights.
Step by Step Instructions
Learn how to build a DIY dice tray with our step-by-step guide. From cutting the base to adding finishing touches, achieve a rewarding outcome easily.
Cutting the Base and Sides
First, measure the width of your board accurately. Mistakes here can affect the final product. Then, cut a square base, ensuring to account for the saw's kerf (width of the cut) to avoid measurement errors.
Next, cut four side pieces with 45-degree angles at each end, making sure they form a perfect square when assembled. This requires a careful approach: measure and cut one piece at a time to account for the saw's material removal.
Assembling the Tray
Apply wood glue along the edges of your base and the angled cuts of your side pieces. Join them together, ensuring a snug fit at the corners for a crisp, professional look. Cleaning up the excess glue immediately helps maintain a clean finish. If you lack clamps, improvising with weighted objects can keep the pieces in place as they dry. Patience is vital here—let the glue cure fully before proceeding.
Adding the Finishing Touches
Once dried, I began the sanding process. This step transformed the tray, smoothing out imperfections and enhancing the wood's natural beauty. Though optional, you could further personalize your tray with a stain or protective coating. I chose to keep mine natural for simplicity.
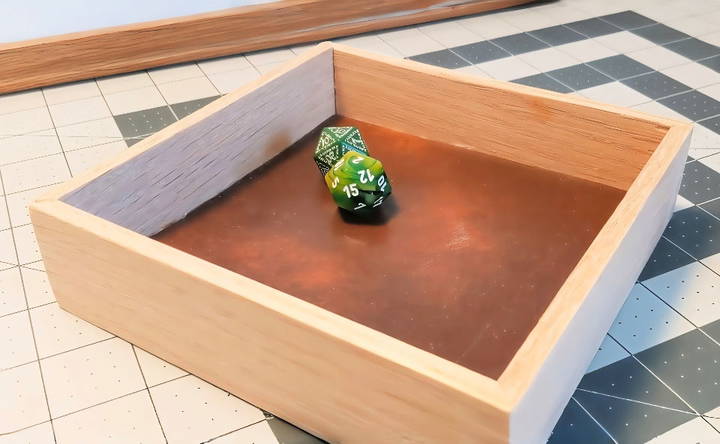
The final piece of craftsmanship was adding the faux leather lining. A precise cut ensured a perfect fit within the tray. Spreading the glue evenly prevented lumps, achieving a smooth, even appearance. Pressing the leather down firmly and letting it dry properly was crucial for a flawless finish.
After the glue had set, I held in my hands not just a dice tray but a testament to the joy of making something from scratch. The process, filled with moments of challenge and triumph, was deeply rewarding. The tray, with its elegant wood grain and soft leather lining, was ready for countless game nights.
Customization Ideas for Your DIY Dice Tray
Building a DIY dice tray is not just about functionality; it's also an opportunity to express your personality and style. Here are some customization ideas that can make your dice tray uniquely yours:
- Choose Your Theme: Start by deciding on a theme that resonates with you. It could be your favorite color scheme, a fantasy setting, a historical era, or inspired by your favorite game. This theme will guide your choices in materials and design.
- Personalize with Patterns: Use stencils or freehand sketches to add patterns to the base or sides of your tray. Geometric shapes, symbols, or characters can add a personal touch.
- Add a Splash of Color: Paint is a simple way to customize your tray. You can paint the entire tray, build designs, or highlight edges. Consider using non-toxic acrylic paints for a durable finish.
- Engrave Your Name or Logo: If you have access to an engraving tool or a laser cutter, engrave your name, initials, or a personal logo onto the tray. This adds a professional touch.
- Line with Felt or Velvet: Lining the bottom of your tray with felt or velvet not only looks luxurious but also helps to quiet the sound of rolling dice. Choose a color that complements your theme.
- Attach Decorative Elements: Glue on decorative items like beads, sequins, or gaming tokens. These elements can enhance the theme and add texture to your tray.
- Experiment with Materials: Don't limit yourself to wood. Try using leather, metal, or acrylic sheets for different looks and feels. Each material can be worked with tools suitable for DIY projects.
- Modular Sections: Build sections within your tray for different types of dice or gaming pieces. This can be done with removable dividers, giving you flexibility in how you use your tray.
- Protective Coating: Apply a clear sealant to protect your artwork and materials from wear and tear. This will keep your tray looking great even after many gaming sessions.
- Make it Collapsible: For gamers on the go, design your tray to be collapsible. Use hinges or magnets to make it easy to assemble and disassemble.
Have fun and be creative with your DIY project. Use these ideas as a base—mix, match, and modify to build your perfect dice tray.
Comparison of Different Techniques for Making a DIY Dice Tray
When it comes to crafting a DIY dice tray, there are several techniques you can choose from, each with its own set of benefits. Here's a comparison of popular methods to help you decide which one might be right for you:
The Basic Wooden Frame Technique:
This method involves making a simple wooden frame and lining it with felt. It's a traditional approach that offers durability and a classic look. You'll need basic tools like a saw, wood glue, and clamps. The result is a sturdy tray that can be stained or painted to your liking.
The Travel Dice Box with Built-In Tower:
For those who want a more complex project, building a travel dice box with a built-in tower can be rewarding. This technique requires more precise cuts and assembly, but it gives you a multi-functional piece that's great for gaming on the go. You'll need tools like a miter saw and possibly a drill.
The Budget-Friendly Approach:
If you're looking to save money, you can build a dice tray for around $5 using scrap materials and minimal tools. This method is perfect for beginners and those who prefer a more rustic look. The focus here is on functionality over aesthetics.
The Upcycled Method:
Environmentally conscious crafters might prefer the upcycled method, where you repurpose an old picture frame or shallow box as the tray's base. This is a great way to recycle materials and requires minimal effort. You can line the tray with leftover fabric or felt for a personalized touch.
The Leather Folding Tray:
For a portable and stylish option, consider making a folding tray out of leather. This technique is simple and requires few materials—just leather, fabric, and some adhesive. The end product is elegant and perfect for gamers who are always on the move.
The Customized Foam Tray:
Foam trays are lightweight and can be cut to any size or shape. This method is quick and easy, allowing for a lot of customization. You can use foam sheets from craft stores and cut them with a utility knife. Add a fabric lining for a finished look.
Pick a technique matching your skills, tools, and desired look for a dice tray. From classic wood to modern portable designs, there's a DIY method for you.
Troubleshooting Common Issues with DIY Dice Trays
When crafting a DIY dice tray, you might encounter a few hiccups along the way. Here's a guide to solving some common problems, ensuring your project turns out just right:
Wood Splintering
When cutting wood for your tray, you might find the edges splintering.
- Solution: Use a sharp blade and cut slowly. If splintering occurs, gently sand the edges with fine-grit sandpaper.
Felt Lining Bubbling
Sometimes, the felt lining doesn't adhere smoothly and builds bubbles.
- Solution: Ensure the tray's surface is clean before applying the felt. Use an adhesive spray and smooth out the felt from the center towards the edges.
Paint Not Sticking
If you're painting your tray and the paint isn't adhering well, it could be frustrating.
- Solution: Sand the surface lightly to build a texture for the paint to grip. Always start with a primer coat.
Structural Weakness
Your tray might feel wobbly or weak at the joints.
- Solution: Check that all joints are glued securely. You can reinforce them with small nails or screws for extra stability.
Decorative Elements Falling Off
Decorations like beads or tiles may come loose after some use.
- Solution: Use a strong, waterproof glue designed for the materials you're working with. Allow it to cure fully before using the tray.
Stains on the Material
Stains can occur from spilled drinks or dirty dice.
- Solution: For wood trays, use a damp cloth and mild soap. For felt or fabric, spot clean with a suitable fabric cleaner.
Scratches on the Surface
Scratches can detract from the beauty of your tray.
- Solution: Apply a furniture marker or crayon that matches the color of your wood. For deeper scratches, wood filler can be used and then painted over.
Tray Too Slippery
The dice might slide too much if the tray's surface is too slick.
- Solution: Apply a clear matte finish or use a less slippery material for lining, like suede.
Anticipate issues and know fixes to build a beautiful DIY dice tray. Patience and attention to detail are essential for DIY projects.
FAQs About DIY Dice Tray
Discover answers to common questions about DIY dice trays. Learn about materials, designs, and tips for the perfect gaming accessory.
A DIY dice tray is a homemade container used for rolling dice. It helps keep the dice from rolling off the table and makes your gaming area neat. You can make one from various materials like wood, leather, or fabric.
Using a dice tray prevents dice from scattering and potentially disrupting your game by knocking over pieces or getting lost. It’s especially handy in games with many dice or lots of game components on the table.
Here’s a simple guide:
Cut your base material to the desired size.
Line the base with your chosen material to cushion the dice.
Assemble the sides if you’re using wood, ensuring they’re high enough to contain the dice.
Glue everything together and let it dry before use.
Absolutely! You can paint the wood, add designs to the felt, or even engrave the leather. The customization options are endless, allowing you to build a dice tray that reflects your personal style.
The size of your dice tray should be based on the number of dice you'll roll and the space available on your gaming table. A good starting point is a tray that's at least 6 inches square, providing ample room for multiple dice without taking up too much space. If you often play games with larger dice pools, consider a larger tray.
Conclusion:
Making your own DIY dice tray is a simple way to improve your game nights, and I'm sure these instructions will guide you through it.


