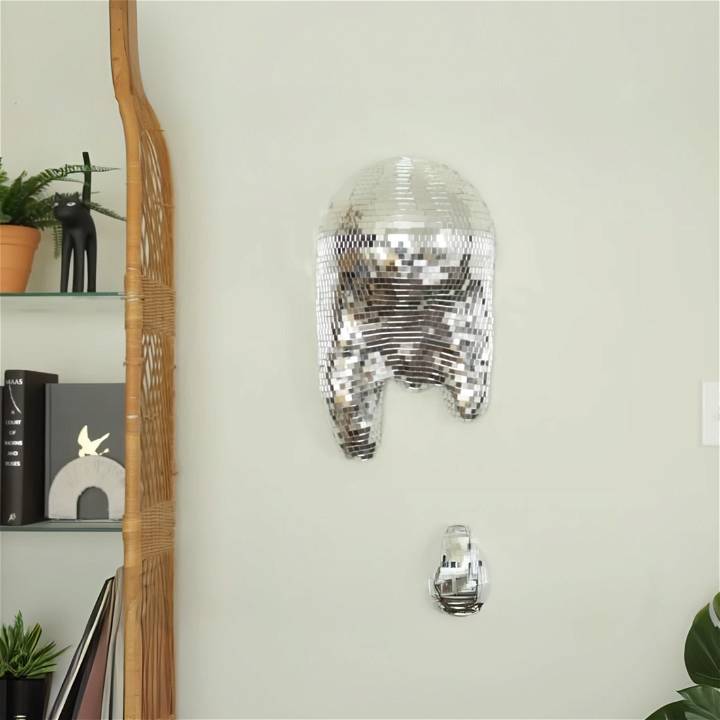
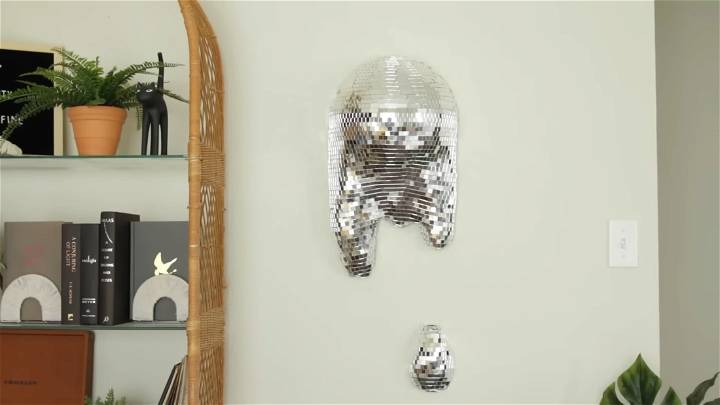
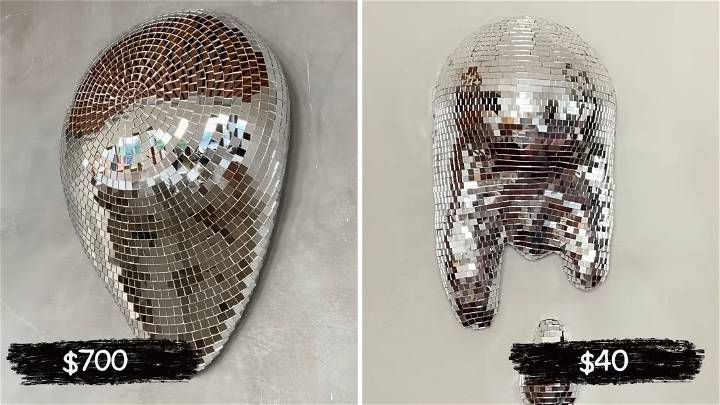
Are you mesmerized by the dazzling beauty of disco balls? Have you seen those trendy melting disco balls online but can't justify spending thousands on d* écor? Well, with a bit of creativity and effort, you can make your very own melting disco ball for a fraction of the price. Here's a step-by-step guide to get you started on making a unique, eye-catching piece for about $46.
Materials You'll Need:
- Large foam half-sphere
- Cardboard
- Air-dry clay or lightweight substitute (e.g., scrunched up paper or foil for volume)
- Duct tape (ideally silver)
- Mirror sheets with adhesive backing
- Scissors
- Exacto knife or a sharp cutting tool
Step-by-Step Instructions
Learn how to make a dazzling disco ball at home with affordable materials. DIY disco ball tutorial for making a fun party atmosphere on a budget.
Prepare Your Base:
- Begin by drawing the desired melted shape on your cardboard. This will act as the skeleton of your piece.
- Cut out the shape with precision; think of it as making the foundation of your art piece.
Build the Melting Effect:
- Use air-dry clay or a lightweight substitute to form the dripping parts of the disco ball. Shape these materials to mimic melting droplets coming off the sphere.
- Attach these drips to your cardboard base, ensuring a secure bond.
Bind It All Together:
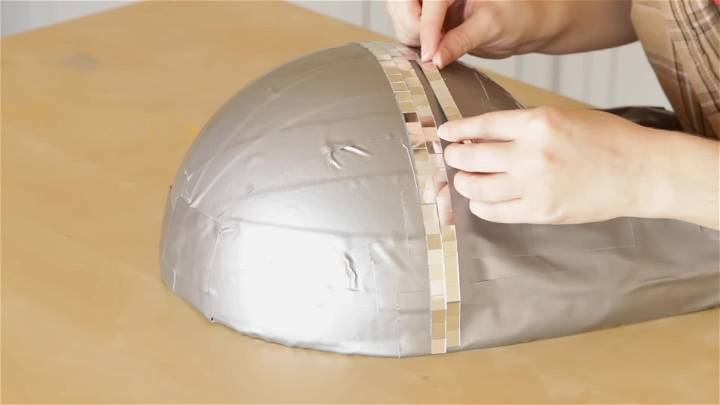
- Cover your structure (base plus drips) with duct tape. This serves dual purposes: it binds all elements together and acts as a cohesive surface for the mirrors.
- When applying tape around curves and edges, make small cuts in the tape to avoid bunching and ensure a smooth surface.
Add the Shine:
- Cut the mirror sheets into small squares or rectangles. Peel off the adhesive backing and start attaching them to your structure.
- Begin from the center and work your way out, arranging the mirror pieces in a brick pattern for an authentic disco ball effect.
Attention to Detail:
- For areas where the mirror pieces must bend or curve, you may need to cut smaller pieces to fit. The goal is a seamless, mirrored surface that fully covers the melting form.
- Don't worry about small gaps between mirrors; these can add to the authenticity of your disco ball.
Final Touches:
- Once fully covered in mirrors, review your piece for any missed spots or unattached edges, securing them as necessary.
Video Tutorial
For a step-by-step video tutorial, watch this YouTube video on making a melting disco ball for less.
It pairs well with this written guide, offering a dynamic perspective on each step to ensure your success in making a stunning decorative piece.
Make your own disco ball inexpensively and easily with simple materials and patience. The joy of DIY lies in the personalization and process.
Troubleshooting Guide
When working on a DIY disco ball, you might encounter some challenges. Here's a guide to help you troubleshoot common issues:
Mirrors Not Sticking
If you find that the mirrors are not sticking to the styrofoam ball, consider the following:
- Check Your Adhesive: Make sure you're using a strong adhesive suitable for both styrofoam and glass. Some adhesives may not bond these materials well.
- Allow Adequate Drying Time: Adhesives need time to cure. If you're moving too quickly, the mirrors may not have enough time to adhere properly.
Uneven Mirror Placement
For a dazzling effect, the mirrors on your disco ball should be evenly placed. If they're not:
- Plan Your Pattern: Before you start gluing, plan out your pattern. This can help ensure even placement.
- Take Your Time: Rushing can lead to mistakes. Take your time to place each mirror carefully.
Disco Ball Not Hanging Properly
If your disco ball isn't hanging straight or is unstable:
- Check Your Hanging Mechanism: Make sure it's securely attached to the disco ball and the ceiling.
- Balance Your Disco Ball: If the mirrors are heavier on one side, the ball will tilt. Try to distribute the weight evenly when attaching the mirrors.
Every DIY project comes with its own set of challenges. Don't be discouraged if things don't go right the first time. With patience and practice, you'll have a disco ball that's the life of the party!
Variations
One of the best parts about making a DIY disco ball is the ability to customize it to your liking. Here are some ideas for variations you can try:
Colorful Disco Ball
Who says disco balls have to be silver? You can make a colorful disco ball using colored mirrors or reflective material. This can add a unique touch to your disco ball and make it stand out.
Patterned Disco Ball
Instead of placing the mirrors randomly, consider making a pattern. This could be stripes, spirals, or any other design that appeals to you. A patterned disco ball can be a real conversation starter!
Different Sizes
Disco balls don't have to be large. You can make mini disco balls for a subtler effect, or go big for a dramatic impact. The size of your disco ball can change the ambiance of the room.
Themed Disco Ball
Consider making a themed disco ball for special occasions. For example, a disco ball covered in red and green mirrors could be a fun addition to a Christmas party.
Feel free to get creative and come up with your own variations. After all, the best part of a DIY project is making it your own!
Maintenance and Care
Taking care of your DIY disco ball will ensure it continues to sparkle for a long time. Here are some tips on how to maintain and care for your disco ball:
Cleaning the Disco Ball
Over time, dust and grime can dull the shine of your disco ball. Here's how to clean it:
- Use a Soft Cloth: Gently wipe the surface of the disco ball with a soft, dry cloth. This should remove most of the dust.
- Avoid Harsh Cleaners: Strong cleaning agents can damage the mirrors and the adhesive. Stick to mild cleaners if needed.
Checking the Hanging Mechanism
The hanging mechanism of your disco ball should be checked regularly to ensure it's secure.
- Inspect the Cord or Chain: Look for any signs of wear and tear. If you notice any, replace it immediately.
- Check the Attachment Point: Make sure the disco ball is still securely attached to the ceiling.
Storing the Disco Ball
If you need to store your disco ball, here are some tips:
- Wrap It Carefully: Use a soft cloth or bubble wrap to protect the mirrors from scratches.
- Store in a Dry Place: Moisture can damage the mirrors and the adhesive. Make sure to store your disco ball in a dry place.
A little care goes a long way in keeping your DIY disco ball looking its best!
FAQs about the DIY disco ball
Here are some frequently asked questions about making a DIY disco ball:
1. What type of mirrors should I use?
Small square mirrors are typically used for a traditional disco ball. However, you can use any small, reflective material. Just ensure it's safe to handle and can be glued to the styrofoam ball.
2. Can I use something other than a styrofoam ball?
Yes, you can use any spherical object as long as it's light enough to hang and can have mirrors glued to it. Some people use paper mache or old bowling balls.
3. What type of glue should I use?
A strong adhesive that's suitable for both styrofoam and glass is recommended. Craft glue or hot glue usually works well.
4. How can I hang my disco ball securely?
You can use a strong cord or chain to hang your disco ball. Make sure the hanging point on the ceiling can support the weight of the disco ball.
5. How do I clean my disco ball?
Gently wipe the surface of the disco ball with a soft, dry cloth. Avoid using harsh cleaners as they can damage the mirrors and the adhesive.
6. Can I make a disco ball in a different color?
Absolutely! You can use colored mirrors or reflective material to make a disco ball in any color you like.
7. How long does it take to make a DIY disco ball?
The time can vary depending on your craft skills and the size of the disco ball, but generally, you can expect to spend around 4-5 hours, excluding drying time.
8. How much does it cost to make a DIY disco ball?
The cost can vary depending on the materials you choose, but generally, you can expect to spend around $25-$45.
9. Can I make a disco ball with a pattern?
Yes, you can arrange the mirrors in a specific pattern to make a unique design on your disco ball.
10. How do I store my disco ball?
Wrap your disco ball in a soft cloth or bubble wrap and store it in a dry place. Make sure to protect the mirrors from scratches.
The key to a successful DIY project is patience and creativity.
Conclusion:
In conclusion, making a DIY disco ball can be a fun and rewarding craft project that adds a touch of sparkle to any event or space. Get creative and shine bright with your handmade disco ball today!


