Making your own DIY dog harness can be both fun and useful. One time, I decided to give it a try for my pup, Max. I was tired of poorly fitting store-bought harnesses. So, I gathered some materials and set out to make something better myself. It's really satisfying to tailor something specifically for your furry friend.
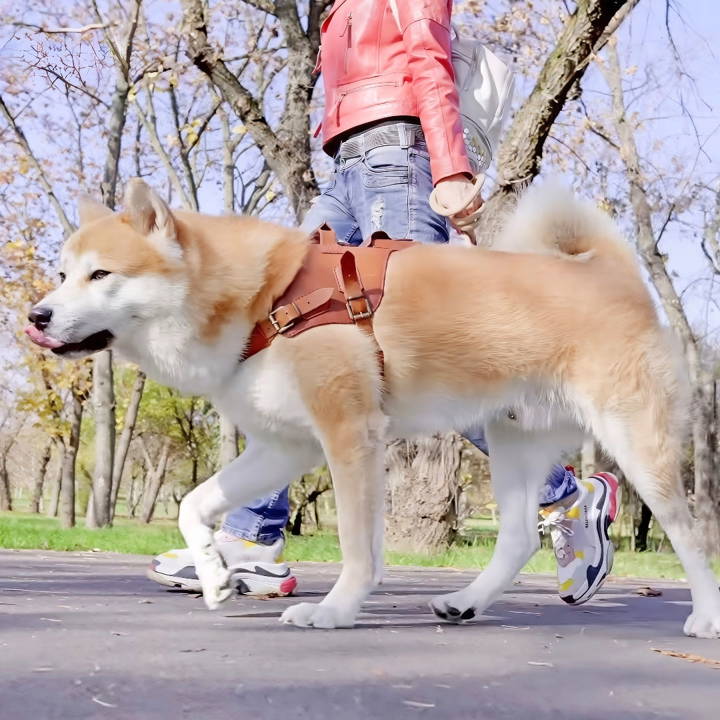
Follow these easy steps to make a harness that fits perfectly and is comfortable for your dog. I'm helping with this guide so you can craft a harness that's just right. Trust me, once you see your dog enjoying its comfy, well-fitted harness, you'll be glad you made it. Let's get started!
Gathering the Materials: The Foundation of Your Project
Discover the essentials for your project: leather, hardware like rivets and buckles, patterns to guide your creation, and all crucial materials to gather.
Leather: The Core Material
For this project, I chose six ounces of brown latigo leather, known for its strength and durability. This leather type is essential as it stands up to the wear and tear of daily walks and adventures with your pup.
Hardware: Rivets, Buckles, and Buttons
The hardware is the backbone of your harness's functionality. I used a few rivets, some brown buttons, and 20 or 25 mm buckles, depending on the size of your dog. This hardware ensures that your harness is secure and adjustable.
The Pattern: Your Blueprint
The most crucial step before beginning is to download the harness pattern. I found a fantastic pattern online which offered three different sizes, accommodating most dog breeds. Ensure you print it at actual size to maintain the correct dimensions.
Step by Step Instructions
Learn how to make a custom DIY dog harness with our step-by-step guide. From pattern prep to edge finishing, make the perfect fit for your furry friend!
Preparing the Pattern
After assembling and cutting out the paper patterns, I used masking tape to firmly secure them onto the leather. This step is crucial for accuracy when cutting the leather pieces.
Punching and Cutting
Using a plastic punching board, I carefully punched out the stitching holes, making sure to wax the stitching line beforehand. The rivet holes followed, requiring a slightly larger punch. Remember, a sharp cutting tool is critical here to achieve clean cuts through the leather in one pass.
Adding a Patina: A Touch of Character
To give the leather an aged look, I applied wax with a felt polishing pad. This step is optional but adds a unique touch to your harness, making it stand out.
Stitching: Bringing Pieces Together
The saddle stitching technique was instrumental in assembling the larger pieces of the harness. Using waxed thread, I meticulously stitched the components, ensuring durability and strength.
Attaching Hardware: The Functional Elements
Before attaching any hardware, it's vital to do so on flat leather pieces when possible. It's easier and ensures a secure fit. Paying close attention to the placement of buckles and rings is crucial for the harness's functionality.
Edge Finishing: The Final Touches
Finishing the edges of the leather is essential for both aesthetics and longevity. Sanding, beveling, and then burnishing provided a smooth, professional look while preventing moisture from penetrating the leather.
The Assembly: Piecing It All Together
Discover the assembly: piecing it all together with buckles, straps, safety handles, and a final product that embodies love and craftsmanship.
Buckles and Straps: Ensuring a Perfect Fit
Adjusting the strap lengths to your dog's size is crucial. Attaching the padded chest and belly straps securely, I ensured comfort for my dog, especially during long walks.
Safety Handle: An Additional Feature
A safety handle can be invaluable in certain situations. I attached this optional feature to offer extra control and peace of mind during our outdoor adventures.
The Final Product: A Testament to Love and Craftsmanship
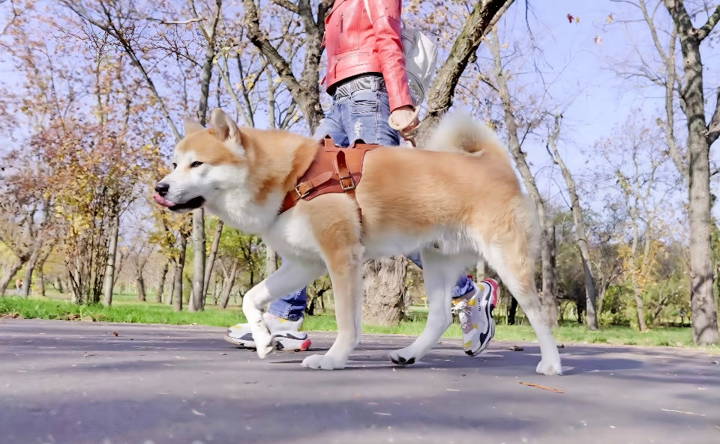
After hours of meticulous work, the custom dog harness was complete. Not only did it fit my dog perfectly, but it also reflected a personal touch that store-bought harnesses simply cannot match.
This project went beyond making dog gear; it was a journey of learning, challenges, and great satisfaction. It taught me patience, precision, and creativity in crafting functional and beautiful items.
Customization Tips for Your DIY Dog Harness
Making a DIY dog harness allows you to tailor every aspect to your dog's unique needs and personality. Here are some tips to help you customize the perfect harness:
- Choose the Right Size: Measure your dog's girth snugly around their chest and neck to ensure the harness will fit comfortably. Add a few inches to the measurements for adjustable straps to allow for movement and growth.
- Select Comfortable Materials: Soft fabrics like fleece or neoprene can provide extra comfort, especially around the chest and belly areas. Ensure the materials are durable and washable for long-term use.
- Adjust for a Perfect Fit: Include adjustable straps with buckles or Velcro to make it easy to fit the harness to your dog's body. This is crucial for their comfort and to prevent the harness from slipping off.
- Reflect Your Dog's Style: Use colors and patterns that match your dog's personality. Bright colors or reflective materials are great for visibility during walks at night or early morning.
- Add Functional Elements: Consider adding a handle on the back for better control or loops for attaching ID tags and a leash. Pockets can also be handy for carrying small items like waste bags or treats.
- Ensure Easy Maintenance: Choose materials that are easy to clean and maintain. The harness should be machine washable or easy to wipe down after outdoor activities.
- Safety First: Always check that the harness does not restrict your dog's movement or breathing. The harness should allow for a full range of motion and not chafe or rub their skin.
Make a functional, safe harness that shows your dog's character by prioritizing their comfort and safety while adding a personal touch.
Troubleshooting Common Issues with DIY Dog Harnesses
When crafting a DIY dog harness, you might encounter a few hiccups along the way. Here's how to troubleshoot some common issues to ensure your harness is both safe and comfortable for your furry friend:
The Harness is Too Loose or Slips Off
- Solution: Adjust the straps for a snug fit, leaving enough room to slide two fingers between the harness and your dog's body. If the harness continues to slip, consider adding more adjustable points or a different fastening system.
The Harness is Too Tight
- Solution: Loosen the straps slightly. A tight harness can cause discomfort or even injury. Make sure the harness allows for full range of motion without digging into your dog's skin.
Chafing or Rubbing
- Solution: Line any areas that come into contact with your dog's skin with soft padding. Ensure that all edges are smooth and that there are no exposed seams that could irritate your dog.
Frayed Edges or Material Wear
- Solution: Use durable materials like nylon webbing and reinforce high-stress areas with extra stitching. If fraying occurs, trim the frayed edges and seal them with a flame or use fray-preventative products.
Difficulty Putting on or Removing the Harness
- Solution: Opt for a design that allows for easy on and off, such as a step-in harness or one with quick-release buckles. Practice putting on and taking off the harness to make it a stress-free experience for your dog.
The Harness Doesn't Reflect at Night
- Solution: Add reflective tape or use reflective thread to sew patterns onto the harness. This will enhance visibility during night walks, keeping your dog safe.
The Harness Isn't Machine Washable
- Solution: Choose materials that are easy to clean or cover the harness with a washable sleeve. Consider designing the harness with removable padding that can be washed separately.
Address these issues to make a durable and functional DIY dog harness. Ensure your pet's comfort and safety by testing and adjusting as needed.
Safety Considerations for DIY Dog Harnesses
When making a DIY dog harness, safety is the most critical aspect. Here are key considerations to ensure your dog's harness is safe:
- Proper Fit is Crucial: A harness that's too tight can restrict breathing and movement, while one that's too loose can slip off or get caught on objects. Ensure the harness fits snugly but allows your dog to move freely and comfortably.
- Check for Allergies: Some dogs have sensitive skin or allergies to certain materials. Choose hypoallergenic fabrics and avoid materials that may cause irritation or allergic reactions.
- Avoid Sharp Edges: All components of the harness should be smooth and free of sharp edges. Hardware like buckles and D-rings should be rounded or covered to prevent injury.
- Strength and Durability: The harness should be strong enough to hold your dog securely, especially if they are large or tend to pull. Use reinforced stitching and high-quality materials to ensure durability.
- Breathability: Choose materials that allow for good airflow, preventing overheating and discomfort, especially in warmer climates.
- Visibility: Incorporate reflective materials or bright colors to make your dog visible to others, particularly in low-light conditions.
- Easy Release Mechanism: In case of emergency, you should be able to remove the harness quickly and safely. Include an easy-release buckle that's secure yet simple to operate.
- Regular Maintenance: Regularly inspect the harness for signs of wear and tear and repair or replace it as necessary to maintain its safety features.
Following these safety tips, you can make a stylish and safe DIY dog harness. Test it under supervision to ensure it meets safety standards before regular use.
FAQs About DIY Dog Harness
Discover answers to common questions in our FAQs about DIY dog harness. Perfect for pet owners looking for a simple, cost-effective solution.
The size of the harness should be based on your dog’s measurements. Measure your dog’s girth around the widest part of their chest and their neck. Add a few inches to these measurements for comfort and adjustability. For small dogs, lighter materials are suitable, while larger dogs may require thicker, more durable materials.
Yes, you can! There are harness designs that don’t require sewing. For example, you can create a harness using knotting techniques with rope or crochet if you’re comfortable with handcrafting. However, ensure the knots are secure and the harness fits comfortably.
DIY dog harnesses can be safe if made correctly. Use strong, durable materials and ensure all connections, such as D-rings and buckles, are secure. It’s important to regularly check the harness for any signs of wear and tear to maintain safety.
Get creative with your DIY dog harness by choosing fun fabrics or adding personalized decorations. You can also make a matching leash or accessories. If you're skilled with crochet, make a harness with colorful patterns or even make a matching set for you and your pup.
To ensure comfort, select soft materials that won't irritate your dog's skin. The harness should fit snugly but not too tightly. You can add padding or fleece to areas that come into contact with your dog, like under the belly and around the chest. Always allow room for two fingers to fit between the harness and your dog's body to check for proper fit.
Conclusion:
By following this simple guide, you, too, can fashion a comfortable and secure DIY dog harness. Let's begin making something special for your pet!


