Learning new DIY projects can be both interesting and useful. My journey began when I needed a way to keep my house warm during winter. I discovered the concept of a DIY door draft stopper. Making one was simple, cost-effective, and practical. This small project not only helped me understand some basics but also sparked a new interest for me.
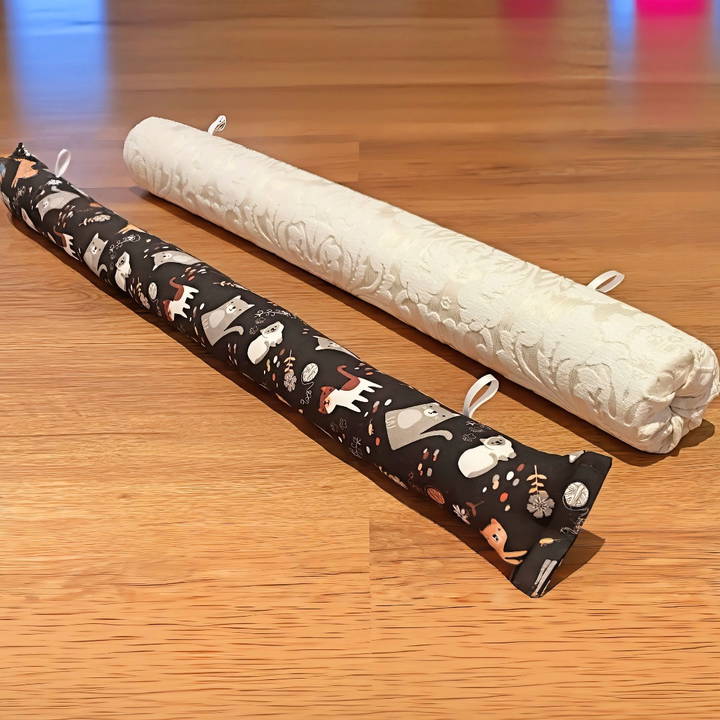
For those of you wanting to make your own draft stopper, I'm here to help you. You will find that it's a rewarding project. This guide will cover everything - from materials needed to step-by-step instructions. I hope that sharing my experience will encourage you to start your own project and enjoy the benefits it brings.
Understanding Drafts
When we talk about drafts in our homes, we're referring to those chilly breezes that seem to sneak in from nowhere, making certain areas feel colder than others. But where do these drafts come from, and why do they happen?
Imagine your home as a big container that holds warm air. Now, this container isn't perfect—it has tiny holes and gaps. These gaps can be around windows, doors, or even through the attic. When the warm air inside tries to escape through these gaps, and the cold air outside tries to get in, that's when you feel a draft.
Why should you care about drafts?
Well, they're not just about comfort. Drafts can actually make your heating system work harder, which means higher energy bills. Plus, they can lead to uneven temperatures in your home, making some rooms feel like a freezer while others are cozy.
So, what can you do?
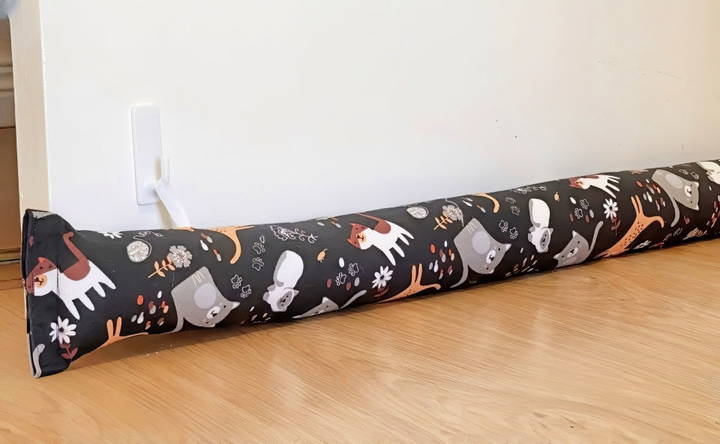
One simple and effective solution is a draft stopper. It's like a barrier that you place at the base of your doors or windows to block the cold air from coming in. Think of it as putting a scarf around your neck on a windy day—you're keeping the cold out and the warmth in.
Understanding drafts and preventing them makes your home comfortable while saving energy and money. Make a draft stopper with materials you have at home—an easy step with big benefits.
Why Make Your Own Draft Stopper?
Before diving into the process, it's essential to know why making your draft stopper can be a game-changer. Firstly, it's a cost-effective solution to prevent heat loss during winter and keep your space cool during summer, saving on energy bills. Secondly, it's a fantastic way to repurpose fabric and materials lying around, making it an eco-friendly project. And lastly, these draft stoppers double as quick and thoughtful gifts for loved ones.
Materials Needed
- Sturdier fabric: Quilting cotton works well for its durability and ease of handling. Pick a design that suits your decor or goes with a seasonal theme for added charm.
- Ruler, scissors, and fabric marker: These are essential for measuring and cutting your fabric accurately.
- Ribbon or elastic (optional): If you want to add a loop for easy handling or hanging when not in use.
- Sewing machine or needle and thread: For stitching everything together. A machine makes it quicker, but hand sewing works too.
- Velcro: This will help make a closure that's easy to open and fill your draft stopper.
- Filling material: Rice, dried beans, or polyester batting are great options, depending on what you have on hand.
Step by Step Instructions
Learn how to make a DIY draft stopper with easy step-by-step instructions for fabric or pool noodle methods. Perfect for keeping cold air out!
Method 1: Fabric Draft Stopper
Learn to make a fabric draft stopper: prepare your fabric, sew and fill it, then close up the stopper. Easy DIY steps to reduce drafts in your home.
Step 1: Prepare Your Fabric
Cut your fabric to the desired length and width based on your door's measurements. Remember to add an inch or two to the length for seam allowance. If you're adding loops for hanging, attach these now at both ends before sewing up the long side.
Step 2: Sew and Fill
Stitch along the length and one short end, leaving one short side open. Through this opening, turn your fabric right side out and start filling with your chosen material. Rice or dried beans give a nice weight, but polyester batting works well if you prefer something softer.
Step 3: Closing the Draft Stopper
Once filled, use velcro to make a closure. This makes it easy to remove the stuffing and wash your draft stopper if needed. Finally, sew the velcro in place, ensuring it's secure.
Method 2: Pool Noodle Draft Stopper
Learn how to make a draft stopper using a pool noodle in 3 easy steps: Measure & cut fabric, sew & insert the noodles, and seal the ends.
Step 1: Measure and Cut Your Fabric
This method uses a pool noodle as the stuffing, making the process quicker and the draft stopper lighter. Measure your pool noodles and cut the fabric accordingly, adding extra length to seal the ends.
Step 2: Sew and Insert Noodle
Sew the fabric into a tube, then insert the pool noodle. This might be a bit of a squeeze, but it ensures the draft stopper fits snugly against your door without slipping.
Step 3: Seal the Ends
Fold the fabric into the hollow ends of the pool noodle to close. You can secure these with a stitch or leave them as is since the tension will keep them in place.
Decorating Your Draft Stopper
Now that you've got your basic draft stopper, feel free to personalize it. Add buttons, embroidery, or even paint fabric for that custom touch.
Customization Tips
Making your home cozy and personalized is a joy, and making your own draft stoppers is a perfect way to add that personal touch while being practical. Here are some tips to make your draft stoppers not only functional but also a reflection of your style:
- Choose Your Fabric Wisely: The fabric you choose for your draft stopper can say a lot about your style. Go for heavy materials like denim or upholstery fabric for a sturdy stopper, or choose a lighter cotton for something easy to wash.
- Play with Patterns: Whether you love bold geometric shapes, soft florals, or classic plaids, picking a pattern that complements your room can turn a simple draft stopper into a statement piece.
- Get Creative with Fillers: Traditional fillers like rice or dried beans work great, but why not try something different? Use popcorn kernels for a lighter feel, or add some dried lavender to bring a soothing scent into the room.
- Add Some Embellishments: Ribbons, buttons, or embroidery can add a special touch to your draft stopper. It's like accessorizing your favorite outfit—those little details make it uniquely yours.
- Make It Multi-Functional: Consider adding a loop or handle to your draft stopper so it can double as a doorstop. Or design it to be reversible, giving you two looks in one.
- Seasonal Themes: Build draft stoppers that celebrate the seasons. Bright colors for spring, warm tones for autumn, or festive designs for the holidays can make your home feel in tune with the time of year.
The key to customization is to have fun and let your personality shine through. Your draft stopper doesn't just have to be practical; it can be a piece of art that brings warmth and style to your home.
Energy Savings Analysis
Draft stoppers are a simple yet effective way to save energy and money in your home. But just how much can you save? Let's break it down in plain language.
- What's the Big Deal with Drafts? Drafts are like little thieves, sneaking in cold air and letting out the warm. This means your heater or air conditioner has to work overtime to keep your home comfortable, which can really add up to your energy bill.
- How Much Can You Save? According to experts, sealing up those drafts can save you between 10% to 20% on your energy bills each year. That's like getting a month or two of energy for free!
- The Math Behind the Savings: Let's say your energy bill is about $100 a month. Over a year, that's $1,200. A 10% saving would mean an extra $120 in your pocket, and a 20% saving would double that to $240. That's no small change!
- The Role of Draft Stoppers By placing a draft stopper at the base of your doors and windows, you're essentially putting a stop to these drafts. It's a low-cost solution that can lead to big savings.
- Long-Term Benefits Besides the immediate savings, draft stoppers also help extend the life of your heating and cooling systems by reducing the amount of work they have to do. Plus, they make your home more environmentally friendly.
In conclusion, investing a little time and effort into making or buying draft stoppers can lead to significant energy savings. It's a smart move for your wallet and the planet.
Maintenance and Care
Keeping your draft stoppers in good shape is key to ensuring they continue to block drafts effectively. Here's how to care for them:
- Regular Checks: Every few weeks, give your draft stopper a once-over. Look for any tears or worn areas, especially if you have pets or children who might be tough on them.
- Cleaning Routine: Draft stoppers can get dirty, just like anything else in your home. If yours is made with a washable cover, take it off and throw it in the washing machine. For those with non-removable covers, spot cleaning with a damp cloth should do the trick.
- Storage Smarts: When the seasons change, and you don't need your draft stopper, store it properly. Make sure it's clean and dry, then put it in a cool, dry place. This helps prevent mold and keeps it ready for next time.
- Refresh the Filling: Over time, the filling inside your draft stopper might settle or become less effective. Open up the end seams and add fresh filling as needed. This will help it maintain its shape and effectiveness.
- Handle with Care: When moving your draft stopper, avoid dragging it across rough surfaces. Pick it up gently to prevent any damage to the fabric or seams.
Follow these tips, and your draft stopper will keep cold out and warmth in for years. A bit of maintenance preserves its life and function.
FAQs About DIY Draft Stopper
Discover answers to common questions about DIY draft stoppers. Learn how to keep your home warm and energy-efficient with easy, budget-friendly solutions.
A DIY draft stopper is a home-made solution to prevent cold air from entering your home through gaps under doors or windows. It’s essentially a tube of fabric filled with insulating material that you place at the base of a door or window. Using a draft stopper can help you save on heating costs and keep your home warmer during cold months.
Yes, but it depends on the filling. If you use a washable filling like fabric scraps, you can machine wash your draft stopper. For fillings like rice or sand, it’s best to make a removable cover that you can wash separately.
Absolutely! You can get creative with your draft stopper by:
Adding decorations: Sew on buttons, appliques, or use different colors of fabric.
Making it multi-functional: Build a draft stopper that doubles as a doorstop by adding a handle.
Themed designs: Match your decor or the season with themed fabrics.
The filling you choose for your draft stopper can affect its weight, insulation, and ease of cleaning. Here are some options:
Rice or dried beans: These are heavy and moldable, making them great for draft stoppers that need to fit snugly against irregular gaps.
Polyester fiberfill: This synthetic filling is lightweight and washable, ideal for a draft stopper with a removable cover.
Sand: It's very dense and adds significant weight to the draft stopper, ensuring it stays in place.
Recycled materials: Old clothes or fabric scraps can be an eco-friendly and cost-effective filling.
Yes, you can make a no-sew draft stopper using materials like:
Old socks: Fill them with rice or beans and tie the ends.
Pool noodles: Cut to the length of your door and cover with fabric, securing the ends with rubber bands.
Tights or pantyhose: Insert a filling of your choice and knot the open end.
Conclusion
Feeling the drafts under your doors can be annoying. Making your own DIY draft stopper is a great way to solve this problem. It's not difficult, and you'll end up with a useful item. This guide will help you understand the process better so you can start right away. The effort you put in today will make your home more comfortable. Give it a try!


