There's something incredibly rewarding about building your own fall decor. It's personal, meaningful, and adds a unique touch to your home. This journey began when I decided to make a beautiful fall wood round door hanger - but what's great about this project is its versatility; you can customize it for any season you wish. Today, I'll guide you through the steps to build your very own DIY door hanger. Let's dive in!

Tools and Materials You Will Need
Before we start, gather all the necessary materials. Each tool and material serves a crucial role in crafting a perfect door hanger.
- Wooden Round: This will be your canvas. I sourced mine from Canadian Craft Crate. They offer various sizes, and the wood is smooth and lightweight, which ensures it stays securely hung on your door.
- Sandpaper: Necessary if the surface of your wooden round is rough. Light sanding ensures a smooth finish for painting or staining.
- Stain and Stain Conditioner: Used to add color and depth. A pre-stain conditioner helps in achieving a uniform finish and avoiding blotches.
- Paint and Brushes/Rollers: Whether you opt for paint instead of stain, you will need these to add colors and patterns.
- Polycyrlic or Mod Podge: These are important for sealing your project and preventing colors from bleeding.
- Cricut Machine and Design Supplies: Cricut Design Space and materials are used for building stencils and designs.
- Transfer Tape: To move your designs from their backing to the wood round without losing shape.
- Painters Tape: Essential for building straight lines and protecting areas from paint.
- Squeegee Tool: Required to eliminate air bubbles from the vinyl/stencil.
- Ribbons, Rope, and Staple Gun: For making a bow and building a method to hang the sign.
- Hot Glue Gun: For securing the floral decor and any fabric elements.
- Wire, Twine, or Craft Wire: These help with assembling the bow.
Step by Step Instructions
Learn DIY door hanger creation step-by-step, from sanding and staining to painting and decorating, complete with bows and hanging tips.
Preparing the Wooden Round
Learn how to prepare a wooden round with sanding and staining or painting. Step-by-step guide for perfect results.
Step 1: Check and Sand
Start by inspecting your wooden round. If there are any rough spots on the surface or the edges, use sandpaper to smoothen it out. This prepares the surface for either staining or painting and ensures that the finish is smooth.
Step 2: To Stain or To Paint?
The next decision is between staining or painting your wooden round. If you admire the warm, earthy tones typical of wood, staining is an excellent choice, albeit time-consuming. For a quicker project, painting provides an array of color options and is easier to manage.
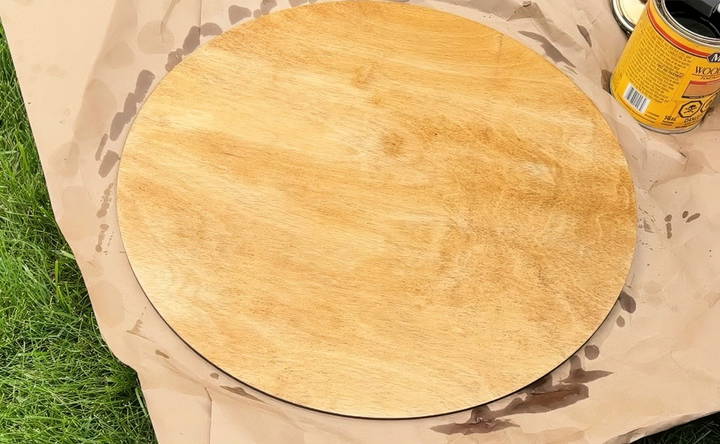
If You Choose Staining:
- Work in a well-ventilated area to avoid inhaling fumes. I always head outside or open windows wide for such tasks.
- Wear gloves to safeguard your hands from stain.
- Begin by applying a pre-stain conditioner, let it sit for about 15 minutes, and wipe off the excess. This step ensures the wood absorbs the stain evenly.
- Apply the stain with the grain using a foam brush or lint-free rag. I opted for Golden Oak by Miniwax, but choose a color that suits your space.
- Allow at least four to six hours of drying time between coats, and wait eight hours after the final coat before proceeding.
Painting and Stenciling
Learn how to stencil and paint perfect stripes with a cricut. Prevent paint bleed and add intricate designs easily. Complete your project seamlessly!
Step 3: Making the Perfect Stripe with Cricut
For a decorative touch, I painted a white stripe across the center.
- Using Cricut Design Space: I maked a circle equal to the diameter of my board (18 inches) and inserted a rectangle across to define my stripe. This template helps in marking a neat and straight line.
- Application: Cut out the template using paper or cardstock, shape it to the wood round, and tape it securely with painter's tape. This prevents any movement during paint application.
Step 4: Preventing Paint Bleed
Apply a thin coat of polycrylic or Mod Podge along the edges of your painter's tape to seal it. This prevents your top coat of paint from bleeding underneath.
Step 5: Painting the Stripe
Use a small roller to paint your stripe. I applied three coats of white paint, drying thoroughly between each.
Step 6: Adding Text or Designs
Now for the lettering! You have options here: permanent vinyl decals (simple), or stenciling with paint (a bit more complex, but worth it if you love the look).
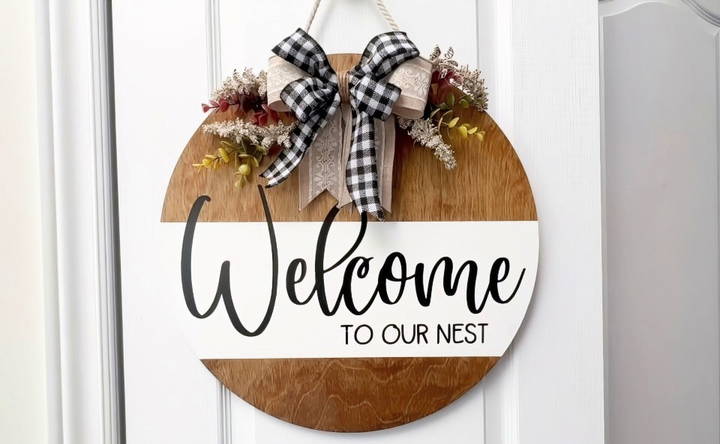
- Making a Stencil: Design your text in Cricut Design Space. "Welcome to our Nest" was my choice, but feel free to choose your own message. Use vinyl or stencil film for this purpose.
- Application to Wood: After cutting your stencil, weed out the negative space, and use transfer tape to lift and apply it onto the sign. I found parchment paper beneath during alignment helps avoid premature sticking.

Finishing Up with a Bow and Hanging Method
Learn how to finish up your wreath with a bow and hanging method. Steps include crafting a bow, securing decorations, and preparing to hang.
Step 7: Crafting a Bow
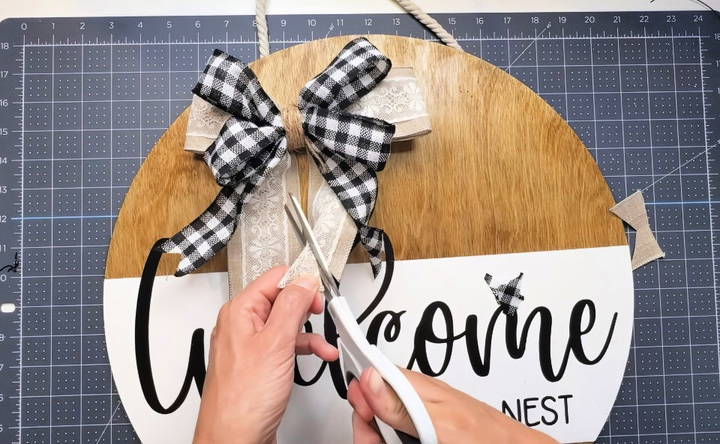
Once the painting is complete, make your sign pop with a bow.
- Materials: Two types of ribbons (I chose burlap and plaid), twine, and wire.
- Making the Bow: Cut ribbons into strips, loop and glue ends together, then stack and cinch them in the middle with wire and twine.
Step 8: Securing the Bow and Floral Decorations
Attach your bow using hot glue. To add seasonal flair, weave in floral stems behind the bow and reinforce them with more hot glue.
Step 9: Preparing to Hang
For hanging, loop rope on the back with staples, ensuring your staples won't puncture the front. Alternatively, make a ribbon loop with strong adhesive.
- Seasonal Variations: Opt for command strip Velcro to attach the bow, making it easy to swap out seasonals. Making different bows and accessories allows you to refresh your sign with each new season.
Advanced Techniques
Discover advanced techniques for wood burning, stenciling, using a cricut machine, decoupage, embellishments, layered painting, resin coating, and success tips.
Wood Burning
Wood burning, or pyrography, is a technique where you use a heated tool to burn designs into wood. This method adds a rustic and personalized touch to your door hanger. Start by sketching your design lightly with a pencil. Then, use a wood-burning tool to trace over your design. Remember to work in a well-ventilated area and wear protective gloves.
Stenciling
Stenciling is a great way to add intricate designs without needing advanced artistic skills. You can buy stencils or make your own using cardstock or plastic sheets. Secure the stencil on your door hanger with painter's tape. Use a sponge or brush to apply paint over the stencil. Remove the stencil carefully to reveal your design.
Using a Cricut Machine
A Cricut machine can cut out precise shapes and letters from various materials like vinyl, paper, and fabric. First, design your pattern using Cricut Design Space software. Load your material into the machine and let it cut out your design. You can then transfer the cutouts onto your door hanger using transfer tape.
Decoupage
Decoupage involves gluing paper cutouts onto your door hanger and sealing them with a clear finish. Choose your paper designs, such as scrapbook paper or printed images. Cut them out and arrange them on your door hanger. Apply a thin layer of decoupage glue to the back of each piece and press it onto the wood. Once dry, seal the entire surface with a clear varnish.
Embellishments
Adding embellishments like beads, buttons, or ribbons can make your door hanger stand out. Use a strong adhesive to attach these items securely. You can also use a hot glue gun for a quicker application. Arrange the embellishments in a way that complements your overall design.
Layered Painting
Layered painting involves applying multiple layers of paint to make depth and texture. Start with a base coat and let it dry completely. Then, use a dry brush technique to add layers of different colors. This technique works well for building a weathered or vintage look.
Resin Coating
Resin coating gives your door hanger a glossy, professional finish. Mix the resin according to the manufacturer's instructions. Pour it over your door hanger and spread it evenly with a spatula. Let it cure for the recommended time, usually 24-48 hours. Ensure your workspace is dust-free to avoid imperfections in the finish.
Tips for Success
- Practice First: Try these techniques on scrap wood before applying them to your final project.
- Safety First: Always follow safety guidelines, especially when using tools like wood burners and hot glue guns.
- Take Your Time: Rushing can lead to mistakes. Allow each layer or step to dry or set properly before moving on.
By incorporating these advanced techniques, you can make unique and professional-looking door hangers that will impress anyone who sees them.
Troubleshooting Common Issues
Learn how to troubleshoot common crafting issues like paint smudging, vinyl not sticking, uneven edges, and more with our expert tips for success.
Paint Smudging
Paint smudging can be frustrating, but it's a common issue. To avoid this, ensure each layer of paint is completely dry before applying the next one. Use a hairdryer on a low setting to speed up the drying process. If smudging occurs, lightly sand the area and repaint.
Vinyl Not Sticking
If your vinyl decals aren't sticking, the surface might be dirty or oily. Clean the door hanger with rubbing alcohol and let it dry completely before applying the vinyl. If the problem persists, use a squeegee to press the vinyl firmly onto the surface, ensuring there are no air bubbles.
Uneven Edges
Uneven edges can make your door hanger look unprofessional. Use painter's tape to make clean lines when painting. If you're cutting wood, ensure your saw blade is sharp and you're using a steady hand. Sand the edges smooth after cutting.
Glue Not Holding
If your embellishments or other elements aren't sticking, you might be using the wrong type of glue. For heavier items, use a strong adhesive like E6000 or a hot glue gun. Ensure the glue is fully cured before handling the door hanger.
Warping Wood
Wood can warp if it's exposed to moisture or not properly sealed. Use a sealant or primer before painting to protect the wood. Store your door hanger in a dry place to prevent warping.
Bubbles in Resin
Bubbles in resin can ruin the smooth finish. To avoid this, mix the resin slowly to minimize air bubbles. Use a heat gun or torch to gently pop any bubbles that rise to the surface after pouring. Work in a dust-free environment to keep the resin clear.
Paint Chipping
Paint chipping can occur if the surface isn't properly prepared. Sand the wood lightly before painting to make a smooth surface. Apply a primer before your base coat to help the paint adhere better. Finish with a clear sealant to protect the paint.
Misaligned Stencils
Misaligned stencils can throw off your design. Secure the stencil with painter's tape to keep it in place. Use a light touch when applying paint to prevent the stencil from shifting. If you make a mistake, touch up the area with a small brush.
Resin Not Curing
If your resin isn't curing, it might be due to incorrect mixing ratios or environmental factors. Follow the manufacturer's instructions carefully, ensuring you mix the resin and hardener thoroughly. Work in a room with a stable temperature and low humidity.
Tips for Success
- Test First: Always test new techniques on scrap material before applying them to your final project.
- Read Instructions: Follow the instructions for all materials and tools carefully.
- Take Your Time: Rushing can lead to mistakes. Allow each step to dry or set properly before moving on.
By addressing these common issues, you can ensure your DIY door hanger projects turn out beautifully every time.
FAQs About DIY Door Hangers
Discover everything you need to know about DIY door hangers with our comprehensive faqs, including materials, tips, and design ideas.
Start by sanding the wood to create a smooth surface. This helps the paint adhere better. Wipe off any dust with a damp cloth. If you want a stained look, apply wood stain and let it dry completely before painting.
You can make door hangers for any occasion or season. Here are a few ideas:
Welcome Signs: Simple and inviting.
Seasonal Themes: Pumpkins for fall, snowflakes for winter, flowers for spring.
Personalized Names: Great for gifts.
Holiday Themes: Easter bunnies, Christmas trees, or Halloween designs.
You can use vinyl cutouts, stencils, or freehand painting. If you have a Cricut machine, you can cut out vinyl letters and designs. Apply them to the wood using transfer tape. For stencils, secure them to the wood and paint over them. Freehand painting allows for more creativity but requires a steady hand.
To protect your door hanger from the elements, apply a clear sealant. Polyurethane or a clear acrylic spray works well. Make sure the paint is completely dry before sealing. This will help your door hanger last longer, especially if it's exposed to weather.
Absolutely! If you prefer not to use wood, there are several alternatives:
Foam Board: Lightweight and easy to cut into various shapes.
Cardboard: A budget-friendly option that can be painted and decorated.
Canvas: Stretched canvas can be painted and hung with ease.
Fabric: Sew or glue fabric pieces together for a soft, unique door hanger.
Plastic: Durable and weather-resistant, great for outdoor use.
Conclusion: Enjoy Your Creation
Crafting this DIY door hanger was an intricate and fulfilling project, taking several days primarily due to drying periods. It's an endeavor I immensely enjoyed, and the final product is a charming addition to our home. Each time someone steps onto our porch, this sign gives a warm, personalized greeting.


