Making a DIY driveway gate was one of the most rewarding projects I've tackled. The process was straightforward and quite fulfilling. It all started with some basic tools and a clear plan. I measured the space, gathered my materials, and got to work. Building wooden driveway gates not only added to the aesthetic but also enhanced the security of my home.
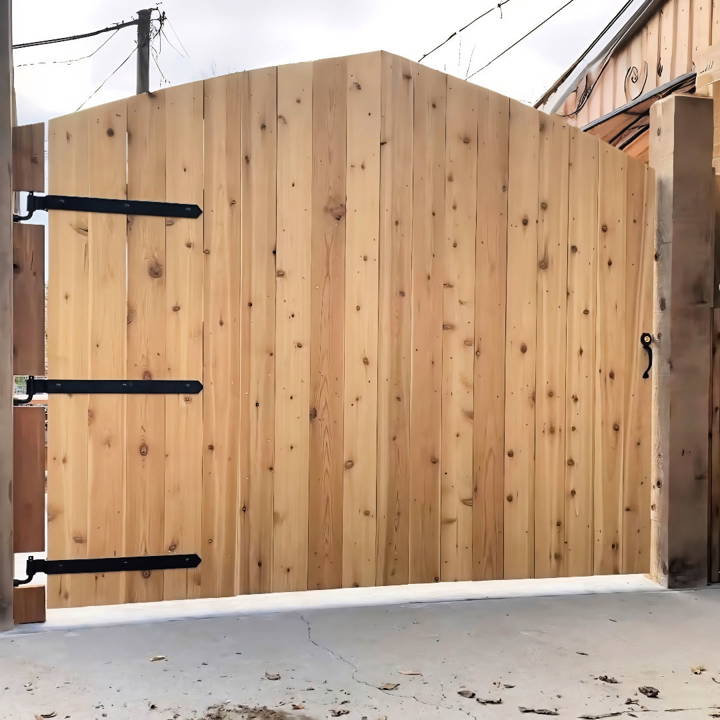
Following a step-by-step guide helped me stay on track and ensure the gate was sturdy and functional. Sanding, painting, and finally installing the gate were the most satisfying parts. The best part? Watching it all come together felt like a major achievement.
Now, i'm happy to share my experience and encourage you to start your own DIY driveway gate project. This guide will help you craft something both beautiful and useful.
Choosing the Right Materials
The choice of material plays a crucial role in the durability and functionality of your driveway gate. I opted for cedar wood for its natural resistance to weather and pests, although it was a bit on the pricey side due to recent market changes. The main materials I settled on included rough 2x8 cedar for the framework and 1x6 cedar boards for the pickets. For the posts, we used 8x8 cedar beams, ensuring they were sunk three feet into the ground for stability.
Why Cedar?
- Durability: Cedar withstands outdoor elements very well, which is crucial for any gate.
- Aesthetics: Its natural look brings a warm, rustic charm to the property.
- Resistance: Cedar naturally repels insects and resists rot, decreasing maintenance needs.
Step by Step Instructions
Learn how to build your own driveway gate with step-by-step instructions, from setting up the framework to the final touches. A perfect DIY guide for beginners!
Setting Up the Framework
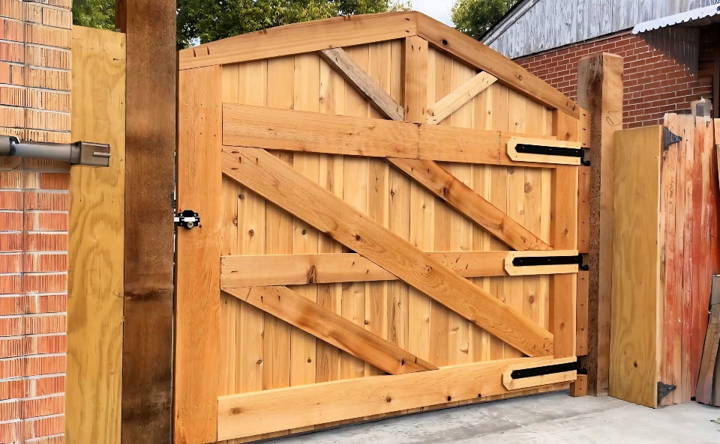
The first step was to cut the 2x8 cedar for the frame, ensuring the peak of the gate matched our desired height and design. I used a 15-degree angle for the peak and marked where the cross rails would join the vertical side pieces.
Building Half-Lap Joints
For added stability and to prevent sagging over time, I decided on half-lap joints where the cross rails met the vertical side pieces. Using a chop saw (though a circular saw would work just as well for those without one), I made multiple cuts into the wood where the joints would intersect, cleaned them out with a chisel, and tested for fit. A good fit is crucial for the overall strength of the gate.
Assembling the Frame
With the joints smoothed out, it was time to assemble the frame. Epoxy was my adhesive of choice because of its strong bond and durability outdoors. I applied a generous amount to both sides of each joint, ensuring coverage for a permanent bond. Pocket screws were installed for immediate hold and extra support while the epoxy cured, securing the structure as we moved forward with the project.
Adding Diagonal Support
One of the key elements to preventing your gate from sagging is proper diagonal bracing. The brace must run from the lower hinge side to the upper latch side, transferring the load and keeping the gate square. Once cut and fitted, these were also secured with epoxy and screws.
Installing the Gate Posts
Although I didn't perform this part of the project myself (it was done by the professionals who put it in our driveway), it's important to highlight that the gate posts must be installed correctly for the gate to function. They were placed 10 feet tall and sunk 3 feet deep, ensuring stability for our heavy cedar gate. Ensuring these posts were plumb and perfectly aligned with each other was critical for the gate to close and open correctly.
Attaching Pickets and Finishing Touches
Once the structural elements were assembled and in place, attaching the pickets was a relatively straightforward process. Starting from one side and working across, we made sure each board was evenly spaced and aligned before securing it with galvanized, ring-shank nails for a firm, long-lasting hold.
For the gate's top design, I wanted something more aesthetically pleasing than a straight line. A slight curve was marked and cut using a jigsaw on the top rail, adding a unique character to the finished project.
Final Touches: Staining and Sealing
To protect the cedar and maintain its natural beauty, we chose a high-quality outdoor sealant. Applying it was the final step in the construction process, ensuring our gate would stand strong and look great for years to come.
Customization Ideas for Your DIY Driveway Gate
Endless options exist to personalize your driveway gate. Custom touches reflect your style and boost curb appeal. Here are some creative DIY ideas:
- Choose a Theme That Reflects Your Style: Whether you prefer a sleek modern look or a charming rustic design, select a theme that resonates with your personal aesthetic. For a modern appeal, consider clean lines and minimalist features. If you're inclined towards a traditional look, classic wood or wrought iron designs can add timeless elegance.
- Incorporate Artistic Elements: Add unique artistic elements to your gate design. This could be anything from intricate metalwork patterns to custom wood carvings. Such details can transform a simple gate into a piece of art.
- Play with Colors and Materials: Don't shy away from experimenting with different materials and colors. A bold color can make your gate stand out, while a combination of materials like wood and metal can offer a sophisticated contrast.
- Add Lighting for Ambiance and Safety: Installing lighting fixtures not only enhances safety but also adds a warm ambiance to your entrance. Consider lantern-style lights for a traditional look or LED strips for a modern vibe.
- Integrate Natural Elements: Blending natural elements such as stone pillars or flower beds with your gate can build a harmonious transition from the outside world to your home.
- Personalize with Signage: Personalize your gate with your family name, house number, or a welcome message. This adds a welcoming touch and makes your property easily identifiable.
- Consider the Practical Aspects: While aesthetics are important, don't overlook the practical aspects. Ensure that your gate design accommodates the necessary hardware for smooth operation and security features if you plan to automate it in the future.
Use these ideas to make a driveway gate that's functional and reflects your style. Key to a successful DIY: plan carefully, be creative, and have fun.
Automation and Security Features for Your DIY Driveway Gate
Enhancing your driveway gate with automation and security features not only adds convenience but also boosts the safety of your property. Here's a detailed guide on the latest trends in gate automation and security that you can incorporate into your DIY project:
- Gate Automation Technologies: The evolution of gate automation has brought forward technologies that offer both security and convenience. You can now integrate biometric access control, such as fingerprint and facial recognition, to ensure that only authorized individuals can enter your property. Additionally, smartphone apps and cloud connectivity allow for remote monitoring and control, providing real-time notifications and activity logs.
- Smart Home Integration: Automated gates can be seamlessly integrated with your smart home systems. This synergy allows you to control your gate using the same apps that manage your home's lighting, heating, and security systems, making a unified home automation experience.
- Solar-Powered Solutions: With a growing focus on sustainability, solar-powered gates have become increasingly popular. They are not only eco-friendly but also cost-effective in the long run, thanks to advancements in solar technology and battery storage.
- Material and Design Innovations: Modern gate designs are now combining aesthetic appeal with functionality. You can choose from a variety of materials that are both durable and stylish, ensuring that your gate stands the test of time while complementing your home's architecture.
- Enhanced Safety Features: Safety is paramount when it comes to automated gates. Advanced sensors and detectors can prevent accidents by detecting obstacles and triggering automatic shutdown features. These systems are crucial for a safe and reliable gate operation.
Add automation and security features to make your driveway gate modern, efficient, and secure. Ensure they are compatible with your gate and follow safety guidelines when installing.
Maintenance Tips for Your DIY Driveway Gate
Keeping your driveway gate in top condition is crucial for ensuring it operates smoothly and lasts for years. Here are some straightforward maintenance tips to help you take care of your DIY driveway gate:
- Regular Inspection: Check your gate regularly for any signs of damage or wear. Look for rust, loose bolts, or any parts that may need repair or replacement.
- Cleaning: Keep your gate clean from dirt, debris, and rust. Use a mild detergent and water to clean metal gates and wood cleaner for wooden gates. Make sure to rinse thoroughly and dry to prevent corrosion.
- Lubrication: All moving parts, such as hinges, wheels, and chains, should be lubricated regularly to ensure smooth operation. Use a suitable lubricant recommended for outdoor use, and apply it sparingly to avoid attracting dirt.
- Paint and Sealant: Apply a fresh coat of paint or sealant as needed to protect your gate from the elements. This not only keeps it looking good but also adds an extra layer of protection against rust and decay.
- Tighten Hardware: Over time, the hardware on your gate can become loose. Periodically tighten all bolts, screws, and hinges to ensure everything is secure and aligned.
- Battery Check: If your gate has an automatic opener, regularly check the batteries to ensure they are charged and functioning properly. Replace them as needed to avoid being locked out.
- Professional Check-Up: Even if you're a DIY enthusiast, it's a good idea to have a professional check your gate annually. They can spot issues you might miss and help prevent costly repairs down the line.
Regular maintenance keeps your driveway gate reliable and looking great, extending its life and ensuring security and appeal for your home.
FAQs About DIY Driveway Gate
Get answers to all your questions about DIY driveway gates, including installation, maintenance, and cost-saving tips. This is your guide to a perfect gate setup!
Consider the style of your property, the level of privacy and security you want, and the material’s durability when choosing a design. Wrought iron gates offer elegance, while wood gates provide a classic look. For a modern touch, consider a steel frame with cedar or a custom metal-wood combination.
Yes, installing a driveway gate can be a DIY project. It involves measuring the driveway, choosing the right materials, constructing the gate, and then installing it with the appropriate hardware. Detailed guides and videos are available to help you through the process.
The cost of building a driveway gate varies widely based on materials, size, and whether it's manual or automatic. A basic wooden gate might cost a few hundred dollars, while a custom automatic gate could run into the thousands. Solar-powered options can save on long-term costs.
Regular maintenance includes checking the hinges and hardware for wear and tear, ensuring the gate opens and closes smoothly, and treating the materials to prevent decay and rust. Wooden gates may need re-staining or sealing, while metal gates might require occasional repainting.
To ensure your DIY driveway gate is safe and secure, install a reliable locking mechanism and consider adding safety sensors that prevent the gate from closing if an obstacle is detected. For automated gates, regular testing of the opening and closing mechanisms is crucial to avoid accidents. Additionally, make sure the gate is well-lit at night to deter trespassers and to provide visibility for those entering and exiting.
Conclusion
Wrapping up, making your own DIY driveway gate can be incredibly rewarding. It is a practical project that adds value to your property. From enhancing security to boosting curb appeal, a driveway gate has numerous benefits. Whether it's made of wood, metal, or a combination of materials, your unique gate can reflect your personal style. So take the first step and make your DIY driveway gate project a reality.


