Building your own DIY electric bike can be a rewarding project that offers a greener way to travel. This guide provides all the information you need about this DIY ebike creation, from selecting the right components to assembling your bike. Follow the step-by-step instructions to understand how to build an electric bike that fits your needs and preferences.
Making an electric bike at home isn't just cost-effective; it's also a fun way to learn about mechanics and electronics. We will delve into the essential materials and tools needed, along with tips on the ideal settings and configurations. Explore the comprehensive guide and discover how to make an electric bike easily and efficiently.
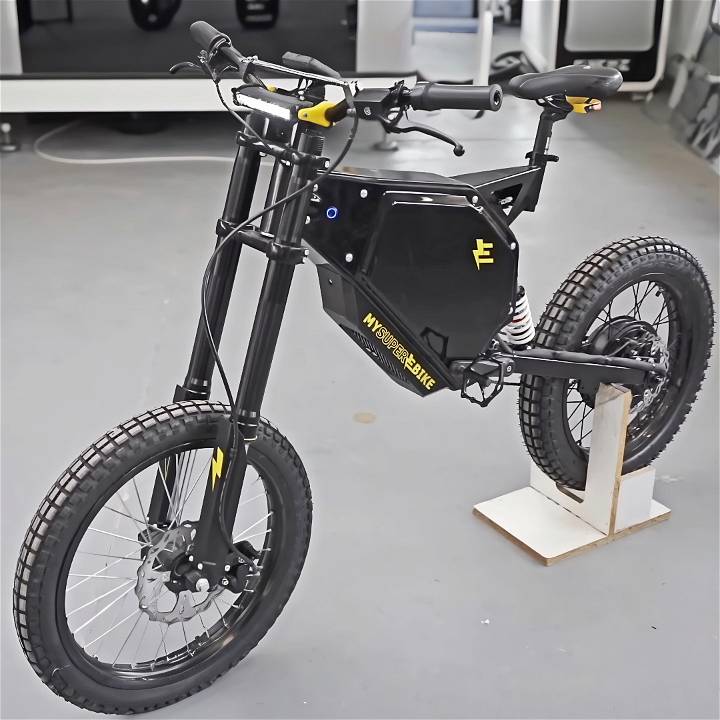
Discover the ultimate guide to building a DIY electric bike. Save money, ride green, and enjoy a custom-built electric bike today!
Choosing the Right Materials
I began by selecting a kit that promised the muscular performance I desired—a 91-volt, 3.2kW power bank capable of powering the bike over 80km on a single charge. The decision to opt for a kit with customized components, like a motorcycle-grade suspension and a versatile nuclear controller, was driven by my aspirations for a high-performing, robust eBike that could hit speeds up to 100km/h.
- Frame and Headset: The foundation of any good eBike. I needed a sturdy frame compatible with the aggressive specifications of my project. The motorcycle headset provided the necessary structural integrity for high speeds.
- Motor and Battery: The heart and soul of the eBike. A 13kW hub motor for the power I craved, and a high-capacity battery for longevity.
- Nuclear Controller and Charger: For precise control and efficient charging. The controller allowed for detailed customization of performance parameters, while the charger ensured quick recharge times.
- Suspension, Brakes, and Wheels: Essential for safety and comfort. Motorcycles-grade components were chosen for their superior performance.
Step by Step Instructions
Step-by-step guide for DIY electric bike: frame prep, motor and suspension, electrical systems, and final touches. Expert advice and reflections are included!
Frame Preparation
My first task was to prep the frame, which involved removing the old headset to make way for the motorcycle-grade replacement. This step required careful hammering to ensure a snug fit. Installing custom-made 3D printed parts for additional support and proper alignment of components was crucial.
Motor and Suspension Installation
Attaching the hub motor to the rear wheel, followed by mounting the wheel to the frame, was a task that demanded precision. Getting the bolts right and ensuring the motor's phase wires were correctly connected was vital for the bike's eventual performance.
The motorcycle suspension installation significantly enhanced the eBike's handling capabilities. I meticulously adjusted the front fork, making sure it was evenly positioned for optimal balance and control.
Electrical and Control Systems
Wiring was the most intricate part of the process. The nuclear controller, with its customizable settings, was central to the eBike's performance. I closely followed the protocol for connecting the battery, motor, and controller, ensuring every wire and connector was perfectly in place.
The display setup was the window into the eBike's soul, allowing me to tweak settings for peak performance. Programming the controller and the display for specific performance characteristics was a detailed task that required a keen understanding of the system.
Final Touches
After mounting the wheels and ensuring the suspension was correctly adjusted, I proceeded with the aesthetic and practical touches. This included installing lights and handlebars and configuring the braking system. The final step involved meticulous adjustments to ensure everything from the seat to the handlebar positioning was perfectly tailored to my preferences.
Learnings and Reflections
The project taught me the value of precision and careful planning. Every component, from the battery to the smallest bolt, played a crucial role in the final product. The most challenging aspect was ensuring the eBike's electrical system was flawlessly configured—a task that demanded patience and attention to detail.
Advice for Aspiring Builders
- Thorough Planning: Understand every component's role and how they fit together before starting.
- Research and Learning: Dive into the specifics of eBike building. Knowledge about electrical systems is particularly crucial.
- Patience and Precision: Take your time with each step, especially when working with electrical components and programming the controller.
Customization Tips for Personalization
Personalizing your electric bike (e-bike) is not just about aesthetics; it’s about creating a ride that resonates with your lifestyle and preferences. Here are some practical tips to help you customize your e-bike, making it uniquely yours while enhancing its functionality.
- Choose Your Style: Start with the visual appeal. Select colors and designs that reflect your personality. Whether you prefer a sleek, modern look or a vibrant, eye-catching design, the choice is yours. Consider custom paint jobs or decals to make your e-bike stand out.
- Upgrade for Comfort: Comfort is key for an enjoyable ride. Upgrade your seat for better ergonomics, and consider handlebars that suit your riding posture. Padded grips can also reduce fatigue on longer rides.
- Lightweight Components: Incorporate lightweight components to improve handling and portability. A lighter e-bike is easier to maneuver and transport, especially if you live in an urban environment with stairs or public transportation.
- Modular Accessories: Opt for modular components that can be easily swapped. This allows for quick upgrades or changes to your e-bike, keeping it up-to-date with the latest trends and technologies.
- Personalized Settings: Adjust the e-bike’s settings to match your riding style. From power output to pedal assist levels, modern e-bikes offer a range of customizable settings that can be tailored to your needs.
- Performance Parts: For those seeking a bit more ‘oomph,’ consider performance parts. Upgraded motors, batteries, and controllers can enhance your e-bike’s speed and range. However, always ensure these modifications comply with local regulations.
- Safety Features: Never compromise on safety. Install lights, reflectors, and a horn to ensure you’re seen and heard in traffic. Also, consider adding mirrors for better situational awareness.
- Carrying Solutions: If you use your e-bike for errands or commuting, look into carrying solutions like baskets, racks, or panniers. These can be both functional and stylish, providing convenient storage without sacrificing the look of your e-bike.
Follow these tips to personalize your e-bike, making it functional and stylish. The aim is to build an e-bike you're excited to ride daily.
Advanced Customizations for Enthusiasts
For electric bike (e-bike) enthusiasts looking to push the boundaries of their ride, advanced customizations can transform a standard e-bike into a high-performance machine. Here’s how you can take your e-bike to the next level:
Performance Enhancements:
- Upgrading the Motor: Consider replacing the stock motor with a more powerful one to increase top speed and improve hill-climbing capabilities.
- Battery Upgrades: Swap out the existing battery for a higher capacity one to extend the range of your e-bike, ensuring longer rides without the need for frequent recharging.
Personalized Ergonomics:
- Custom Handlebars and Grips: Tailor the handlebars and grips to fit your body perfectly, enhancing comfort and control during rides.
- Adjustable Pedals and Cranks: Install pedals and cranks that can be adjusted for your leg length and riding style, which can help in reducing fatigue.
Aesthetics and Style:
- Custom Frames and Decals: Personalize your e-bike’s appearance with custom frames or unique decals that showcase your personal style.
- LED Lighting: Add LED lights not just for safety but also to build a distinctive look with customizable colors and patterns.
Advanced Technology Integration:
- Smart Displays: Integrate advanced smart displays that provide real-time data on your ride, including speed, distance, and battery life.
- GPS and Tracking: For added security and navigation, install GPS systems that can track your e-bike’s location and plan routes efficiently.
Safety and Security Enhancements:
- High-Performance Brakes: Upgrade to high-performance brakes for better-stopping power, which is crucial when increasing the speed of your e-bike.
- Reinforced Tires: Invest in reinforced tires that can handle the extra power and provide better grip and puncture resistance.
By incorporating these advanced customizations, you’ll not only enhance the performance and aesthetics of your e-bike but also improve its safety and functionality. Always check local regulations to ensure your customized e-bike complies with the law.
Maintenance and Upkeep
Keeping your electric bike (e-bike) in top condition is crucial for ensuring a safe and enjoyable ride. Regular maintenance not only extends the life of your e-bike but also ensures it runs efficiently. Here’s a straightforward guide to maintaining your e-bike:
Battery Care:
- Charge Regularly: Keep your battery charged and top it off after each ride. Avoid letting it run completely flat.
- Store Properly: If you’re not using your e-bike for a while, store the battery in a cool, dry place.
- Inspect for Damage: Regularly check your battery for any signs of damage or swelling.
Tire Maintenance:
- Check Pressure: Before each ride, ensure your tires are inflated to the recommended pressure. This helps prevent flats and makes your ride smoother.
- Inspect Tread: Look for signs of wear or damage on your tires, as worn-out tires can affect your e-bike’s performance.
Brake System:
- Regular Checks: Make sure your brakes are responsive and adjust them if they feel loose or spongy.
- Replace Pads: Worn brake pads reduce stopping power. Replace them regularly to maintain safety.
Chain and Gears:
- Clean and Lube: Keep your chain clean and well-lubricated to prevent rust and ensure smooth gear shifts.
- Adjustment: If your gears are skipping or not shifting smoothly, they may need an adjustment.
General Inspection:
- Bolts and Fasteners: Check that all bolts and fasteners are tight. Loose parts can lead to noise or even accidents.
- Clean Regularly: Use a cloth or soft brush to clean your e-bike. Avoid high-pressure water as it can damage electrical components.
Professional Service:
- Annual Check-Up: Even with regular home maintenance, it’s a good idea to have your e-bike professionally serviced at least once a year.
- Follow Manufacturer’s Guidelines: Consult your e-bike’s manual for specific maintenance recommendations and service intervals.
By following these simple maintenance steps, you can keep your e-bike running smoothly and safely for years to come. A well-maintained e-bike is a reliable companion on your cycling adventures.
FAQs About DIY Electric Bike
Explore common queries in our faqs about DIY electric bike, covering topics from assembly tips to safety and performance guidelines.
Before you begin, assess your skill level with tools and electronics, as well as your budget for the conversion kit and any additional tools. Consider the space where you’ll work on your bike and whether it’s adequate for the task. Lastly, think about your goals for the electric bike, such as improved commuting or recreational use.
Select a bicycle that matches the type of riding you plan to do. For example, a mountain bike is suitable for off-road, while a road bike is better for city commuting. Ensure the bike is in good condition and can support the added weight of an electric kit.
A typical electric bike kit includes a motor, battery, controller, throttle, and pedal assist sensor. You may also need various wiring and connectors to set up the system. Some kits come with additional features like LCD displays to monitor your ride.
Yes, if you have basic mechanical skills, you can install the kit yourself. Follow the manufacturer’s instructions carefully, and use the proper tools. It’s important to ensure all components are securely attached and the wiring is correct to avoid any safety issues.
Regular maintenance includes checking the battery charge, ensuring all electrical connections are secure, and inspecting the motor and controller for wear and tear. Also, keep an eye on the brakes and tires, as they may wear out faster due to the increased weight and speed of an electric bike.
Final Thoughts
Wrapping up, building your DIY electric bike can be a fulfilling and cost-effective project. With the right tools and guidance on how to make an electric bike, you're well on your way to exploring the benefits and adventures of electric biking. Remember, every step of how to build an electric bike brings you closer to endless rides and eco-friendly travel. Happy biking!


